【目标检测】YOLOv5算法实现(二):模型搭建
本系列文章记录本人硕士阶段YOLO系列目标检测算法自学及其代码实现的过程。其中算法具体实现借鉴于ultralytics YOLO源码Github,删减了源码中部分内容,满足个人科研需求。
本系列文章主要以YOLOv5为例完成算法的实现,后续修改、增加相关模块即可实现其他版本的YOLO算法。
文章地址:
YOLOv5算法实现(一):算法框架概述
YOLOv5算法实现(二):模型搭建
YOLOv5算法实现(三):数据集构建
YOLOv5算法实现(四):损失计算(编辑中…)
YOLOv5算法实现(五):预测结果后处理(编辑中…)
YOLOv5算法实现(六):评价指标及实现(编辑中…)
YOLOv5算法实现(七):模型训练(编辑中…)
YOLOv5算法实现(八):模型验证(编辑中…)
YOLOv5算法实现(九):模型预测(编辑中…)
模型加载
- 引言
- 模型结构绘制
- 模型模块实现(common.py)
- 模型配置文件构建(model.yaml)
- 模型搭建(yolo.py)
- 本篇代码
-
- common.py
- yolo.py
引言
本篇文章以YOLOv5网络为例实现“模型构建”的实现,相关内容涉及三个文件:
model.yaml:模型结构配置文件,定义模型的具体模块和参数,其参数配置需与common.py中实现的模块对应;
common.py:model.yaml中使用的模型模块的具体实现
yolo.py:解析model.yaml文件,完成模型的搭建
基于以上三个文件将模型拆解为不同的模块的组合,这种模块化搭建模型的方式有利于根据需要对模型结构进行改动以及增加算法的复用性。
模型搭建的过程如下图所示:

模型结构绘制
YOLOv5(v6.0)的模型结构如图2所示,为实现模块的最大化复用,其由CBS模块、CSP模块、SPPF模块组成、Upsample模块、Concat模块和Detect模块组成。

模型模块实现(common.py)
基于图2所示的模型结构,完成每个模块的实现。
第三方库导入与公用函数
import math
import torch
import torch.nn as nn
def autopad(k, p=None, d=1):
    '''
    将特征的输出通道数填充为与输入通道数相同
    :param k:卷积核大小
    :param p:填充数
    :param d:nn.Conv2d卷积间隙参数(dilation),该参数具体作用见官方文档,默认为1时即我们常用的标准卷积
    '''
    if d > 1:
        k = d * (k - 1) + 1 if isinstance(k, int) else [d * (x - 1) + 1 for x in k]
    if p is None:
        p = k // 2 if isinstance(k, int) else [x // 2 for x in k]
    return p
CBS模块:卷积层、批标准化层(BN)、激活函数
Class Conv(nn.Module):
	'''
	卷积块:conv-BN-Activation
	'''
	default_act = nn.SiLU()  # 默认激活函数
    def __init__(self, c1, c2, k=1, s=1, p=None, g=1, d=1, act=True, b=False):
       '''
       :param c1: 输入通道数
       :param c2: 输出通道数
       :param k: 卷积核大小
       :param s: 步长
       :param p: 填充 默认为None则表示填充至与输入分辨率相同
       :param g: 分组卷积,默认为1时为标准卷积
       :param d: 间隙卷积,默认为1时为标准卷积;不为1表示点之间有空隙的过滤器,对卷积核进行膨胀
       :param act: 是否使用激活函数
       :param b: 卷积偏置,默认使用无偏置卷积
       '''
       super(Conv, self).__init__()
       self.conv = nn.Conv2d(c1, c2, k, s, autopad(k, p, d), groups=g, dilation=d, bias=b)
       self.bn = nn.BatchNorm2d(c2)
       # 若act为True:使用默认激活函数;若act为其他激活函数模块:则使用该激活函数;反之:使用nn.Identity,表示不对输入进行操作,直接输出输入
       self.act = self.default_act if act is True else act if isinstance(act, nn.Module) else nn.Identity()
    def forward(self, x):
    	# 前向传播
        return self.act(self.bn(self.conv(x)))
CSP模块:跨阶段网络,具体结构见图2,虚线框内为残差结构瓶颈层,由shortcut参数实现有无残差连接
class Bottleneck(nn.Module):
	'''
	残差瓶颈连接层,实现图2CSP结构中虚线框内过程
	'''
    def __init__(self, c1, c2, shortcut=True, g=1, e=0.5):
       '''
       :param c1: 输入通道
       :param c2: 输出通道
       :param shortcut: 为True时采用残差连接
       :param g: groups 在输出通道上分组, c2 // g 分组后不同组之间的卷积核参数不同
       :param e: 中间层的通道数比例
       '''
       super(Bottleneck, self).__init__()
       c_ = int(c2 * e)  # 中间层的通道数
       self.cv1 = Conv(c1, c_, 1, 1)  # 输入通道, 输出通道, 卷积核大小, 步长
       self.cv2 = Conv(c_, c2, 3, 1, g=g)
       self.add = shortcut and c1 == c2
   def forward(self, x):
   out = self.cv2(self.cv1(x))
   return x + out if self.add else out

class CSP(nn.Module):
    '''
    yolov5中的CSP模块
    '''
    def __init__(self, c1, c2, n=1, shortcut=True, g=1, e=0.5):
        '''
        :param c1: 输入通道
        :param c2: 输出通道
        :param n: Bottleneck层数量
        :param shortcut: Bottleneck中是否残差连接
        :param g: groups
        :param e: 中间层通道
        '''
        super(C3, self).__init__()
        c_ = int(c2 * e)  # 中间层通道
        self.cv1 = Conv(c1, c_, 1, 1)  # Bottleneck的前一层
        self.cv2 = Conv(c1, c_, 1, 1)  # CSP连接层
        self.cv3 = Conv(2 * c_, c2, 1, 1)  # CSP通道合并后进行特征提取
        # 残差瓶颈层
        self.m = nn.Sequential(*(Bottleneck(c_, c_, shortcut, g, e=1.0) for _ in range(n)))
	def forward(self, x):
		y1 = self.m(self.cv1(x))
		y2 = self.cv2(x)
		return self.cv3(torch.cat((y1, y2), 1))
SPPF模块:空间金字塔池化层(Spatial Pyramid Pooling, SPP)的改进,具体结构图2
class SPPF(nn.Module):
	'''
	Spatial Pyramid Pooling - Fast(SPPF)
	'''
    def __init__(self, c1, c2, k=5, e=0.5):
        '''
        :param c1: 输入通道
        :param c2: 输出通道
        :param k: 最大池化核大小
        :param e: 中间通道数比例
        '''
        super(SPPF, self).__init__()
        c_ = int(c1 * e)  # 中间池化层
        self.cv1 = Conv(c1, c_, 1, 1)  # 池化层前通道下降
        self.cv2 = Conv(c_ * 4, c2, 1, 1)  # 池化层通道相加后通道数调整
        self.m = nn.MaxPool2d(kernel_size=k, stride=1, padding=k // 2)  # 最大池化

    def forward(self, x):
        x = self.cv1(x)
       	y1 = self.m(x)
        y2 = self.m(y1)
        y3 = self.m(y2)
        # 在通道维度上对结果进行拼接
        return self.cv2(torch.cat((x, y1, y2, y3), dim=1))
Concat模块:将特征在通道维度上进行拼接
class Concat(nn.Module):
	'''
	不同的特征图进行拼接
	'''
    def __init__(self, dimension=1):
    	'''
    	特征形状为(N, C, W, H), d=1表示为通道维度
    	'''
        super(Concat, self).__init__()
        self.d = dimension
    def forward(self, x):
    	'''
    	x的形式为 [feature_map_1, feature_map_2,...]
    	'''
        return torch.cat(x, dim=self.d)
Upsample模块:上采样,特征分辨率扩充
class Upsample(nn.Moudle):
	'''
	上采样
	'''
    def __init__(self, size=None, scale_factor=2, mode='nearest'):
    	'''
    	:param size:输出特征图大小
    	:param scale_factor:特征图缩放比例
    	:param mode:采样方式
    	其中size和scale_factor只需填一个即可

    	'''
        super().__init__()
        self.u = nn.Upsample(size, scale_factor, mode)
    def forward(self, x):
        return self.u(x)
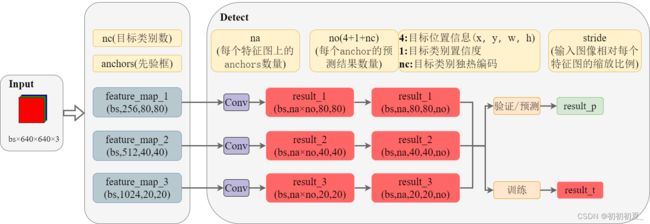
Detect模块:YOLOv5检测头(Anchor-based),实现模型在训练/推理时的输出
YOLOv5对结果的预测有如下特征:
(1)基于不同分辨率的特征图实现对不同大小的目标的预测;
(2)基于先验Anchor实现目标宽、高的预测,每个Anchor负责得到一个预测结果;
(3)每张特征图以像素为单位进行划分,对中心点落在该像素单位的目标进行预测,每个单位负责得到一个预测结果;
假设特征图数量为nl,特征图中的分辨率为(grid_xi,grid_yi),Anchor数量为na,则一张图片可得到的预测结果数量np为:
n p = ∑ i = 1 n l ( n a × g r i d _ x i × g r i d _ y i ) np = \sum\limits_{i = 1}^{nl} {(na \times grid\_xi \times grid\_yi} ) np=i=1∑nl(na×grid_xi×grid_yi)
Detect模块的运算流程如图3所示。预测结果中的位置信息为每个像素单位中的回归参数,其与目标实际的像素坐标关系如图4所示,其中(grid_x,grid_y)为得到当前预测结果的像素单位左上角坐标,(a_w,a_h)为得到当前预测结果的Anchor大小,stride为输入图像相对得到当前预测结果的特征图的缩放比例。
模型在训练时输出result_t,其为包含三个特征图的预测结果的列表,存储的位置信息为回归参数(x,,y,w,h);在非训练时输出result_p,其形状为(bs,na×(20×20+40×40+80×80),no),存储的位置信息为目标在输入图像上的绝对坐标(x_p,y_p,w_p,h_p)。

class Detect(nn.Module):
    '''yolov5 检测头(Anchor-based)'''
    stride = None  # 特征图与原图之间的跨度
    def __init__(self, nc=80, anchors=(), ch=(), inplace=True):
        super(Detect, self).__init__()
        self.nc = nc  # 目标类别数
        self.no = nc + 5  # 每个单位/Anchor的预测结果(4+1+nc)
        self.nl = len(anchors)  # feature_map的数量
        self.na = len(anchors[0]) // 2  # anchors的数量
        self.grid = [torch.empty(0) for _ in range(self.nl)]  # 初始化预测单位(每张feature_map的预测单位数不同)
        self.anchor_grid = [torch.empty(0) for _ in range(self.nl)]  # 初始化Anchors大小(每张feature_map上的anchors)
        # anchors (3, 6) -- (3, 3, 2)
        # self.refuster_buffer定义参:该参数在模型训练时不会更新
        self.register_buffer('anchors', torch.tensor(anchors).float().view(self.nl, -1, 2))  # (nl, na, 2)
        # 输出卷积, 获得最后的预测结果
        self.m = nn.ModuleList(nn.Conv2d(x, self.no * self.na, 1) for x in ch)
		self.inplce = inplce  # 训练时原地操作,节省内存
    def forward(self, x):
        '''
        输入 img_size = 640时
        训练时返回 x = {[bs, 3, 20, 20, 85], [bs, 3, 40, 40, 85], [bs, 3, 80, 80, 85]}
        推理时返回 z = [bs, 3*(20*20 + 40*40 + 80*80), 85], x
        其中推理时的坐标已经转换为原图上的(xcenter, ycenter, w, h)绝对坐标
        '''
        z = []  # 推理时的输出
        for i in range(self.nl):
            x[i] = self.m[i](x[i])  # 输出结果 (bs, na * no, grid_y, grid_x)
            bs, _, ny, nx = x[i].shape  # 输出结果中图像数,高度,宽度
            # x(bs, 255, 20, 20) to x(bs, 3, 85, 20, 20) to x(bs, 3, 20, 20, 85)
            x[i] = x[i].view(bs, self.na, self.no, ny, nx).permute(0, 1, 3, 4, 2).contiguous()

            # 非训练时, 对输出作进一步的调整,将回归参数转换为原图上的物体中心点坐标和包含物体的框大小
            if not self.training:
            	# 得到每个预测结果对应的像素单位左上角坐标(grid_x,grid_y)和每个预测结果对应的Anchors大小(a_w,a_h)
                if self.grid[i].shape[2:4] != x[i].shape[2:4]:
                    self.grid[i], self.anchor_grid[i] = self._make_grid(nx, ny, i)
                # 将回归参数应用到坐标上 xy/wh:(bs, 3, 20, 20, 2) conf:(bs, 3, 20, 20, 1+80)
                xy, wh, conf = x[i].sigmoid().split((2, 2, self.nc + 1), 4)
                # grid[i] (1, 3, 20, 20, 2) 每个像素单位的左上角x和y坐标
                xy = (xy * 2 - 0.5 + self.grid[i]) * self.stride[i]  # xy
                # anchor_grid[i] (1, 3, 20, 20, 2) 当前feature map对应原图上的anchors的w和h
                wh = (wh * 2) ** 2 * self.anchor_grid[i]  # wh
                # (bs, 3, grid_y, grid_x, 85),当前feature_map上的所有预测结果
                y = torch.cat((xy, wh, conf), 4)
                z.append(y.view(bs, self.na * nx * ny, self.no))

        return x if self.training else (torch.cat(z, 1), x)

    def _make_grid(self, nx=20, ny=20, i=0):
    	# 生成当前特征图下,每个预测结果对应的像素单位左上角坐标和Anchor
        d = self.anchors[i].device
        t = self.anchors[i].dtype
        shape = 1, self.na, ny, nx, 2  # 当前特征图下预测结果数量
        # y=[0,1,2,...,ny-1] x=[0,1,2,3,....,nx-1]
        y, x = torch.arange(ny, device=d, dtype=t), torch.arange(nx, device=d, dtype=t)
        yv, xv = torch.meshgrid(y, x)
        # 生成当前特征图下每个预测结果对应的像素单位左上角坐标
        grid = torch.stack((xv, yv), 2).expand(shape)
        # 生成当前特征图下每个预测结果对应的Anchor大小(Anchors大小为在原图上的大小)
        anchor_grid = (self.anchors[i] * self.stride[i]).view((1, self.na, 1, 1, 2)).expand(shape)
        return grid, anchor_grid
模型配置文件构建(model.yaml)
基于图2所示的模型结构和模型模块所需的参数,构建模型配置文件,YOLOv5源码中的配置文件如下所示。其中结构解析包含四个参数[from,number,module,args]
· from:当前层的输入来自于哪一层
· number:当前层数量
· module:当前层所有模块(在common.py中实现,需与类名对应)
· args:第一个参数为当前层输出通道数,其余参数为模块特有参数;当前层的输入通道数由“from”参数指向的层决定,在结构解析时加入该参数。
模型配置文件model.yaml
# YOLOv5  by Ultralytics, AGPL-3.0 license

# Parameters
nc: 80  # number of classes 类别数
depth_multiple: 1.0  # model depth multiple 模型深度(CSP模块个数系数)
width_multiple: 1.0  # layer channel multiple 模型宽度(模块通道数系数)
anchors:
  - [10,13, 16,30, 33,23]  # P3/8 (stride=8 feature_map所用Anchor,小目标检测)
  - [30,61, 62,45, 59,119]  # P4/16 (stride=16 feature_map所用Anchor)
  - [116,90, 156,198, 373,326]  # P5/32 (stride=32 feature_map所用Anchor,大目标检测)

# YOLOv5 v6.0 backbone
backbone:
  # [from, number, module, args]
  [[-1, 1, Conv, [64, 6, 2, 2]],  # 0-P1/2
   [-1, 1, Conv, [128, 3, 2]],  # 1-P2/4
   [-1, 3, CSP, [128]],
   [-1, 1, Conv, [256, 3, 2]],  # 3-P3/8
   [-1, 6, CSP, [256]],
   [-1, 1, Conv, [512, 3, 2]],  # 5-P4/16
   [-1, 9, CSP, [512]],
   [-1, 1, Conv, [1024, 3, 2]],  # 7-P5/32
   [-1, 3, CSP, [1024]],
   [-1, 1, SPPF, [1024, 5]],  # 9
  ]

# YOLOv5 v6.0 head
head:
  [[-1, 1, Conv, [512, 1, 1]],
   [-1, 1, Upsample, [None, 2, 'nearest']],
   [[-1, 6], 1, Concat, [1]],  # cat backbone P4
   [-1, 3, CSP, [512, False]],  # 13

   [-1, 1, Conv, [256, 1, 1]],
   [-1, 1, Upsample, [None, 2, 'nearest']],
   [[-1, 4], 1, Concat, [1]],  # cat backbone P3
   [-1, 3, CSP, [256, False]],  # 17 (P3/8-small)

   [-1, 1, Conv, [256, 3, 2]],
   [[-1, 14], 1, Concat, [1]],  # cat head P4
   [-1, 3, CSP, [512, False]],  # 20 (P4/16-medium)

   [-1, 1, Conv, [512, 3, 2]],
   [[-1, 10], 1, Concat, [1]],  # cat head P5
   [-1, 3, CSP, [1024, False]],  # 23 (P5/32-large)

   [[17, 20, 23], 1, Detect, [nc, anchors]],  # Detect(P3, P4, P5)
  ]
模型搭建(yolo.py)
第三方库与函数导入
import contextlib # 上下文管理器
from models.common import * # 导入模型模块
from utils.general import colorstr # 用于设置命令输出字符串结果的颜色
from copy import deepcopy # 深拷贝, 对新数据的操作不会影响原数据
模型结构配置文件解析
def parse_model(d, ch):
    '''
    对模型配置文件字典进行解析
    :param d: 模型结构配置字典
    :param ch: 每一层的输出通道数存储列表,第一个元素为输入图片的通道数
    :return:
    '''
    # 模型结构输出
    print(colorstr('bright_red', f"\n{'':>3}{'from':>18}{'n':>3}{'params':>10}  {'module':<40}{'arguments':<30}"))

    # anchors[3, 6];类别数;模型深度比例因子;模型通道比例因子;激活函数(若配置文件中没有则为None)
    anchors, nc, gd, gw, act = d['anchors'], d['nc'], d['depth_multiple'], d['width_multiple'], d.get('activation')
    # 如果更改了激活函数,则修改Conv模块的默认激活函数
    if act:
    	# eval()返回传入字符串的表达式的结果, 这里实现字符串与nn.Module之间的转换
        Conv.default_act = eval(act)
    # num of anchors, 每个feature map的anchors数量
    # 若传入的为anchors的宽高形式则根据长度获取, 若传入的直接为anchors数量则直接赋值
    na = (len(anchors[0]) // 2) if isinstance(anchors, list) else anchors
    # num of output = anchors * (classes + 5), 预测层输出的通道数
    no = na * (nc + 5)

    # 模型保存的列表;保存后续会用到的输出层序号;上一层模型的输出通道数/下一层的输入通道数
    layers, save, c2 = [], [], ch[-1]
    # f:该层的输入来自哪一层;n:模块个数;m:模型类别;args:输入模型的参数
    for i, (f, n, m, args) in enumerate(d['backbone'] + d['head']):
        # eval()返回传入字符串的表达式的结果, 例如可以实现list, dict, tuple与str之间的转换
        # 在这里可以实现将'Conv','CSP'等转换成在commom中定义的基础层
        m = eval(m) if isinstance(m, str) else m
        for j, a in enumerate(args):
            with contextlib.suppress(NameError):
                # contextlib.suppress(type_of_error)返回一个上下文管理器, 在with语句主体中, 则抑制任何指定的异常,然后使用with结束后的第一条语句继续执行
                # 因为这里将参数从str转换为相应参数, 包括此时未出现的变量, 但会在之后定义
                args[j] = eval(a) if isinstance(a, str) else a
        # 其中gd为深度因子, 不同的yolov5网络在模块的个数上不同
        n = n_ = max(round(n * gd), 1) if n > 1 else n
        # 根据模型类型, 重新修改args参数(主要为加入模块的输入通道数(来自于上一层输出))
        if m in {Conv, SPPF, CSP}:
            c1, c2 = ch[f], args[0]  # 当前模块的输入和输出通道数
            if c2 != no:  # 非结果预测层, 需要利用gw参数对模型的通道数进行修正
				c2 = math.ceil(c2 * gw / 8) * 8 # 保证通道数为8的倍数(因为模型下采样中最大缩放比例为8)
            args = [c1, c2, *args[1:]]  # 输入通道数, 输出通道数, 针对不同模块的具体参数
            # Conv (ch_in, ch_out, kernel_size, stride, padding)
            # SPPF (ch_in, ch_out, k)
            # CSP (ch_in, ch_out), 需要插入模块个数
            if m in {CSP}:
                args.insert(2, n)  # C3 (ch_in, ch_out, num)
                n = 1
        elif m is nn.BatchNorm2d:
            # nn.BatchNorm2d (ch_out,)
            args = [ch[f]]
        elif m is Concat:  # Concat (dim=1)
            c2 = sum(ch[x] for x in f)
        elif m in {Detect}:
            # Detect 预测输出层 (nc, anchors, [输入通道数])
            args.append([ch[x] for x in f])
            if isinstance(args[1], int):  # num of anchors
                # 若anchors表示每个输出特征层的anchors数量, 则将其转换成列表
                args[1] = [list(range(args[1] * 2))] * len(f)
        else:
            c2 = ch[f]

        # 建立模型, 以nn.Sequential进行构建
        m_ = nn.Sequential(*(m(*args) for _ in range(n))) if n > 1 else m(*args)
        # 获取模型名字 “" -> 'modedl.comon.Conv'
        t = str(m)[8:-2].replace('__main__.', '')
        # num parameters 模型的参数量
        np = sum(x.numel() for x in m_.parameters())
        # attach index, 'from' index, type, number of params
        # 该模型在整个模型中的序号;以哪一个模型进行连接;模型名字;模型的参数
        m_.i, m_.f, m_.type, m_.np = i, f, t, np
        # 打印模型信息
        print(colorstr(f'{i:>3}{str(f):>18}{n_:>3}{np:10.0f}  {t:<40}{str(args):<30}'))
        # 保存后续会用到的模型层序号, 若x为-1, 则直接与上一层连接, 无需进行保存
        # 后续层不需要用到的输出结果不进行保存, 节省内存空间
        save.extend(x % i for x in ([f] if isinstance(f, int) else f) if x != -1)
        layers.append(m_)  # 以列表的形式存储所有模型
        if i == 0:
            ch = []
        ch.append(c2)  # 从第一层开始的输出通道数

    return nn.Sequential(*layers), sorted(save)
模型搭建
class DetectionModel(nn.Module):
    '''
    yolov5 检测模型
    '''
    def __init__(self, cfg='../cfg/models/yolov5s.yaml', ch=3, nc=None, anchors=None):
        '''
        :param cfg: 模型结构配置文件
        :param ch: 输入图像的通道数
        :param nc: 类别数, 为Node时默认为cfg文件中设置的nc
        :param anchors: anchors, 为None时默认为cfg文件中设置的anchors
        '''
        super(DetectionModel, self).__init__()
        # 读取配置文件并将其转换为字典
        if isinstance(cfg, dict):
            self.yaml = cfg  # 如果已经为模型结构字典了, 直接读取
        else:  # 若为配置文件(.yaml) 则将其转换为字典
            import yaml
            with open(cfg, encoding='ascii', errors='ignore') as f:
                self.yaml = yaml.safe_load(f)  # 模型字典

        # ------------------------------------------
        # 定义模型
        # ------------------------------------------
        # 输入图像通道数, 字典 dict.get(key, value): 若存在key返回其value, 若不存在则返回value
        ch = self.yaml['ch'] = self.yaml.get('ch', ch)
        # 若在初始化时定义了nc,则更改nc
        if nc and nc != self.yaml['nc']:
            self.yaml['nc'] = nc
        # 若在初始化时定义了anchors,则更改anchors
        if anchors:
            self.yaml['anchors'] = anchors
        # 根据模型字典得到模型列表, 以及会被后面层用到的模型层
        # model:模型; save:需要保存结果的模型层序号
        self.model, self.save = parse_model(deepcopy(self.yaml), ch=[ch])
        # 类别数字(0,1,2,...,nc-1)
        self.names = [str(i) for i in range(self.yaml['nc'])]
        # 训练时原地操作,节省内存
        self.inplace = self.yaml.get('inplace', True)

        # 初始化模型stride:输入图像相对feature_map的大小
        # 初始化feature_map的Anchors: cfg文件中的Anchors大小为在输入图像上的尺寸,
        # 根据stride将其缩放到feature_map上的尺寸
        m = self.model[-1]  # Detect模块层
        if isinstance(m, (Detect,)):
            s = 640  # 测试经过模型输出后, 特征图相对原图的stride, 要为32的倍数
            forward = lambda x: self.forward(x)  # 前向传播
            m.inplace = self.inplace
            # stride [8, 16, 32]
            m.stride = torch.tensor([s / x.shape[-2] for x in forward(torch.zeros(1, ch, s, s))])
            # anchors.shape [3, 3, 2]; stride.shape [3,] value(8, 16, 32)
            # m.anchors [3, 3, 2] m.stride.view(-1, 1, 1) [3, 1, 1]
            # 将anchors缩放成feature map上的anchors尺寸
            m.anchors /= m.stride.view(-1, 1, 1)
            self.stride = m.stride
            self._initialize_biases()  # 初始化特征预测层的卷积偏置

        # 初始化权重
        self._initialize_weights()

    # 前向传播
    def forward(self, x):
        # y存储后续会使用到的层,如果当前层输出不会被后续用到, 则存储为NONE, 节省内存0
        y = []
        for m in self.model:
            if m.f != -1:  # 如果不是从前一层传播下来
                # 得到当前层的输入
                x = y[m.f] if isinstance(m.f, int) else [x if j == -1 else y[j] for j in m.f]
            # 前向传播
            x = m(x)
            # 如果当前层会被后续使用,则保存
            y.append(x if m.i in self.save else None)
        # 训练时: x {[bs,na,80,80,no], [ba,na,40,40,no], [bs,na,20,20,no]}
        # 非训练时: z [bs,na(20*20+40*40+80*80),no] x
        return x
    # 初始化卷积层偏置
    def _initialize_biases(self, cf=None):
        '''
        初始化预测层的偏置, 除了预测层的卷积模块均无偏置
        '''
        m = self.model[-1]  # detect() module
        for mi, s in zip(m.m, m.stride):  # mi为detect()中的卷积层, s为该卷积层输出的分辨率在原图上的跨度
            b = mi.bias.view(m.na, -1)   # 卷积核数量为(na * (nc + 5)) conv.bias(255) to (3, 85)
            b.data[:, 4] += math.log(8 / (640 / s) ** 2)
            b.data[:, 5:5 + m.nc] += math.log(0.6 / (m.nc - 0.99999)) if cf is None else torch.log(cf / cf.sum())
            mi.bias = torch.nn.Parameter(b.view(-1), requires_grad=True)
    # 初始化模型参数
    def _initialize_weights(self):
        for m in self.modules():
            t = type(m)
            if t is nn.Conv2d:
                pass
            elif t is nn.BatchNorm2d:
                m.eps = 1e-3
                m.momentum = 0.03
            elif t in [nn.LeakyReLU, nn.ReLU, nn.SiLU]:
                m.inplace = True
本篇代码
common.py
import warnings

import torch
import torch.nn as nn

def autopad(k, p=None, d=1): #kernel, padding, dilation
    #Pad to "same" shape outpus
    if d > 1:
        k = d * (k - 1) + 1 if isinstance(k, int) else [d * (x - 1) + 1 for x in k]
    if p is None:
        p = k // 2 if isinstance(k, int) else [x // 2 for x in k]
    return p
class Conv(nn.Module):
    '''
    标准卷积块 Conv - BN - Activation
    '''
    default_act = nn.SiLU()  # 默认激活函数
    def __init__(self, c1, c2, k=1, s=1, p=None, g=1, d=1, act=True):
        '''
        :param c1: 输入通道
        :param c2: 输出通道
        :param k: 卷积核大小
        :param s: 步长
        :param p: padding p为None则表示 "pad to same shape"
        :param g: groups=1时为标准卷积
        :param d: dilation=1时为标准卷积,点之间有空隙的过滤器, 对卷积核进行膨胀
        :param act: 激活函数
        '''
        super(Conv, self).__init__()
        self.conv = nn.Conv2d(c1, c2, k, s, autopad(k, p, d), groups=g, dilation=d, bias=False)
        self.bn = nn.BatchNorm2d(c2)
        # nn.Identity不对输入任何操作, 直接返回原输入
        self.act = self.default_act if act is True else act if isinstance(act, nn.Module) else nn.Identity()

    def forward(self, x):
        return self.act(self.bn(self.conv(x)))

    def forward_fuse(self, x):
        '''不使用BN层'''
        return self.act(self.conv(x))
class Concat(nn.Module):
    #不同的特征图在通道维度上进行拼接
    def __init__(self, dimension=1):
        super(Concat, self).__init__()
        self.d = dimension
    def forward(self, x):
        return torch.cat(x, dim=self.d)


class Upsample(nn.Module):
    '''
    上采样
    '''
    def __init__(self, size=None, scale_factor=2, mode='nearest'):
        '''
        :param size:输出特征图大小
        :param scale_factor:特征图缩放比例
        :param mode:采样方式
        其中size和scale_factor只需填一个即可
        '''
        super(Upsample, self).__init__()
        self.u = nn.Upsample(size, scale_factor, mode)

    def forward(self, x):
        return self.u(x)

# ----------------------------------------------------------------------------------
# todo:YOLOv5
# ----------------------------------------------------------------------------------
class Bottleneck(nn.Module):
    '''
    残差连接瓶颈层, Residual block
    '''
    def __init__(self, c1, c2, shortcut=True, g=1, e=0.5):
        '''
        :param c1: 输入通道
        :param c2: 输出通道
        :param shortcut: 为True时采用残差连接
        :param g: groups 在输出通道上分组, c2 // g 分组后不同组之间的卷积核参数不同
        :param e: 中间层的通道数
        '''
        super(Bottleneck, self).__init__()
        c_ = int(c2 * e)  # 中间层的通道
        self.cv1 = Conv(c1, c_, 1, 1)  # ch_in, ch_out, kereal_size, stride
        self.cv2 = Conv(c_, c2, 3, 1, g=g)
        self.add = shortcut and c1 == c2
    def forward(self, x):
        out = self.cv2(self.cv1(x))
        return x + out if self.add else out
class CSP(nn.Module):
    '''yolov5中的CspBottleneck, yolov5中c1 = c2'''
    def __init__(self, c1, c2, n=1, shortcut=True, g=1, e=0.5):
        '''
        :param c1: 输入通道
        :param c2: 输出通道
        :param n: Bottleneck层数量
        :param shortcut: Bottleneck中的残差连接
        :param g: groups
        :param e: 中间层通道
        '''
        super(CSP, self).__init__()
        c_ = int(c2 * e)
        self.cv1 = Conv(c1, c_, 1, 1)  # Bottleneck的前一层
        self.cv2 = Conv(c1, c_, 1, 1)  # Csp连接层
        self.cv3 = Conv(2 * c_, c2, 1, 1)  # Csp通道合并后进行特征提取
        self.m = nn.Sequential(*(Bottleneck(c_, c_, shortcut, g, e=1.0) for _ in range(n)))

    def forward(self, x):
        y1 = self.m(self.cv1(x))
        y2 = self.cv2(x)
        return self.cv3(torch.cat((y1, y2), 1))
class SPPF(nn.Module):
    #Spatial Pyramid Pooling - Fast(SPPF)
    def __init__(self, c1, c2, k=5, e=0.5):
        '''
        :param c1: 输入通道
        :param c2: 输出通道
        :param k: 池化核大小
        '''
        super(SPPF, self).__init__()
        c_ = int(c1 * e)
        self.cv1 = Conv(c1, c_, 1, 1)  # 池化层前通道下降
        self.cv2 = Conv(c_ * 4, c2, 1, 1)  # 池化层通道相加后通道数调整
        self.m = nn.MaxPool2d(kernel_size=k, stride=1, padding=k // 2)

    def forward(self, x):
        x = self.cv1(x)
        with warnings.catch_warnings():
            warnings.simplefilter("ignore")  # 忽略警告
            y1 = self.m(x)
            y2 = self.m(y1)
            y3 = self.m(y2)
            return self.cv2(torch.cat((x, y1, y2, y3), dim=1))
class Detect(nn.Module):
    '''yolov5 检测头(Anchor-based)'''
    stride = None  # 特征图与原图之间的跨度
    def __init__(self, nc=80, anchors=(), ch=(), inplace=True):
        super(Detect, self).__init__()
        self.nc = nc  # 类别数
        self.no = nc + 5  # 每个anchor的输出数量
        self.nl = len(anchors)  # 预测特征图的数量  3
        self.na = len(anchors[0]) // 2  # 每个feature map上的anchors的数量  3
        self.grid = [torch.empty(0) for _ in range(self.nl)]  # 初始化网格
        self.anchor_grid = [torch.empty(0) for _ in range(self.nl)]  # 初始化anchor的网格
        # anchors (3, 6) -- (3, 3, 2)
        # self.register_buffer定义的参数在训练时不会被更新
        self.register_buffer('anchors', torch.tensor(anchors).float().view(self.nl, -1, 2))  # (nl, na, 2)
        self.m = nn.ModuleList(nn.Conv2d(x, self.no * self.na, 1) for x in ch)  # 输出卷积, 获得最后的预测结果
        self.inplace = inplace

    def forward(self, x):
        '''
        输入 img_size = 640时
        训练时返回 x = {[bs, 3, 20, 20, 85], [bs, 3, 40, 40, 85], [bs, 3, 80, 80, 85]}
        推理时返回 z = [bs, 3*(20*20 + 40*40 + 80*80), 85], x
        其中推理时的坐标已经转换为原图上的(xcenter, ycenter, w, h)绝对坐标
        '''
        z = []  # 推理的输出
        for i in range(self.nl):
            x[i] = self.m[i](x[i])  # 输出结果 (bs, na * no, grid_y, grid_x)
            bs, _, ny, nx = x[i].shape
            # x(bs, 255, 20, 20) to x(bs, 3, 85, 20, 20) to x(bs, 3, 20, 20, 85)
            x[i] = x[i].view(bs, self.na, self.no, ny, nx).permute(0, 1, 3, 4, 2).contiguous()

            # 非训练时, 对输出作进一步的调整
            if not self.training:
                if self.grid[i].shape[2:4] != x[i].shape[2:4]:
                    self.grid[i], self.anchor_grid[i] = self._make_grid(nx, ny, i)

                # 将回归参数应用到坐标上 xy/wh:(bs, 3, 20, 20, 2) conf:(bs, 3, 20, 20, 1+80)
                xy, wh, conf = x[i].sigmoid().split((2, 2, self.nc + 1), 4)
                # grid[i] (1, 3, 20, 20, 2) 每个cell的左上角x和y坐标
                xy = (xy * 2 + self.grid[i]) * self.stride[i]  # xy
                # anchor_grid[i] (1, 3, 20, 20, 2) 当前feature map对应原图上的anchors的w和h
                wh = (wh * 2) ** 2 * self.anchor_grid[i]  # wh
                # (bs, 3, grid_y, grid_x, 85)
                y = torch.cat((xy, wh, conf), 4)
                z.append(y.view(bs, self.na * nx * ny, self.no))

        return x if self.training else (torch.cat(z, 1), x)

    def _make_grid(self, nx=20, ny=20, i=0):
        d = self.anchors[i].device
        t = self.anchors[i].dtype
        shape = 1, self.na, ny, nx, 2  # 网格的形状
        y, x = torch.arange(ny, device=d, dtype=t), torch.arange(nx, device=d, dtype=t)
        yv, xv = torch.meshgrid(y, x)
        # 增加网格的偏置, y = 2 * x - 0.5
        grid = torch.stack((xv, yv), 2).expand(shape) - 0.5
        anchor_grid = (self.anchors[i] * self.stride[i]).view((1, self.na, 1, 1, 2)).expand(shape)
        return grid, anchor_grid
yolo.py
import contextlib
import math

from pathlib import Path
import sys
import os
import platform
from copy import deepcopy  # 提供一个深拷贝, 对新数据的操作不会影响原数据

import torch

FILE = Path(__file__).resolve()  # 获取当前文件的绝对路径
ROOT = FILE.parents[1]   # 获得当前项目的根目录
if str(ROOT) not in sys.path:
    sys.path.append(str(ROOT))  # 将根目录加载到系统路径中
if platform.system() != 'Windows':
    ROOT = Path(os.path.relpath(ROOT, Path.cwd()))

from models.common import *
from utils.general import colorstr


try:
    import thop  # FLOPs 计算工具
except ImportError:
    thop = None

def parse_model(d, ch):
    '''
    对模型配置文件字典进行解析
    :param d: 模型配置字典
    :param ch: 输入图片通道数
    :return:
    '''
    print(colorstr("red", f"\n{'':>3}{'from':>18}{'n':>3}{'params':>10}  {'module':<40}{'arguments':<30}"))
    # print(colorstr('bright_red', f"\n{'':>3}{'from':>18}{'n':>3}{'params':>10}  {'module':<40}{'arguments':<30}"))
    # anchors[3, 6], 类别个数, 模块个数的比例因子, 通道数的比例因子, 采用的激活函数(如果配置文件中有说明)
    anchors, nc, gd, gw, act = d['anchors'], d['nc'], d['depth_multiple'], d['width_multiple'], d.get('activation')
    # 修改默认的卷积模块里的激活函数, 如果更改了激活函数
    if act:
        Conv.default_act = eval(act)

    # num of anchors, 每个feature map的anchors数量
    # 若传入的为anchors的宽高形式则根据长度获取, 若传入的直接为anchors数量则直接赋值
    na = (len(anchors[0]) // 2) if isinstance(anchors, list) else anchors
    # num of output = anchors * (classes + 5), 预测层输出的通道数
    no = na * (nc + 5)

    # 模型保存的列表, 保存后续会用到的输出层序号, 上一层模型的输出通道数/下一层的输入通道数
    layers, save, c2 = [], [], ch[-1]
    # f: 该层的输入来自哪一层, n:模块个数, m:模型类别, args:输入模型的参数
    for i, (f, n, m, args) in enumerate(d['backbone'] + d['head']):
        # eval()返回传入字符串的表达式的结果, 例如可以实现list, dict, tuple与str之间的转换
        # 在这里可以实现将'Conv','C3'转换成在commom中定义的基础层
        m = eval(m) if isinstance(m, str) else m
        for j, a in enumerate(args):
            with contextlib.suppress(NameError):
                # contextlib.suppress(type_of_error)返回一个上下文管理器, 在with语句主体中, 则抑制任何指定的异常,然后使用with结束后的第一条语句继续执行
                # 因为这里将参数从str转换为相应参数, 包括此时未出现的变量, 但会在之后定义
                args[j] = eval(a) if isinstance(a, str) else a
        # 其中gd为深度因子, 不同的yolov5网络在模块的个数上不同
        n = n_ = max(round(n * gd), 1) if n > 1 else n
        # 根据模型类型, 重新修改args参数
        if m in {Conv, SPPF, CSP}:
            c1, c2 = ch[f], args[0]  # 当前模块的输入和输出通道数
            if c2 != no:  # 非输出层, 需要利用gw参数对模型的通道数进行修正
                c2 = math.ceil(c2 * gw / 8) * 8

            args = [c1, c2, *args[1:]]  # 输入通道数, 输出通道数, 针对不同模块的具体参数
            # Conv/DSCConv/SPDConv (ch_in, ch_out, kernel_size, stride, padding)
            # SPPF (ch_in, ch_out, k)
            # C3 (ch_in, ch_out), 需要插入模块个数
            if m in {CSP}:
                args.insert(2, n)  # C3 (ch_in, ch_out, num)
                n = 1
        elif m is nn.BatchNorm2d:
            # nn.BatchNorm2d (ch_out,)
            args = [ch[f]]
        elif m is Concat:  # Concat (dim=1)
            c2 = sum(ch[x] for x in f)
        elif m in {Detect}:
            # Detect 预测输出层 (nc, anchors, [输入通道数])
            args.append([ch[x] for x in f])
            if isinstance(args[1], int):  # num of anchors
                # 若anchors表示每个输出特征层的anchors数量, 则将其转换成列表
                args[1] = [list(range(args[1] * 2))] * len(f)
        else:
            c2 = ch[f]

        # 建立模型, 以nn.Sequential进行构建
        m_ = nn.Sequential(*(m(*args) for _ in range(n))) if n > 1 else m(*args)
        # 获取模型名字 “" -> 'modedl.comon.Conv'
        t = str(m)[8:-2].replace('__main__.', '')
        # num parameters 模型的参数量
        np = sum(x.numel() for x in m_.parameters())
        # attach index, 'from' index, type, number of params
        # 该模型在整个模型中的序号, 以哪一个模型进行连接, 模型名字以及模型的参数
        m_.i, m_.f, m_.type, m_.np = i, f, t, np
        # 打印模型信息
        print(colorstr("red", f'{i:>3}{str(f):>18}{n_:>3}{np:10.0f}  {t:<40}{str(args):<30}'))
        # 保存后续会用到的模型层序号, 若x为-1, 则直接与上一层连接, 无需进行保存
        # 后续层不需要用到的输出结果不进行保存, 节省内存空间
        save.extend(x % i for x in ([f] if isinstance(f, int) else f) if x != -1)
        layers.append(m_)  # 以列表的形式存储所有模型
        if i == 0:
            ch = []
        ch.append(c2)  # 从第一层开始的输出通道数

    return nn.Sequential(*layers), sorted(save)

class DetectionModel(nn.Module):
    '''
    yolov5 检测模型
    '''
    def __init__(self, cfg='../cfg/models/yolov5s.yaml', ch=3, nc=None, anchors=None):
        '''
        :param cfg: 模型结构配置文件
        :param ch: 输入图像的通道数
        :param nc: 类别数, 为Node时默认为cfg文件中设置的nc
        :param anchors: anchors, 为None时默认为cfg文件中设置的anchors
        '''
        super(DetectionModel, self).__init__()
        # 读取配置文件并将其转换为字典
        if isinstance(cfg, dict):
            self.yaml = cfg  # 如果已经为模型结构字典了, 直接读取
        else:  # 若为配置文件(.yaml) 则将其转换为字典
            import yaml
            with open(cfg, encoding='ascii', errors='ignore') as f:
                self.yaml = yaml.safe_load(f)  # 模型字典

        # ------------------------------------------
        # 定义模型
        # ------------------------------------------
        # 输入图像通道数, 字典 dict.get(key, value): 若存在key返回其value, 若不存在则返回value
        ch = self.yaml['ch'] = self.yaml.get('ch', ch)
        # 若在初始化时定义了nc,则更改nc
        if nc and nc != self.yaml['nc']:
            self.yaml['nc'] = nc
        # 若在初始化时定义了anchors,则更改anchors
        if anchors:
            self.yaml['anchors'] = anchors
        # 根据模型字典得到模型列表, 以及会被后面层用到的模型层
        # model:模型; save:需要保存结果的模型层序号
        self.model, self.save = parse_model(deepcopy(self.yaml), ch=[ch])
        # 类别数字(0,1,2,...,nc-1)
        self.names = [str(i) for i in range(self.yaml['nc'])]
        # 训练时原地操作,节省内存
        self.inplace = self.yaml.get('inplace', True)

        # 初始化模型stride:输入图像相对feature_map的大小
        # 初始化feature_map的Anchors: cfg文件中的Anchors大小为在输入图像上的尺寸,
        # 根据stride将其缩放到feature_map上的尺寸
        m = self.model[-1]  # Detect模块层
        if isinstance(m, (Detect,)):
            s = 640  # 测试经过模型输出后, 特征图相对原图的stride, 要为32的倍数
            forward = lambda x: self.forward(x)  # 前向传播
            m.inplace = self.inplace
            # stride [8, 16, 32]
            m.stride = torch.tensor([s / x.shape[-2] for x in forward(torch.zeros(1, ch, s, s))])
            # anchors.shape [3, 3, 2]; stride.shape [3,] value(8, 16, 32)
            # m.anchors [3, 3, 2] m.stride.view(-1, 1, 1) [3, 1, 1]
            # 将anchors缩放成feature map上的anchors尺寸
            m.anchors /= m.stride.view(-1, 1, 1)
            self.stride = m.stride
            self._initialize_biases()  # 初始化特征预测层的卷积偏置

        # 初始化权重
        self._initialize_weights()

    # 前向传播
    def forward(self, x):
        # y存储后续会使用到的层,如果当前层输出不会被后续用到, 则存储为NONE, 节省内存0
        y = []
        for m in self.model:
            if m.f != -1:  # 如果不是从前一层传播下来
                # 得到当前层的输入
                x = y[m.f] if isinstance(m.f, int) else [x if j == -1 else y[j] for j in m.f]
            # 前向传播
            x = m(x)
            # 如果当前层会被后续使用,则保存
            y.append(x if m.i in self.save else None)
        # 训练时: x {[bs,na,80,80,no], [ba,na,40,40,no], [bs,na,20,20,no]}
        # 非训练时: z [bs,na(20*20+40*40+80*80),no] x
        return x
    # 初始化卷积层偏置
    def _initialize_biases(self, cf=None):
        '''
        初始化预测层的偏置, 除了预测层的卷积模块均无偏置
        '''
        m = self.model[-1]  # detect() module
        for mi, s in zip(m.m, m.stride):  # mi为detect()中的卷积层, s为该卷积层输出的分辨率在原图上的跨度
            b = mi.bias.view(m.na, -1)   # 卷积核数量为(na * (nc + 5)) conv.bias(255) to (3, 85)
            b.data[:, 4] += math.log(8 / (640 / s) ** 2)
            b.data[:, 5:5 + m.nc] += math.log(0.6 / (m.nc - 0.99999)) if cf is None else torch.log(cf / cf.sum())
            mi.bias = torch.nn.Parameter(b.view(-1), requires_grad=True)
    # 初始化模型参数
    def _initialize_weights(self):
        for m in self.modules():
            t = type(m)
            if t is nn.Conv2d:
                pass
            elif t is nn.BatchNorm2d:
                m.eps = 1e-3
                m.momentum = 0.03
            elif t in [nn.LeakyReLU, nn.ReLU, nn.SiLU]:
                m.inplace = True


Model = DetectionModel   #  retain YOLOv5 'Model' class for backwards compatibility