Spring Cloud第二季--消息驱动Spring Cloud Stream
文章目录
- 什么是Spring Cloud Stream
-
- Stream 原理
- 牛刀小试
-
- 消息重复消费问题
什么是Spring Cloud Stream
Spring Cloud Stream is a framework for building highly scalable event-driven microservices connected with shared messaging systems.
The framework provides a flexible programming model built on already established and familiar Spring idioms and best practices, including support for persistent pub/sub semantics, consumer groups, and stateful partitions.
官方定义 Spring Cloud Stream 是一个构建消息驱动微服务的框架。
比如有这样的一个场景,应用A 使用了RabbitMQ作为消息队列,而应用B使用了Kafka,各消息中间件构建的初衷不同,架构不同,肯定不能直接通信,更不用说发送消息、接收消息啦,但我们业务上又必须让二者通信,怎么办呢?这时候,就是Spring Cloud Stream大显身手的时候啦!
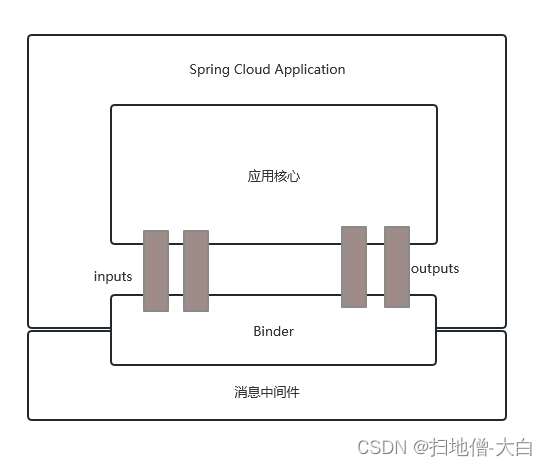
Spring Cloud Stream通过定义绑定器(binder)作为中间层,完美地实现了应用程序与消息中间件细节之间的隔离。
Stream 原理
Stream中的消息通信方式遵循了发布-订阅模式
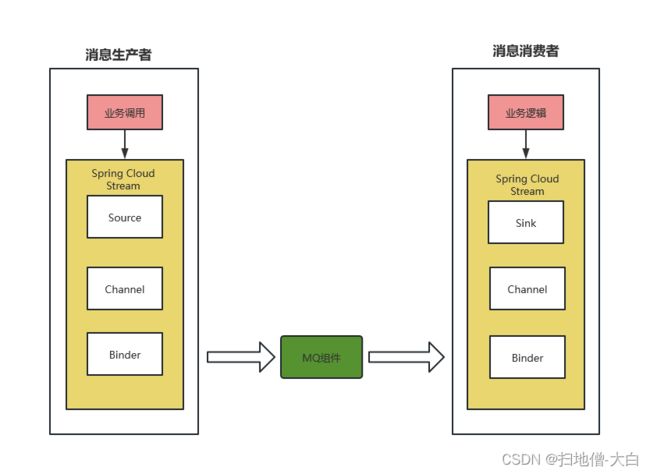
Source和Sink,简单的可理解为参照对象是Spring Cloud Stream自身,从Stream发布消息就是输出,接受消息就是输入。
通过向应用程序暴露统一的Channel通道,使得应用程序不需要再考虑各种不同的消息中间件实现。
Binder可以生成Binding,Binding用来绑定消息容器的生产者和消费者,它有两种类型,INPUT和OUTPUT,INPUT对应于消费者,OUTPUT对应于生产者。
目前Spring Cloud Stream仅支持RabbitMQ、Kafka。
牛刀小试
第一步,新建cloud-stream-provider, 作为生产者,进行发消息。pom文件添加依赖:
        <dependency>
            <groupId>org.springframework.cloud</groupId>
            <artifactId>spring-cloud-starter-stream-rabbit</artifactId>
        </dependency>
        <dependency>
            <groupId>org.springframework.boot</groupId>
            <artifactId>spring-boot-starter-web</artifactId>
        </dependency>
        <dependency>
            <groupId>org.springframework.boot</groupId>
            <artifactId>spring-boot-starter-actuator</artifactId>
        </dependency>
        <dependency>
            <groupId>org.springframework.cloud</groupId>
            <artifactId>spring-cloud-starter-netflix-eureka-client</artifactId>
        </dependency>

        <!--基础配置-->
        <dependency>
            <groupId>org.springframework.boot</groupId>
            <artifactId>spring-boot-devtools</artifactId>
            <scope>runtime</scope>
            <optional>true</optional>
        </dependency>
        <dependency>
            <groupId>org.projectlombok</groupId>
            <artifactId>lombok</artifactId>
            <optional>true</optional>
        </dependency>
        <dependency>
            <groupId>org.springframework.boot</groupId>
            <artifactId>spring-boot-starter-test</artifactId>
            <scope>test</scope>
        </dependency>
配置文件application.yml,output参数标识输出通道,发布的消息将通过该通道离开应用程序
server:
  port: 8801

spring:
  application:
    name: cloud-stream-provider
  cloud:
      stream:
        binders: # 配置绑定的rabbitmq的服务信息;
          defaultRabbit: # 表示定义的名称,用于于binding整合
            type: rabbit # 消息组件类型
            environment: # 设置rabbitmq的相关的环境配置
              spring:
                rabbitmq:
                  host: ******
                  port: 5672
                  username: ******
                  password: ******
        bindings: # 服务的整合处理
          output: # 这个名字是一个通道的名称
            destination: testExchange07 # 表示要使用的Exchange名称定义
            content-type: application/json # 设置消息类型,本次为json,文本则设置“text/plain”
            binder: defaultRabbit # 设置要绑定的消息服务的具体设置

eureka:
  client: # 客户端进行Eureka注册的配置
    service-url:
      defaultZone: http://localhost:7001/eureka
  instance:
    lease-renewal-interval-in-seconds: 2 # 设置心跳的时间间隔(默认是30秒)
    lease-expiration-duration-in-seconds: 5 # 如果现在超过了5秒的间隔(默认是90秒)
    prefer-ip-address: true     # 访问的路径变为IP地址
发送消息接口及实现类
/**
 * @Auther: songweichao
 * @Date: 2023-05-10 11:52
 * @Description:
 */
public interface MessageProvider {

    public String send() ;

}
@EnableBinding ,信道channel和exchange绑定在一起
/**
 * @Auther: songweichao
 * @Date: 2023-05-10 11:52
 * @Description:
 */
@EnableBinding(Source.class)
public class MessageProviderImpl implements MessageProvider{

    @Resource
    private MessageChannel output;

    @Override
    public String send() {

        SimpleDateFormat sdf = new SimpleDateFormat();
        this.output.send(MessageBuilder.withPayload(sdf.format(new Date())).build());

        return "success";
    }
}
方法调用:
/**
* @Auther: songweichao
* @Date: 2023-05-10 12:14
* @Description:
*/
@RestController
public class SendMessageController {
@Resource
private MessageProvider messageProvider;
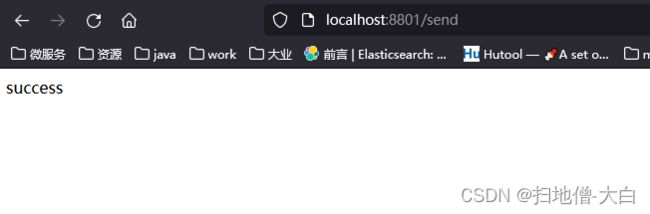
@GetMapping(value = "/send")
public String sendMessage(){
return messageProvider.send();
}
}
第二步,新建cloud-stream-consumer7701,pom依赖同cloud-stream-provider,添加配置文件application.yml
input参数标识输入通道,通过该输入通道接收到的消息进入应用程序。
server:
  port: 7702

spring:
  application:
    name: cloud-stream-consumer
  cloud:
      stream:
        binders: # 配置绑定的rabbitmq的服务信息;
          defaultRabbit: # 表示定义的名称,用于于binding整合
            type: rabbit # 消息组件类型
            environment: # 设置rabbitmq的相关的环境配置
              spring:
                rabbitmq:
                  host: ******
                  port: 5672
                  username: ******
                  password: ******
        bindings: # 服务的整合处理
          input: # 这个名字是一个通道的名称
            destination: testExchange07 # 表示要使用的Exchange名称定义
            content-type: application/json # 设置消息类型,本次为对象json,如果是文本则设置“text/plain”
            binder: defaultRabbit # 设置要绑定的消息服务的具体设置

eureka:
  client: # 客户端进行Eureka注册的配置
    service-url:
      defaultZone: http://localhost:7001/eureka
  instance:
    lease-renewal-interval-in-seconds: 2 # 设置心跳的时间间隔(默认是30秒)
    lease-expiration-duration-in-seconds: 5 # 如果现在超过了5秒的间隔(默认是90秒)
    prefer-ip-address: true     # 访问的路径变为IP地址
接收消息实现,@StreamListener ,监听队列,用于消费者队列的消息接收
/**
* @Auther: songweichao
* @Date: 2023-05-10 12:26
* @Description:
*/
@Component
@EnableBinding(Sink.class)
public class ReceiveMessageListener {
@Value("${server.port}")
private String port;
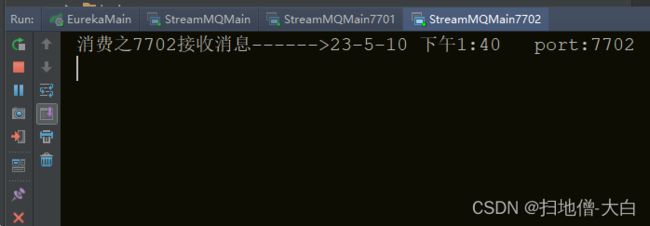
@StreamListener(Sink.INPUT)
public void input(Message<String> message){
System.out.println("消费之7702接收消息------>"+message.getPayload()+"\t port:"+port);
}
}
第三步,复制cloud-stream-consumer7701为cloud-stream-consumer7702,构建两个消费者,分别启动cloud-stream-provider和cloud-stream-consumer,调用接口测试:
控制台输出打印,7701和7702都收到了消息。

消息重复消费问题
如果7701和7702属于同一个微服务的集群部署,不应该都收到消息,一条消息只能由一个消费者消费,该怎么实现呢?
Spring Cloud Stream 通过分组的方式实现。不同组是可以全面消费的(重复消费),同一组内会发生竞争关系,只有其中一个可以消费。
分别在7701和7702的配置中,添加group属性,为同一组,重启测试

7701/7702实现了轮询分组,每次只有一个消费者;8801模块的发的消息只能被7701或7702其中一个接收到,这样避免了重复消费。