squid代理配置
文章目录
- 安装
-
- centos环境
- 配置
-
- 配置文件说明
- 修改日志时间格式
- 重启服务
- ipv6代理
-
- 配置 tcp_outgoing_address 标记
- 解决squid只监听ipv6地址问题
- 关闭sulinux,防火墙
- squid透明代理模式
- squid实现访问控制
-
- 根据时间控制
- 没有限制
- 客户端代理设置
-
- win10系统
- centos7
安装
centos环境
squid在本地镜像里有,只需要配置好本地端yum源即可
yum -y install squid
配置
配置文件说明
[root@agent2 ~]# vim /etc/squid/squid.conf		简化的配置文件
[root@agent2 ~]# vim /usr/share/doc/squid-3.1.23/squid.conf.documented 	查看文档
//设置监听端IP和端口号
http_port 3128
//额外提供给squid使用端内存大小
cache_mem	256MB(默认大小)
//设置squid磁盘缓存最大文件,超过4M端文件不保存到磁盘
maximum_object_size 4MB
//设置squid磁盘缓存最小文件
minimum_object_size 0 KB
//设置squid内存缓存最大文件,超过4M不保存到内存
maximum_object_size_in_memory 4096 KB
//定义squid端cache存放路径、cache目录容量(单位M)、一级缓存目录数量、二级缓存目录数量
cache_dir ufs /var/spool/squid 100 16 256

//log文件日志格式
#logformat combined %>a %ui %un [%tl] "%rm %ru HTTP/%rv" %>Hs %h" "%{User-Agent}>h" %Ss:%Sh
//log文件存放路径和日志格式
# access_log /var/log/squid/access.log squid
//设置缓存日志
cache_log /var/log/suqid/cache.log
//log轮转60天
logfile_rotate 60
//cache目录使用量大于95%时,开始清理旧的cache
cache_swap_high 95
//cache目录清理到90%时停止
cache_swap_low 90

//定义本地网段
acl localnet src 192.168.1.0/24
//允许本地网段使用
http_access allow localnet
//拒绝所有
http_access deny all
//主机名
visible_hostname xxx.xxxx.xxxx

//管理员邮箱
cache_mgr 123456@qq.com
示例配置
#
# Recommended minimum configuration:
#
# Example rule allowing access from your local networks.
# Adapt to list your (internal) IP networks from where browsing
# should be allowed
acl localnet src 10.0.0.0/8 # 过网闸有个地址转换,只能认识网址地址 RFC1918 possible internal network
#acl localnet src 172.16.0.0/12 # RFC1918 possible internal network
#acl localnet src 192.168.0.0/16 # RFC1918 possible internal network
#acl localnet src fc00::/7 # RFC 4193 local private network range
#acl localnet src fe80::/10 # RFC 4291 link-local (directly plugged) machines
#允许的目标ip地址列表
#政府网站的目标地址
#acl d-dst dst 10.11.12.0/24
acl d-dst dst 103.66.32.242
#允许的域名列表
#政府网的
#acl d-domains dstdomain stat.www.gov.cn
#acl d-domains dstdomain user.www.gov.cn
acl d-domains dstdomain .gov.cn
acl d-domains dstdomain dcs.conac.cn
acl d-domains dstdomain certify.alexametrics.com
acl d-domains dstdomain www.gov.cn
#政务服务网
acl d-domains dstdomain redirect.prod.experiment.routing.cloudfront.aws.a2z.com
acl d-domains dstdomain .zmdzwfw.gov.cn
acl SSL_ports port 443
acl Safe_ports port 80 # http
#acl Safe_ports port 21 # ftp
acl Safe_ports port 443 # https
#acl Safe_ports port 70 # gopher
#acl Safe_ports port 210 # wais
#acl Safe_ports port 1025-65535 # unregistered ports
#acl Safe_ports port 280 # http-mgmt
#acl Safe_ports port 488 # gss-http
#acl Safe_ports port 591 # filemaker
#acl Safe_ports port 777 # multiling http
acl Safe_ports port 8005 # multiling http
acl CONNECT method CONNECT
#
# Recommended minimum Access Permission configuration:
#
# Deny requests to certain unsafe ports
http_access deny !Safe_ports
# Deny CONNECT to other than secure SSL ports
http_access deny CONNECT !SSL_ports
# Only allow cachemgr access from localhost
#http_access allow localhost manager
http_access deny manager
# We strongly recommend the following be uncommented to protect innocent
# web applications running on the proxy server who think the only
# one who can access services on "localhost" is a local user
#http_access deny to_localhost
#
# INSERT YOUR OWN RULE(S) HERE TO ALLOW ACCESS FROM YOUR CLIENTS
#
# Example rule allowing access from your local networks.
# Adapt localnet in the ACL section to list your (internal) IP networks
# from where browsing should be allowed
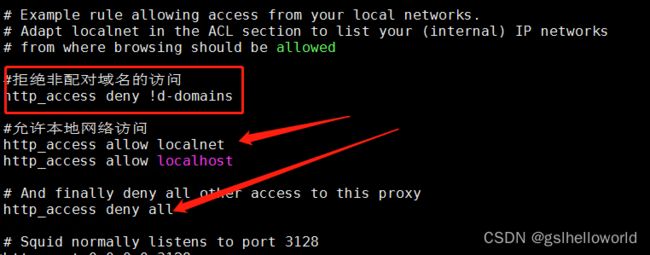
#拒绝非配对目标ip地址的访问
http_access allow d-dst
#拒绝非配对域名的访问
#临时注释,可以访问所有,安装程序用20220817
http_access deny !d-domains
#允许本地网络访问
http_access allow localnet
http_access allow localhost
# And finally deny all other access to this proxy
http_access deny all
# Squid normally listens to port 3128
http_port 0.0.0.0:3128
# Uncomment and adjust the following to add a disk cache directory.
#cache_dir ufs /var/spool/squid 100 16 256
# Leave coredumps in the first cache dir
coredump_dir /var/spool/squid
#
# Add any of your own refresh_pattern entries above these.
#
refresh_pattern ^ftp: 1440 20% 10080
refresh_pattern ^gopher: 1440 0% 1440
refresh_pattern -i (/cgi-bin/|\?) 0 0% 0
refresh_pattern . 0 20% 4320
修改日志时间格式
squid access日志默认是以毫秒为单位计的,而想要重新定义时,可以通过以下方式在squid.conf中定义并调用:
vim /etc/squid/squid.conf
#增加以下内容
logformat combined %>a %ui %un [%tl] "%rm %ru HTTP/%rv" %Hs %<st "%{Referer}>h" "%{User-Agent}>h" %Ss:%Sh %{host}>h
access_log /var/log/squid/access.log combined
注意在logformat格式设置有问题时,通过squid -k parse检查配置文件或利用squid -k reconfigure重载错误的配置文件,都会出现下面的提示(此时,只需要根据官方参数提示,重新设置即可):
重启服务
systemctl restart squid
ipv6代理
如何设置squid支持ipv6?
ipv6只是地址不同,设置方法和采用cidr的ipv4一样。
只需要关注以下几点:
external_acl_type flags ‘ipv4’ or ‘ipv6’
tcp_outgoing_address magic ACL’s
CIDR is required - that brand spanking new concept (from 1993).
localhost has two IP addresses.
配置 tcp_outgoing_address 标记
允许映射请求到不同的出站ip,依据发起请求的用户名和源地址
	tcp_outgoing_address ipaddr [[!]aclname] ...

	示例;
		Forwarding clients with dedicated IPs for certain subnets.

	  acl normal_service_net src 10.0.0.0/24
	  acl good_service_net src 10.0.2.0/24

	  tcp_outgoing_address 2001:db8::c001 good_service_net
	  tcp_outgoing_address 10.1.0.2 good_service_net

	  tcp_outgoing_address 2001:db8::beef normal_service_net
	  tcp_outgoing_address 10.1.0.1 normal_service_net

	  tcp_outgoing_address 2001:db8::1
	  tcp_outgoing_address 10.1.0.3
系统按指定的顺序执行,如果遇到符合的即停止往下查找。
系统默认对每一行添加了一个ip版本测试项。
	Requests going to IPv4 websites will use the outgoing 10.1.0.* addresses.
	Requests going to IPv6 websites will use the outgoing 2001:db8:* addresses.
解决squid只监听ipv6地址问题
netstat -tulnp | grep squid
tcp6       0      0 :::3128                 :::*                    LISTEN      12052/(squid-1)
udp        0      0 0.0.0.0:52569           0.0.0.0:*                           12052/(squid-1)
udp6       0      0 :::43207                :::*                                12052/(squid-1)
怀疑是squid服务只监听ipv6的缘故
所以需要修改squid的配置文件
vim /etc/squid/squid.conf
将http_port行的3128改为0.0.0.0:3128后, 重启服务
即可实现squid监听ipv4地址
关闭sulinux,防火墙
[root@rexian-proxy ~]# systemctl start squid
[root@rexian-proxy ~]# getenforce
Disabled
[root@rexian-proxy ~]# systemctl status firewalld
● firewalld.service - firewalld - dynamic firewall daemon
   Loaded: loaded (/usr/lib/systemd/system/firewalld.service; enabled; vendor preset: enabled)
   Active: active (running) since 五 2021-12-31 08:16:09 CST; 1min 31s ago
     Docs: man:firewalld(1)
 Main PID: 4531 (firewalld)
   CGroup: /system.slice/firewalld.service
           └─4531 /usr/bin/python -Es /usr/sbin/firewalld --nofork --nopid

12月 31 08:16:08 rexian-proxy systemd[1]: Starting firewalld - dynamic firewall daemon...
12月 31 08:16:09 rexian-proxy systemd[1]: Started firewalld - dynamic firewall daemon.
[root@rexian-proxy ~]# systemctl stop firewalld
[root@rexian-proxy ~]# systemctl disable firewalld
Removed symlink /etc/systemd/system/multi-user.target.wants/firewalld.service.
Removed symlink /etc/systemd/system/dbus-org.fedoraproject.FirewallD1.service.
[root@rexian-proxy ~]# systemctl start squid
[root@rexian-proxy ~]# systemctl stop squid
[root@rexian-proxy ~]#
squid透明代理模式
iptables -F
iptables -t nat -F
iptables -t nat -I PREROUTING -i eth0 -s 10.0.0.0/24 -p tcp --dport 80 -j REDIRECT --to 3128
iptables -t nat -I PREROUTING -i eth0 -s 10.0.0.0/24 -p tcp --dport 443 -j REDIRECT --to 3128
iptables -I INPUT -p tcp --dport 3128 -j ACCEPT
ip6tables -F
ip6tables -t nat -F
ip6tables -t nat -I PREROUTING -i eth0 -s fd01::/64 -p tcp --dport 80 -j REDIRECT --to 3128
ip6tables -t nat -I PREROUTING -i eth0 -s fd01::/64 -p tcp --dport 443 -j REDIRECT --to 3128
ip6tables -I INPUT -p tcp --dport 3128 -j ACCEPT
ip6tables -A FORWARD -m state --state RELATED,ESTABLISHED -j ACCEPT
ip6tables -A FORWARD -i enp0s10f0 -o eth0 -j ACCEPT
ip6tables -A FORWARD -i  eth0 -o enp0s10f0 -j ACCEPT
该命令允许从 enp0s10f0 到 eth0 的所有 IPv6 数据包通过。
squid实现访问控制
语法
src          源地址
dst              目标地址
port            目标地址
dstdomain       目标域
time            访问时间
maxconn       最大并发连接
url_regex         目标URL地址  # 可以定义大的范围比如http://www.baidu.com
urlpath_regex  整个目标URL路径  # 可以定位到每个网站的具体目标的url,比如百度音乐的一首歌的url
1.禁止IP地址为192.168.0.100的客户机上网
acl test src 192.168.0.100 //定义来源IP,test可以自己定义,代表定义端IP
http_access deny test //拒绝test后面定义端源IP :192.168.0.100上网
可以把要管理的IP写到一个文件里,然后在src后面跟上“文件路径”
2.禁止192.168.1.0这个网段里端所有客户机上网
acl test src 192.168.1.0/255.255.255.0
或者
acl test src 192.168.1.0/24
http_access deny test
3.禁止用户访问IP为210.21.118.68的网站
acl test dst 210.21.118.68
http_access deny test
4.禁止用户访问域名为www.163.com的网站
acl test dstdomain -i www.163.com //-i 忽略大小写
http_access deny test
5.禁止用户访问域名包含有163.com的网站
acl test url_regex -i 163.com //使用正则表达式匹配URL地址
http_access deny test
6.禁止用户访问包含有sex关键字端URL
acl test url_regex -i sex
http_access deny test
7.禁止用户访问多个网址
acl test dstdom_regex "/etc/squid/baddaturl"
//如果网址太多,可以写成一个文件,然后在这个文件里一行一个网站写上要
http_access deny test
8.vip用户没有任何限制
acl vip arp 00:0c:29:79:0C:1A //绑定mac地址
http_access allow vip
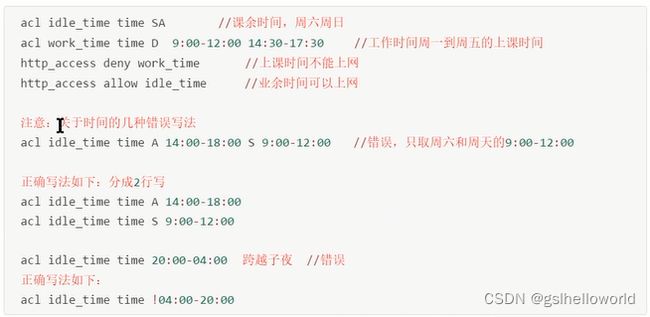
9.禁止192.168.2.0这个子网内所有客户机在周一到周五的9点到18点上网
acl test1 src 192.168.2.0/255.255.255.0
acl test2 time MTWHF 9:00-18:00 /S日/M一/T二/W三/H四/F五/A六/D(周一到周五)
http_access deny test1 test2
hwclock --hctosys 还原时间命令
10.禁止用户下载*.mp3,*.exe,*.zip,*.rar带有定义后缀名的文件
acl test urlpath_regex -i \.mp3$ \.exe$ \.zip$ \.rar$ \.txt$
//urlpath_regex 正则表达式匹配URL地址
http_access deny test
注意:设置acl访问控制规则的时候,有先后顺序。第一条规则匹配上就不再继续往下,所以先把拒绝写在前面
11. 允许访问所有目的域名,注释掉本行即可
#拒绝非配对域名的访问
# http_access deny !d-domains
根据时间控制
没有限制

定义制定的目标域名

加载规则,位置很重要
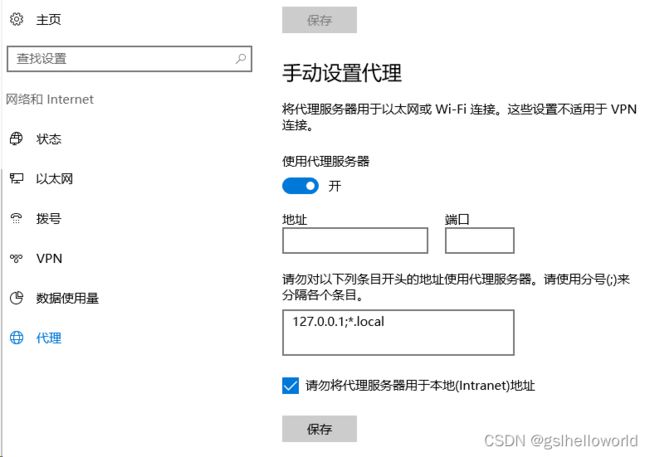
客户端代理设置
win10系统
centos7
具体实现代码如下所示:
//编辑配置文件
vi /etc/profile
//在该配置文件的最后添加代理配置
export http_proxy=http://代理服务器ip:代理服务器设置端口
export https_proxy=http://代理服务器ip:代理服务器设置端口

#无需代理的IP
export no_proxy="localhost, 127.0.0.1, ::1"
// 退出profile文件并保存
#更新一下环境文件:
source /etc/profile
#取消设置
unset http_proxy
unset https_proxy
unset ftp_proxy
unset no_proxy