【12.17】mongodb(上)
【12.17】mongodb(上)
- 21.26 mongodb介绍
- 21.27 mongodb安装
- 21.28 连接mongodb
- 21.29 mongodb用户管理
- 21.30 mongodb创建集合、数据管理
21.26 mongodb介绍
介绍:
- 官网www.mongodb.com, 当前最新版3.4
- C++ 编写,基于分布式的,属于 NoSQL 的一种
- 在 NoSQL 中是最像关系型数据库的
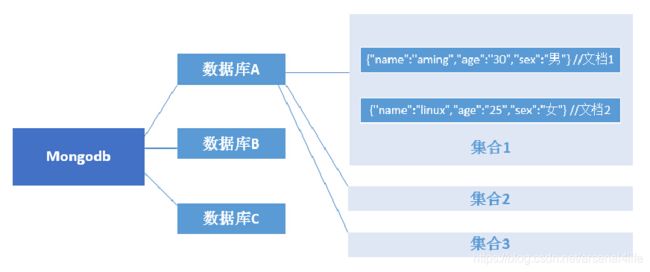
- MongoDB 将数据存储为一个文档,数据结构由键值(key=>value)对组成。MongoDB 文档类似于 JSON 对象。字段值可以包含其他文档、数组及文档数组。
- 关于JSON http://www.w3school.com.cn/json/index.asp
- 因为基于分布式,所以很容易扩展
MongoDB和关系型数据库对比:
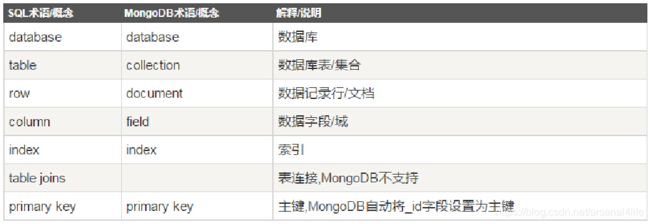
关系型数据库数据结构:

MongoDB数据结构:
21.27 mongodb安装
epel自带的mongodb版本为2.6,我们需要安装3.4版本
官方安装文档 docs.mongodb.com/manual/tutorial/install-mongodb-on-red-hat/
1、制作 yum 源
[root@arslinux-01 ~]# cd /etc/yum.repos.d/
[root@arslinux-01 yum.repos.d]# vim mongo.repo
[mongodb-org-3.4]
name=MongoDB Repository
baseurl=https://repo.mongodb.org/yum/redhat/$releasever/mongodb-org/3.4/x86_64/
gpgcheck=1
enabled=1
gpgkey=https://www.mongodb.org/static/pgp/server-3.4.asc
2、查看可安装的 mogodb 版本
[root@arslinux-01 yum.repos.d]# yum list |grep mongodb
mongodb-org.x86_64                      3.4.21-1.el7                   mongodb-org-3.4
mongodb-org-mongos.x86_64               3.4.21-1.el7                   mongodb-org-3.4
mongodb-org-server.x86_64               3.4.21-1.el7                   mongodb-org-3.4
mongodb-org-shell.x86_64                3.4.21-1.el7                   mongodb-org-3.4
mongodb-org-tools.x86_64                3.4.21-1.el7                   mongodb-org-3.4
mongodb-server.x86_64                   2.6.12-6.el7                   epel
mongodb-test.x86_64                     2.6.12-6.el7                   epel
nodejs-mongodb.noarch                   1.4.7-1.el7                    epel
php-mongodb.noarch                      1.0.4-1.el7                    epel
php-pecl-mongodb.x86_64                 1.1.10-1.el7                   epel
poco-mongodb.x86_64                     1.6.1-3.el7                    epel
3、yum 安装
[root@arslinux-01 yum.repos.d]# yum install mongodb-org
21.28 连接mongodb
1、启动 MongoDB
[root@arslinux-01 ~]# systemctl start mongod
[root@arslinux-01 ~]# ps aux|grep mongo
mongod     8597  1.7  3.8 973456 38076 ?        Sl   12:39   0:00 /usr/bin/mongod -f /etc/mongod.conf
root       8620  0.0  0.0 112724   988 pts/0    R+   12:39   0:00 grep --color=auto mongo
[root@arslinux-01 ~]# netstat -lntp|grep mongo
tcp        0      0 127.0.0.1:27017         0.0.0.0:*               LISTEN      8597/mongod
2、进入 MongoDB
[root@arslinux-01 ~]# mongo
MongoDB shell version v3.4.21
connecting to: mongodb://127.0.0.1:27017
MongoDB server version: 3.4.21
Welcome to the MongoDB shell.
For interactive help, type "help".
For more comprehensive documentation, see
	http://docs.mongodb.org/
Questions? Try the support group
	http://groups.google.com/group/mongodb-user
Server has startup warnings:
2019-07-16T12:39:35.723+0800 I CONTROL  [initandlisten]
2019-07-16T12:39:35.723+0800 I CONTROL  [initandlisten] ** WARNING: Access control is not enabled for the database.
2019-07-16T12:39:35.723+0800 I CONTROL  [initandlisten] **          Read and write access to data and configuration is unrestricted.
2019-07-16T12:39:35.723+0800 I CONTROL  [initandlisten]
2019-07-16T12:39:35.723+0800 I CONTROL  [initandlisten]
2019-07-16T12:39:35.723+0800 I CONTROL  [initandlisten] ** WARNING: /sys/kernel/mm/transparent_hugepage/enabled is 'always'.
2019-07-16T12:39:35.723+0800 I CONTROL  [initandlisten] **        We suggest setting it to 'never'
2019-07-16T12:39:35.723+0800 I CONTROL  [initandlisten]
2019-07-16T12:39:35.723+0800 I CONTROL  [initandlisten] ** WARNING: /sys/kernel/mm/transparent_hugepage/defrag is 'always'.
2019-07-16T12:39:35.723+0800 I CONTROL  [initandlisten] **        We suggest setting it to 'never'
2019-07-16T12:39:35.723+0800 I CONTROL  [initandlisten]
>
3、如果mongodb监听端口并不是默认的27017,则在连接的时候需要加–port 选项
例如:mongo --port 27018
连接远程mongodb,需要加–host,例如
mongo --host 127.0.0.1
4、如果设置了验证,则在连接的时候需要带用户名和密码
mongo -uusername -ppasswd --authenticationDatabase db //这个和 MySQL挺像
21.29 mongodb用户管理
1、创建用户,添加密码
> use admin
switched to db admin
> db.createUser( { user: "admin", customData: {description: "superuser"}, pwd: "admin122", roles: [ { role: "root", db: "admin" } ] } )
Successfully added user: {
	"user" : "admin",
	"customData" : {
		"description" : "superuser"
	},
	"roles" : [
		{
			"role" : "root",
			"db" : "admin"
		}
	]
}
user 指定用户;customData 为说明字段,可以省略;pwd 为密码;roles 指定用户的角色;db 指定库名
2、列出所有用户,需要切换到admin库
> use admin
switched to db admin
> db.system.users.find()
{ "_id" : "admin.admin", "user" : "admin", "db" : "admin", "credentials" : { "SCRAM-SHA-1" : { "iterationCount" : 10000, "salt" : "JeDsJTa/kJYAXFhd9CKb2A==", "storedKey" : "YW+dUA7OTWw5ZmA8AN+HqHz677U=", "serverKey" : "LjyBIPucqbf0vqz6+5dTfmpVFqE=" } }, "customData" : { "description" : "superuser" }, "roles" : [ { "role" : "root", "db" : "admin" } ] }
3、查看当前库下所有的用户
> show users
{
	"_id" : "admin.admin",
	"user" : "admin",
	"db" : "admin",
	"customData" : {
		"description" : "superuser"
	},
	"roles" : [
		{
			"role" : "root",
			"db" : "admin"
		}
	]
}
4、删除用户 db.dropUser(‘admin’)
> db.createUser( { user: "arslinux",  pwd: "123456", roles: [ { role: "read", db: "testdb" } ] } )
Successfully added user: {
	"user" : "arslinux",
	"roles" : [
		{
			"role" : "read",
			"db" : "testdb"
		}
	]
}
> db.dropUser('arslinux')
true
> show users
{
	"_id" : "admin.admin",
	"user" : "admin",
	"db" : "admin",
	"customData" : {
		"description" : "superuser"
	},
	"roles" : [
		{
			"role" : "root",
			"db" : "admin"
		}
	]
}
5、用户生效
1)先重新创建回用户 arslinux
> db.createUser({user:"arslinx",pwd:"123456",roles:[{role:"read",db:"testdb"}]})
Successfully added user: {
	"user" : "arslinx",
	"roles" : [
		{
			"role" : "read",
			"db" : "testdb"
		}
	]
}
2)编辑启动脚本/usr/lib/systemd/system/mongod.service,在OPTIONS= 后面增 --auth
[root@arslinux-01 ~]# vim /usr/lib/systemd/system/mongod.service
Environment="OPTIONS=--auth -f /etc/mongod.conf"
[root@arslinux-01 ~]# systemctl restart mongod
Warning: mongod.service changed on disk. Run 'systemctl daemon-reload' to reload units.
[root@arslinux-01 ~]# systemctl daemon-reload
[root@arslinux-01 ~]# systemctl restart mongod
3)加了 --auth 后,普通方法登录后,出现没有授权(not authorized)
[root@arslinux-01 ~]# mongo --host 127.0.0.1 --port 27017
MongoDB shell version v3.4.21
connecting to: mongodb://127.0.0.1:27017/
MongoDB server version: 3.4.21
> use admin
switched to db admin
> show users
2019-07-16T20:25:00.524+0800 E QUERY    [thread1] Error: not authorized on admin to execute command { usersInfo: 1.0 } :
_getErrorWithCode@src/mongo/shell/utils.js:25:13
DB.prototype.getUsers@src/mongo/shell/db.js:1539:1
shellHelper.show@src/mongo/shell/utils.js:797:9
shellHelper@src/mongo/shell/utils.js:704:15
@(shellhelp2):1:1
4)重新登录,做认证
[root@arslinux-01 ~]# mongo --host 127.0.0.1 --port 27017 -u admin -p admin122 --authenticationDatabase "admin"
可以登录成功
5)哪个库中创建的用户,需要先到哪个库认证后再操作,否则会提示验证失败
> db.createUser({user:"test1",pwd:"123aaa",roles:[{role:"readWrite",db:"db1"},{role:"read",db:"db2"}]})
Successfully added user: {
	"user" : "test1",
	"roles" : [
		{
			"role" : "readWrite",
			"db" : "db1"
		},
		{
			"role" : "read",
			"db" : "db2"
		}
	]
}
> show users
{
	"_id" : "db1.test1",
	"user" : "test1",
	"db" : "db1",
	"roles" : [
		{
			"role" : "readWrite",
			"db" : "db1"
		},
		{
			"role" : "read",
			"db" : "db2"
		}
	]
}
test1 用户对 db1 库读写,对 db2 库只读。
之所以先 use db1,表示用户在 db1 库中创建,就一定要 db1 库验证身份,即用户的信息跟随数据库。比如上述 test1 虽然有 db2 库的读取权限,但是一定要先在 db1 库进行身份验证,直接访问会提示验证失败。
> use db2
switched to db db2
> db.auth('test1','123aaa')
Error: Authentication failed.
0
> use db1
switched to db db1
> db.auth('test1','123aaa')
1
MongoDB用户角色:
- Read: 允许用户读取指定数据库
- readWrite: 允许用户读写指定数据库
- dbAdmin: 允许用户在指定数据库中执行管理函数,如索引创建、删除,查看统计或访问·system.profile
- userAdmin: 允许用户向system.users集合写入,可以找指定数据库里创建、删除和管理用户
- clusterAdmin: 只在admin数据库中可用,赋予用户所有分片和复制集相关函数的管理权限。
- readAnyDatabase: 只在admin数据库中可用,赋予用户所有数据库的读权限
- readWriteAnyDatabase: 只在admin数据库中可用,赋予用户所有数据库的读写权限
- userAdminAnyDatabase: 只在admin数据库中可用,赋予用户所有数据库的userAdmin权限
- dbAdminAnyDatabase: 只在admin数据库中可用,赋予用户所有数据库的dbAdmin权限。
- root: 只在admin数据库中可用。超级账号,超级权限
21.30 mongodb创建集合、数据管理
创建集合:
- db.version() 查看版本
- use userdb 如果库存在就切换,不存在就创建
- show dbs 查看库,此时userdb并没有出现,这是因为该库是空的,还没有任何集合,只需要创建一个集合就能看到了
- db.createCollection(name,options) 创建集合,在当前库下面创建
> db.createCollection("mycol",{capped:true,size:6142800,max:10000})
{ "ok" : 1 }
name 就是集合的名字,options 可选,用来配置集合的参数,参数如下
capped true/false (可选)如果为 true,则启用封顶集合。封顶集合是固定大小的集合,当它达到其最大大小,会自动覆盖最早的条目。如果指定 true,则也需要指定尺寸参数。
size(可选)指定最大大小字节封顶集合。如果封顶如果是 true,那么你还需要指定这个字段。单位 B
max(可选)指定封顶集合允许在文件的最大数量
数据管理:
- show collections 或 show tables 查看集合
> show collections
mycol
> show tables
mycol
- db.集合名.insert({格式:…}) 插入数据,定义格式。Account 是库名
如果集合不存在,直接插入数据,则 mongodb 会自动创建集合
> db.Account.insert({AccountID:1,UserName:"123",password:"123456"})
WriteResult({ "nInserted" : 1 })
> show tables
Account
mycol
> db.Account.insert({AccountID:2,UserName:"zhangsan",password:"abcde"})
WriteResult({ "nInserted" : 1 })
- db.集合名.update({集合名ID:…},{动作}:{“字段”:值}) 更新
> db.Account.update({AccountID:1},{"$set":{"Age":20}})
WriteResult({ "nMatched" : 1, "nUpserted" : 0, "nModified" : 1 })
- db.集合名.find() 查看所有文档
{ "_id" : ObjectId("5d2dd565a1976b473ed539f8"), "AccountID" : 1, "UserName" : "123", "password" : "123456", "Age" : 20 }
{ "_id" : ObjectId("5d2dd5c6a1976b473ed539f9"), "AccountID" : 2, "UserName" : "zhangsan", "password" : "abcde" }
- db.集合名.find({条件}) 根据条件查询
> db.Account.find({AccountID:1})
{ "_id" : ObjectId("5d2dd565a1976b473ed539f8"), "AccountID" : 1, "UserName" : "123", "password" : "123456", "Age" : 20 }
> db.Account.find({AccountID:2})
{ "_id" : ObjectId("5d2dd5c6a1976b473ed539f9"), "AccountID" : 2, "UserName" : "zhangsan", "password" : "abcde" }
- db.集合名.remove({条件}) 根据条件删除
> db.Account.remove({AccountID:1})
WriteResult({ "nRemoved" : 1 })
> db.Account.find()
{ "_id" : ObjectId("5d2dd5c6a1976b473ed539f9"), "AccountID" : 2, "UserName" : "zhangsan", "password" : "abcde" }
- db.集合名.drop() 删除所有文档,即删除集合
> db.Account.drop()
true
> show tables
mycol
- db.printCollectionStats() 查看集合状态
> db.printCollectionStats()