For The Freedom之R9000P(AMD5800h&rtx3060)安装Gentoo(一)
驰骋纵横之Gentoo安装(一)
本教程采用实体机安装,并且全程远程。之所以安装Gentoo就是应为老子他妈的看不惯windows家用版卖1000多,所以正版我直接删除,想让我在系统花钱简直是痴人说梦(虽然我确实花钱买了系统和office是系统自带的我没办法),所以我的y7000p也是专业版(滑稽),不管怎么说,我生来就是跟制度抗衡,为了自由!
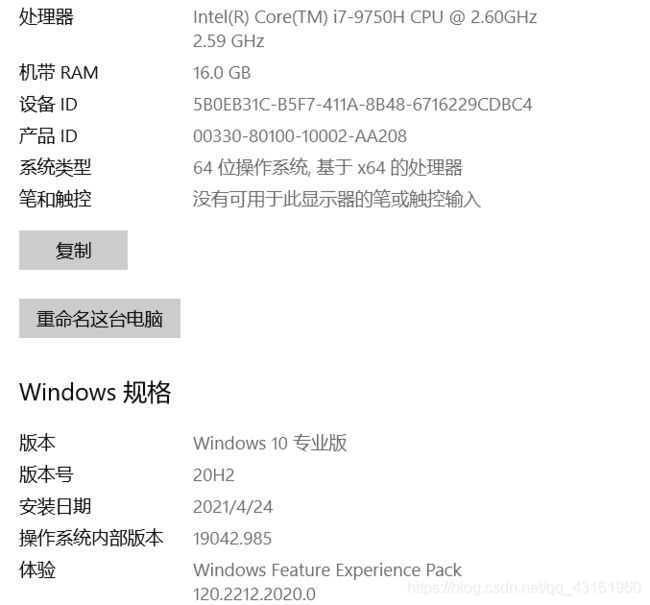
制作系统这里不再讲解,系统盘的制作跟window差不多,加载linux的安装脚本需要在bios里设置,应为没法截图就不介绍了。百度有的。
这里我在重申下为什么会把文章分为几节,并不是想水,只是技术不行,需要慢慢琢磨,内核编译经常出问题。所以这里先写到如何搭建环境。
我们从加载进去需要在服务器端输入命令开始
查看网卡
ifconfig

看到这一定会有老哥会问,咦 无线网卡呢。。。
那你输入ifconfig -a
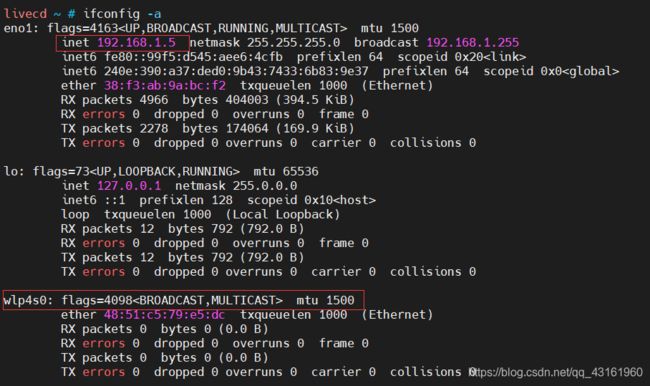
这就出来了。
1、开启ssh
rc-service sshd start
设置root密码主备远程了
passwd root
基本配置已经完成,接下来就是令人兴奋的配置了。
全程建议远程安装应为命令可以复制,毕竟当你选择了linux就是选择了舒心稳定。
安装GentooLinux的基础环境我将其分为10步,具体如下
- 分盘将硬盘分区
- 将硬盘格式化
- 创建swap,并挂载
- 下载strage
- 配置
- 进入chroot
- 挂载 boot 分区
- 更新Portage ebuild 数据库
- 选择profile
- 更新@world集合
**
分区方法一:
**
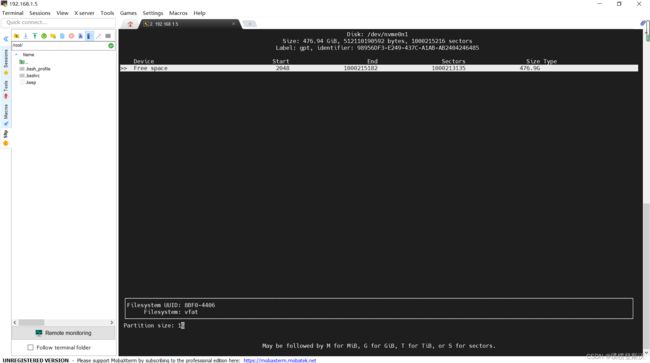
查看硬盘分区状态
fdisk -l /dev/nvme0n1

这个的意思是一块盘三个分区。
分区方法:
cfdisk -z /dev/nvme0n1

选gpt
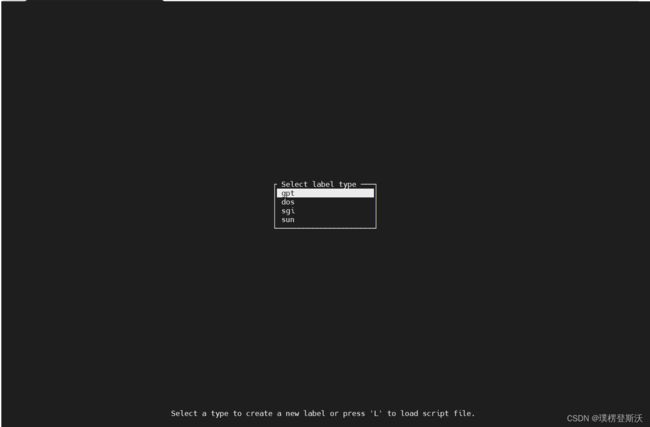
进入如下:
字符界面如下

按此方法分区,其中EFI System没有必要搞成1G,我之所以搞成1G是盘大,任性。还有一个需要强调的,如果是第一次分区,会有选项选盘的分区方式,一定要选gdb,因为可以使用UUID
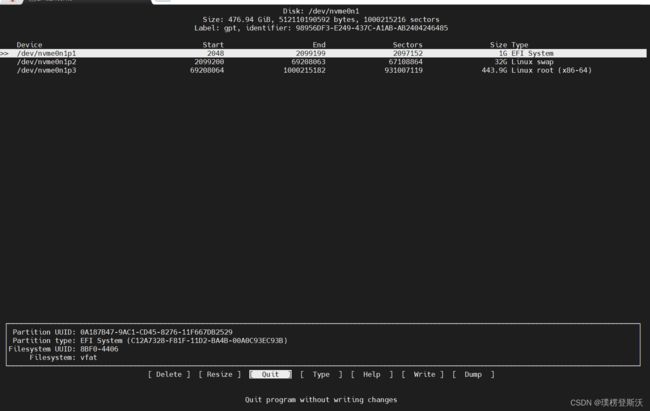
分区结束并保存

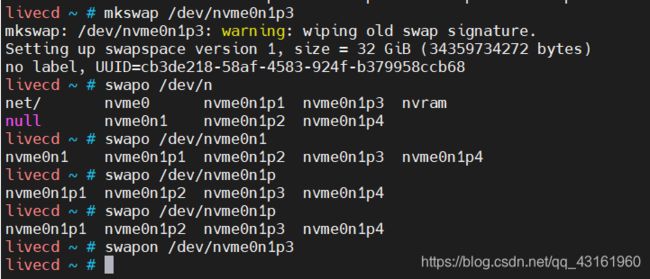
分区分好后将其格式化
mkfs.vfat /dev/nvme0n1p1
mkfs.btrfs -f /dev/nvme0n1p3
mkswap /dev/nvme0n1p2
swapon /dev/nvme0n1p2
格式化结果如下图


盘分好了,接下来就是将盘挂载到目录下
mount /dev/nvme0n1p3 /mnt/gentoo

将stage3上传至/mnt/gentoo下
这里强烈建议使用openrc,我使用systemd会出现问题。

按此方法解压
tar -pxvf stage3-amd64-openrc-20221211T170150Z.tar.xz --xattrs-include='*.*' --numeric-owner

接下来需要配置make.conf文件。
复制此命令
nano -w /mnt/gentoo/etc/portage/make.conf
按如下修改
# These settings were set by the catalyst build script that automatically
# built this stage.
# Please consult /usr/share/portage/config/make.conf.example for a more
# detailed example.
COMMON_FLAGS="-O3 -pipe -march=znver3"
CFLAGS="${COMMON_FLAGS}"
CXXFLAGS="${COMMON_FLAGS}"
FCFLAGS="${COMMON_FLAGS}"
FFLAGS="${COMMON_FLAGS}"
CPU_FLAGS_X86="aes avx avx2 f16c fma3 mmx mmxext pclmul popcnt rdrand sha sse sse2 sse3 sse4_1 sse4_2 sse4a ssse3"
# NOTE: This stage was built with the bindist Use flag enabled
#PORTDIR="/var/db/repos/gentoo"
#DISTDIR="/var/cache/distfiles"
#PKGDIR="/var/cache/binpkgs"
# This sets the language of build output to English.
# Please keep this setting intact when reporting bugs.
LC_MESSAGES=C
MAKEOPTS="-j16"
VIDEO_CARDS="radeon nvidia"
GENTOO_MIRRORS="https://mirrors.tuna.tsinghua.edu.cn/gentoo"
L10N="en-US zh-CN en zh"
LINGUAS="en_US zh_CN en zh"
GRUB_PLATFORMS="efi-64"
USE_X11="xorg xvfb xnest xephyr xcsecurity unwind udev suid elogind"
USE_KDE1="sdk sddm bluetooth -game accessibility wallpapers thunderbolt grub gtk discover networkmanager desktop-portal crypt display-manager"
USE_KDE2="firewall crash-handler kwallet plymouth"
USE_KDE_EUDEV="kmod rule-generator split-usr"
USE_KDE_ELOGIND="acl audit cgroup-hybrid pam policykit -systemd"
USE_KDE_DBUS="valgrind dbus"
USE_KDE_POLKIT="policykit kde duktape introspection"
USE_KDE_UDISKS="lvm nls acl udisks"
USE_NVIDIA="X wayland strip persistenced modules-sign modules dist-kernel vdpau nvenc nvidia acpi driver compat -kernel-open"
USE_BUMBLEBEE="bbswitch video_cards_nvidia -video_cards_nouveau"
USE_MATLAB="java nsplugin"
USE_OPENCL="nsight profiler rdma sanitizer vis-profiler"
USE_BLENER="openpgl tiff"
USE_GCC="lto cxx fortran graphite go jit modula2 objc-gc pog rush zstd pie nls"
USE_FFMPEG1="opengl openal opus x264 x265 samba oss openssl mp3 vulkan ssh appkit jpeg2k"
USE_FCITX="opencc lua table gtk2 pango xkb cairo enchant autostart introspection"
USE_OPENCL="-opencl"
USE_VNC="dri3 drm server viewer xinerama"
USE_FEH="xinerama inotify exif curl"
USE_FIRMWARE="initramfs unknown-license savedconfig redistributable compress-xz"
USE_ACPI="acpi"
USE_BLUETOOTH="cups btpclient deprecated test-programs readline obex midi mesh extra-tools experimental"
USE_WPA_SUPPLICANT="qt5 tkip wps wimax tdls smartcard privsep p2p ap eap-sim eapol-test fasteap fils hs2-0 mbo uncommon-eap-types readline ps3 tdls"
USE_BTRFS="compress"
USE_ALSA="alisp vnc"
USE="${USE_KDE1} ${USE_NVIDIA} ${USE_X11} ${USE_KDE2} ${USE_MATLAB} ${USE_KDE_ELOGIND} ${USE_KDE_EUDEV} ${USE_KDE_DBUS} ${USE_KDE_POLKIT} ${USE_KDE_UDISKS} ${USE_OPENCL} ${USE_BUMBLEBEE} ${USE_BLENER} ${USE_GCC} ${USE_FFMPEG1} ${USE_FCITX} ${USE_OPENCL} ${USE_VNC} ${USE_FEH} ${USE_FIRMWARE} ${USE_ACPI} ${USE_BLUETOOTH} ${USE_WPA_SUPPLICANT} ${USE_BTRFS} ${USE_ALSA}"
CONFIG_PROTECT="/usr/share/sddm/scripts/Xsetup"
ACCEPT_LICENSE="*"
ACCEPT_KEYWORDS="~amd64"
CHOST="x86_64-pc-linux-gnu"
INPUT_DEVICES="libinput synaptics"
#PORTAGE_TMPDIR="/tmp"
####################################################################################################
#FEATURES="ccache -test"
#CCACHE_DIR="/var/cache/ccache"
####################################################################################################
#FETCHCOMMAND="/usr/bin/aria2c -d \${DISTDIR} -o \${FILE} --allow-overwrite=true --max-tries=5 --max-file-not-found=2 --max-concurrent-downloads=5 --connect-timeout=5 --timeout=5 --split=5 --min-split-size=2M --lowest-speed-limit=20K --max-connection-per-server=9 --uri-selector=feedback \${URI}"
#RESUMECOMMAND="${FETCHCOMMAND}"
####################################################################################################
直接复制就行了。
我要安装kde和谷歌浏览器需要配置package,把下面的内容复制就行。
package的路径在/etc/portage/package.use
>=net-libs/nodejs-18.12.1 inspector
>=x11-base/xorg-server-21.1.6 xvfb
>=dev-lang/python-3.10.9:3.10 tk
# required by media-sound/pulseaudio-daemon-16.1-r6::gentoo[alsa,alsa-plugin]
# required by media-libs/libpulse-16.1-r2::gentoo
# required by kde-plasma/plasma-pa-5.26.4::gentoo
# required by kde-plasma/plasma-pa (argument)
>=media-plugins/alsa-plugins-1.2.7.1-r1 pulseaudio
>x11-drivers/nvidia-drivers-174
# required by kde-apps/kdenlive-22.12.0::gentoo
# required by kde-apps/kdemultimedia-meta-22.12.0::gentoo
# required by kde-apps/kde-apps-meta-22.12.0::gentoo[multimedia]
# required by @selected
# required by @world (argument)
>=media-video/ffmpeg-4.4.3 libass
# required by x11-drivers/xf86-video-amdgpu-22.0.0::gentoo
# required by xf86-video-amdgpu (argument)
>=x11-libs/libdrm-2.4.115 video_cards_amdgpu
>=media-sound/pulseaudio-daemon-16.1-r7 jack
# required by media-sound/jack2-1.9.22::gentoo[opus]
# required by @selected
# required by @world (argument)
>=media-libs/opus-1.3.1-r4 custom-modes
如下图所示
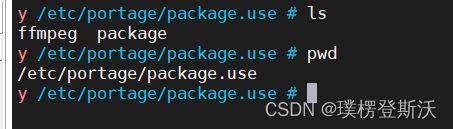
其中package的内容是

在系统stage3搭建完成输入如下命令后便可获取CPU_FLAGS_X86
emerge app-portage/cpuid2cpuflags
因为我已经写好了这个软件可以不用装
![]()
AMDcpuz
CPU_FLAGS_X86: aes avx avx2 f16c fma3 mmx mmxext pclmul popcnt rdrand sha ssie sse2 sse3 sse4_1 sse4_2 sse4a ssse3
最重要的一步完成了。接下来直接复制进入chroot模式
mkdir --parents /mnt/gentoo/etc/portage/repos.conf
cp /mnt/gentoo/usr/share/portage/config/repos.conf /mnt/gentoo/etc/portage/repos.conf/gentoo.conf
nano /mnt/gentoo/etc/portage/repos.conf/gentoo.conf
删除原来的源换成清华源
sync-uri = rsync://mirrors.tuna.tsinghua.edu.cn/gentoo-portage
结果如下
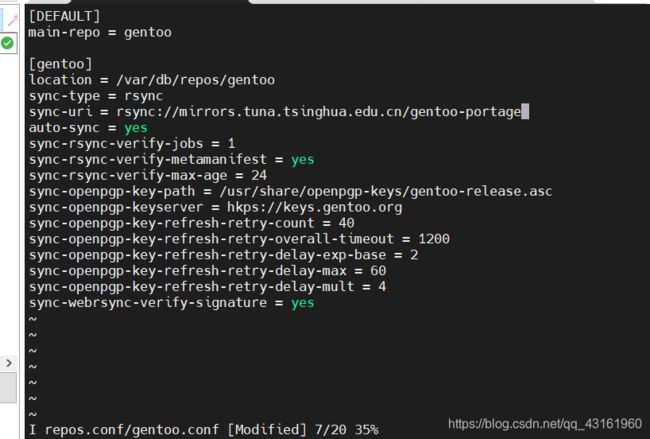
[DEFAULT]
main-repo = gentoo
[gentoo]
location = /var/db/repos/gentoo
sync-type = rsync
sync-uri = rsync://mirrors.tuna.tsinghua.edu.cn/gentoo-portage
auto-sync = yes
sync-rsync-verify-jobs = 1
sync-rsync-verify-metamanifest = yes
sync-rsync-verify-max-age = 24
sync-openpgp-key-path = /usr/share/openpgp-keys/gentoo-release.asc
sync-openpgp-keyserver = hkps://keys.gentoo.org
sync-openpgp-key-refresh-retry-count = 40
sync-openpgp-key-refresh-retry-overall-timeout = 1200
sync-openpgp-key-refresh-retry-delay-exp-base = 2
sync-openpgp-key-refresh-retry-delay-max = 60
sync-openpgp-key-refresh-retry-delay-mult = 4
sync-webrsync-verify-signature = yes
这是要进入chroot啦,第一次的内容马上就过半了
cp --dereference /etc/resolv.conf /mnt/gentoo/etc/
mount --types proc /proc /mnt/gentoo/proc
mount --rbind /sys /mnt/gentoo/sys
mount --make-rslave /mnt/gentoo/sys
mount --rbind /dev /mnt/gentoo/dev
mount --make-rslave /mnt/gentoo/dev
太麻烦了,要挂载好几遍,建议使用如下代码
mount --types proc /proc /mnt/gentoo/proc && mount --rbind /sys /mnt/gentoo/sys && mount --make-rslave /mnt/gentoo/sys && mount --rbind /dev /mnt/gentoo/dev && mount --make-rslave /mnt/gentoo/dev

chroot /mnt/gentoo /bin/bash
source /etc/profile
export PS1="(chroot) ${PS1}"
当然我还是建议直接使用如下命令,如果你只是准备安装gentoo而没有实际行动,我更建议将其写成shell脚本,这样会大大节省复制的时间
chroot /mnt/gentoo /bin/bash && source /etc/profile && export PS1="(chroot) ${PS1}"

mount /dev/nvme0n1p1 /boot/
将上面的复制运行,并及时挂载/boot。
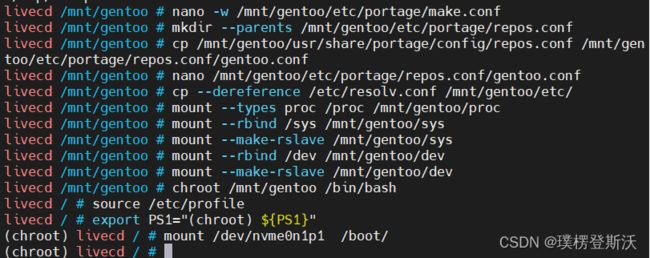
结果如上图。
那么接下来就是更新数据库了
emerge --sync

emerge-webrsync

依次运行上面的命令。
选择需要搭建的环境,我比较喜欢kde,所以我这里选择了8。
查看环境列表,默认是13
eselect profile list

eselect profile set 8

设置成功。
使用fstab。这就是为什么开局就让你们选择gdb的原因。
复制如下命令
nano /etc/hosts

并增加如下ip,这个程序是ArchLinux的
# Github Start
151.101.64.133  raw.githubusercontent.com
# Github End
在当前目录运行wget
wget https://raw.githubusercontent.com/YangMame/Gentoo-Installer/master/genfstab
赋予下载软件的权限
chmod 777 genfstab
使用软件写UUID
./genfstab / > /etc/fstab
查看

使用blkid

使用UUID编写,如下图

更新最新的gcc
emerge -av --oneshot gcc
查看使用的gcc版本选择最新的
eselect gcc list

eselect gcc set 2
emerge -av --oneshot gcc
在用最新的编译gcc。
然后使用更新。
emerge -auvDN --with-bdeps=y --autounmask-write @world
哈哈提前给大家展示下成品。
驰骋纵横Gentoo安装第一步完成。接下来就是难点了,希望大家休息好跟我走进Gentoo安装(二)。