coldfusion_使用ColdFusion 8轻松实现富Internet应用程序
coldfusion
The term Rich Internet Application (RIA) was coined by Macromedia (now Adobe) in 2002. An RIA is a web application — it runs inside a web browser, but looks and feels more like a desktop application. Gartner analysts Mark Driver, Ray Valdes, and Gene Phifer describe RIAs as "the next evolution of the Web" (PDF, 56KB).
富互联网应用程序(RIA)是由Macromedia(现为Adobe)于2002年创造的。RIA是Web应用程序,它在Web浏览器中运行,但外观上更像是桌面应用程序。 Gartner分析师Mark Driver,Ray Valdes和Gene Phifer将RIA描述为“网络的下一个发展” (PDF,56KB)。
Some of the properties that differentiate an RIA from a traditional web application are:
使RIA与传统Web应用程序区分开的一些属性是:
- a richer user experience 更丰富的用户体验
- cross-browser consistency 跨浏览器一致性
- the ability to load data without having to refresh the page 无需刷新页面即可加载数据的功能
Several different technologies can be used to create RIAs, including Adobe Flash, Adobe Flex, and Ajax. With ColdFusion 8, Adobe has given developers new tools to quickly and easily create RIAs that are either based on the Flash platform, or use plain old HTML and rely upon Ajax. This article will focus on the new Ajax family of tags and functions; I’ll guide you with step-by-step instructions through the challenge of building your first RIA — a simple user manager application — using Adobe ColdFusion 8.
可以使用几种不同的技术来创建RIA,包括Adobe Flash,Adobe Flex和Ajax。 借助ColdFusion 8,Adobe为开发人员提供了新工具,可快速轻松地创建基于Flash平台或使用纯旧HTML并依赖Ajax的RIA。 本文将重点介绍新的Ajax标签和函数系列; 我将为您提供分步指导,以克服使用Adobe ColdFusion 8构建第一个RIA(一个简单的用户管理器应用程序)带来的挑战。
要求 (Requirements)
If you’d like to play along at home, here’s what you’ll need:
如果您想在家里玩,请遵循以下条件:
ColdFusion 8 (try or buy)
ColdFusion 8( 尝试或购买 )
the code archive for this article (zip, 72Kb)
本文的代码档案 (zip,72Kb)
To follow along at home, download and unzip the code archive to the web root of your local development environment (the files exist in the RIA folder).
要在家中进行学习,请将代码存档下载并解压缩到本地开发环境的Web根目录(这些文件位于RIA文件夹中)。
入门 (Getting Started)
Before we get started, we need to set up a ColdFusion data source. Our application will make use of another ColdFusion 8 feature — an Apache Derby database. Apache Derby is a Java relational database management system that can be embedded within an application. By making use of Derby for our database, we minimize the need to install any additional software, thus ensuring compatibility across multiple operating systems.
在开始之前,我们需要设置一个ColdFusion数据源。 我们的应用程序将利用ColdFusion 8的另一个功能-Apache Derby数据库。 Apache Derby是一个Java关系数据库管理系统,可以嵌入到应用程序中。 通过将Derby用于我们的数据库,我们最大程度地减少了安装任何其他软件的需求,从而确保了在多个操作系统之间的兼容性。
Our first step is to set up a data source that will be used by ColdFusion to read and retrieve information from the database. Here’s how we set up a data source:
我们的第一步是建立一个数据源,ColdFusion将使用该数据源从数据库中读取和检索信息。 这是我们设置数据源的方式:
- Log into the ColdFusion Administrator. 登录到ColdFusion管理员。
Navigate to Data & Services and click on Data Sources.
导航到“ 数据和服务” ,然后单击“ 数据源” 。
In the form at the top of the page, enter the text "RIA" (without the quotes) in the field labeled Data Source Name.
在页面顶部的表单中,在标记为Data Source Name的字段中输入文本“ RIA”(不带引号)。
In the field labeled Driver, select Apache Derby Embedded.
在“ 驱动程序 ”字段中,选择“ Apache Derby Embedded” 。
Click the Add button.
单击添加按钮。
On the next screen, you’ll be asked for the absolute path to the database folder. Set your path to the following:
{path to web root}/RIA/database/RIA.在下一个屏幕上,将询问您数据库文件夹的绝对路径。 将路径设置为以下内容:
{path to web root}/RIA/database/RIA。- Add a brief description (this step is optional). 添加简短描述(此步骤是可选的)。
Finally, click the Submit button to create the data source.
最后,单击Submit按钮创建数据源。
查看演示应用程序 (Viewing the Demo Application)
We’re now ready to take our demo application for a test run. Point your web browser to http://{web root}/RIA, and you should see a page that looks similar to Figure 1.
现在,我们准备好将演示应用程序进行测试运行。 将您的Web浏览器指向http://{web root}/RIA ,您应该看到一个类似于图1的页面。
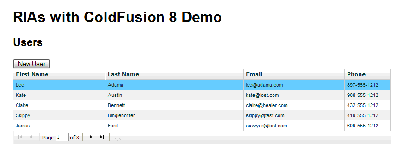
You’ll notice that our grid is nicely formatted — it displays alternating colors for the rows of data (known as zebra stripes), pagination controls, and even allows for column sorting (you can test this by clicking on the header of the column you wish to sort).
您会注意到我们的网格格式很好-它为数据行(称为斑马条纹),分页控件甚至为列排序显示交替的颜色(甚至可以通过单击列标题来进行测试)希望排序)。
To launch a user detail window, click the New User button, or double-click any row in the grid — a User Information dialog box will launch, as illustrated in Figure 2.
要启动用户详细信息窗口,请单击New User按钮,或双击网格中的任何行-将启动一个User Information对话框,如图2所示。
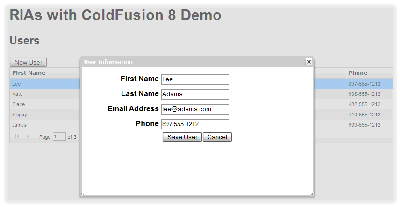
You’ll notice that the form appears within a modal window — a window that prevents a user from interacting with the underlying page. Enter or change some user data, and click Save User — doing so will close the window, and the data grid will be updated to reflect your changes.
您会注意到该表单出现在模式窗口中,该窗口可防止用户与基础页面进行交互。 输入或更改一些用户数据,然后单击“ 保存用户” -这样做将关闭窗口,并且数据网格将更新以反映您的更改。
Let’s break the code that we used to create this page into small chunks. We’ll starts with the code for displaying the grid, which is located in the file index.cfm.
让我们将用于创建此页面的代码分成小块。 我们将从显示网格的代码开始,该代码位于文件index.cfm 。
用
Normally, displaying a grid or table that has sortable columns and pagination requires a considerable amount of code (even with other frameworks). But with ColdFusion 8, it’s as simple as using the following ColdFusion tags:
通常,显示具有可排序列和分页的网格或表格需要大量代码(即使使用其他框架)。 但是使用ColdFusion 8,就像使用以下ColdFusion标签一样简单:
name="userGrid"

  format="html"

  pagesize="5"

preservePageOnSort="true"            bind="cfc:com.user.UserService.getAllUsers( {cfgridpage}, {cfgridpagesize}, {cfgridsortcolumn}, {cfgridsortdirection})"

sort="true"

stripeRows="true">
That’s all we need to do! There’s no JavaScript — there’s not even any HTML. All we need are a few lines of ColdFusion code. Let’s look at what each of the attributes in the cfgrid tag represents.
这就是我们需要做的! 没有JavaScript,甚至没有HTML。 我们需要的只是几行ColdFusion代码。 让我们看一下cfgrid标记中的每个属性代表什么。
name– This attribute specifies the name of the grid. This also how you reference the grid within JavaScript.name–此属性指定网格的名称。 这也是在JavaScript中引用网格的方式。format– This attribute determines the format that ColdFusion should use to build the grid. To create an AJAX grid, as we’ve done in the above example, specify "HTML".format–此属性确定ColdFusion用于构建网格的格式。 如上例中所述,要创建AJAX网格,请指定“ HTML”。pageSize– This attribute defines the number of items to display per page.pageSize–此属性定义每页显示的项目数。bind– This attribute tells ColdFusion from where to retrieve the data that populates the grid. In the above example, we’re telling ColdFusion to use the method namedgetAllUsersin a ColdFusion Component (CFC) namedUserServicein thecom/user/directory. Note that when we’re invoking CFCs in ColdFusion, we use the dot notation to specify the path to the CFC. Also note that we’re passing in some arguments to thegetAllUsersmethod, namely{cfgridpage},{cfgridpagesize},{cfgridsortcolumn}, and{cfgridsortdirection}. These variables describe the current state of the grid, and how we need to retrieve our information to sort or paginate the grid.bind–此属性告诉ColdFusion从何处检索填充网格的数据。 在上面的示例中,我们告诉ColdFusion在com/user/目录中名为UserService的ColdFusion组件(CFC)中使用名为getAllUsers的方法。 请注意,当我们在ColdFusion中调用CFC时,我们使用点表示法指定CFC的路径。 还要注意,我们向getAllUsers方法传递了一些参数,即{cfgridpage},{cfgridpagesize},{cfgridsortcolumn}和{cfgridsortdirection}。 这些变量描述了网格的当前状态,以及我们如何检索信息以对网格进行排序或分页。sort– This attribute tells ColdFusion that the columns are sortable.sort–此属性告诉ColdFusion列是可排序的。preservePageOnSort– This attribute controls whether the current page should be redrawn when the user performs a sort of the data (for example, when a user is viewing page 2, and they resort the data, show page 2 of the new dataset). If you don’t set this value, the grid will be reset to page 1 whenever the grid is sorted.preservePageOnSort–此属性控制当用户执行某种数据时(例如,当用户查看第2页并且他们求助于数据时,显示新数据集的第2页)是否应重绘当前页面。 如果未设置此值,则每当对网格排序时,网格将重置为第1页。stripeRows– This attribute tells ColdFusion to alternate the row colors.stripeRows–此属性告诉ColdFusion替换行颜色。
There are many other attributes that can be used to dictate how the grid will look and behave. For more information, check out the LiveDocs for the cfgrid element.
还有许多其他属性可用于指示网格的外观和行为。 有关更多信息,请查看cfgrid中的cfgrid元素 。
The next group of tags,
下一组标签
name– This attribute contains as a value the name of the element (query column) that will be used to populate this column.name此属性包含将用于填充此列的元素(查询列)的名称作为值。header– This attribute is the text that is displayed in the column header.header–此属性是列标头中显示的文本。width– This attribute specifies the width of the column.width–此属性指定列的宽度。
Note: The userID is not displayedYou may notice that our data source retrieves a userId column, but hides it with the attribute display="false". The value of userId is used to uniquely identify this user in our database — we need this value for a selected row so that we can retrieve and display all of the user’s information in the User Information window.
注意:未显示userID 您可能会注意到,我们的数据源检索到一个userId列,但使用属性display="false"将其隐藏。 userId的值用于在数据库中唯一标识该用户-我们需要此值用于选定的行,以便我们可以在“用户信息”窗口中检索并显示所有用户信息。
There are many other attributes that can be set to dictate how a grid column will look and behave. For more information, check out the LiveDocs help for
可以设置许多其他属性来指示网格列的外观和行为。 有关更多信息,请查看
Let’s now take a look at the CFC that’s referenced in the bind attribute of our
现在让我们看一下
使用queryConvertForGrid检索所有用户 (Retrieving All Users with queryConvertForGrid)
Here’s the code for our queryConvertForGrid method:
这是我们的queryConvertForGrid方法的代码:
SELECT userId,firstName,lastName,emailAddress,phone

FROM  users


ORDER BY #arguments.cfgridsortcolumn# #arguments.cfgridsortdirection#


ORDER BY lastName ASC
This is a very basic function that accepts four arguments:
这是一个非常基本的函数,它接受四个参数:
cfgridpagecfgridpagecfgridpagesizecfgridpagesizecfgridsortcolumncfgridsortcolumncfgridsortdirectioncfgridsortdirection
These arguments match the arguments that we specified in the bind attribute of our
这些参数与我们在bind属性中指定的参数匹配。
One thing that’s worth noting about the access attribute set to "remote".
关于access属性设置为"remote" 。
The function runs a very simple query against the users table in our database, and uses the arguments cfgridsortcolumn and cfgridsortdirection to order the results accordingly. If both of these values are empty strings, the results are sorted by last name.
该函数对数据库中的users表运行非常简单的查询,并使用cfgridsortcolumn和cfgridsortdirection参数对结果进行相应排序。 如果这两个值都是空字符串,则结果按姓氏排序。
Finally, we use queryConvertForGrid function. queryConvertForGrid is a native ColdFusion function, and exists solely for the purpose of taking the results of a query and formatting them in a way that they can be used to automatically populate a
最后,我们使用queryConvertForGrid函数返回的值。 queryConvertForGrid是一个本机ColdFusion函数,并且仅出于获取查询结果并以一种可用于自动填充
- the query result 查询结果
- the page number requested 请求的页码
- the page size 页面大小
It returns a ColdFusion structure that’s formatted in such a way that the
它返回一个ColdFusion结构,该结构的格式使
将侦听器添加到网格 (Adding a Listener to the Grid)
Now we’ll explore the task of opening the details window. Before we delve into the details, lets look at these two lines of code from index.cfm:
现在,我们将探讨打开详细信息窗口的任务。 在深入研究细节之前,让我们看一下index.cfm这两行代码:
The first line simply tells ColdFusion that the first time an Ajax call is made, it should run the initGrid JavaScript function. The second line tells ColdFusion that the ColdFusion elements we’ll be using will require that we load some libraries in the main page.
第一行只是告诉ColdFusion,第一次进行Ajax调用时,它应该运行initGrid JavaScript函数。 第二行告诉ColdFusion,我们将要使用的ColdFusion元素将要求我们在主页中加载一些库。
The initGrid JavaScript function simply adds a listener to the grid. With this listener in place, the showUser JavaScript function will be called when a row is double-clicked. The code for initGrid looks like this:
initGrid JavaScript函数只是将一个侦听器添加到网格中。 放置此侦听器后,双击一行将调用showUser JavaScript函数。 initGrid的代码如下所示:
function initGrid(){
var grid = ColdFusion.Grid.getGridObject("userGrid");
grid.on("rowdblclick", showUserForm);
}
The first line in theinitGridmethod provides us with an instance of the grid nameduserGrid, which is the value we specified in the name attribute of the.The second line sets the listener for the
rowdblclickevent, and specifies that theshowUserFormfunction should be called when this event occurs. ColdFusion actually uses the Ext JS JavaScript library to create the grid, sorowdblclickis an event that's native to the grid object. More information about the Ext JS grid object can be found at the ExtJS site.Now that we've told the grid to run
showUserFormwhen a row is double-clicked, let's look at the code that displays the details window.Displaying a Details Window
First up, here's the code that comprises the
showUserFormmethod:The first line in the method above retrieves the
userIdof the selected row.ColdFusion.getElementValueaccepts three arguments:
function initGrid(){
var grid = ColdFusion.Grid.getGridObject("userGrid");
grid.on("rowdblclick", showUserForm);
}
The first line in theinitGridmethod provides us with an instance of the grid nameduserGrid, which is the value we specified in the name attribute of the.The second line sets the listener for the
rowdblclickevent, and specifies that theshowUserFormfunction should be called when this event occurs. ColdFusion actually uses the Ext JS JavaScript library to create the grid, sorowdblclickis an event that's native to the grid object. More information about the Ext JS grid object can be found at the ExtJS site .Now that we've told the grid to run
showUserFormwhen a row is double-clicked, let's look at the code that displays the details window.Displaying a Details Window
First up, here's the code that comprises the
showUserFormmethod:The first line in the method above retrieves the
userIdof the selected row.ColdFusion.getElementValueaccepts three arguments:
- the name of the control we want to look at 我们要查看的控件的名称
- the name of the form that the items belongs to 项目所属表格的名称
- the attribute we're looking for 我们正在寻找的属性
In this case, we're telling ColdFusion to retrieve the userId attribute from the userGrid control in the userGridForm form.
在这种情况下,我们告诉ColdFusion从userGridForm表单的userGrid控件中检索userId属性。
We then set a variable named url, which will store the URL to which we'll take the user. We append the userId as a parameter to the URL. This URL is used in the next line, which makes an http request to the URL and displays the result inside a userWin. You can use the ColdFusion.navigate method to populate any HTML element on a page, such as a div. The last line will display the
然后,我们设置一个名为url的变量,该变量将存储将用户带到的URL。 我们将userId作为参数附加到URL。 该URL用于下一行,该URL向URL发出http请求,并将结果显示在名为userWin的userWin 。 您可以使用ColdFusion.navigate方法填充页面上的任何HTML元素,例如div 。 最后一行将显示
Next up is the code for creating a JavaScript-based popup window using the
接下来是使用
Pretty simple, huh? Let's look at what each of these attributes represents:
很简单吧? 让我们看看这些属性分别代表什么:
title- This attribute specifies the text that will appear at the top of the window.title此属性指定将显示在窗口顶部的文本。initShow- This attribute can be used to control whether or not the window is initially visible.initShow此属性可用于控制窗口最初是否可见。modal- This attribute specifies whether the popup window is modal or not. Remember, modal windows prevent the user from interacting with the underlying page.modal-此属性指定弹出窗口是否为模态。 请记住,模态窗口会阻止用户与基础页面进行交互。center- If this attribute is set totrue, the popup window will be centered on the screen.center如果此属性设置为true,则弹出窗口将在屏幕上居中。
There are many other attributes that can be used to dictate how the grid will look and behave. For more information, check out the LiveDocs for
还有许多其他属性可用于指示网格的外观和行为。 有关更多信息,请查看
The next part of our application that we'll look at is the form.
我们将要看的应用程序的下一部分是表单。
创建表格 (Creating the Form)
Here's our code for creating a user form:
这是用于创建用户表单的代码:
There's nothing terribly complex going on here.
这里没有复杂的事情发生。
First, we use UserService object and call the getUser method, passing in the URL variable named userId.
首先,我们使用UserService对象的实例并调用getUser方法,并传入名为userId的URL变量。
The rest of the code simply populates the form with the information retrieved from the database. If this is a new user, the result retrieved from the database will contain empty strings, so our form will be empty.
其余代码仅使用从数据库中检索到的信息填充表单。 如果这是新用户,则从数据库检索的结果将包含空字符串,因此我们的表单将为空。
One other point that's worth mentioning is how the Submit and Cancel buttons operate. The Submit button calls a JavaScript function named submitForm, while the Cancel button simply calls ColdFusion.Window.hide("userWin"), which hides the div with an id similar to "{formFieldName}Error". This id will be used to display any error messages that are returned when the form is validated.
值得一提的另一点是“ 提交”和“ 取消”按钮的操作方式。 “ 提交”按钮调用一个名为submitFormJavaScript函数,而“ 取消”按钮仅调用ColdFusion.Window.hide("userWin") ,该ColdFusion.Window.hide("userWin")隐藏div ,其id类似于"{formFieldName}Error" 。 此ID将用于显示验证表单时返回的所有错误消息。
The final point worth making about this page is that it contains no JavaScript. Since this form will exist within our main page, we can store all of our JavaScript references there.
关于该页面的最后一点是,它不包含JavaScript。 由于此表单将存在于我们的主页中,因此我们可以在其中存储所有JavaScript引用。
处理表格 (Processing the Form)
Let's take a look at the submitForm function in index.cfm:
让我们看一下index.cfm中的submitForm函数:
function submitForm() {

clearErrors();

ColdFusion.Ajax.submitForm("userForm", "userForm_submit.cfm", submitCallback, errorHandler);

    }
The first task performed by the function above is to call the clearErrors methods, which clears any form validation errors that may exist in our form from previous usage. The second line of the code above performs the post -- the ColdFusion.Ajax.submitForm method takes the values of all of the items in the form named userForm, and posts them to the URL userForm_Submit.cfm. When the server sends back a response, the submitCallback function is called, and should there be any errors, the errorHandler method is executed.
上面的函数执行的第一个任务是调用clearErrors方法,该方法将清除以前使用过的表单中可能存在的任何表单验证错误。 上面代码的第二行执行发布操作ColdFusion.Ajax.submitForm方法以名为userForm的形式获取所有项目的值,并将其发布到URL userForm_Submit.cfm 。 服务器发送回响应时,将submitCallback函数,并且如果出现任何错误,将执行errorHandler方法。
Next let's take a look at the userForm_submit.cfm file. This is the file that we use to validate our form and save our user details:
接下来,让我们看一下userForm_submit.cfm文件。 这是我们用来验证表单并保存用户详细信息的文件:
#serializeJSON(errors)#
In this page, we've created a variable named errors that will hold any information relating to failed validation. The validation we're applying in this example is quite simple -- it checks to make sure that firstName and lastName are not empty strings, and that emailAddress and phone contain a valid email address and telephone number, respectively.
在此页面中,我们创建了一个名为errors的变量,该变量将保存与验证失败有关的所有信息。 我们在此示例中应用的验证非常简单-检查以确保firstName和lastName不是空字符串,并且emailAddress和phone分别包含有效的电子邮件地址和电话号码。
Once our data has been validated (assuming that our errors variable is empty), we can safely save it to our database. Once again, we create an instance of our UserService and call the save method, passing in the form scope as the argumentCollection. Our save method contains logic to determine whether we're dealing with a new user (that needs to be inserted) or an existing user (that needs to be updated).
验证我们的数据后(假设我们的errors变量为空),我们可以安全地将其保存到数据库中。 再次,我们创建UserService的实例并调用save方法,将表单范围作为argumentCollection传递。 我们的save方法包含确定我们要处理的是新用户(需要插入)还是现有用户(需要更新)的逻辑。
If our errors variable is not empty, it means that our data contains errors. We need to pass them along in a way that will indicate to the main page that we encountered problems. This is best accomplished using JSON (JavaScript Object Notation), and fortunately, ColdFusion 8 has a native function, serializeJSON, to serialize a ColdFusion object into a JSON string.
如果我们的errors变量不为空,则意味着我们的数据包含错误。 我们需要以某种方式将它们传递给主页,以表明我们遇到了问题。 最好使用JSON(JavaScript对象表示法)来完成此操作,幸运的是,ColdFusion 8具有本机函数serializeJSON ,用于将ColdFusion对象序列化为JSON字符串。
By wrapping this call to this function in deserializeJSON that accepts a JSON string and returns a comparable ColdFusion data structure.
通过将此调用包装在deserializeJSON的ColdFusion函数,该函数接受JSON字符串并返回类似的ColdFusion数据结构。
To see how we use the results from this page, let's revisit index.cfm and look at the code in our submitCallback method:
要查看如何使用此页面上的结果,让我们重新访问index.cfm并查看我们的submitCallback方法中的代码:
function submitCallback(response){

      var errors = ColdFusion.JSON.decode(response);

      var valid = true;

      for(i in errors){

    document.getElementById(i+"Error").innerHTML = errors[i];

    valid = false;

      }

  if(valid){

    ColdFusion.Window.hide("userWin");

        ColdFusion.Grid.refresh("userGrid", true);

  }

    }
As you can see, the submitCallback function takes one argument, which is the response that was returned from the server when the form was submitted. Our first task is to decode the JSON string that's returned using ColdFusion.JSON.decode -- this will take the JSON string and turn it into a JavaScript object. As you may have suspected, there also exists a function named ColdFusion.JSON.encode that accepts a JavaScript object, and returns a JSON string.
如您所见, submitCallback函数采用一个参数,它是提交表单时从服务器返回的响应。 我们的第一个任务是使用ColdFusion.JSON.decode解码返回的JSON字符串-这将获取JSON字符串并将其转换为JavaScript对象。 您可能已经怀疑,还存在一个名为ColdFusion.JSON.encode的函数,该函数接受JavaScript对象并返回JSON字符串。
If there are any errors in the errors JavaScript object, we loop over the elements in the object and set the innerHTML of the corresponding div for the form field. (These are the same divs that are cleared when the clearErrors method is called.) If any errors are returned, we set the variable valid to false.
如果错误JavaScript对象中存在任何错误,我们将遍历对象中的元素,并为form字段设置相应div的innerHTML。 (与调用clearErrors方法时清除的div相同。)如果返回任何错误,则将变量valid设置为false 。
If there are no errors returned, and the form is valid, we can happily close the ColdFusion.Window.hide("show"). Finally, we refresh the grid using ColdFusion.Grid.refresh so that any changes that were made will be reflected in the grid.
如果没有错误返回并且表单有效,则可以使用ColdFusion.Window.hide("show")方法愉快地关闭ColdFusion.Grid.refresh刷新网格,以便所做的任何更改都将反映在网格中。
The only thing we haven't covered yet is how we display the form to create a new user.
我们还没有介绍的唯一内容是如何显示表单以创建新用户。
创建一个新用户 (Creating a New User)
Our users can create a new user by clicking the New User button. This button calls the newUser JavaScript function:
我们的用户可以通过单击“新用户”按钮来创建新用户。 此按钮调用newUser JavaScript函数:
function newUser(){

  var url = "userForm.cfm" ;

  ColdFusion.navigate(url, "userWin");

  ColdFusion.Window.show("userWin");

}
As you can see from the code above, this function is similar to the showUserForm function, with one exception -- we're not passing a userId in the URL. This approach will ensure that the
从上面的代码中可以看到,此函数类似于showUserForm函数,但有一个例外-我们未在URL中传递userId 。 这种方法将确保
You may have noticed the minimal amount of JavaScript in our code; if you look at the source code, you'll see a lot more. Whenever you use any of the ColdFusion Ajax components, ColdFusion will automatically pull in the JavaScript that's necessary for your component to function.
您可能已经注意到我们代码中JavaScript数量最少; 如果您查看源代码,将会看到更多。 每当您使用任何ColdFusion Ajax组件时,ColdFusion都会自动提取组件正常运行所必需JavaScript。
摘要 (Summary)
It may seem like there was a lot involved in this example, but given what we've accomplished -- a cross-browser compatible, rich interface for viewing and managing a list of users -- there really wasn't that much to it. Remember that our grid contains sortable columns and pagination, and we're making Ajax calls to refresh the grid as well as to display and process our form.
在这个示例中似乎涉及了很多事情,但是鉴于我们已经完成了工作-跨浏览器兼容的丰富界面,用于查看和管理用户列表-确实没有那么多。 请记住,我们的网格包含可排序的列和分页,并且我们正在进行Ajax调用以刷新网格以及显示和处理表单。
All of this was achieved with four relatively small ColdFusion files and about 30 lines of JavaScript. I think that speaks volumes about ColdFusion's capabilities for helping you create RIAs without getting bogged down in all the intricacies of JavaScript, Ajax, and browser compatibility issues.
所有这些都是通过四个相对较小的ColdFusion文件和大约30行JavaScript来实现的。 我认为这足以说明ColdFusion的功能,可以帮助您创建RIA,而不会陷入JavaScript,Ajax和浏览器兼容性问题的所有复杂情况。
This example merely scratches the surface of ColdFusion's Ajax capabilities. For more information on creating Ajax applications with ColdFusion 8, check out the ColdFusion Developer's Guide.
这个例子只是在刮擦ColdFusion的Ajax功能的表面。 有关使用ColdFusion 8创建Ajax应用程序的更多信息,请参阅ColdFusion开发人员指南 。
翻译自: https://www.sitepoint.com/applications-coldfusion-8/
coldfusion