微信小程序云开发学习笔记
(官网)
1、创建小程序选择云开发

对应的环境
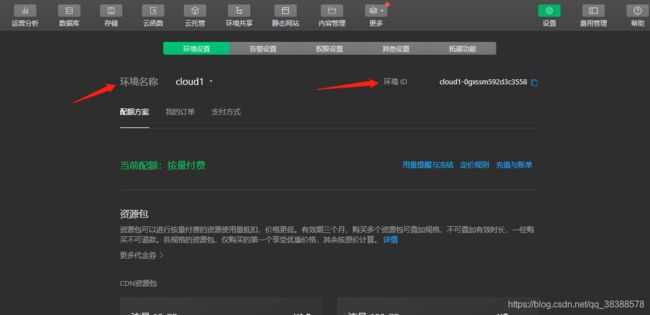
在app.js中配置环境Id
//app.js
App({
  onLaunch: function () {
    if (!wx.cloud) {
      console.error('请使用 2.2.3 或以上的基础库以使用云能力')
    } else {
      wx.cloud.init({
        // env 参数说明:
        //   env 参数决定接下来小程序发起的云开发调用(wx.cloud.xxx)会默认请求到哪个云环境的资源
        //   此处请填入环境 ID, 环境 ID 可打开云控制台查看
        //   如不填则使用默认环境(第一个创建的环境)
         env: 'cloud1-0gxssm592d3c3558',
        traceUser: true,
      })
    }

    this.globalData = {}
  }
})
获取openId的云函数
const cloud = require('wx-server-sdk')

cloud.init({
  env: cloud.DYNAMIC_CURRENT_ENV
})

// 获取openId云函数入口函数
exports.main = async (event, context) => {
  // 获取基础信息
  const wxContext = cloud.getWXContext()

  return {
    openid: wxContext.OPENID,
    appid: wxContext.APPID,
    unionid: wxContext.UNIONID,
  }
}
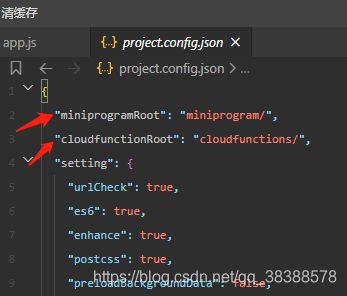
project.config文件定义云函数及项目目录文件名,修改时一起修改
2、数据库

新建数据库
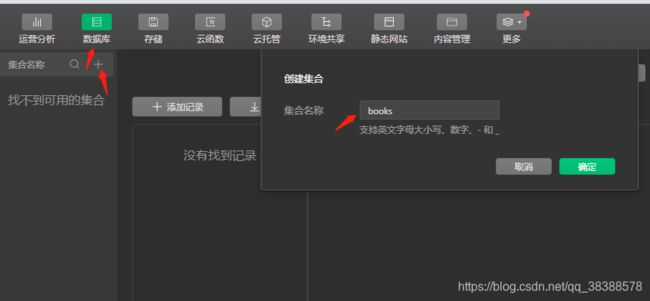
新增数据


2-1、查询
1、查询所有
index.js
const db = wx.cloud.database()
Page({
  data: {
    books:[]
  },
  onLoad (options) {
    db.collection('books').get().then(res=>{
      this.setData({
        books:res.data
      })
    })
  },
})
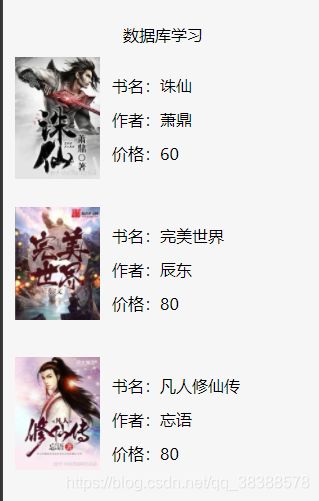
index.html
<view class="container">
  <view class="title">数据库学习view>
  <view wx:for="{{books}}" wx:key='_id' class="book_item">
    <image class="book_img" mode="widthFix" src="{{item.img}}">image>
    <view class="book_info">
      <view>书名:{{item.name}}view>
      <view>作者:{{item.author}}view>
      <view>价格:{{item.price}}view>
    view>
  view>
view>
where 方法可以指定查询条件(查询价格为80的数据)
db.collection(‘books’).where({
price:80
}).get().then(res=>{
this.setData({
books:res.data
})
})
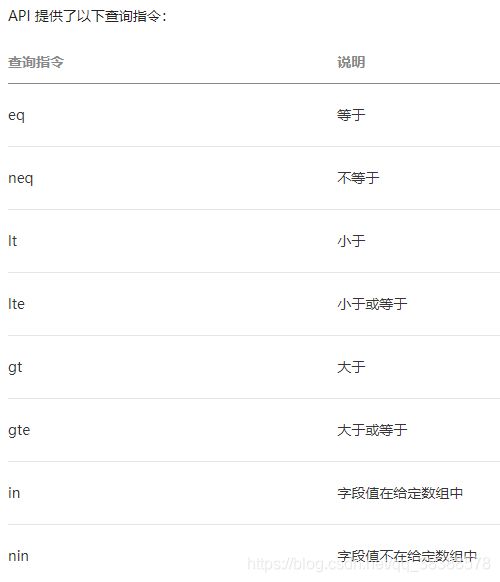
2、查询指令:指令都暴露在 db.command 对象上
 onLoad (options) {
    const _ = db.command
    db.collection('books').where({
      // gt 方法用于指定一个 "大于" 条件,此处 _.gt(80) 是一个 "大于 80" 的条件
      price: _.gt(80)
    })
    .get().then(res=>{
          this.setData({
            books:res.data
          })
        })
    },
##3、 逻辑指令and、 or
 const _ = db.command
    db.collection('books').where({
        and 方法用于指定一个 "与" 条件,此处表示需同时满足 _.gt(30) 和 _.lt(80) 两个条件
      //price:  _.gt(30).and(_.lt(90))
      // or 方法用于指定一个 "或" 条件,此处表示需满足 _.eq(0) 或 _.eq(90)
      price:  _.eq(60).or(_.eq(90))
    })
    .get().then(res=>{
          this.setData({
            books:res.data
          })
        })
    },
2-2、更新
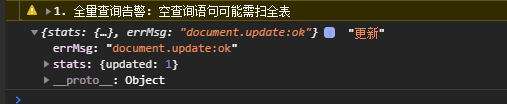
局部更新update
updateBook(){
      db.collection('books').doc('8937eaa9611a05f604ef5b3065050162').update({
        // data 传入需要局部更新的数据
        data: {
          // 表示将 done 字段置为 true
          price: 120
        },
        success: function(res) {
          console.log(res,'更新')
          this.getBooks()
        }
      })
    }

更新失败:因为数据是在云开发控制台手动添加的,没有_openid字段,通过小程序方法创建的数据携带_openid,可以更改
除了用指定值更新字段外,数据库 API 还提供了一系列的更新指令用于执行更复杂的更新操作,更新指令可以通过 db.command 取得:

例:将小程序端新增的数据价格加10
updateBook(){
    const _ = db.command
    db.collection('books').doc('8937eaa9611a18ac04f2a1480028048e').update({
        // data 传入需要局部更新的数据
        data: {
          // 表示将 price 加10
          price:_.inc(10)
        }
      }).then(res=>{
        console.log(res,'更新');
        this.getBooks()
      })
  },

替换更新:如果需要替换更新一条记录,可以在记录上使用 set 方法,替换更新意味着用传入的对象替换指定的记录:
 updateBook(){
    db.collection('books').doc('8937eaa9611a18ac04f2a1480028048e').set({
        // data 传入需要更新的数据
        data: {
          price:150,
          name:'一念永恒',
          author:'白小纯'
        }
      }).then(res=>{
        console.log(res,'更新');
        this.getBooks()
      })
  },

2-3、新增
 <view>书名:<input  bindinput='addBookName' />view>
  <view>作者:<input bindinput='addBookAuthor' />view>
  <view>价格:<input bindinput='addBookPrice' />view>
  <button type="primary" bindtap="addBook">新增button>
 addBookName(e){
    console.log(e.detail.value,'书名');
    this.setData({
      bookName:e.detail.value
    })
  },
  addBookAuthor(e){
    this.setData({
      bookAuthor:e.detail.value
    })
  },
  addBookPrice(e){
    this.setData({
      bookPrice:e.detail.value
    })
  },
  addBook(){
    db.collection('books').add({
      // data 字段表示需新增的 JSON 数据
      data: {
       name:this.data.bookName,
       price:parseInt(this.data.bookPrice),
       author:this.data.bookAuthor,
      }
    })
    .then(res => {
      console.log(res,'新增')
    })
  }
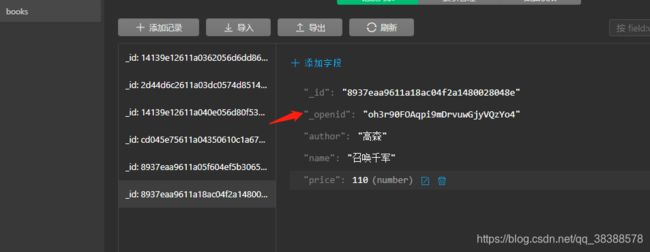
新增的数据带有_openid,可以测试修改
 <button type="primary" bindtap="updateBook">更新</button>
 updateBook(){
      db.collection('books').doc('8937eaa9611a18ac04f2a1480028048e').update({
        // data 传入需要局部更新的数据
        data: {
          // 表示将 done 字段置为 true
          price: 120
        }
      }).then(res=>{
        console.log(res,'更新');
        this.getBooks()
      })
  },
2-4、删除
删除一条记录remove
删除手动在云开发控制台新增的数据(无_openid)
 deleteBook(){
    db.collection('books').doc('14139e12611a040e056d80f5374d86d1').remove().then(res=>{
      console.log(res,'删除');
      this.getBooks()
    })
  },

更换在小程序端创建的数据
 deleteBook(){
    db.collection('books').doc('8937eaa9611a18ac04f2a1480028048e').remove().then(res=>{
      console.log(res,'删除');
      this.getBooks()
    })
  },

删除多条记录(可通过 where 语句选取多条记录执行删除,只有有权限删除的记录会被删除)
deleteBook(){
    db.collection('books').where({
      price: 150
    }).remove().then(res=>{
      console.log(res,'删除');
      this.getBooks()
    })
  },

直接操作数据库,只删除了一条,云函数可以删除多条
完整例子
const db = wx.cloud.database()  //获取数据库的引用
const _ = db.command     //获取数据库查询及更新指令
db.collection("china")  //获取集合china的引用
  .where({              //查询的条件指令where
    gdp: _.gt(3000)     //查询筛选条件,gt表示字段需大于指定值。
  })
  .field({             //显示哪些字段
    _id:false,         //默认显示_id,这个隐藏
    city: true,
    province: true,
    gdp:true
  })
  .orderBy('gdp', 'desc')  //排序方式,降序排列
  .skip(0)                 //跳过多少个记录(常用于分页),0表示这里不跳过
  .limit(10)               //限制显示多少条记录,这里为10

  .get()                   //获取根据查询条件筛选后的集合数据
  .then(res => {
    console.log(res.data)
  })
  .catch(err => {
    console.error(err)
  })
分页查询
const cloud = require('wx-server-sdk')
cloud.init({
  env: cloud.DYNAMIC_CURRENT_ENV
})
const db = cloud.database()
const MAX_LIMIT = 100
exports.main = async (event, context) => {
  // 先取出集合记录总数
  const countResult = await db.collection('books').count()
  const total = countResult.total
  // 计算需分几次取
  const batchTimes = Math.ceil(total / 100)
  // 承载所有读操作的 promise 的数组
  const tasks = []
  for (let i = 0; i < batchTimes; i++) {
    const promise = db.collection('books').skip(i * MAX_LIMIT).limit(MAX_LIMIT).get()
    tasks.push(promise)
  }
  // 等待所有
  return tasks
}
3、存储
3-1、上传文件
上传图片
uploadFile(){
    wx.chooseImage({
      success (res) {
        console.log(res)
        const tempFilePaths = res.tempFilePaths;
        wx.cloud.uploadFile({
          cloudPath: 'example.png', // 上传至云端的路径
          filePath: tempFilePaths[0], // 小程序临时文件路径
          success: res => {
            // 返回文件 ID
            console.log(res.fileID)
          },
          fail: console.error
        })
      }
    })
  }


上传图片并展示(根据文件ID获取临时路径)
 uploadFile(){
    wx.chooseImage({
      success: (res) =>{
        const tempFilePaths = res.tempFilePaths;
        wx.cloud.uploadFile({
          cloudPath: 'example.png', // 上传至云端的路径
          filePath: tempFilePaths[0], // 小程序临时文件路径
          success: res => {
            // 返回文件 ID
            wx.cloud.getTempFileURL({
              fileList: [res.fileID],
              success: res => {
                // fileList 是一个有如下结构的对象数组
                // [{
                //    fileID: 'cloud://xxx.png', // 文件 ID
                //    tempFileURL: '', // 临时文件网络链接
                //    maxAge: 120 * 60 * 1000, // 有效期
                // }]
                console.log(res.fileList[0].tempFileURL)
                this.setData({
                  imgUrl:res.fileList[0].tempFileURL
                })
                console.log(this.data.imgUrl)
              },
              fail: console.error
            })

          },
          fail: console.error
        })
      }
    })
  }```
上传视频
```javascript
  uploadFile(){
    wx.chooseVideo({
      sourceType: ['album','camera'],
      maxDuration: 60,
      camera: 'back',
      success:(res)=> {
        wx.showLoading({
          title: '上传中',
        })
        console.log(res.tempFilePath)
        wx.cloud.uploadFile({
          cloudPath: 'video.mp4', // 上传至云端的路径
          filePath: res.tempFilePath, // 小程序临时文件路径
          success: res => {
            // 返回文件 ID
            console.log(res.fileID)
            wx.cloud.getTempFileURL({
              fileList: [res.fileID],
              success: res => {
                // fileList 是一个有如下结构的对象数组
                // [{
                //    fileID: 'cloud://xxx.png', // 文件 ID
                //    tempFileURL: '', // 临时文件网络链接
                //    maxAge: 120 * 60 * 1000, // 有效期
                // }]
                console.log(res.fileList)
                this.setData({
                  videoSrc:res.fileList[0].tempFileURL
                })
                wx.hideLoading()
              },
              fail: console.error
            })
          },
          fail: console.error
        })
      }
    })
  }
上传文件
uploadFile(){
    wx.chooseMessageFile({
      count: 1,
      type: 'file',
      success: (res)=> {
        // tempFilePath可以作为img标签的src属性显示图片
        const tempFilePaths = res.tempFiles
        console.log(tempFilePaths,'返回路径')
        wx.cloud.uploadFile({
          cloudPath: 'example.pdf', // 上传至云端的路径
          filePath: tempFilePaths[0].path, // 小程序临时文件路径
          success: res => {
            // 返回文件 ID
            console.log(res.fileID)
          },
          fail: console.error
        })
      }
    })
  },

下载图片
 downloadFile(){
    wx.cloud.downloadFile({
      fileID: 'cloud://cloud1-0gxssm592d3c3558.636c-cloud1-0gxssm592d3c3558-1256078064/example.png', // 文件 ID
      success: res => {
        // 返回临时文件路径
        console.log(res.tempFilePath,'下载')
        wx.saveImageToPhotosAlbum({
          filePath:res.tempFilePath,
          success:(res)=> {
            console.log(res,'保存')
          }
        })
      },
      fail: console.error
    })
  }

下载文件并打开
downloadFile(){
    wx.cloud.downloadFile({
      fileID: 'cloud://cloud1-0gxssm592d3c3558.636c-cloud1-0gxssm592d3c3558-1256078064/example.pdf', // 文件 ID
      success: res => {
        // 返回临时文件路径
        console.log(res.tempFilePath,'下载')
        wx.openDocument({
          filePath: res.tempFilePath,
          success: (res)=> {
            console.log('打开文档成功')
          }
        })
      },
      fail: console.error
    })
  },

删除文件
deleteFile(){
    wx.cloud.deleteFile({
      fileList: ['cloud://cloud1-0gxssm592d3c3558.636c-cloud1-0gxssm592d3c3558-1256078064/example.png'],
      success: res => {
        // handle success
        console.log(res.fileList)
      },
      fail: console.error
    })
  }

4、云函数
4-1、新建云函数
在云函数根目录上右键,在右键菜单中,可以选择创建一个新的 Node.js 云函数add

add.js(云函数)
// 云函数入口文件
const cloud = require('wx-server-sdk')
cloud.init({
  env:'cloud1-0gxssm592d3c3558'
})
// 云函数入口函数
exports.main = async (event, context) => {
  return event.a + event.b
}
页面js中调用云函数
// pages/cloundfn/cloundfn.js
Page({
data:{
sum:0,
},
onLoad(options) {
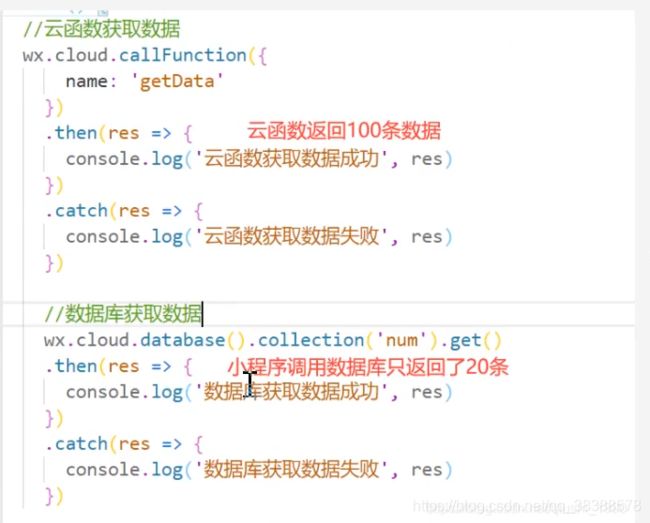
wx.cloud.callFunction({
// 云函数名称
name: 'add',
// 传给云函数的参数
data: {
a: 1,
b: 2,
},
})
.then(res => {
console.log(res.result) // 3
this.setData({
sum:res.result
})
})
.catch(console.error)
},
})
右键单击云函数点击上传并部署(云安装依赖,不上传node_modules)
然后在云开发控制台就可以看到上传的云函数了
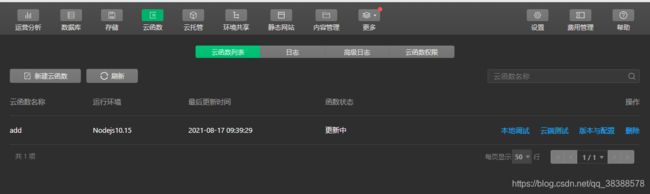
点击本地测试,弹出云函数本地测试弹框,点击右侧开启本地测试,安装node_modules依赖,重新编译一下页面代码即可看到返回值
展示返回结果

4-2、云函数获取小程序用户信息
<button type="primary" bindtap="getUserInfo">获取用户信息button>
getUserInfo(){
    wx.cloud.callFunction({
      // 云函数名称
      name: 'getOpenId',
    })
    .then(res => {
      console.log(res,'用户信息') //
      this.setData({
        openId:res.result.OPENID,
        appId:res.result.APPID,
      })
    })
    .catch(console.error)
  }
新建getOpenId云函数,右键上传并部署
本地测试

调试器返回

页面展示

4-3、云函数调用数据库
1、云函数获取书籍列表
页面js获取数据
  onLoad (options) {
   this.getBooks()
  },
  getBooks(){
    wx.cloud.callFunction({
      // 云函数名称
      name: 'getBooks',
    })
    .then(res => {
      console.log(res,'书籍信息') //
      this.setData({
        books:res.result.data
      })
    })
    .catch(console.error)
  },
新建getBooks云函数,上传并部署
const cloud = require('wx-server-sdk')
cloud.init({
  env: cloud.DYNAMIC_CURRENT_ENV
})
const db = cloud.database()
exports.main = async (event, context) => {
  // collection 上的 get 方法会返回一个 Promise,因此云函数会在数据库异步取完数据后返回结果
  return db.collection('books').get()
}
本地调试

调试器输出
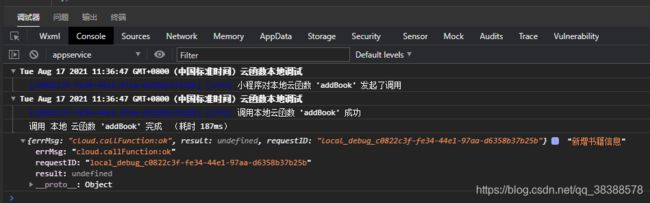
2、云函数新增书籍
页面js方法
 addBook(){
    wx.cloud.callFunction({
      // 云函数名称
      name: 'addBook',
      data:{
        name:this.data.bookName,
        price:parseInt(this.data.bookPrice),
        author:this.data.bookAuthor,
      }
    })
    .then(res => {
      console.log(res,'新增书籍信息') //
    })
    .catch(console.error)
  }
新增书籍云函数
// 云函数入口文件
const cloud = require('wx-server-sdk')
cloud.init({
  env: cloud.DYNAMIC_CURRENT_ENV
})
const db = cloud.database()
// 云函数入口函数
exports.main = async (event, context) => {
  const {name,price,author} = event
  console.log(name,price,author,'传递过来的数据')
  return db.collection('books').add({
    // data 字段表示需新增的 JSON 数据
    data: {
     name,
     price,
     author,
    }
  })
  .then(res => {
    console.log(res,'新增')
  })

}
注意
cloud.init({
  env: cloud.DYNAMIC_CURRENT_ENV
})
要在
const db = cloud.database()
之前初始化否则报错

结果:
云函数本地调试弹框

调试器:
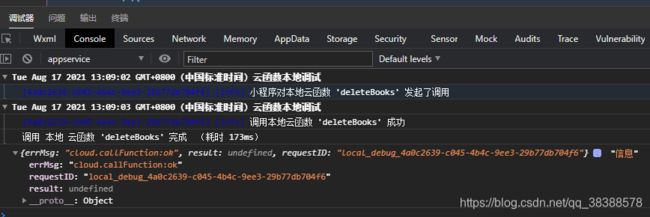
3、云函数删除书籍
新建deleteBooks的云函数
// 云函数入口文件
const cloud = require('wx-server-sdk')
cloud.init({
  env: cloud.DYNAMIC_CURRENT_ENV
})
const db = cloud.database()
// 云函数入口函数
exports.main = async (event, context) => {
  //删除价格为150的数据
  return  db.collection('books').where({
    price: 150
  }).remove()
  .then(res => {
    console.log(res,'删除')
  })
}
页面方法调用:
deleteBook(){
    wx.cloud.callFunction({
      // 云函数名称
      name: 'deleteBooks',
    })
    .then(res => {
      console.log(res,'信息') //
    })
    .catch(console.error)
  },
云函数本地调试返回

调试器返回
4-4、云函数中调用存储
假设我们要上传在云函数目录中包含的一个图片文件(demo.jpg):
const cloud = require('wx-server-sdk')
const fs = require('fs')
const path = require('path')

cloud.init({
  env: cloud.DYNAMIC_CURRENT_ENV
})

exports.main = async (event, context) => {
  const fileStream = fs.createReadStream(path.join(__dirname, 'demo.jpg'))
  return await cloud.uploadFile({
    cloudPath: 'demo.jpg',
    fileContent: fileStream,
  })
}
在云函数中,__dirname 的值是云端云函数代码所在目录
4-5、云函数中调用其他云函数
const cloud = require('wx-server-sdk')

cloud.init({
  env: cloud.DYNAMIC_CURRENT_ENV
})

exports.main = async (event, context) => {
  return await cloud.callFunction({
    name: 'sum',
    data: {
      x: 1,
      y: 2,
    }
  })
}
4-6、在云函数中访问第三方服务器
在云函数终端安装依赖 cnpm install got
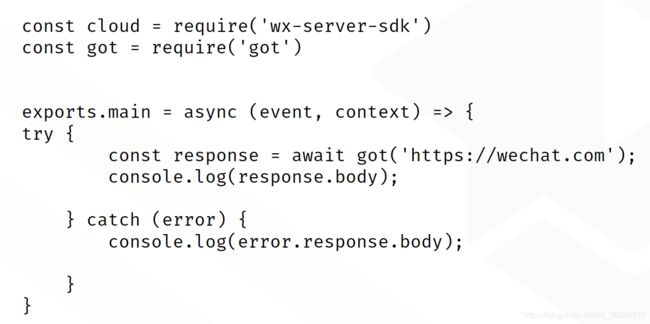
调用其他三方接口可以用node的request库
需安装request 、request-promise
4-7、在云函数中生成小程序码
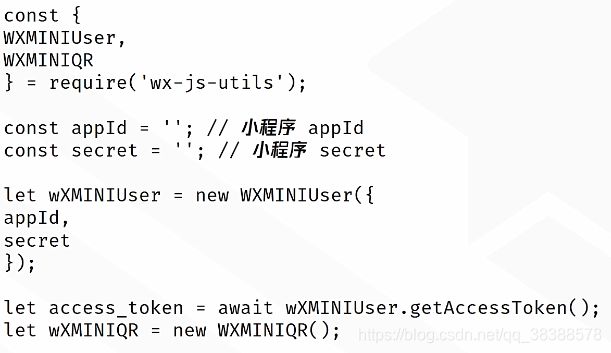
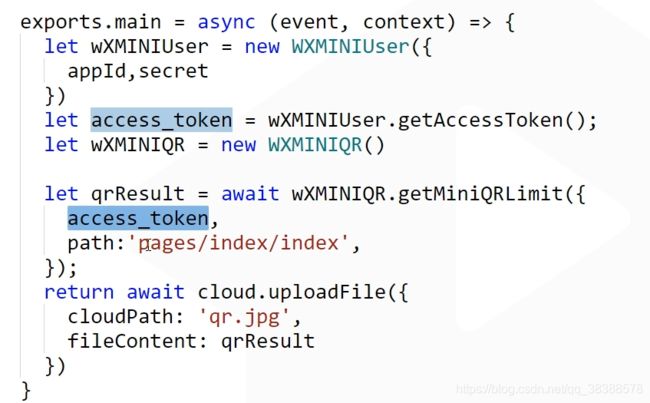
4-8、在云函数中推送模板消息
依赖wx-js-utils库,先安装依赖

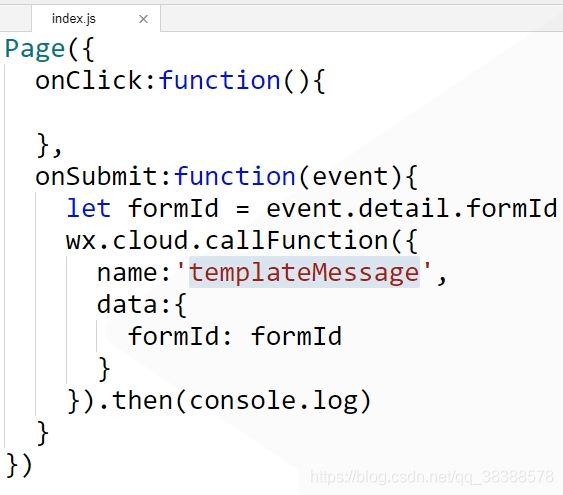
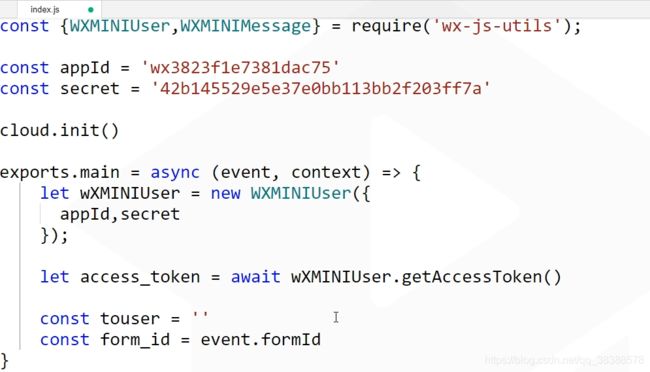
模板消息Id在小程序后台选择


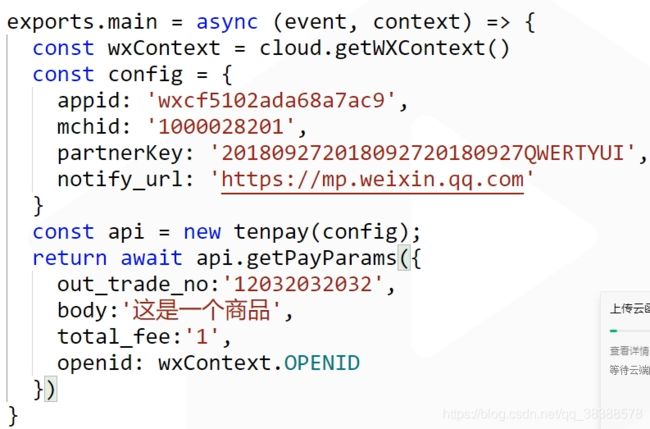
4-9、云函数调用微信支付
小程序方法

云函数:(依赖tenpay库,需先安装tenpay库)
其他:

5、商城笔记
工具类asyncWX.js
/**
 * 显示加载框
 */
export const ml_showLoading = () => {
  return new Promise((resolve) => {
    wx.showLoading({
      title: 'Loading...',
      success: resolve
    })
  })
}
/**
 * 隐藏加载框
 */
export const ml_hideLoading = () => {
  return new Promise((resolve) => {
    wx.hideLoading({
      success: resolve
    })
  })
}

/**
 * 消息提示框
 */
export const ml_showToast = (title) => {
  return new Promise((resolve) => {

    wx.showToast({
      title,
      icon :'none',
      success: resolve
    })
  })
}


/**
 * 消息提示框 -成功
 */

export const ml_showToastSuccess = (title) => {
  return new Promise((resolve) => {

    wx.showToast({
      title,
      success: resolve
    })
  })
}

/**
 *  发起支付
 */

export const ml_payment = (pay) => {
  return new Promise((resolve,reject) => {

      wx.requestPayment({
        ...pay,
        success: resolve,
        fail: reject
      })

  })
}
5-1、首页(轮播、列表(上拉加载、下拉刷新、添加购物车、设置tabbar右上角数字))
// 获取数据库
const db = wx.cloud.database()
// 获取集合
const goods_col = db.collection('goods')
const carts_col = db.collection('carts')

// 引入 异步操作
import {
  ml_showLoading,
  ml_hideLoading,
  ml_showToast,
  ml_showToastSuccess
} from '../../utils/asyncWX.js'

Page({

  data: {
    goods: [], // 商品列表数据
    _page: 0,
    hasMore: true, // 是否有更多数据可加载
    swipers :[]
  },

  onLoad() {
    this.setTabBar()
    this.loadSwipersData()
    this.loadListData()
  },
  // 加载轮播图数据
  // 需求 : 请求访问量前三的商品  count
  // 限制  :3个
  // 排序 : 降序
  async loadSwipersData(){

     let res = await goods_col.orderBy('count','desc').limit(3).get()
     console.log('轮播图',res)
     this.setData({
      swipers : res.data
     })
  },
  // 加载列表数据
  async loadListData() {
    // 1 2 3 4 5    6 7 8 9 10    11 ...
    const LIMIT = 5
    let {
      _page,
      goods
    } = this.data // 0

    // 显示加载框
    await ml_showLoading()

    let res = await goods_col.limit(LIMIT).skip(_page * LIMIT).get()

    // 隐藏加载框
    await ml_hideLoading()

    // 手动停止下拉刷新
    wx.stopPullDownRefresh()

    console.log('列表数据', res.data)

    this.setData({
      goods: [...goods, ...res.data],
      _page: ++_page, // 1
      hasMore: res.data.length === LIMIT
    })
  },
  // 上拉刷新
  async onReachBottom() {

    // 没有更多数据的情况
    if (!this.data.hasMore) {

      await ml_showToast('没有更多数据了')

      return console.log('没有数据了')
    }

    console.log('上拉刷新')
    this.loadListData()
  },
  // 下拉刷新
  onPullDownRefresh() {
    console.log('下拉刷新')
    //1. 重置
    this.setData({
      goods :[],
      _page :0,
      hasMore : true
    })
    //2. 加载最新的数据
    this.loadListData()
  },
  // 加入到购物车
  async addCart(e){
    //1. 拿到该商品
    let { item } = e.currentTarget.dataset

    // 2. 判断该商品在不在购物车里面
    //  根据 _id 尝试从购物车里面获取数据, 看能不能获取到
    try{
      let res = await carts_col.doc(item._id).get()
        console.log('有值')
        // 有值, 把购物车里面的该商品 的 num值累加
      await carts_col.doc(item._id).update({
        data : {
          num : db.command.inc(1)
        }
      })


    }catch(err){
       console.log('没有值')

       //没有值 把该商品添加到购物车里面去
       await carts_col.add({
         data : {
           _id :item._id,
           imageSrc : item.imageSrc,
           price :item.price,
           title :item.title,
           num : 1,
           selected : true
         }
       })
    }

    this.setTabBar()
    await ml_showToastSuccess('下单成功')
  },

  // 修改tabBar 右上角数字
  async setTabBar(){

    let total = 0
    let res = await carts_col.get()

    res.data.forEach(v => {
      total += v.num
    })

    if(total === 0)  return

    wx.setTabBarBadge({
      index: 1,
      text: total+'',
    })
  }
})
5-2、商品详情
const db = wx.cloud.database()

const goods_col = db.collection('goods')

Page({
  data :{
    detail : {}
  },
  onLoad(options){

    let { id } = options

    this.loadDetailData(id)
  },
  // 加载详情数据
  async loadDetailData(id){

    // 拿到数据库的商品
    let ins = goods_col.doc(id)

    //+1
    await ins.update({
      data :{
        count : db.command.inc(1)
      }
    })

    // 获取
   let res =  await ins.get()

   // 赋值
   this.setData({
     detail : res.data
   })


    // count +1
    //  await goods_col.doc(id).update({
    //   data : {
    //     count : db.command.inc(1)
    //   }
    // })

    // // 获取详情数据
    // let res = await goods_col.doc(id).get()
    // console.log('商品信息',res)
    // this.setData({
    //   detail : res.data
    // })

  }
})
5-3、购物车页面
const db = wx.cloud.database()
const carts_col = db.collection('carts')

import { ml_showToastSuccess, ml_payment } from '../../utils/asyncWX.js'

Page({

  data :{
    carts :[],  // 购物车数据
    totalCount :0,
    totalPrice :0
  },

  onLoad(){

    this.loadCartsData()
  },
  // 加载购物车数据
 async loadCartsData(){

    let res = await carts_col.get()
    console.log('购物车数据',res)
    this.setData({
        carts : res.data
    })

    // 统计总价格和总数量
   this.setCart(res.data)
  },
   // 统计总价格和总数量
  setCart(carts){

    let totalCount = 0
    let totalPrice = 0

    carts.forEach(v => {
      totalCount += v.num
      totalPrice += v.num * v.price
    })


    this.setData({
      totalCount,
      totalPrice
    })

  },
  // 点击 +
  async addCount(e){

    //1. 获取 id
    let id = e.currentTarget.dataset.id

    //2. 修改num +1
    let res = await carts_col.doc(id).update({
      data : {
        num : db.command.inc(1)
      }
    })
    console.log('+1',res)
    // 3.1 +1 成功后 再次重新刷新
    // this.loadCartsData()
    // 3.2 +1 成功后 修改当前data里面的carts数据
    let newCarts = this.data.carts
    let goods = newCarts.find(v => v._id == id)
    goods.num += 1
    this.setData({
      carts: newCarts
    })

    //4. 提示 累加成功
    await ml_showToastSuccess('累加成功')

    //5. 再次统计
    this.setCart(newCarts)

  },

  // 点击 当前页面对应的tab
  onTabItemTap(){

    wx.setTabBarBadge({
      index: 1,
      text: '',
    })
  },
  // 开始支付
  async startpay(){

    //1. 发起订单 => 获取订单号  => 未支付
   let res1 = await wx.cloud.callFunction({
      name : 'makeOrder',
      data : {
        carts : this.data.carts
      }
    })
   await ml_showToastSuccess('发起订单成功')
   const { order_number } = res1.result
    console.log('发起订单', order_number)

    //2. 预支付  => 获取支付所需要的5个参数
   let res2 = await wx.cloud.callFunction({
      name : 'pay',
      data : {
        order_number
      }
    })
    console.log('预支付',res2)

    //3. 发起支付
    await ml_payment(res2.result)

    await ml_showToastSuccess('支付成功')

    //4. 更新支付状态  => 已支付
   let res3 = await wx.cloud.callFunction({
      name :'updateStatus',
      data : {
        order_number
      }
    })
    console.log('更新状态',res3)

    //5. 清空购物车
   let res4 = await wx.cloud.callFunction({
      name : 'clearCarts'
    })
   console.log('清空购物车',res4)
   this.setData({
     carts : [],
     totalCount :0,
     totalPrice : 0
   })

   // 跳转到订单页面
   wx.navigateTo({
     url: '/pages/orders/orders',
   })

  }
})
5-4、云函数
1、clearCarts(清除购物车)
// 云函数入口文件
const cloud = require('wx-server-sdk')

cloud.init()

const db = cloud.database({
  env: 'prod-hswqx'
})
const carts_col = db.collection('carts')

// 云函数入口函数
exports.main = async (event, context) => {

  // 清空购物车
  let res = await carts_col.where({
    selected : true
  }).remove()

  return res
}
2、makeOrder(创建订单)
// 云函数入口文件
const cloud = require('wx-server-sdk')

cloud.init()

const db = cloud.database({
  env:'prod-hswqx'
})
const orders_col = db.collection('orders')

// 云函数入口函数
exports.main = async (event, context) => {

    //1. 创建一个随机订单号, 组成一个对象
    let obj = {
      order_number : Date.now(),
      carts : event.carts,
      status : 0  // 0-未支付  1-已支付
    }

    //2. 添加到 orders 集合里面
    let res = await orders_col.add({
      data: obj
    })

    return {
      res,
      order_number : obj.order_number
    }
}
3、updateStatus(更新订单状态)
// 云函数入口文件
const cloud = require('wx-server-sdk')

cloud.init()

const db = cloud.database({
  env: 'prod-hswqx'
})
const orders_col = db.collection('orders')


// 云函数入口函数
exports.main = async (event, context) => {

  // 更新 status
  let res = await orders_col.where({
    order_number : event.order_number
  }).update({
    data : {
      status : 1
    }
  })

  return res
}
4、支付(依赖tenpay)
// 云函数入口文件
const cloud = require('wx-server-sdk')

cloud.init()
//1. 引入 tenpay
const tenpay = require('tenpay');
//2. 配置
const config = {
  appid: '************',//小程序appid
  mchid: '**************',//商户号
  partnerKey: '******************',//商户秘钥
  notify_url: '',
  spbill_create_ip: ''
};

// 云函数入口函数
exports.main = async (event, context) => {
  const wxContext = cloud.getWXContext()

  //3. 初始化
  const api = tenpay.init(config);

  //4. 获取支付参数
  let result = await api.getPayParams({
    out_trade_no: event.order_number + '',
    body: '这是一次支付',
    total_fee: 1,
    openid: wxContext.OPENID
  });

  return result
}
readMe
/**
--------------清理工作--------------
1. 把 app.json 里面的pages/logs/logs 删除了 顺便把 logs 页面也给删除了
2. 把 index 页面 里面的 index.js / .wxml / .wxss 里面的内容也清除掉了
3. app.js , onLuanch() 里面也清除了
--------------准备工作-------------------
1. 配置tabBar 创建 index 和 cart页面
- 导入 assets 引入两种图标
2. 导入数据
2.1 创建商品集合 goods
2.2 从数据文件夹里面导入 `goods-支付.json` 里面的数据
-------------展示首页列表数据-----------------
1. 获取数据
- 获取全部数据 17条
- 把 17条数据保存到 goods
2. wxml 结构 (拷贝)
3. wxss 样式 (拷贝)
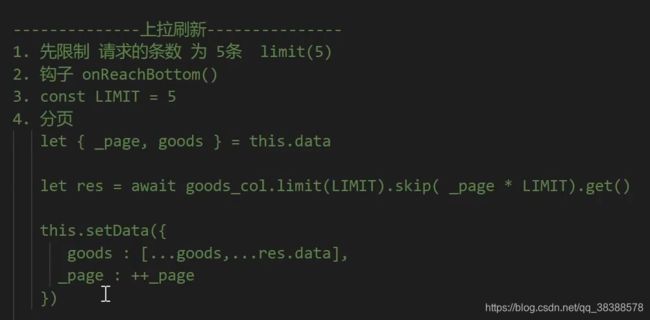
--------------上拉刷新---------------
1. 先限制 请求的条数 为 5条 limit(5)
2. 钩子 onReachBottom()
3. const LIMIT = 5
4. 分页
let { _page, goods } = this.data
let res = await goods_col.limit(LIMIT).skip( _page * LIMIT).get()
this.setData({
goods : [...goods,...res.data],
_page : ++_page
})
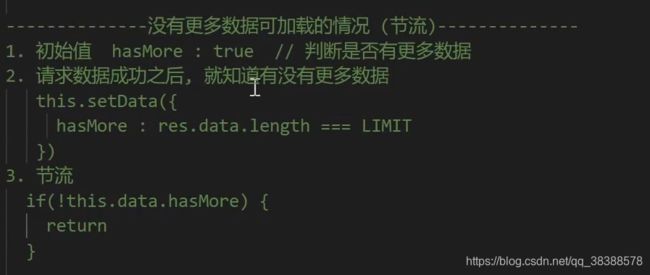
--------------没有更多数据可加载的情况 (节流)--------------
1. 初始值 hasMore : true // 判断是否有更多数据
2. 请求数据成功之后, 就知道有没有更多数据
this.setData({
hasMore : res.data.length === LIMIT
})
3. 节流
if(!this.data.hasMore) {
return
}
--------------加载框和提示框的封装-----------------------
>> 参考 utils/asyncWx.js
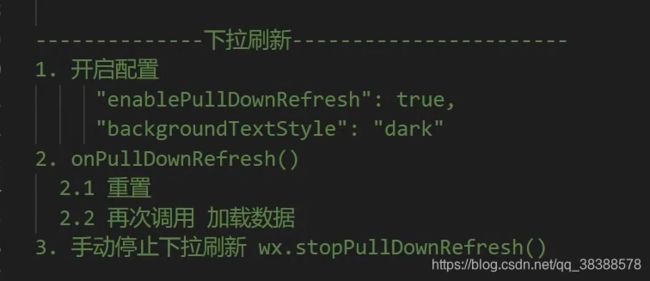
--------------下拉刷新-----------------------
1. 开启配置
"enablePullDownRefresh": true,
"backgroundTextStyle": "dark"
2. onPullDownRefresh()
2.1 重置
2.2 再次调用 加载数据
3. 手动停止下拉刷新 wx.stopPullDownRefresh()
----------------- 轮播图数据 -------------------------
1. 加载轮播图数据
2. 需求 : 请求访问量前三的商品 count
限制 :3个
排序 : 降序
3. 代码 :
let res = await goods_col.orderBy('count','desc').limit(3).get()
----------------- 跳转到详情页 -------------------------
1. 在商品外面套一个 navigator 导航组件 url='/pages/detail/detail?id={{item._id}}'
2. 在 detail.js 里面 根据 id 获取商品详情信息
3. 获取该id的商品信息 goods_col.doc(id).get()
4. 累加访问量
----------------- 点击下单 -------------------------
>> 把该商品加入到购物车里面
- 注册点击事件 catchtap : 不允许冒泡
- 加入购物车逻辑
1. 拿到点击要添加入到购物车的`商品`
2. 判断该商品在不在购物车里面
3. 如果不在, 把该商品添加到购物车里面, 并且新加一个字段 num = 1
4. 如果在, 修改改商品的num值 累加
----------------- 设置 tab 右上角数字 -------------------------
1. wx.setTabbarBadge({
index : 1,
text : ''
})
2. 点击 购物车 tabItem的时候, 触发的钩子,
// 点击 当前页面对应的tab
onTabItemTap(){
wx.setTabBarBadge({
index: 1,
text: '',
})
}
----------------- 进入到购物车 -----------------------
1. 添加自定义编译模式 刷新自动切换到购物车页面
2. 在购物车里面加载购物车 数据 展示
3. 拷贝 wxml + wxss
4. 设置一下总价格 和总数量
5. 点击+1 累加数据
累加完之后更新数据
----------------- 点击支付 -------------------------
>> 准备工作
- appId
- 商户号
- 秘钥
>> 具体步骤
1. 发起订单 => 获取订单号
2. 预支付 => 获取支付所需要的5个参数
3. 支付 => wx.requestPayment(..)
4. 更新支付状态 => 未支付 => 已支付
5. 清空购物车 (清空 carts 集合 里面的数据)
*/