【腾讯云HAI域探秘】搭建Stable Diffusion模型服务快速进行AI绘画
【腾讯云HAI域探秘】搭建Stable Diffusion模型服务快速进行AI绘画
- 一、秒懂Stable Diffusion模型文生图原理
- 二、高性能应用服务HAI + Stable Diffusion WebUI模型创建体验
- 三、使用jupyter_lab算力连接方式 进行StableDiffusion API部署
- 四、使用python向HAI服务提供的StableDiffusion API发送请求
- 五、基于腾讯云 Cloud Studio构建的Web应用
一、秒懂Stable Diffusion模型文生图原理
SD是一个基于latent的扩散模型,它在UNet中引入text condition来实现基于文本生成图像。SD模型整体上是一个End-to-End模型,主要由VAE(变分自编码器,Variational Auto-Encoder),U-Net以及CLIP Text Encoder三个核心组件构成。
- CLIP Text Encoder模型作为SD模型的前置模块,将输入的人类文本信息进行编码,输出特征矩阵,这个特征矩阵与文本信息相匹配。
- 完成对文本信息的编码后,就会输入到SD模型的“图像优化模块”中对图像的优化进行控制。“图像优化模块”是由一个U-Net网络和一个Schedule算法共同组成。U-Net网络负责预测噪声,不断优化生成过程,在预测噪声的同时不断注入文本语义信息。而schedule算法对每次U-Net预测的噪声进行优化处理(动态调整预测的噪声,控制U-Net预测噪声的强度。在SD中,U-Net的迭代优化步数大概是50或者100次,在这个过程中Latent Feature的质量不断的变好(纯噪声减少,图像语义信息增加,文本语义信息增加)。
- U-Net网络和Schedule算法的工作完成以后,SD模型会将优化迭代后的Latent Feature输入到图像解码器(VAE Decoder)中,将Latent Feature重建成像素级图像。

二、高性能应用服务HAI + Stable Diffusion WebUI模型创建体验
-
点击进入“高性能应用服务HAI”申请体验资格!

-
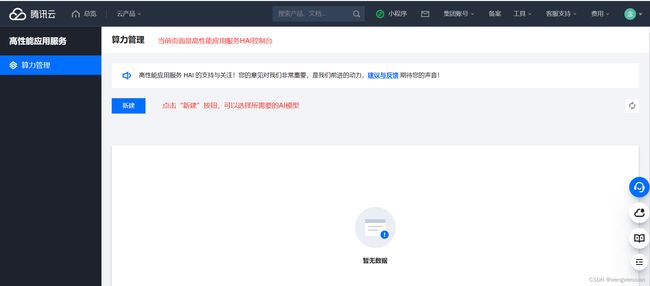
申请到体验资格后,登录到高性能应用服务HAI控制台

-
点击上图“新建”按钮,创建Stable Diffusion模型

-
等待实例创建完成,约3~8分钟

-
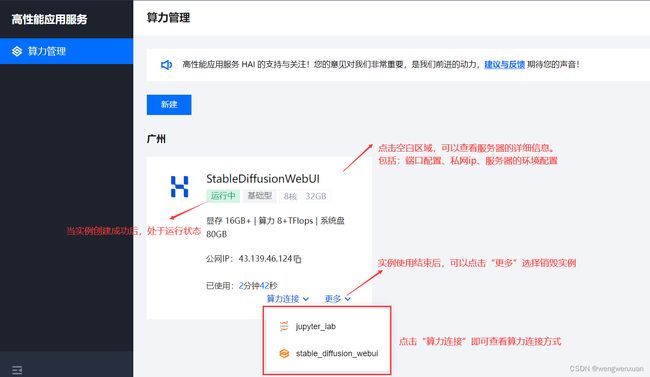
创建完成后,可以查看实例的详细信息
-
选择stable_diffusion_webui算力连接方式,进行AI绘画
(1)在进行AI绘画通常会使用到如下功能:

(2)通过设置提示词、反向提示词、采样方式、采样迭代次数、提示词相关性等参数,可以通过Stable Diffusion模型生成对应图片

SD模型重要参数介绍
正向的prompt:描述对应图片内容,需要更多的细节的描述,以生成高画质图片
反向的 prompt:描述图片不需要的风格,同时需要保证图片的完整性,不要少胳膊断腿,要一个正常的图
采样方式:Euler a、DDIM、DPM ++ 2M Karras这三种方式比较推荐
随机种子:默认值是 -1,表示每次出图都会随机一个种子,根据这个种子进行出图。如果想要固定某个形象,那么把对应种子的值填在这,那么每次出图的效果大致都会一样。
小提示:提示词越多,AI 绘图结果会更加精准。更高的迭代步数会消耗更多的计算时间,但并不意味着一定会得到更好的结果。
三、使用jupyter_lab算力连接方式 进行StableDiffusion API部署
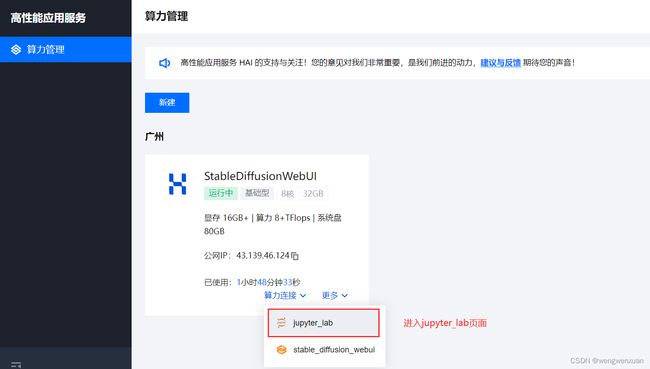
- 选择jupyter_lab连接方式
jupyter_lab 操作界面,如下图所示

- 新建一个终端,进入Stable Diffusion模型所在目录。然后,运行launch.py文件,服务监听端口为7862
cd /root/stable-diffusion-webui
python launch.py --nowebui --xformers --opt-split-attention  --listen --port 7862

3. 为了保证其他网络能够顺利访问到该服务器所提供的API服务,需要为该服务进行端口配置。配置ip来源为0.0.0.0/0,协议端口为TCP:7862


4. 在浏览器访问 服务器ip:端口号/docs,如果能够访问成功,则证明端口配置生效;且能够通过该网址查看相关API接口swagger 使用指南

四、使用python向HAI服务提供的StableDiffusion API发送请求
可以发送一个包含提示词、反向提示词、迭代次数和随机种子等参数的请求。 服务器将返回一个 base64 编码的 PNG 文件,我们需要对其进行解码。 以下使用python作为脚本代码测试:
import json
import base64
import requests

your_ip = '0.0.0.0' # HAI服务器IP地址
your_port = 7862  # SD api 监听的端口

def submit_post(url: str,data: dict):
  """
  Submit a POST request to the given URL with the given data.
  """
  return requests.post(url,data=json.dumps(data))

def save_encoded_image(b64_image: str,output_path: str):
  """
  Save the given image to the given output path.
  """
  with open(output_path,"wb") as image_file:
      image_file.write(base64.b64decode(b64_image))

if __name__ == '__main__':
  # /sdapi/v1/txt2img
  txt2img_url = f'http://{your_ip}:{your_port}/sdapi/v1/txt2img'
  data = {
     'prompt': 'a pretty cat,cyberpunk art,kerem beyit,very cute robot zen,Playful,Independent,beeple |',
     'negative_prompt':'(deformed,distorted,disfigured:1.0),poorly drawn,bad anatomy,wrong anatomy,extra limb,missing limb,floating limbs,(mutated hands and fingers:1.5),disconnected limbs,mutation,mutated,ugly,disgusting,blurry,amputation,flowers,human,man,woman',
     'Steps':70,
     'Seed':1791574510
  }
  response = submit_post(txt2img_url,data)
  save_encoded_image(response.json()['images'][0], 'cat.png')
运行上述代码后,会在该当前目录下保存模型生成的图片。

五、基于腾讯云 Cloud Studio构建的Web应用
如果本地没有安装VSCode和nodejs,可以使用腾讯云提供的Cloud Studio!
- 点击链接进入 腾讯云 登录
- 在搜索框输入Cloud Studio ,点击搜索


- 选择 开发空间 下的 手动创建 并 立即创建

- 自定义配置工作空间

- 通过sd_api.zip链接,下载所需的项目代码并上传

- 使用解压命令解压压缩包,命令如下
unzip sd_api.zip

7. 修改vue项目下的 vite.config 文件,将sdapi和controlnet的api改为HAI服务器的地址和端口。

8. 安装依赖包,并启动项目。命令如下:
npm install
npm run dev

9. 在浏览器打开访问地址,就可以进行绘画啦!


现在还有活动呢,下面是活动的连接:
腾讯云 HAI 新品公测产品体验地址 :https://cloud.tencent.com/act/pro/hai
腾讯云 HAI 新品公测专题页地址:https://marketing.csdn.net/p/b18dedb1166a0d94583db1877e49b039