【深入浅出Spring6】第二期——依赖注入
一、 IoC 控制反转
- 控制反转是一种思想,依赖注入是其具体实现【Dependence Injection】
- 控制反转的目的:为了降低程序的耦合度,提高程序的可扩展力,进而使程序满足开闭原则和依赖倒置原则
- 控制反转的主要工作:
- 通过第三方容器创建对象
- 通过第三方容器维护对象和对象之间的关系
二、 DI 依赖注入
- Spring 通过依赖注入来完成 Bean 对象的创建以及属性赋值
- 依赖注入都包括什么:
- 依赖 是指对象和对象之间的关系
- 注入 是指一种通过数据传递让对象之间产生关系的行为
- 依赖注入如何实现:
- set 注入
- 构造方法注入
1、学习前的准备工作?
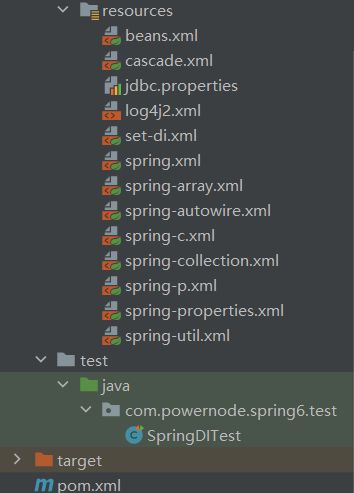
(1)创建一个新模块 spring6-003-dependency-injection ,并配置pom.xml【打包、依赖】
	<packaging>jar</packaging>
    <!--配置多个仓库repositories标签-->
    <repositories>
        <repository>
            <id>repository.spring.milestone</id>
            <name>Spring Milestone Repository</name>
            <url>https://repo.spring.io/milestone</url>
        </repository>
    </repositories>
    <!--配置相关依赖-->
    <dependencies>
        <!--spring context依赖-->
        <dependency>
            <groupId>org.springframework</groupId>
            <artifactId>spring-context</artifactId>
            <version>6.0.0-M2</version>
        </dependency>
        <dependency>
            <groupId>junit</groupId>
            <artifactId>junit</artifactId>
            <version>4.13.2</version>
            <scope>test</scope>
        </dependency>
        <!--log4j2的依赖-->
        <dependency>
            <groupId>org.apache.logging.log4j</groupId>
            <artifactId>log4j-core</artifactId>
            <version>2.19.0</version>
        </dependency>
        <dependency>
            <groupId>org.apache.logging.log4j</groupId>
            <artifactId>log4j-slf4j2-impl</artifactId>
            <version>2.19.0</version>
        </dependency>
    </dependencies>
(2)创建几个包【只是为了说明相关的问题,包下的文件并不是真正的实现对应的功能】
- com.powernode.spring6.dao 用来存储于数据库操作的java类
- com.powernode.spring6.bean 用来存储我们的bean对象相关的类
- com.powernode.spring6.service 用来存储我们的业务类
- com.powernode.spring6.jdbc 用来存储我们自定义的数据源
- com.powernode.spring6.test 在这个包下我们写一个测试类,专门用于存储我们的测试方法
- resources 包下我们存放我们的spring的配置文件
- 完整目录结构:

$ set 注入
- set 注入的核心原理:通过反射机制调用set方法来给属性赋值,进而让两个对象之间产生关系
- 需求分析:我们想要保存用户数据,在dao成通过UserDao插入数据,业务层我们通过save方法调用持久层的方法【通过案例说明set注入是如何实现的】
1、我们需要创建 UserDao、UserService、spring 配置文件
UserDao.java 【此处我们通过打印日志的形式输出我们指定的内容】
package com.powernode.spring6.dao;

import org.slf4j.Logger;
import org.slf4j.LoggerFactory;

/**
 * @author Bonbons
 * @version 1.0
 */
public class UserDao {
    // 定义一个静态的日志对象
    private static final Logger logger = LoggerFactory.getLogger(UserDao.class);
    // 提供一个insert方法,用logger记录一下日志
    public void insert(){
        logger.info("数据库正在保存用户信息。");
    }
}
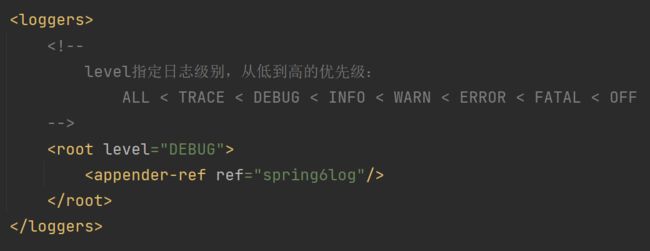
但是我们需要注意,我们想要通过日志输出内容,就要满足我们选择的日志等级大于等于配置的日志等级
UserService.java 【set 注入必须提供set方法】
package com.powernode.spring6.service;

import com.powernode.spring6.dao.UserDao;

/**
 * @author Bonbons
 * @version 1.0
 */
public class UserService {
	// 创建持久层的对象
    private UserDao userDao;

    // 使用set方式注入,必须提供set方法。
    public void setUserDao(UserDao userDao) {
        this.userDao = userDao;
    }
	// 我们的业务方法
    public void save(){
        userDao.insert();
    }
}
spring.xml 【配置bean标签和property标签】
<?xml version="1.0" encoding="UTF-8"?>
<beans xmlns="http://www.springframework.org/schema/beans"
       xmlns:xsi="http://www.w3.org/2001/XMLSchema-instance"
       xsi:schemaLocation="http://www.springframework.org/schema/beans http://www.springframework.org/schema/beans/spring-beans.xsd">

    <!--配置我们要托管的类-->
    <bean id="userDaoBean" class="com.powernode.spring6.dao.UserDao" />
    <bean id="userServiceBean" class="com.powernode.spring6.service.UserService">
        <!--set注入需要在这里配置property标签
            name 配置我们set方法去掉后首字母变小写后的结果
            ref 配置我们要注入的bean的id[在本配置文件对应的类的id]-->
        <property name="userDao" ref="userDaoBean" />
    </bean>
</beans>
- 我们通过bean标签类配置我们需要托管的类,一般有两个属性
- id 代表我们bean的唯一标识,在一个配置文件中不能出现同名的情况
- class 代表我们要声明为bean的类的全限定类名【从根目录为起始位置】
- 如果有属性,我们需要通过property标签进一步配置
- name 属性对应我们获取属性的set方法【去掉set+剩余部分首字母变小写】
- ref 属性对应我们想要注入的bean 【就是托管类的 id】
- 如果是简单类型,我们就是用value直接赋值【代替ref属性】
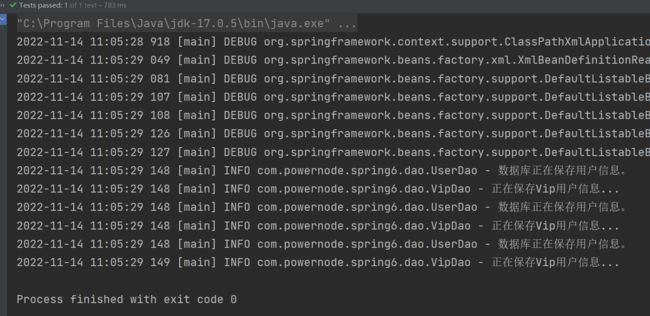
SpringDITest.java 编写我们的测试方法 >> 单元测试
@Test
public void testSetDI(){
	// 获取我们的Spring容器
	ApplicationContext applicationContext = new ClassPathXmlApplicationContext("spring.xml");
	// 通过 id 获取我们需要的对象
	UserService userServiceBean = applicationContext.getBean("userServiceBean", UserService.class);
	// 不出意外调用会出现空指针异常
	userServiceBean.saveUser();
}
- 创建对象的工作我们是交给Spring容器来完成的,那么我们如何获得创建的对象呢?
- 第一步,先解析 xml 文件,获得 Spring 容器
- 第二步,通过ApplicationContext的对象的getBean方法,根据bean的id获取指定的bean
- 如果还想调用获取到的对象的方法,我们就需要在第二步传递第二个参数,对象类型.class

2、我们再总结一下最简单的set注入
- 我们通过spring的配置文件到获得具体的bean对象,整个流程是怎样的呢?
通过 property 标签的 name 属性获取到属性名 userDao
通过属性名推断出我们要查找的set方法为 setUserDao
通过反射机制调用 set 方法给属性赋值
通过 ref 属性完成bean的装配,说白了就是两个对象之间产生关联
$ 构造注入
- 构造注入是一种基于无参构造方法的注入
- 需求:我们 CustomerService 类调用 UserDao 和 VipDao 的 insert 方法保存用户信息
1、补充 VipDao 和 CustomerService 以及新的配置文件
VipDao 保存Vip用户的信息,其实和UserDao没啥太大区别
package com.powernode.spring6.dao;

import org.apache.commons.logging.LogFactory;
import org.slf4j.Logger;
import org.slf4j.LoggerFactory;

/**
 * @author Bonbons
 * @version 1.0
 */
public class VipDao {
    // 使用自定义日志
    private static final Logger logger = LoggerFactory.getLogger(VipDao.class);
    // 也提供一个insert方法
    public void insert(){
        logger.info("正在保存Vip用户信息...");
    }
}
CustuomerService 保存普通用户和Vip用户信息的业务类
package com.powernode.spring6.service;

import com.powernode.spring6.dao.UserDao;
import com.powernode.spring6.dao.VipDao;

/**
 * @author Bonbons
 * @version 1.0
 */
public class CustomerService {
    private UserDao userDao;
    private VipDao vipDao;

    // 通过构造方法注入

    public CustomerService(UserDao userDao, VipDao vipDao) {
        this.userDao = userDao;
        this.vipDao = vipDao;
    }

    // 保存用户数据
    public void save(){
        userDao.insert();
        vipDao.insert();
    }
}
编写配置文件 beans.xml 【直接给出的是完整文件,但我会分块展开讨论的】
<?xml version="1.0" encoding="UTF-8"?>
<beans xmlns="http://www.springframework.org/schema/beans"
       xmlns:xsi="http://www.w3.org/2001/XMLSchema-instance"
       xsi:schemaLocation="http://www.springframework.org/schema/beans http://www.springframework.org/schema/beans/spring-beans.xsd">

    <!--将我们这三个需要自动生成对象的类放到spring容器中-->
    <bean id="userDaoBean" class="com.powernode.spring6.dao.UserDao" />
    <bean id="vipDaoBean" class="com.powernode.spring6.dao.VipDao" />
    <bean id="csBean" class="com.powernode.spring6.service.CustomerService">
        <!--构造方法注入: constructor-arg 标签
            index 代表参数下标[从零开始]
            ref 代表注入指定bean的id
            -->
        <constructor-arg index="0" ref="userDaoBean" />
        <constructor-arg index="1" ref="vipDaoBean" />
    </bean>
    <!--在此处constructor-arg 的第一个参数可以用 name替换-->
    <bean id="csBean2" class="com.powernode.spring6.service.CustomerService" >
        <!--name 代表我们的参数名-->
        <constructor-arg name="userDao" ref="userDaoBean" />
        <constructor-arg name="vipDao" ref="vipDaoBean" />
    </bean>
    <!--spring 还可以根据类型自动推断注入-->
    <bean id="csBean3" class="com.powernode.spring6.service.CustomerService">
        <!--此处只需要给出待注入bean的id即可-->
        <constructor-arg ref="userDaoBean" />
        <constructor-arg ref="vipDaoBean" />
    </bean>
</beans>
- 第一步,我们定义 UserDao、VipDao 的 bean,没有属性我们直接声明一下就可以
- 第二步,我们定义我们业务类的bean,并将另外两个类的对象作为属性与业务类关联起来
- 第三步,利用字标签 constructor-arg 注入属性,有三种方式
- 第一种,通过 index 属性和 ref 属性来注入
- index 对应我们参数的下标【从零开始】
- ref 对应我们待注入对象的 bean
- 第二种,通过 name 属性和 ref 属性注入
- name 对应我们构造方法的参数名
- ref 对应我们待注入对象的 bean
- 第三种,我们只需要使用 ref 属性,spring 会根据类型自动推断注入
- ref 对应我们待注入对象的 bean
- 第一种,通过 index 属性和 ref 属性来注入
测试程序
@Test
public void testConstructorDI(){
	ClassPathXmlApplicationContext classPathXmlApplicationContext = new ClassPathXmlApplicationContext("beans.xml");
	CustomerService csBean = classPathXmlApplicationContext.getBean("csBean", CustomerService.class);
	csBean.save();

	CustomerService csBean2 = classPathXmlApplicationContext.getBean("csBean2", CustomerService.class);
	csBean2.save();

	CustomerService csBean3 = classPathXmlApplicationContext.getBean("csBean3", CustomerService.class);
	csBean3.save();
}
2、因为 set 方法更常用一些,所以我们对 set 方法展开讨论
三、set 注入专题
$ 注入外部 bean 与 内部 bean
- 我们以下面配置文件为例
- 来说明什么叫外部bean和内部bean,以及他们之间有什么区别
<?xml version="1.0" encoding="UTF-8"?>
<beans xmlns="http://www.springframework.org/schema/beans"
       xmlns:xsi="http://www.w3.org/2001/XMLSchema-instance"
       xsi:schemaLocation="http://www.springframework.org/schema/beans http://www.springframework.org/schema/beans/spring-beans.xsd">

    <!--定义bean-->
    <bean id="orderDaoBean" class="com.powernode.spring6.dao.OrderDao" />
    <bean id="orderService" class="com.powernode.spring6.service.OrderService">
        <!--通过ref属性注入外部bean-->
        <property name="orderDao" ref="orderDaoBean" />
    </bean>
    <bean id="orderServiceBean2" class="com.powernode.spring6.service.OrderService">
        <property name="orderDao">
            <!--在property内部定义的bean我们称之为内部bean,一般很少这么用-->
            <bean class="com.powernode.spring6.dao.OrderDao" />
        </property>
    </bean>
</beans>
-
我们定义两个 bean 标签,在一个bean 标签中通过 ref 属性或标签来注入另一个bean
- 这就是注入外部bean,两个bean是分开的
-
我们在一个bean的字标签 property 标签中,定义的bean就属于内部bean
- 这就是注入内部bean, 这个bean属于property的字标签,存在嵌套关系
-
总结:
- 我们只是说明有注入内部bean的这种方法,但是并不推荐使用
- 当存在很多属性时,都采用内部bean会导致代码量很大,降低了程序的可读性
我们还可以测试一下这两种注入方式是否可以正常运行 【因为OrderDao、OrderService比较简单就没有写在这里】
@Test
public void testSetDI2(){
	ClassPathXmlApplicationContext classPathXmlApplicationContext = new ClassPathXmlApplicationContext("set-di.xml");
	OrderService orderService = classPathXmlApplicationContext.getBean("orderService", OrderService.class);
	orderService.generate();
	OrderService orderServiceBean2 = classPathXmlApplicationContext.getBean("orderServiceBean2", OrderService.class);
	orderServiceBean2.generate();
}
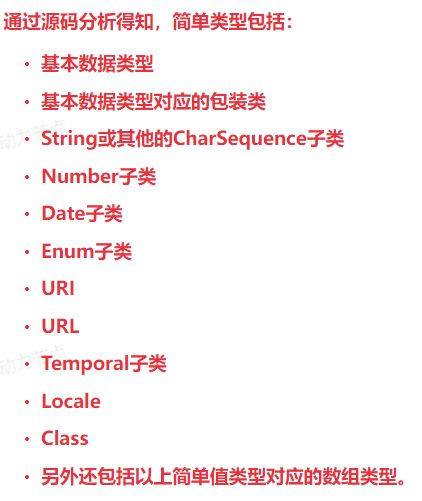
$ 注入简单类型
- 我们希望直接知道,简单类型包括哪些
- 给简单类型赋值,我们使用的是value属性或标签,而不是ref属性或标签
- 需求:我们通过一个相对全面的程序,对简单类型进行测试 【包含一些简单类型的属性】
编写 SimpleValueType 类,我们即将使用的一个bean
package com.powernode.spring6.bean;


import java.util.Date;

/**
 * 对基本类型和包装类set注入测试
 * @author Bonbons
 * @version 1.0
 */
public class SimpleValueType {
    // 创建 整型、布尔型、字符型及其包装类的属性
    private int a;
    private Integer b;
    private boolean c;
    private Boolean d;
    private char e;
    private Character f;
    private Season season;
    private String username;
    private Class clazz;

    // 添加Date属性
    private Date birth;

    @Override
    public String toString() {
        return "SimpleValueType{" +
                "a=" + a +
                ", b=" + b +
                ", c=" + c +
                ", d=" + d +
                ", e=" + e +
                ", f=" + f +
                ", season=" + season +
                ", username='" + username + '\'' +
                ", clazz=" + clazz +
                ", birth=" + birth +
                '}';
    }
    // 提供set方法

    public void setA(int a) {
        this.a = a;
    }

    public void setB(Integer b) {
        this.b = b;
    }

    public void setC(boolean c) {
        this.c = c;
    }

    public void setD(Boolean d) {
        this.d = d;
    }

    public void setE(char e) {
        this.e = e;
    }

    public void setF(Character f) {
        this.f = f;
    }

    public void setSeason(Season season) {
        this.season = season;
    }

    public void setUsername(String username) {
        this.username = username;
    }

    public void setClazz(Class clazz) {
        this.clazz = clazz;
    }

    public void setBirth(Date birth) {
        this.birth = birth;
    }
}
在 set-di.xml 配置文件中编写对应的 bean
<!--简单类型测试-->
    <bean id="svt" class="com.powernode.spring6.bean.SimpleValueType">
        <property name="a" value="100"/>
        <property name="b" value="101"/>
        <property name="c" value="true"/>
        <property name="d" value="false"/>
        <property name="e" value="c"/>
        <property name="f" value="C"/>
        <property name="season" value="WINTER"/>
        <property name="username" value="王维"/>
        <property name="clazz" value="java.lang.String"/>
        <!--补充添加的新属性-->
        <!--如果把Date当做简单类型,在通过value注入的时候就要遵循指定的格式:
            Sat Nov 12 10:13:53 CST 2022
            但是在开发中我们一般都不将其作为简单类型使用
        -->
        <property name="birth" value="Sat Nov 12 10:13:53 CST 2022"/>
    </bean>
尽管Date类属于简单类型,但是我们一般不把它当做简单类使用,因为它的格式不合适我们直接赋值【不符合我们中国人的习惯】
测试方法:
@Test
    public void testSimpleTypeSet(){
        ApplicationContext applicationContext = new ClassPathXmlApplicationContext("set-di.xml");
        /*
        User user = applicationContext.getBean("userBean", User.class);
        // 使用了toString方法
        System.out.println(user);
        */
        SimpleValueType svt = applicationContext.getBean("svt", SimpleValueType.class);
        System.out.println(svt);

    }

$ 级联属性赋值
- 我们以班级类和学生类为例,每个学生只能属于一个班级
- 在配置文件中通过 ref 找到对应的bean,通过属性再赋值的方式更新为新的属性值
- 但是使用级联的那个类要提供get方法,并且语句的顺序是不可替换的【此处为Student类】
编写Clazz类和Student类
package com.powernode.spring6.bean;

/**
 * 班级类
 * 用于级联属性set的测试
 * @author Bonbons
 * @version 1.0
 */
public class Clazz {
    private String name;

    public void setName(String name) {
        this.name = name;
    }

    @Override
    public String toString() {
        return "Clazz{" +
                "name='" + name + '\'' +
                '}';
    }
}
package com.powernode.spring6.bean;

/**
 * 学生类
 * @author Bonbons
 * @version 1.0
 */
public class Student {
    private String name;

    // 给学生添加上班级的信息
    private Clazz clazz;

    public void setClazz(Clazz clazz) {
        this.clazz = clazz;
    }
    // 使用级联属性赋值需要提供get方法
    public Clazz getClazz() {
        return clazz;
    }

    @Override
    public String toString() {
        return "Student{" +
                "name='" + name + '\'' +
                ", clazz=" + clazz +
                '}';
    }

    public void setName(String name) {
        this.name = name;
    }
}
编写 cscade.xml 配置文件
<?xml version="1.0" encoding="UTF-8"?>
<beans xmlns="http://www.springframework.org/schema/beans"
       xmlns:xsi="http://www.w3.org/2001/XMLSchema-instance"
       xsi:schemaLocation="http://www.springframework.org/schema/beans http://www.springframework.org/schema/beans/spring-beans.xsd">

    <!--声明学生和班级的bean-->
    <bean id="studentBean" class="com.powernode.spring6.bean.Student">
        <!--简单类型使用value,其他使用ref-->
        <property name="name" value="李华"/>
        <property name="clazz" ref="clazzBean"/>
        <!--通过get方法获取属性然后赋值-->
        <property name="clazz.name" value="高三二班"/>

    </bean>
    <bean id="clazzBean" class="com.powernode.spring6.bean.Clazz">
        <property name="name" value="高三十四班"/>
    </bean>
</beans>
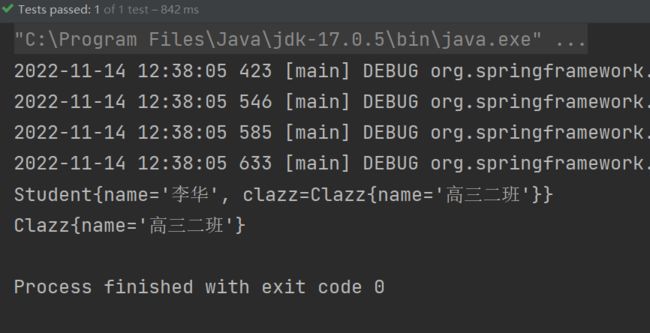
编写测试方法:
@Test
    public void testCascade(){
        ApplicationContext applicationContext = new ClassPathXmlApplicationContext("cascade.xml");
        Student studentBean = applicationContext.getBean("studentBean", Student.class);
        Clazz clazzBean = applicationContext.getBean("clazzBean", Clazz.class);
        System.out.println(studentBean);
        System.out.println(clazzBean);
    }
$ 注入数组
- 分为两种情况:数组是简单类型、数组不是简单类型
- 既然有不是简单类型的属性、所以我们得单独写一个bean类
- 需求:我们写一个类,包含两个属性、分别为字符串数组和Woman数组【Woman是我们单独写的一个bean类】
Woman 类:代表我们主人公的女朋友们
package com.powernode.spring6.bean;

/**
 * @author Bonbons
 * @version 1.0
 */
public class Woman {
    private String name;

    @Override
    public String toString() {
        return "Woman{" +
                "name='" + name + '\'' +
                '}';
    }

    public void setName(String name) {
        this.name = name;
    }
}
LaoWang 类:我们的主人公
package com.powernode.spring6.bean;

import java.util.Arrays;

/**
 * @author Bonbons
 * @version 1.0
 */
public class LaoWang{
	// 爱好
    private String [] aiHaos;
    // 女性朋友
    private Woman [] womens;
    public void setAiHaos(String[] aiHaos) {
        this.aiHaos = aiHaos;
    }

    public void setWomens(Woman[] womens) {
        this.womens = womens;
    }

    @Override
    public String toString() {
        return "QianDaYe{" +
                "aiHaos=" + Arrays.toString(aiHaos) +
                ", womens=" + Arrays.toString(womens) +
                '}';
    }
}
编写我们注入数组的配置文件: spring-array.xml
<?xml version="1.0" encoding="UTF-8"?>
<beans xmlns="http://www.springframework.org/schema/beans"
       xmlns:xsi="http://www.w3.org/2001/XMLSchema-instance"
       xsi:schemaLocation="http://www.springframework.org/schema/beans http://www.springframework.org/schema/beans/spring-beans.xsd">

    <bean id="laoWang" class="com.powernode.spring6.bean.QianDaYe">
        <property name="aiHaos">
            <!--通过array标签完成赋值-->
            <array>
                <value>抽烟</value>
                <value>喝酒</value>
                <value>烫头</value>
            </array>
        </property>
        <property name="womens">
            <array>
                <ref bean="w1"/>
                <ref bean="w2"/>
                <ref bean="w3"/>
            </array>
        </property>
    </bean>
    <bean id="w1" class="com.powernode.spring6.bean.Woman">
        <property name="name" value="小王" />
    </bean>
    <bean id="w2" class="com.powernode.spring6.bean.Woman">
        <property name="name" value="小李" />
    </bean>
    <bean id="w3" class="com.powernode.spring6.bean.Woman">
        <property name="name" value="小张" />
    </bean>
</beans>
- 首先我们定义多个女朋友的 bean 【目的是获得多个女朋友对象】
- 对于数组中存储的是一组值,所以我们在property标签的内部使用array标签注入数组的值
- 如果是简单类型,我们直接使用value标签进行赋值即可
- 如果非简单类型,我们通过 ref 标签利用bean属性属性注入属性值
测试方法:
@Test
    public void testArray(){
        ApplicationContext applicationContext = new ClassPathXmlApplicationContext("spring-array.xml");
        QianDaYe laoWang= applicationContext.getBean("yuQian", LaoWang.class);
        System.out.println(laoWang);
    }

$ 注入集合
- List 集合有一个特点:存储的元素有序可重复的 【有序的含义为可根据索引取元素】
- Set 集合:存储的是无序不可重复的元素
- Map 集合:存储的是键值对类型的元素
- Properties 集合:继承了HashTable,父类实现了Map接口
- 此处我直接通过一个综合案例演示这四种情况的集合注入方法
- 需求:我们有一个Person类,包含List集合的名字、Set集合的地址、Map集合的电话号、Properties集合的数据库连接信息,我们通过测试方法检测我们注入的数据是否成功
为了演示非普通类型的注入,对于Set集合的注入我选择了定义一个bean >> Address.java 类
package com.powernode.spring6.bean;

/**
 * @author Bonbons
 * @version 1.0
 */
public class Address {
    private String address;

    @Override
    public String toString() {
        return "Address{" +
                "address='" + address + '\'' +
                '}';
    }

    public void setAddress(String address) {
        this.address = address;
    }
}
Person 类,有四个私有属性对应我们这四种集合
package com.powernode.spring6.bean;

import java.util.List;
import java.util.Map;
import java.util.Properties;
import java.util.Set;

/**
 * set--集合注入[set、list]
 * @author Bonbons
 * @version 1.0
 */
public class Person {
    // 名字集合
    private List<String> names;
    // 地址集合
    private Set<Address> address;

    // 添加Map集合
    private Map<Integer, String> phones;

    // Properties 另一种集合,其父类HashTable实现了Map接口
    private Properties properties;

    public void setProperties(Properties properties) {
        this.properties = properties;
    }

    public void setPhones(Map<Integer, String> phones) {
        this.phones = phones;
    }

    public void setAddress(Set<Address> address) {
        this.address = address;
    }

    public void setNames(List<String> names) {
        this.names = names;
    }

    @Override
    public String toString() {
        return "Person{" +
                "names=" + names +
                ", address=" + address +
                ", phones=" + phones +
                ", properties=" + properties +
                '}';
    }
}
编写一个单独的配置文件 spring-collection.xml
<?xml version="1.0" encoding="UTF-8"?>
<beans xmlns="http://www.springframework.org/schema/beans"
       xmlns:xsi="http://www.w3.org/2001/XMLSchema-instance"
       xsi:schemaLocation="http://www.springframework.org/schema/beans http://www.springframework.org/schema/beans/spring-beans.xsd">

    <!--创建四个对应的地址-->
    <bean id="a" class="com.powernode.spring6.bean.Address">
        <property name="address" value="吉林长春" />
    </bean>
    <bean id="b" class="com.powernode.spring6.bean.Address">
        <property name="address" value="甘肃兰州" />
    </bean>
    <bean id="c" class="com.powernode.spring6.bean.Address">
        <property name="address" value="湖北武汉" />
    </bean>
    <bean id="d" class="com.powernode.spring6.bean.Address">
        <property name="address" value="湖南长沙" />
    </bean>

    <bean id="personBean" class="com.powernode.spring6.bean.Person">
        <!--名字集合-->
        <property name="names">
            <list>
                <value>张三</value>
                <value>李四</value>
                <value>王五</value>
                <value>赵六</value>
            </list>
        </property>
        <!--地址集合,此处我做了修改不使用简单类型进行测试-->
        <property name="address">
            <set>
                <ref bean="a" />
                <ref bean="b"/>
                <ref bean="c"/>
                <ref bean="d"/>
            </set>
        </property>

        <!--注入map集合-->
        <property name="phones">
            <map>
                <!--
                    对于简单类型直接使用key、value
                    如果不是简单类型,我们可以使用key-ref、value-ref来指向对应的bean
                -->
                <entry key="1" value="110" />
                <entry key="2" value="119" />
                <entry key="3" value="120" />
            </map>
        </property>

        <!--properties集合的注入-->
        <property name="properties">
            <props>
                <prop key="driver">com.mysql.cj.jdbc.Driver</prop>
                <prop key="url">jdbc:mysql://localhost:3306/spring6</prop>
                <prop key="username">root</prop>
                <prop key="password">root</prop>
            </props>
        </property>
    </bean>

</beans>
- 几种集合的处理外部都是一样的,在property标签内部使用不同的子标签
- 分别为 list、set、map、props
- list 集合与 set 集合一致
- map 集合
- 简单类型使用
- 非简单类型使用
- 简单类型使用
- properties 集合与Map集合类似但不相同,map采用属性赋值,properties在标签中间传值
- 使用
root
- 使用
测试方法:
@Test
    public void testCollection(){
        ApplicationContext applicationContext = new ClassPathXmlApplicationContext("spring-collection.xml");
        Person personBean = applicationContext.getBean("personBean", Person.class);
        System.out.println(personBean);
    }

$ 注入null和空字符串
- 需求:我们编写一个Cat类,具有两个属性,探索如何让属性值为空和空字符串
编写我们的bean类 Cat.java
package com.powernode.spring6.bean;

/**
 * @author Bonbons
 * @version 1.0
 */
public class Cat {
    private String name;
    private int age;

    public void setName(String name) {
        this.name = name;
    }

    public void setAge(int age) {
        this.age = age;
    }

    @Override
    public String toString() {
        return "Cat{" +
                "name='" + name + '\'' +
                ", age=" + age +
                '}';
    }
}
在 set-di.xml 文件中,编写我们的 bean
<!--为了演示空值和字符串的注入-->
    <bean id="catBean" class="com.powernode.spring6.bean.Cat">
        <!--有姓名和年龄两个属性-->
        <property name="name" value= "tom" />
        <property name="age" value="3" />
        <!--
            1、赋值为 null
            如果我们不进行注入就会默认为 null,
            如果我们传递 "null" 代表字符串null,
            那么我们如何手动让属性值为空呢?
                我们可以使用 null 标签,例如:我们想要年龄属性值为空
                <property name = "age"> <null /> </property>
        -->
        <!--
            2、赋值为空串
            (1)在指定value的属性的时候,我们直接赋值""
            <property name="name" value=""></property>
            (2)我们可以通过value标签来赋值空串
            <property name="name"> <value /> </property>
        -->
    </bean>
-
因为两个属性都属于简单类型,所以我们直接可以通过property标签注入属性值
-
如何让属性值为 null 呢?
- 方法一,我们不通过property标签为属性赋值,属性值默认为null
- 方法二,我们使用了property标签,但是通过value嵌套 null 标签,效果还是属性值为空
-
如何让属性值为空串呢?【首先属性的类型需要为字符串类型】
- 方法一,在我们使用property标签的value属性赋值的时候,直接赋值为
""【代表空字符串】 - 方法二,我们也可以使用property标签嵌套value标签,但是value标签中不传递任何值,属性值还是为空串
- 方法一,在我们使用property标签的value属性赋值的时候,直接赋值为
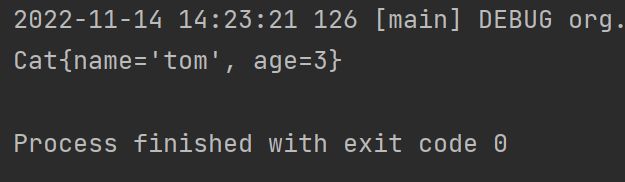
给出测试方法,因为我配置的都是正常信息,所以不会显示为空或空串
@Test
    public void testCat(){
        ApplicationContext applicationContext = new ClassPathXmlApplicationContext("set-di.xml");
        Cat catBean = applicationContext.getBean("catBean", Cat.class);
        System.out.println(catBean);
    }
$ 注入含特殊符号的值
- 特殊符号都包含哪些?【在 XML 中包含五种特殊字符】
大于号 >、 小于号 < 、单引号 ’ 、双引号 " 、与符号 &
- 需求:我们编写一个MathBean类,包含一个字符串属性,我们测试注入一个含特殊字符的字符串
编写 MathBean 类
package com.powernode.spring6.bean;

/**
 * @author Bonbons
 * @version 1.0
 */
public class MathBean {
    private String result;

    public void setResult(String result) {
        this.result = result;
    }

    @Override
    public String toString() {
        return "MathBean{" +
                "result='" + result + '\'' +
                '}';
    }
}
重点都是配置文件中如何编写 bean
<!--关于特殊符号的注入-->
    <bean id="mathBean" class="com.powernode.spring6.bean.MathBean">
<!--        <property name="result" value=" 2 < 3" />-->
        <!--
            1、包括五种特殊字符 <、>、'、"、&
            2、直接使用含有特殊符号的字符串会产生报错
            3、有两种解决办法:
                (1)使用实体符号代替
                (2)只能使用value标签,并使用CDATA来括起来,这样会自动识别为指定内容为一个字符串
                    ![CDATA[字符串内容]]  【是xml文件中的一种规范,会被xml文件解析】
        -->
        <property name="result">
            <value><![CDATA[2 < 3]]></value>
        </property>
    </bean>
- 我们想使用包含特殊符号的语句怎么办?
- 第一种,使用转义符号代替特殊符号
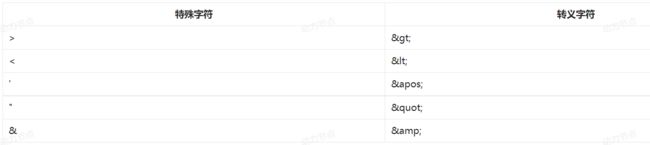
- 第二种,使用
将特殊字符片段包裹起来,这部分内容不会被XML文件解析器解析
- 第一种,使用转义符号代替特殊符号
编写测试方法
@Test
    public void testSpecial(){
        ApplicationContext applicationContext = new ClassPathXmlApplicationContext("set-di.xml");
        MathBean mathBean = applicationContext.getBean("mathBean", MathBean.class);
        System.out.println(mathBean);
    }

四、 命名空间注入
$ p 命名空间注入
- 基于set方法简化set注入的一种方式
- 需求:通过Dog类演示如何使用p命名空间注入
Dog 类:
package com.powernode.spring6.bean;

import java.util.Date;

/**
 * @author Bonbons
 * @version 1.0
 */
public class Dog {
    // 提供三个属性
    private String name;
    private int age;
    // 尽管Date是简单类型,但是我们一般还是不把它当做简单类型来使用[因为格式的原因]
    private Date birth;

    // 命名空间注入可以让xml文件更简单,但是其底层还是由set注入实现的

    public void setName(String name) {
        this.name = name;
    }

    public void setAge(int age) {
        this.age = age;
    }

    public void setBirth(Date birth) {
        this.birth = birth;
    }

    @Override
    public String toString() {
        return "Dog{" +
                "name='" + name + '\'' +
                ", age=" + age +
                ", birth=" + birth +
                '}';
    }
}
编写配置文件 spring-p
<?xml version="1.0" encoding="UTF-8"?>
<beans xmlns="http://www.springframework.org/schema/beans"
       xmlns:xsi="http://www.w3.org/2001/XMLSchema-instance"
       xmlns:p="http://www.springframework.org/schema/p"
       xsi:schemaLocation="http://www.springframework.org/schema/beans http://www.springframework.org/schema/beans/spring-beans.xsd">

    <!--
        使用p命名空间:
            第一步,在标签首部添加配置:xmlns:p="http://www.springframework.org/schema/p"
            第二步,在我们bean标签的属性使用指定的属性:
                一般为命名空间名:属性名[对于简单类型而言]
                如果不是简单类型,我们可以使用 命名空间名:属性名-ref
    -->
    <bean id="dogBean" class="com.powernode.spring6.bean.Dog" p:name="小白" p:age="1" p:birth-ref="birthBean" />
    <bean id="birthBean" class="java.util.Date" />
</beans>
- 使用 p 命名空间的流程:
- 第一步,在顶部配置文件中添加一条语句
xmlns:p="http://www.springframework.org/schema/p" - 第二步,在注入参数值的时候,直接通过bean的属性传递参数值即可
- 简单类型, 直接通过
p:属性名="参数值"注入即可 - 非简单类型,通过
p:属性名-ref="待注入bean的id"赋值
- 简单类型, 直接通过
- 第一步,在顶部配置文件中添加一条语句
编写测试方法
@Test
    public void testP(){
        ApplicationContext applicationContext = new ClassPathXmlApplicationContext("spring-p.xml");
        Dog dogBean = applicationContext.getBean("dogBean", Dog.class);
        System.out.println(dogBean);
    }

$ c 命名空间注入
- c命名空间是简化构造方法注入,我们的Bean类一定要提供构造方法
- 需求:定义一个People类来演示c命名空间是如何简化构造方法注入的
编写我们的People类,包含名字、年龄、性别三个属性
package com.powernode.spring6.bean;

/**
 * @author Bonbons
 * @version 1.0
 */
public class People {
    private String name;
    private int age;
    private boolean sex;

    // c 命名空间是基于构造方法,简化构造方法的一种命名空间

    public People(String name, int age, boolean sex) {
        this.name = name;
        this.age = age;
        this.sex = sex;
    }

    @Override
    public String toString() {
        return "People{" +
                "name='" + name + '\'' +
                ", age=" + age +
                ", sex=" + sex +
                '}';
    }
}
编写 spring-c.xml 配置文件
<?xml version="1.0" encoding="UTF-8"?>
<beans xmlns="http://www.springframework.org/schema/beans"
       xmlns:xsi="http://www.w3.org/2001/XMLSchema-instance"
       xmlns:c="http://www.springframework.org/schema/c"
       xsi:schemaLocation="http://www.springframework.org/schema/beans http://www.springframework.org/schema/beans/spring-beans.xsd">

    <!--和p命名空间类似,第一步也是配置xml文件
        之前使用构造方法注入是通过字标签 <constructor-arg> 来完成的,此时只需要通过bean的属性
        就可以完成,我们可以使用属性名、_属性索引对属性进行赋值,当然还可以用-ref来解决非普通类型
        变量的赋值
    -->
    <bean id="peopleBean" class="com.powernode.spring6.bean.People" c:name="李白" c:_1="20" c:sex="true" />
</beans>
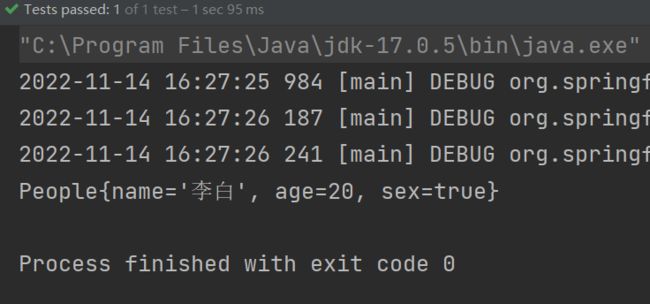
测试方法:
@Test
    public void testC(){
        ApplicationContext applicationContext = new ClassPathXmlApplicationContext("spring-c.xml");
        People peopleBean = applicationContext.getBean("peopleBean", People.class);
        System.out.println(peopleBean);
    }
$ util 命名空间
- 该命名空间的作用是提高代码的复用率
- 一般是针对集合类型的数据操作的
- 需求:我们要对两个数据源进行参数注入【driver、url、username、password四个参数】
编写我们的两个数据源类,除了类名不同,内部代码完全相同 MyDataSource1、MyDataSource2
package com.powernode.spring6.jdbc;

import javax.sql.DataSource;
import java.io.PrintWriter;
import java.sql.Connection;
import java.sql.SQLException;
import java.sql.SQLFeatureNotSupportedException;
import java.util.Properties;
import java.util.logging.Logger;

/**
 * @author Bonbons
 * @version 1.0
 */
public class MyDataSource1 implements DataSource {
    // 数据库连接需要四个信息 driver url username password
    // 我们通过注入的方式,将属性与值放到properties的集合中
    private Properties properties;

    public void setProperties(Properties properties) {
        this.properties = properties;
    }

    @Override
    public String toString() {
        return "MyDataSource1{" +
                "properties=" + properties +
                '}';
    }

    @Override
    public Connection getConnection() throws SQLException {
        return null;
    }

    @Override
    public Connection getConnection(String username, String password) throws SQLException {
        return null;
    }

    @Override
    public PrintWriter getLogWriter() throws SQLException {
        return null;
    }

    @Override
    public void setLogWriter(PrintWriter out) throws SQLException {

    }

    @Override
    public void setLoginTimeout(int seconds) throws SQLException {

    }

    @Override
    public int getLoginTimeout() throws SQLException {
        return 0;
    }

    @Override
    public Logger getParentLogger() throws SQLFeatureNotSupportedException {
        return null;
    }

    @Override
    public <T> T unwrap(Class<T> iface) throws SQLException {
        return null;
    }

    @Override
    public boolean isWrapperFor(Class<?> iface) throws SQLException {
        return false;
    }
}
编写我们的配置文件 spring-util
<?xml version="1.0" encoding="UTF-8"?>
<beans xmlns="http://www.springframework.org/schema/beans"
       xmlns:xsi="http://www.w3.org/2001/XMLSchema-instance"
       xmlns:util="http://www.springframework.org/schema/util"
       xsi:schemaLocation="http://www.springframework.org/schema/beans http://www.springframework.org/schema/beans/spring-beans.xsd
                           http://www.springframework.org/schema/util http://www.springframework.org/schema/util/spring-util.xsd">

    <!--为了提高代码的可复用性,我们使用util命名空间:
        (1)配置xml的首部 xmlns:util、xsi:schemaLocation
        (2)通过util:集合的方式,创建我们要重复使用的代码块
        (3)要使用的时候直接通过 ref 引入bean的id即可
    -->
    <util:properties id="pros">
        <prop key="driver">com.mysql.cj.jdbc.Driver</prop>
        <prop key="url">jdbc:mysql://localhost:3306/spring6</prop>
        <prop key="username">root</prop>
        <prop key="password">root</prop>
    </util:properties>
    <bean id="ds1" class="com.powernode.spring6.jdbc.MyDataSource1">
        <!--此处直接通过ref引入我们要重复使用的片段-->
        <property name="properties" ref="pros" />
    </bean>

    <bean id="ds2" class="com.powernode.spring6.jdbc.MyDataSource1">
        <property name="properties" ref="pros" />
    </bean>
</beans>
编写测试方法:
@Test
    public void testUtil(){
        ApplicationContext applicationContext = new ClassPathXmlApplicationContext("spring-util.xml");
        MyDataSource1 ds1 = applicationContext.getBean("ds1", MyDataSource1.class);
        System.out.println(ds1);
    }

五、基于XML的自动装配
- Spring 的自动化注入又被成为自动装配
- 分为按名称自动装配和按类型自动装配两种方式
$ 根据名称自动装配
- 底层调用的是set方法完成注入
- 需求:我们结合前面的 orderDao、orderService来完成自动装配的演示
因为前面没有给出orderDao和orderService的内容,所以在此处给出
package com.powernode.spring6.dao;


import org.slf4j.Logger;
import org.slf4j.LoggerFactory;

/**
 * @author Bonbons
 * @version 1.0
 */
public class OrderDao {
    // 日志
    private static final Logger logger = LoggerFactory.getLogger(OrderDao.class);

    // 生成订单
    public void insert(){
        logger.info("订单正在生成......");
    }
}
package com.powernode.spring6.service;

import com.powernode.spring6.dao.OrderDao;

/**
 * @author Bonbons
 * @version 1.0
 */
public class OrderService {
    private OrderDao orderDao;

    public void setOrderDao(OrderDao orderDao) {
        this.orderDao = orderDao;
    }

    public void generate(){
        orderDao.insert();
    }
}
编写我们的 spring-autowire.xml 文件
<?xml version="1.0" encoding="UTF-8"?>
<beans xmlns="http://www.springframework.org/schema/beans"
       xmlns:xsi="http://www.w3.org/2001/XMLSchema-instance"
       xsi:schemaLocation="http://www.springframework.org/schema/beans http://www.springframework.org/schema/beans/spring-beans.xsd">

    <bean id="orderDao" class="com.powernode.spring6.dao.OrderDao" />

    <!--我们可以使用名字自动装配,直接配置指定bean的属性,要求被加载的bean的id必须为set方法去掉set和首字母小写后的名字-->
    <bean id="orderService" class="com.powernode.spring6.service.OrderService" autowire="byName" />
</beans>
- 使用步骤分为两个部分:
- 第一,待注入的bean的id命名有要求 >> 只能为对应set方法 去掉set+剩余部分首字母变小写
- 第二,在声明我们的bean的时候,添加一个属性
autowire = "byName"
测试一下 >> 对象生成成功,并可以调用对应方法
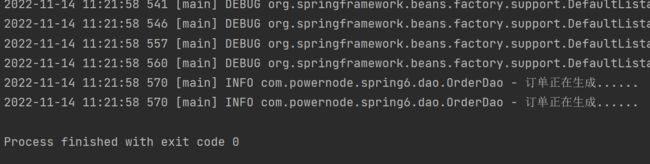
@Test
    public void testAutowire(){
        ApplicationContext applicationContext = new ClassPathXmlApplicationContext("spring-autowire.xml");
        OrderService orderService = applicationContext.getBean("orderService", OrderService.class);
        orderService.generate();
        System.out.println(orderService);
    }

$ 根据类型自动装配
- 当byType进行自动装配的时候,配置文件中某种类型的Bean必须是唯一的,不能出现多个
- 无论是byName还是byType,在装配的时候都是基于set方法的
- 需求:使用上面的UserDao、VipDao、UserService
我们只需要在 spring-autowire.xml 文件中添加新的bean即可
<!--通过autowire的byType按照类型自动装配,在有效的配置文件当中某种类型的实例只能有一个-->
    <bean class="com.powernode.spring6.dao.UserDao" />
    <bean class="com.powernode.spring6.dao.VipDao" />
    <bean id="cs" class="com.powernode.spring6.service.CustomerService" autowire="byType" />
测试方法:
@Test
    public void testAutowire2(){
        ApplicationContext applicationContext = new ClassPathXmlApplicationContext("spring-autowire.xml");
        // 按照类名自动装配
        CustomerService cs = applicationContext.getBean("cs", CustomerService.class);
        cs.save();
    }

六、Spring中引入外部属性配置文件
- 单独写一个配置文件,然后引入到我Spring配置文件中,通过
${属性名}直接调用 - 需求:我们以MydataSource为例,通过外部文件传递 dirver、url、username、password
外部配置文件 jdbc.properties
driverClass=com.mysql.cj.jdbc.Driver
url=jdbc:mysql://localhost:3306/spring6
username=root
password=root
编写我们的MyDataSource类
package com.powernode.spring6.jdbc;

import javax.sql.DataSource;
import java.io.PrintWriter;
import java.sql.Connection;
import java.sql.SQLException;
import java.sql.SQLFeatureNotSupportedException;
import java.util.logging.Logger;

/**
 * set简单类型注入案例:数据源的四个参数注入
 * 规定时间DataSource接口的可以提供连接对象的都称之为数据源
 * @author Bonbons
 * @version 1.0
 */
public class MyDataSource implements DataSource {
    // 连接时候的四个属性 driver url usename password
    private String driver;
    private String url;
    private String username;
    private String password;
    // 提供set方法

    public void setDriver(String driver) {
        this.driver = driver;
    }

    public void setUrl(String url) {
        this.url = url;
    }

    public void setUsername(String username) {
        this.username = username;
    }

    public void setPassword(String password) {
        this.password = password;
    }
    // 提供toString方法

    @Override
    public String toString() {
        return "MyDataSource{" +
                "driver='" + driver + '\'' +
                ", url='" + url + '\'' +
                ", username='" + username + '\'' +
                ", password='" + password + '\'' +
                '}';
    }

    @Override
    public Connection getConnection() throws SQLException {
        return null;
    }

    @Override
    public Connection getConnection(String username, String password) throws SQLException {
        return null;
    }

    @Override
    public PrintWriter getLogWriter() throws SQLException {
        return null;
    }

    @Override
    public void setLogWriter(PrintWriter out) throws SQLException {

    }

    @Override
    public void setLoginTimeout(int seconds) throws SQLException {

    }

    @Override
    public int getLoginTimeout() throws SQLException {
        return 0;
    }

    @Override
    public Logger getParentLogger() throws SQLFeatureNotSupportedException {
        return null;
    }

    @Override
    public <T> T unwrap(Class<T> iface) throws SQLException {
        return null;
    }

    @Override
    public boolean isWrapperFor(Class<?> iface) throws SQLException {
        return false;
    }
}
编写我们的配置文件 spring-properties.xml
<?xml version="1.0" encoding="UTF-8"?>
<beans xmlns="http://www.springframework.org/schema/beans"
       xmlns:xsi="http://www.w3.org/2001/XMLSchema-instance"
       xmlns:context="http://www.springframework.org/schema/context"
       xsi:schemaLocation="http://www.springframework.org/schema/beans http://www.springframework.org/schema/beans/spring-beans.xsd
                           http://www.springframework.org/schema/context http://www.springframework.org/schema/context/spring-context.xsd">

    <!--
        我们想引入properties外部文件
            (1)我们需要修改xml配置文件的头部信息,使用context命名空间[与使用util命名空间类似]
            (2)通过context:property-placeholder标签引入我们的外部文件
            (3)使用的时候我们只需要通过 ${key} 引用即可
            (4)重点:我们需要注意,在Spring中直接通过 ${username} 获取的是当前计算机的用户名
    -->
    <context:property-placeholder location="jdbc.properties" />

    <!--假设此处我们想为MyDataSource配置数据源-->
    <bean id="ds" class="com.powernode.spring6.jdbc.MyDataSource">
        <property name="driver" value="${driverClass}" />
        <property name="url" value="${url}" />
        <property name="username" value="${username}" />
        <property name="password" value="${password}" />
    </bean>
</beans>
测试程序:
@Test
    public void testdataSource(){
        ApplicationContext applicationContext = new ClassPathXmlApplicationContext("spring-properties.xml");
        MyDataSource ds = applicationContext.getBean("ds", MyDataSource.class);
        System.out.println(ds);
    }

npc 是我电脑名,所以一般jdbc的外部配置文件都不使用username,一般都加个前缀 jdbc.username