linux驱动开发-点亮第一个led灯

linux驱动开发-点亮第一个led灯

  • 一.背景知识
  • 二.如何写驱动程序
  • 三.实战演练
    • 3.1 查询原理图
    • 3.2 配置引脚为gpio模式
    • 3.3 配置引脚为输出模式
    • 3.4 DR寄存器
  • 四.代码实例
    • 4.1 驱动层
    • 4.2 应用层

一.背景知识

我们这里使用的是百问网的imx_6ullpro的开发板。这里和裸机不同的是,这类开发板可以运行linux操作系统,所以和裸机开发有点不同。
另外前面博主以及写过51,32单片机的技术博客,入门都是从点灯开始,这里也不例外。

二.如何写驱动程序

其实驱动程序和我们的裸机程序也类似。也需要操作寄存器来控制引脚。而不同的是程序是运行在操作系统之上的,可以调用标准c库以及内核提供的函数接口,且需要将文件编译为ko文件,加载进linux内核中才能运行。下面我通过实际代码来讲解驱动程序,这样才能更加理解驱动。

三.实战演练

3.1 查询原理图

我们可以看原理图得知,开发板上有一个led可以操控,引脚为GPIO5_3,这样我们只需要操作对应寄存器即可。

3.2 配置引脚为gpio模式

可以看到此寄存器地址:0x02290000+0x14,需要将此寄存器的MUX_MODE配置为101才能使用GPIO5_IO3。
linux驱动开发-点亮第一个led灯_第1张图片

3.3 配置引脚为输出模式

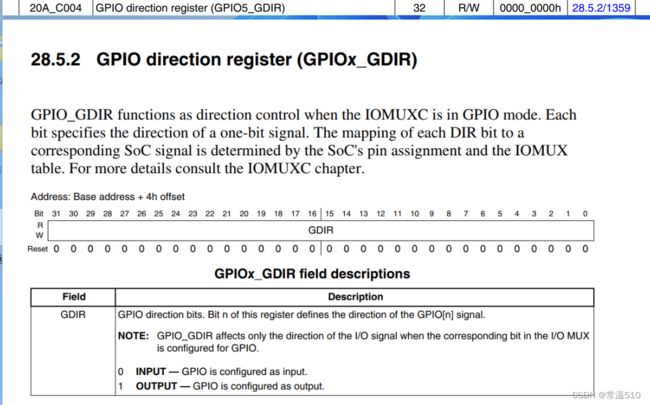
可以看出地址为0x020A_C004,配置0为输入模式,配置1为输出模式
linux驱动开发-点亮第一个led灯_第2张图片

3.4 DR寄存器

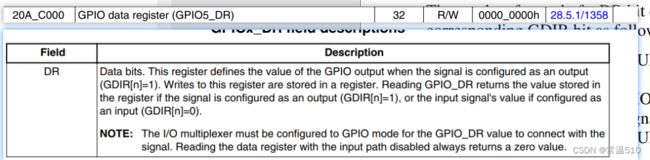
DR寄存器也就是配置引脚输出电平是高电平还是低电平
linux驱动开发-点亮第一个led灯_第3张图片

四.代码实例

前面都是相关知识的介绍,包括原理图以及寄存器。下面我们进行代码的讲解。

4.1 驱动层

#include 
#include 
#include 
#include 
#include 
#include 
#include 
#include 
#include 
#include 
#include 
#include 

static int major;
static struct class *led_class;

/* registers */
// IOMUXC_SNVS_SW_MUX_CTL_PAD_SNVS_TAMPER3 地址:0x02290000 + 0x14
static volatile unsigned int *IOMUXC_SNVS_SW_MUX_CTL_PAD_SNVS_TAMPER3;

// GPIO5_GDIR 地址:0x020AC004
static volatile unsigned int *GPIO5_GDIR;

//GPIO5_DR 地址:0x020AC000
static volatile unsigned int *GPIO5_DR;

static ssize_t led_write(struct file *filp, const char __user *buf,size_t count, loff_t *ppos)
{
	char val;
	int ret;
	
	/* copy_from_user : get data from app */
	ret = copy_from_user(&val, buf, 1);

	/* to set gpio register: out 1/0 */
	if (val)
	{
		/* set gpio to let led on */
		*GPIO5_DR &= ~(1<<3);
	}
	else
	{

		/* set gpio to let led off */
		*GPIO5_DR |= (1<<3);
	}
	return 1;
}

static int led_open(struct inode *inode, struct file *filp)
{
	/* enable gpio5
	 * configure gpio5_io3 as gpio
	 * configure gpio5_io3 as output 
	 */
	*IOMUXC_SNVS_SW_MUX_CTL_PAD_SNVS_TAMPER3 &= ~0xf;
	*IOMUXC_SNVS_SW_MUX_CTL_PAD_SNVS_TAMPER3 |= 0x5;

	*GPIO5_GDIR |= (1<<3);
	
	return 0;
}

static struct file_operations led_fops = {
	.owner		= THIS_MODULE, //默认THIS_MOUDLE
	.write		= led_write, //绑定应用层write函数
	.open		= led_open,//绑定应用层open函数
};

/* 入口函数 */
static int __init led_init(void)
{
	printk("%s %s %d\n", __FILE__, __FUNCTION__, __LINE__);
	//注册设备,返回主设备号
	major = register_chrdev(0, "100ask_led", &led_fops);

	/* ioremap */
	//物理地址转换为裸机地址
	IOMUXC_SNVS_SW_MUX_CTL_PAD_SNVS_TAMPER3 = ioremap(0x02290000 + 0x14, 4);
	
	// GPIO5_GDIR 地址:0x020AC004
	GPIO5_GDIR = ioremap(0x020AC004, 4);
	
	//GPIO5_DR 地址:0x020AC000
	GPIO5_DR  = ioremap(0x020AC000, 4);
   //创建设备类
	led_class = class_create(THIS_MODULE, "myled");
    //创建设备
	device_create(led_class, NULL, MKDEV(major, 0), NULL, "myled"); /* /dev/myled */
	
	return 0;
}
//出口函数
static void __exit led_exit(void)
{
	iounmap(IOMUXC_SNVS_SW_MUX_CTL_PAD_SNVS_TAMPER3);
	iounmap(GPIO5_GDIR);
	iounmap(GPIO5_DR);
	
	device_destroy(led_class, MKDEV(major, 0));
	class_destroy(led_class);
	
	unregister_chrdev(major, "100ask_led");
}

module_init(led_init);
module_exit(led_exit);
MODULE_LICENSE("GPL");

4.2 应用层

#include 
#include 
#include 
#include 
#include 
#include 


// ledtest /dev/myled on
// ledtest /dev/myled off

int main(int argc, char **argv)
{
	int fd;
	char status = 0;
	
	if (argc != 3)
	{
		printf("Usage: %s  \n", argv[0]);
		printf("  eg: %s /dev/myled on\n", argv[0]);
		printf("  eg: %s /dev/myled off\n", argv[0]);
		return -1;
	}
	// open
	fd = open(argv[1], O_RDWR);
	if (fd < 0)
	{
		printf("can not open %s\n", argv[0]);
		return -1;
	}

	// write
	if (strcmp(argv[2], "on") == 0)
	{
		status = 1;
	}

	write(fd, &status, 1);
	return 0;	
}

你可能感兴趣的:(Linux,linux,驱动开发,单片机)