分布式定时任务xxljob
xxl-job的xxl为作者名徐雪里拼音首字母。
xxl-job的作者是2015年开始开发这个项目,那时候springmvc+bootstrap+adminlte 大行其道,所以这个框架调度器一直沿用这个架构。
一、运行调度器
调度器可以集群或单点运行,以单点运行为例
下载代码:https://github.com/xuxueli/xxl-job/releases
点击source code(zip)下载代码 我这里的版本是2.4.0
下载后用idea打开。
打开后是有三个子模块的maven项目,xxl-job-admin是调度器,xxl-job-core是核心库,xxl-job-executor-samples是示例源码。
首先初始化数据库。数据库默认是mysql,你也可以换成别的。
执行脚本在 项目目录\doc\db\tables_xxl_job.sql ,内容如下
#
# XXL-JOB v2.4.0
# Copyright (c) 2015-present, xuxueli.

CREATE database if NOT EXISTS `xxl_job` default character set utf8mb4 collate utf8mb4_unicode_ci;
use `xxl_job`;

SET NAMES utf8mb4;

CREATE TABLE `xxl_job_info` (
  `id` int(11) NOT NULL AUTO_INCREMENT,
  `job_group` int(11) NOT NULL COMMENT '执行器主键ID',
  `job_desc` varchar(255) NOT NULL,
  `add_time` datetime DEFAULT NULL,
  `update_time` datetime DEFAULT NULL,
  `author` varchar(64) DEFAULT NULL COMMENT '作者',
  `alarm_email` varchar(255) DEFAULT NULL COMMENT '报警邮件',
  `schedule_type` varchar(50) NOT NULL DEFAULT 'NONE' COMMENT '调度类型',
  `schedule_conf` varchar(128) DEFAULT NULL COMMENT '调度配置,值含义取决于调度类型',
  `misfire_strategy` varchar(50) NOT NULL DEFAULT 'DO_NOTHING' COMMENT '调度过期策略',
  `executor_route_strategy` varchar(50) DEFAULT NULL COMMENT '执行器路由策略',
  `executor_handler` varchar(255) DEFAULT NULL COMMENT '执行器任务handler',
  `executor_param` varchar(512) DEFAULT NULL COMMENT '执行器任务参数',
  `executor_block_strategy` varchar(50) DEFAULT NULL COMMENT '阻塞处理策略',
  `executor_timeout` int(11) NOT NULL DEFAULT '0' COMMENT '任务执行超时时间,单位秒',
  `executor_fail_retry_count` int(11) NOT NULL DEFAULT '0' COMMENT '失败重试次数',
  `glue_type` varchar(50) NOT NULL COMMENT 'GLUE类型',
  `glue_source` mediumtext COMMENT 'GLUE源代码',
  `glue_remark` varchar(128) DEFAULT NULL COMMENT 'GLUE备注',
  `glue_updatetime` datetime DEFAULT NULL COMMENT 'GLUE更新时间',
  `child_jobid` varchar(255) DEFAULT NULL COMMENT '子任务ID,多个逗号分隔',
  `trigger_status` tinyint(4) NOT NULL DEFAULT '0' COMMENT '调度状态:0-停止,1-运行',
  `trigger_last_time` bigint(13) NOT NULL DEFAULT '0' COMMENT '上次调度时间',
  `trigger_next_time` bigint(13) NOT NULL DEFAULT '0' COMMENT '下次调度时间',
  PRIMARY KEY (`id`)
) ENGINE=InnoDB DEFAULT CHARSET=utf8mb4;

CREATE TABLE `xxl_job_log` (
  `id` bigint(20) NOT NULL AUTO_INCREMENT,
  `job_group` int(11) NOT NULL COMMENT '执行器主键ID',
  `job_id` int(11) NOT NULL COMMENT '任务,主键ID',
  `executor_address` varchar(255) DEFAULT NULL COMMENT '执行器地址,本次执行的地址',
  `executor_handler` varchar(255) DEFAULT NULL COMMENT '执行器任务handler',
  `executor_param` varchar(512) DEFAULT NULL COMMENT '执行器任务参数',
  `executor_sharding_param` varchar(20) DEFAULT NULL COMMENT '执行器任务分片参数,格式如 1/2',
  `executor_fail_retry_count` int(11) NOT NULL DEFAULT '0' COMMENT '失败重试次数',
  `trigger_time` datetime DEFAULT NULL COMMENT '调度-时间',
  `trigger_code` int(11) NOT NULL COMMENT '调度-结果',
  `trigger_msg` text COMMENT '调度-日志',
  `handle_time` datetime DEFAULT NULL COMMENT '执行-时间',
  `handle_code` int(11) NOT NULL COMMENT '执行-状态',
  `handle_msg` text COMMENT '执行-日志',
  `alarm_status` tinyint(4) NOT NULL DEFAULT '0' COMMENT '告警状态:0-默认、1-无需告警、2-告警成功、3-告警失败',
  PRIMARY KEY (`id`),
  KEY `I_trigger_time` (`trigger_time`),
  KEY `I_handle_code` (`handle_code`)
) ENGINE=InnoDB DEFAULT CHARSET=utf8mb4;

CREATE TABLE `xxl_job_log_report` (
  `id` int(11) NOT NULL AUTO_INCREMENT,
  `trigger_day` datetime DEFAULT NULL COMMENT '调度-时间',
  `running_count` int(11) NOT NULL DEFAULT '0' COMMENT '运行中-日志数量',
  `suc_count` int(11) NOT NULL DEFAULT '0' COMMENT '执行成功-日志数量',
  `fail_count` int(11) NOT NULL DEFAULT '0' COMMENT '执行失败-日志数量',
  `update_time` datetime DEFAULT NULL,
  PRIMARY KEY (`id`),
  UNIQUE KEY `i_trigger_day` (`trigger_day`) USING BTREE
) ENGINE=InnoDB DEFAULT CHARSET=utf8mb4;

CREATE TABLE `xxl_job_logglue` (
  `id` int(11) NOT NULL AUTO_INCREMENT,
  `job_id` int(11) NOT NULL COMMENT '任务,主键ID',
  `glue_type` varchar(50) DEFAULT NULL COMMENT 'GLUE类型',
  `glue_source` mediumtext COMMENT 'GLUE源代码',
  `glue_remark` varchar(128) NOT NULL COMMENT 'GLUE备注',
  `add_time` datetime DEFAULT NULL,
  `update_time` datetime DEFAULT NULL,
  PRIMARY KEY (`id`)
) ENGINE=InnoDB DEFAULT CHARSET=utf8mb4;

CREATE TABLE `xxl_job_registry` (
  `id` int(11) NOT NULL AUTO_INCREMENT,
  `registry_group` varchar(50) NOT NULL,
  `registry_key` varchar(255) NOT NULL,
  `registry_value` varchar(255) NOT NULL,
  `update_time` datetime DEFAULT NULL,
  PRIMARY KEY (`id`),
  KEY `i_g_k_v` (`registry_group`,`registry_key`,`registry_value`)
) ENGINE=InnoDB DEFAULT CHARSET=utf8mb4;

CREATE TABLE `xxl_job_group` (
  `id` int(11) NOT NULL AUTO_INCREMENT,
  `app_name` varchar(64) NOT NULL COMMENT '执行器AppName',
  `title` varchar(12) NOT NULL COMMENT '执行器名称',
  `address_type` tinyint(4) NOT NULL DEFAULT '0' COMMENT '执行器地址类型:0=自动注册、1=手动录入',
  `address_list` text COMMENT '执行器地址列表,多地址逗号分隔',
  `update_time` datetime DEFAULT NULL,
  PRIMARY KEY (`id`)
) ENGINE=InnoDB DEFAULT CHARSET=utf8mb4;

CREATE TABLE `xxl_job_user` (
  `id` int(11) NOT NULL AUTO_INCREMENT,
  `username` varchar(50) NOT NULL COMMENT '账号',
  `password` varchar(50) NOT NULL COMMENT '密码',
  `role` tinyint(4) NOT NULL COMMENT '角色:0-普通用户、1-管理员',
  `permission` varchar(255) DEFAULT NULL COMMENT '权限:执行器ID列表,多个逗号分割',
  PRIMARY KEY (`id`),
  UNIQUE KEY `i_username` (`username`) USING BTREE
) ENGINE=InnoDB DEFAULT CHARSET=utf8mb4;

CREATE TABLE `xxl_job_lock` (
  `lock_name` varchar(50) NOT NULL COMMENT '锁名称',
  PRIMARY KEY (`lock_name`)
) ENGINE=InnoDB DEFAULT CHARSET=utf8mb4;

INSERT INTO `xxl_job_group`(`id`, `app_name`, `title`, `address_type`, `address_list`, `update_time`) VALUES (1, 'xxl-job-executor-sample', '示例执行器', 0, NULL, '2018-11-03 22:21:31' );
INSERT INTO `xxl_job_info`(`id`, `job_group`, `job_desc`, `add_time`, `update_time`, `author`, `alarm_email`, `schedule_type`, `schedule_conf`, `misfire_strategy`, `executor_route_strategy`, `executor_handler`, `executor_param`, `executor_block_strategy`, `executor_timeout`, `executor_fail_retry_count`, `glue_type`, `glue_source`, `glue_remark`, `glue_updatetime`, `child_jobid`) VALUES (1, 1, '测试任务1', '2018-11-03 22:21:31', '2018-11-03 22:21:31', 'XXL', '', 'CRON', '0 0 0 * * ? *', 'DO_NOTHING', 'FIRST', 'demoJobHandler', '', 'SERIAL_EXECUTION', 0, 0, 'BEAN', '', 'GLUE代码初始化', '2018-11-03 22:21:31', '');
INSERT INTO `xxl_job_user`(`id`, `username`, `password`, `role`, `permission`) VALUES (1, 'admin', 'e10adc3949ba59abbe56e057f20f883e', 1, NULL);
INSERT INTO `xxl_job_lock` ( `lock_name`) VALUES ( 'schedule_lock');

commit;
执行完成之后修改配置文件application.properties的两个地方
数据库
### xxl-job, datasource
spring.datasource.url=jdbc:mysql://127.0.0.1:3306/xxl_job?useUnicode=true&characterEncoding=UTF-8&autoReconnect=true&serverTimezone=Asia/Shanghai
spring.datasource.username=root
spring.datasource.password=Since@2022
spring.datasource.driver-class-name=com.mysql.cj.jdbc.Driver
数据库连接用户名密码改成你自己的
token
### xxl-job, access token
xxl.job.accessToken=xxl_token
这里token的默认值早期版本是空,后期版本给了个默认值,无论哪个版本,请务必更改这个值,由于GLUE模式存在,可能会造成代码执行漏洞。
之后打包
进入xxl-job-admin目录执行
mvn clean package打包后会在target目录生成jar,可用命令执行jar启动调度器
java -jar xxl-job-admin-2.4.0.jar二、配置执行器
在示例配置中有springboot示例项目,简单拷贝一下就能执行。
pom引入依赖,注意跟调度器版本对应
            com.xuxueli
            xxl-job-core
            2.4.0
application.yml配置
server:
  port: 8081
logging:
  config: classpath:logback.xml
xxl:
  job:
    admin:
      addresses: http://127.0.0.1:8080/xxl-job-admin
    accessToken: xxl_token
    executor:
      appname: xxl-job-demo
      address: ''
      ip: ''
      port: 9999
      logpath: /data/applogs/xxl-job/jobhandler
      logretentiondays: 30
logback.xml
    logback


            %d{HH:mm:ss.SSS} %contextName [%thread] %-5level %logger{36} - %msg%n


        ${log.path}

            ${log.path}.%d{yyyy-MM-dd}.zip


            %date %level [%thread] %logger{36} [%file : %line] %msg%n
配置类XxlJobConfig.java
package com.example.demo.config;

import com.xxl.job.core.executor.impl.XxlJobSpringExecutor;
import org.slf4j.Logger;
import org.slf4j.LoggerFactory;
import org.springframework.beans.factory.annotation.Value;
import org.springframework.context.annotation.Bean;
import org.springframework.context.annotation.Configuration;

/**
 * xxl-job config
 *
 * @author xuxueli 2017-04-28
 */
@Configuration
public class XxlJobConfig {
    private Logger logger = LoggerFactory.getLogger(com.example.demo.config.XxlJobConfig.class);

    @Value("${xxl.job.admin.addresses}")
    private String adminAddresses;

    @Value("${xxl.job.accessToken}")
    private String accessToken;

    @Value("${xxl.job.executor.appname}")
    private String appname;

    @Value("${xxl.job.executor.address}")
    private String address;

    @Value("${xxl.job.executor.ip}")
    private String ip;

    @Value("${xxl.job.executor.port}")
    private int port;

    @Value("${xxl.job.executor.logpath}")
    private String logPath;

    @Value("${xxl.job.executor.logretentiondays}")
    private int logRetentionDays;


    @Bean
    public XxlJobSpringExecutor xxlJobExecutor() {
        logger.info(">>>>>>>>>>> xxl-job config init.");
        XxlJobSpringExecutor xxlJobSpringExecutor = new XxlJobSpringExecutor();
        xxlJobSpringExecutor.setAdminAddresses(adminAddresses);
        xxlJobSpringExecutor.setAppname(appname);
        xxlJobSpringExecutor.setAddress(address);
        xxlJobSpringExecutor.setIp(ip);
        xxlJobSpringExecutor.setPort(port);
        xxlJobSpringExecutor.setAccessToken(accessToken);
        xxlJobSpringExecutor.setLogPath(logPath);
        xxlJobSpringExecutor.setLogRetentionDays(logRetentionDays);

        return xxlJobSpringExecutor;
    }

    /**
     * 针对多网卡、容器内部署等情况,可借助 "spring-cloud-commons" 提供的 "InetUtils" 组件灵活定制注册IP;
     *
     *      1、引入依赖:
     *
     *             org.springframework.cloud
     *             spring-cloud-commons
     *             ${version}
     *
     *
     *      2、配置文件,或者容器启动变量
     *          spring.cloud.inetutils.preferred-networks: 'xxx.xxx.xxx.'
     *
     *      3、获取IP
     *          String ip_ = inetUtils.findFirstNonLoopbackHostInfo().getIpAddress();
     */


}
bean任务job类
package com.example.demo.jobhandler;

import com.xxl.job.core.context.XxlJobHelper;
import com.xxl.job.core.handler.annotation.XxlJob;
import lombok.extern.slf4j.Slf4j;
import org.springframework.stereotype.Component;

import java.util.Date;


@Slf4j
@Component
public class SampleXxlJob {

    /**
     * Bean模式任务
     */
    @XxlJob("demoJobHandler")
    public void demoJobHandler() throws Exception {
        XxlJobHelper.log("XXL-JOB, Hello World." + new Date());
        log.info("XXL-JOB, Hello World." + new Date());
        // default success
    }
}
这样一个打印语句+当前时间的定时任务执行器写完了
三、配置调度器
配置调度器,通知执行器何时执行任务。
先看执行器管理


appname 填执行器配置的xxl.job.executor.appname
名称 填任意名,不能超过12字符
注册方式 填手动录入
机器地址 填http://localhost:9999
其中localhost为执行器所在IP,早期版本不需要http:// ,9999为调度器的通信端口 配置项为xxl.job.executor.port
然后再任务管理中添加执行表达式。
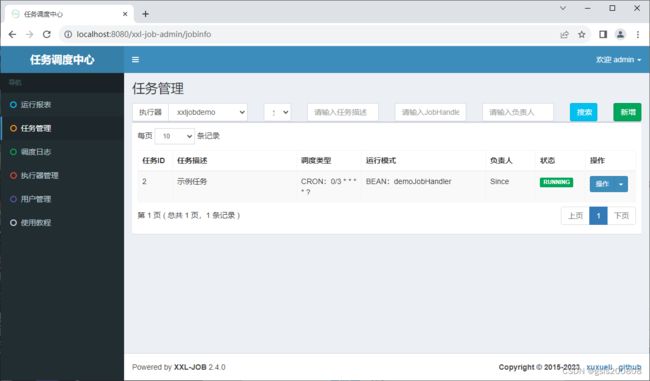

执行器 填 前一个页面配置的名称
调度类型 CRON
CRON 填CRON表达式,这里是每3秒一次
运行模式 BEAN
JobHandler 这里填@XxlJob注解配置的名称
高级配置里可以指定分布式运行时的策略,失败的策略等等。
四、结论
xxl-job近年来越来越流行,功能基本趋于稳定。不过还是存在一点点不足,不能很好的与zookeeper、nacos这样的注册中心集成,需要自己做改造。调度器和执行器的通信走的单独端口。同类的几款产品quartz Elastic-Job PowerJob,仅Elastic-Job支持zookeeper注册中心。