搭建SSM项目 IDEA版本
搭建SSM项目 IDEA版本
- 实验环境
- 项目源文件地址
- 创建Maven WebApp
-
- 打开IDEA
- 选择项目类型
- 指定项目坐标
- 配置Maven相关参数
- 设置项目本地存放位置
- IDEA自动生成的项目骨架
- 修改项目
- 运行项目
- 启动一个web项目的过程
- JavaEE、SSM中一些概念与重要文件的释义
-
- context-param
-
- 如何使用
-
- 页面中
- Servlet中
- context-param和init-param区别
- Listener、Servlet、Filter
- 相关配置文件
-
- applicationContext.xml
-
- 第一种方式
- 第二种方式
- 修改web.xml
-
- 修改web.xml中的配置为:
- 在pom.xml中添加Servlet、jsp依赖
- 自定义一个Listener
- 添加DispatcherServlet的配置
- 在`spring-servlet.xml`文件中的配置
-
- 定义一个Controller,检验配置是否正确
-
- 验证视图解析器是否正确
- 自己定义配置类,专门映射页面
-
- 自定义Config
- 在`spring-servlet.xml`中添加配置
- 自定义一个Servlet
- 数据访问的配置
-
- 数据源配置
- 增删改查
-
- 增
- 参考链接
本篇我们使用Maven构建我们的SSM项目,并简要介绍项目的配置
实验环境
-
JDK 8
-
IDEA 2017.2.6专业版(通过学生邮箱认证的)
-
Maven 3.5.0
-
Tomcat 8.5
项目源文件地址
点此查看
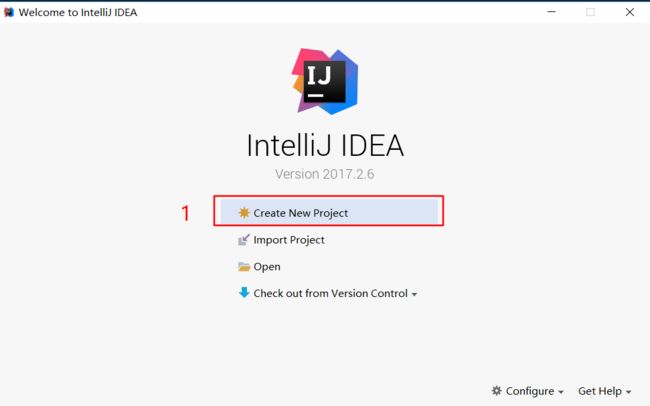
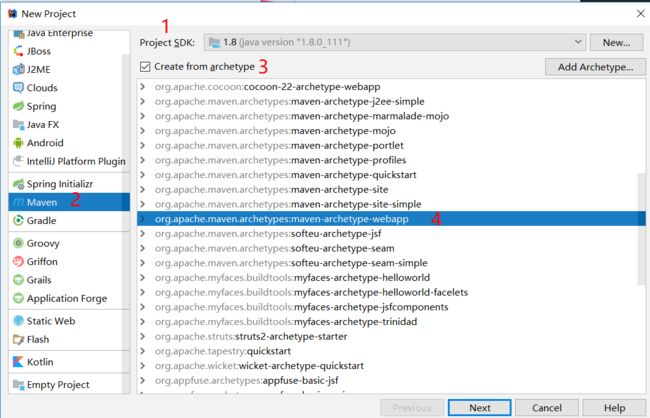
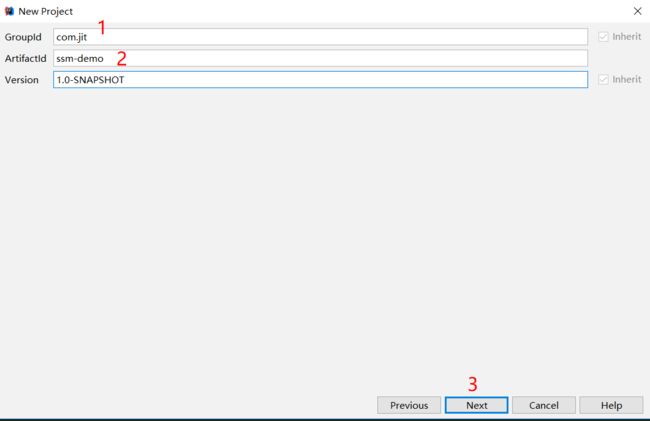
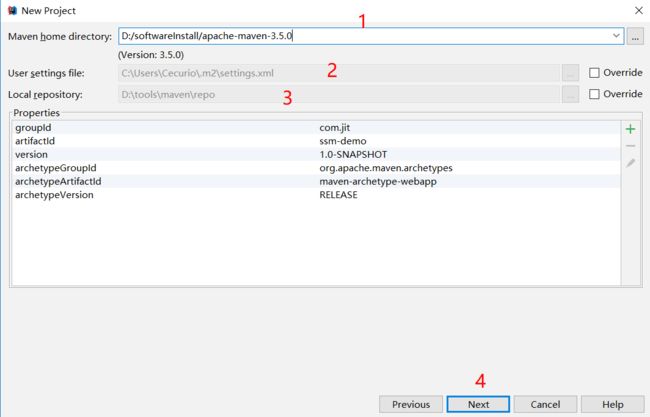
创建Maven WebApp
打开IDEA
选择项目类型
指定项目坐标
配置Maven相关参数
设置项目本地存放位置

IDEA自动生成的项目骨架
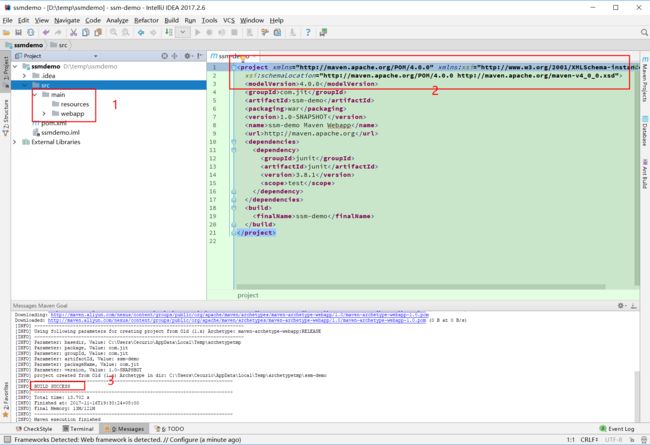
修改项目
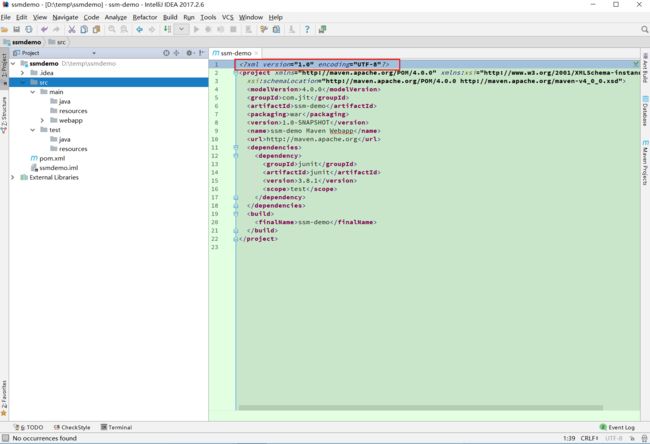
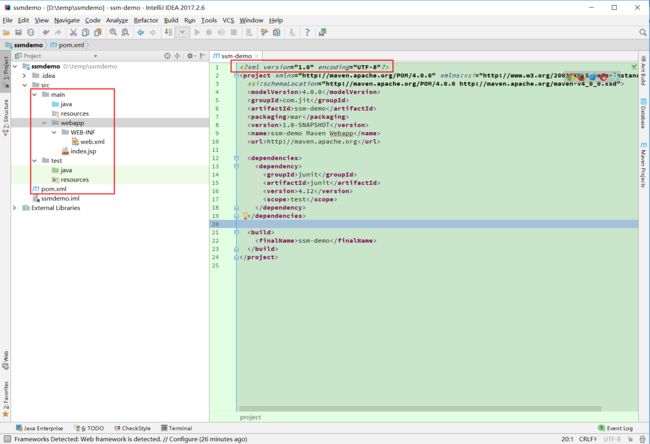
在pom.xml里面添加xml文件头
补全的Maven项目的目录结构,Maven标准目录结构的介绍请看这里
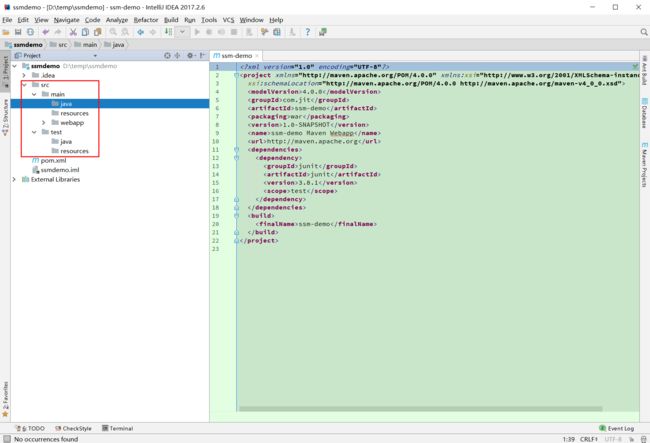
标记各个目录
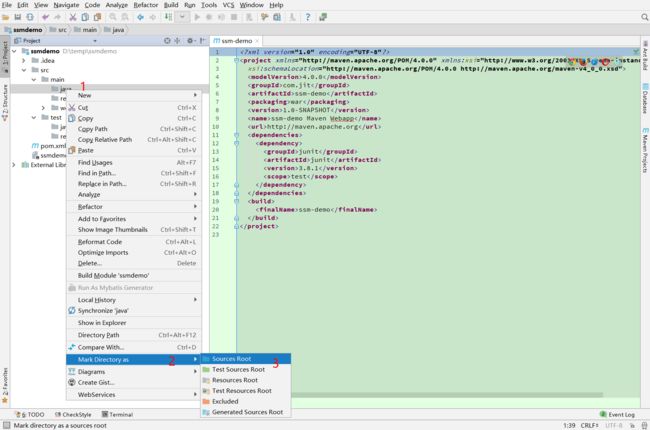
把src/main/java目录标记为Sources Root,把src/main/resources目录标记为Resources Root,把src/test/java目录标记为Test Sources Root,把src/test/resources目录标记为Test Resources Root
如果不把src/main/java标记为Sources Root,就无法创建package,只能创建Directory
下面是标记完成后的效果图
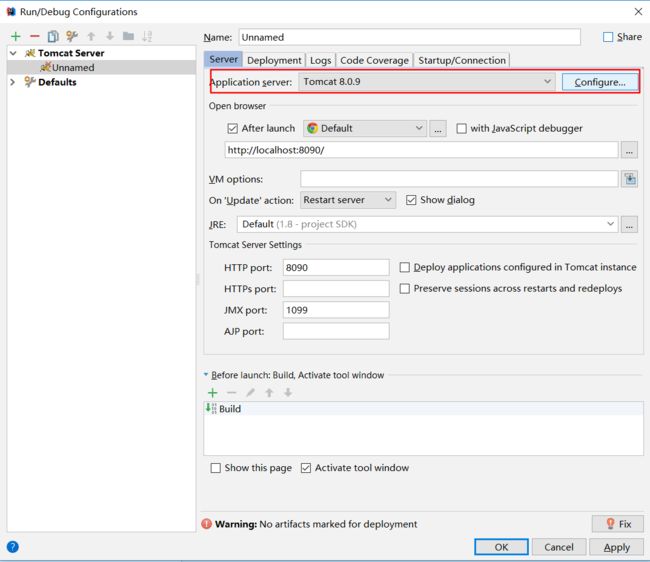
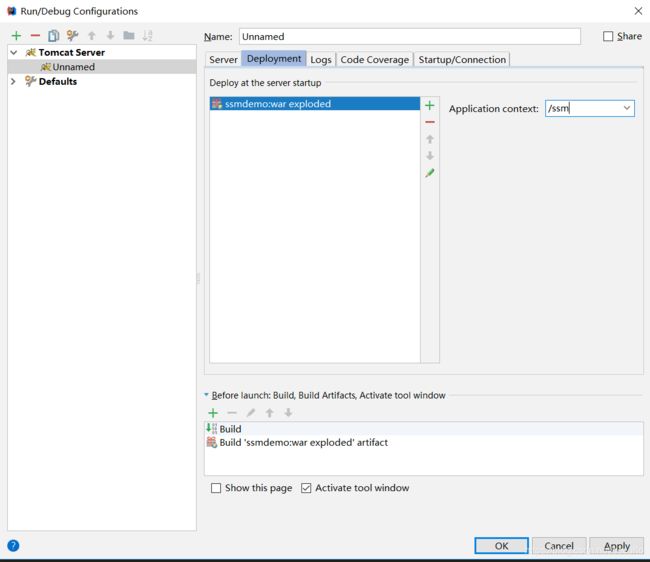
运行项目
编辑项目运行的配置


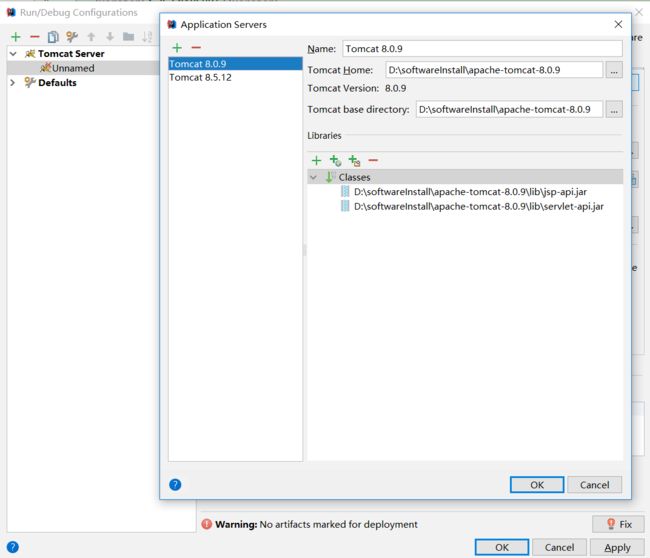
点击+号,添加本地的tomcat

添加tomcat


运行结果

启动一个web项目的过程
-
在启动一个web项目的时候,容器(比如Tomcat、Jetty)会去读它的配置文件web.xml 读两个节点:
-
容器创建一个ServletContext,这个web项目所有部分都将共享这个上下文
-
容器将
-
容器创建
-
在监听中会有contextInitialized(ServletContextEvent args)初始化方法,在这个方法中执行
this.servletContext = servletContextEvent.getServletContext();,从而获得ServletContext。context-param的值 = ServletContext.getInitParameter(“context-param的键”); 问:一个web项目能不能设置两个Listener? -
得到这个context-param的值之后,你就可以做一些操作了。注意,这个时候你的web项目还没有完全启动完成。这个动作会比所有的Servlet要早。换句话说,这个时候,你对
完全启动之前被执行 -
举个栗子,你可能想要在项目启动之前就打开数据库,那么你可以在
-
这个监听是自己写的一个类,除了初始化方法,它还有销毁方法(用于关闭应用前释放资源,比如:数据库连接的关闭)
JavaEE、SSM中一些概念与重要文件的释义
context-param
该元素用来声明应用范围(整个WEB项目)内的上下文初始化参数
param-name 设定上下文的参数名称。必须是唯一名称
param-value 设定的参数名称的值
如何使用
页面中
${initParam.contextConfigLocation}
Servlet中
String paramValue=getServletContext().getInitParameter(“contextConfigLocation”);
context-param和init-param区别
第一种参数在servlet里面可以通过getServletContext().getInitParameter("paramName")得到
第二种参数在servlet里面可以通过getInitParameter("paramName")取得
Listener、Servlet、Filter
注意Listener和servlet的区别,加载优先级是Listener大于servlet,同时两者性质也不同,Listener的操作是对一个事件对象的监听,而servlet和filter比较类似,是对于URL的一种匹配拦截。
相关配置文件
applicationContext.xml
顾名思义,是应用上下文、全局的配置。其启动配置一般在web.xml的Listener节点中
org.springframework.web.context.ContextLoaderListener 默认加载/WEB-INF/applicationContext.xml文件
可以有两种方式配置它
第一种方式
applicationContext.xml放在[maven-webapp-project]/src/main/java/webapp/WEB-INF/文件夹下,然后在web.xml中配置
org.springframework.web.context.ContextLoaderListener
第二种方式
applicationContext.xml放在[maven-webapp-project]/src/main/java/resources/文件夹下,然后在web.xml中配置
    contextConfigLocation
    classpath:applicationContext.xml


    org.springframework.web.context.ContextLoaderListener
指定contextConfigLocation的值的时候,要加classpath修饰,表示在类路径下查找文件,不然将会抛出java.io.FileNotFoundException异常
修改web.xml
web.xml 文件提供有关包含 Web 应用程序的 Web 组件的配置和部署信息。
Java Servlet 规范根据 XML 模式文档来定义 web.xml 部署描述符文件。为了获取向后兼容性,Web 容器支持任何写入 Servlet 2.2 或更高版本且在 WebSphere® Application Server 的先前版本中工作的 web.xml 文件。
web.xml 文件必须位于 Web 应用程序所在的目录层次结构上下文下的 WEB-INF 目录。
修改web.xml中的配置为:
<web-app xmlns="http://xmlns.jcp.org/xml/ns/javaee"
         xmlns:xsi="http://www.w3.org/2001/XMLSchema-instance"
         xsi:schemaLocation="http://xmlns.jcp.org/xml/ns/javaee
                      http://xmlns.jcp.org/xml/ns/javaee/web-app_3_1.xsd"
         version="3.1">


    <welcome-file-list>
        <welcome-file>index.htmlwelcome-file>
        <welcome-file>index.jspwelcome-file>
    welcome-file-list>


    <context-param>
        <param-name>myNameparam-name>
        <param-value>shankaiparam-value>
    context-param>


    <listener>
        <listener-class>cn.cecurio.listeners.ContextListenerlistener-class>
    listener>

web-app>
在pom.xml中添加Servlet、jsp依赖
<dependency>
	<groupId>javax.servletgroupId>
	<artifactId>javax.servlet-apiartifactId>
	<version>3.0.1version>
	<scope>providedscope>
dependency>
<dependency>
    <groupId>javax.servlet.jspgroupId>
    <artifactId>jsp-apiartifactId>
    <version>2.1version>
    <scope>providedscope>
dependency>
自定义一个Listener
listener在tomcat启动时就会被加载,可以用代码证明一下,自定义一个Listener
package cn.cecurio.listeners;

import javax.servlet.ServletContext;
import javax.servlet.ServletContextAttributeEvent;
import javax.servlet.ServletContextAttributeListener;
import javax.servlet.ServletContextEvent;
import javax.servlet.ServletContextListener;

/**
 * 自定义的上下文监听器
 * @author: Cecurio
 **/
public class ContextListener implements ServletContextAttributeListener, ServletContextListener {
    private ServletContext context = null;

    public void attributeAdded(ServletContextAttributeEvent event) {
        log("attributeAdded('" + event.getName() + "', '" +
            event.getValue() + "')");
    }

    public void attributeRemoved(ServletContextAttributeEvent event) {
        log("attributeRemoved('" + event.getName() + "', '" +
            event.getValue() + "')");
    }

    public void attributeReplaced(ServletContextAttributeEvent event) {
        log("attributeReplaced('" + event.getName() + "', '" +
            event.getValue() + "')");
    }

    public void contextInitialized(ServletContextEvent servletContextEvent) {
        log("自定义的ContextListener被加载了,执行了contextInitialized()");

        // 加载自定义的context-param
        String myName = servletContextEvent.getServletContext().getInitParameter("myName");
        log("context-param中自定义的键值对myName=>" + myName);

        this.context = servletContextEvent.getServletContext();
    }

    public void contextDestroyed(ServletContextEvent servletContextEvent) {
        log("contextDestroyed()");
        this.context = null;
    }

    private void log(String message) {
        if (context != null)
            context.log("ContextListener: " + message);
        else
            System.out.println("ContextListener: " + message);
    }
}
然后在web.xml中配置
<listener>
    <listener-class>cn.cecurio.listeners.ContextListenerlistener-class>
listener>
启动项目,控制台的输出表明listener在应用启动的时候被加载了

添加DispatcherServlet的配置
<servlet>
    <servlet-name>ssm-demo-springmvcservlet-name>
    <servlet-class>org.springframework.web.servlet.DispatcherServletservlet-class>
    <init-param>
        <param-name>contextConfigLocationparam-name>
        <param-value>classpath:spring-servlet.xmlparam-value>
    init-param>
    <load-on-startup>1load-on-startup>
servlet>
<servlet-mapping>
    <servlet-name>ssm-demo-springmvcservlet-name>
    <url-pattern>/url-pattern>
servlet-mapping>
servlet-name随意命名,但是servlet和servlet-mapping里的名字要一致。
在servlet的配置当中,
在spring-servlet.xml文件中的配置
<beans xmlns="http://www.springframework.org/schema/beans"
       xmlns:xsi="http://www.w3.org/2001/XMLSchema-instance"
       xmlns:context="http://www.springframework.org/schema/context"
       xmlns:mvc="http://www.springframework.org/schema/mvc"
       xsi:schemaLocation="http://www.springframework.org/schema/beans
       http://www.springframework.org/schema/beans/spring-beans.xsd
        http://www.springframework.org/schema/context http://www.springframework.org/schema/context/spring-context.xsd
        http://www.springframework.org/schema/mvc http://www.springframework.org/schema/mvc/spring-mvc.xsd">

    <context:component-scan base-package="cn.cecurio.controller"/>


    <context:component-scan base-package="cn.cecurio.config"/>


    <mvc:annotation-driven/>


    <bean class="org.springframework.web.servlet.view.InternalResourceViewResolver">
        <property name="prefix" value="/WEB-INF/view/"/>
        <property name="suffix" value=".jsp"/>
    bean>
beans>
需要注意的是 schemaLocation 的设置一定要正确,一个schema对应一个xsd文件,如果缺少的话,就会报
通配符的匹配很全面, 但无法找到元素 context:component-scan 的声明的错误~教训啊
定义一个Controller,检验配置是否正确
package cn.cecurio.controller;

import org.springframework.http.MediaType;
import org.springframework.stereotype.Controller;
import org.springframework.web.bind.annotation.RequestMapping;
import org.springframework.web.bind.annotation.ResponseBody;

import java.util.Arrays;
import java.util.HashMap;
import java.util.Map;

/**
 * Controller Demo
 * @author: Cecurio
 **/
@Controller
public class DemoController {
    @RequestMapping(value = "/demo",produces = MediaType.APPLICATION_JSON_VALUE)
    @ResponseBody
    public Map<String, Object> demoController() {
        Map<String, Object> map = new HashMap<>();
        map.put("desc", "this is a demo");
        map.put("component", Arrays.asList("Spring", "SpringMVC", "MyBatis"));
        return map;
    }
}
必须pom.xml要添加以下依赖包,用于json转换;The resource identified by this request is only capable of generating responses with characteristics not acceptable according to the request "accept" headers.这个错误
<properties>
    <jackson.version>2.8.9jackson.version>
properties>

<dependency>
    <groupId>com.fasterxml.jackson.coregroupId>
    <artifactId>jackson-databindartifactId>
    <version>${jackson.version}version>
dependency>
<dependency>
    <groupId>com.fasterxml.jackson.coregroupId>
    <artifactId>jackson-annotationsartifactId>
    <version>${jackson.version}version>
dependency>
<dependency>
    <groupId>com.fasterxml.jackson.coregroupId>
    <artifactId>jackson-coreartifactId>
    <version>${jackson.version}version>
dependency>
在spring-servlet.xml添加如下配置
<bean class="org.springframework.web.servlet.mvc.method.annotation.RequestMappingHandlerAdapter">
    <property name="messageConverters">
        <util:list id="beanList">
            <ref bean="mappingJacksonHttpMessageConverter" />
        util:list>
    property>
bean>


<bean id="mappingJacksonHttpMessageConverter"
      class="org.springframework.http.converter.json.MappingJackson2HttpMessageConverter">
    <property name="supportedMediaTypes">
        <list>
            <value>text/html;charset=UTF-8value>
        list>
    property>
bean>
输出结果如下:

验证视图解析器是否正确
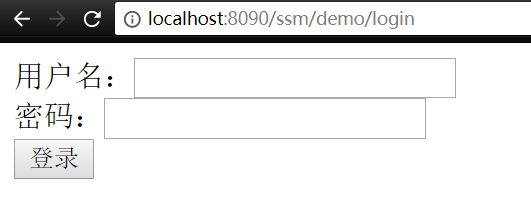
在webapp/WEB-INF/文件夹下创建一个文件夹view,然后在webapp/WEB-INF/view下面创建login.jsp文件
<%@ page contentType="text/html;charset=UTF-8" language="java" %>
<html>
<head>
    <title>Login Pagetitle>
head>
<body>
<form action="#" method="post">
    用户名:<input type="text" name="username" ><br/>
    密码:<input type="password" name="password"><br/>
    <input type="submit" value="登录">
form>
body>
html>
在cn.cecurio.controller.DemoController类中添加如下代码:
@RequestMapping(value = "/demo/login",method = RequestMethod.GET)
public String loginPage() {
    return "login";
}
结果如下:
自己定义配置类,专门映射页面
上述映射页面的方法,可行是可行,但是页面如果多了,就会很繁琐,有更简单的方式
自定义Config
在src/main/java/cn/cecurio/config文件夹下新建类WebMvcConfig
package cn.cecurio.config;

import org.springframework.context.annotation.Configuration;
import org.springframework.web.servlet.config.annotation.EnableWebMvc;
import org.springframework.web.servlet.config.annotation.ResourceHandlerRegistry;
import org.springframework.web.servlet.config.annotation.ViewControllerRegistry;
import org.springframework.web.servlet.config.annotation.WebMvcConfigurerAdapter;

/**
 * 自定义配置类
 * @author: Cecurio
 **/
@EnableWebMvc
@Configuration
public class WebMvcConfig extends WebMvcConfigurerAdapter {

    //注册静态资源,没注册的话,网站是访问不了的
    @Override
    public void addResourceHandlers(ResourceHandlerRegistry registry) {
        registry.addResourceHandler("/resources/**")
        .addResourceLocations("/WEB-INF/resources/");
    }

    //页面映射
    @Override
    public void addViewControllers(ViewControllerRegistry registry) {
        registry.addViewController("/demo/login").setViewName("login");
    }
}
要添加@EnableWebMvc、@Configuration注解,用于告诉spring我是一个配置类,请加载我,并按照我的配置去做
在spring-servlet.xml中添加配置
<context:component-scan base-package="cn.cecurio.config"/>
告诉spring,要扫描我的这个自定义的包
自定义一个Servlet
用于测试init-param context-param的加载与作用域
package cn.cecurio.servlet;

import javax.servlet.ServletException;
import javax.servlet.http.HttpServlet;
import javax.servlet.http.HttpServletRequest;
import javax.servlet.http.HttpServletResponse;
import java.io.IOException;

/**
 * 测试init-param context-param的加载与作用域
 * @author: Cecurio
 * @create: 2017-11-19 20:15
 **/
public class TestServlet extends HttpServlet {

    @Override
    public void init() throws ServletException {
        String initParam = getInitParameter("myEnglishName");
        print("init-param in init(): " + initParam);
        String contextParam = getServletContext().getInitParameter("myName");
        print("context-param in init(): " + contextParam);
    }

    @Override
    protected void doGet(HttpServletRequest req, HttpServletResponse resp) throws ServletException, IOException {
        String initParam = getInitParameter("myEnglishName");
        print("init-param in doGet()(): " + initParam);
        String contextParam = getServletContext().getInitParameter("myName");
        print("context-param in doGet(): " + contextParam);
        resp.setContentType("text/html;charset=utf-8");
        resp.getWriter().append("自定义的Servlet");
    }

    private void print(String message) {
        System.out.println("自定义的Servlet: " + message);
    }

}
在web.xml文件中配置
<context-param>
    <param-name>myNameparam-name>
    <param-value>shankaiparam-value>
context-param>

<servlet>
    <servlet-name>testServletservlet-name>
    <servlet-class>cn.cecurio.servlet.TestServletservlet-class>
    <init-param>
        <param-name>myEnglishNameparam-name>
        <param-value>Cecurioparam-value>
    init-param>
servlet>
<servlet-mapping>
    <servlet-name>testServletservlet-name>
    <url-pattern>/param.actionurl-pattern>
servlet-mapping>
输出结果:
自定义的Servlet: init-param in init(): Cecurio
自定义的Servlet: context-param in init(): shankai
自定义的Servlet: init-param in doGet(): Cecurio
自定义的Servlet: context-param in doGet(): shankai

数据访问的配置
数据源配置
数据源 会话工厂 mapper.xml与接口的对应
applicationContext.xml中如下配置:
<context:property-placeholder location="classpath:jdbc.properties"/>


<bean id="dataSource" class="com.alibaba.druid.pool.DruidDataSource">
    <property name="driverClassName" value="${jdbc.driverClassName}" />
    <property name="url" value="${jdbc.url}"/>
    <property name="username" value="${jdbc.username}"/>
    <property name="password" value="${jdbc.password}"/>
bean>

<bean id="sqlSessionFactory" class="org.mybatis.spring.SqlSessionFactoryBean">

    <property name="dataSource" ref="dataSource" />

    <property name="configLocation" value="classpath:mybatis-config.xml" />

    <property name="typeAliasesPackage" value="cn.cecurio.entity" />

    <property name="mapperLocations" value="classpath:mapper/*.xml" />
bean>

<bean class="org.mybatis.spring.mapper.MapperScannerConfigurer">

    <property name="sqlSessionFactoryBeanName" value="sqlSessionFactory" />

    <property name="basePackage" value="cn.cecurio.dao" />
bean>
jdbc.properties如下配置
jdbc.driverClassName=com.mysql.jdbc.Driver
jdbc.url=jdbc:mysql://localhost:3306/ssm?useUnicode=true&characterEncoding=utf8
jdbc.username=root
jdbc.password=root
增删改查
增
<insert id="addOne" parameterType="cn.cecurio.entity.UserEntity" useGeneratedKeys="true" keyProperty="userId">
    INSERT INTO ssm_user (username,passwd,create_time,active_status) VALUES (#{username},#{passwd},#{createTime},#{activeStatus});
insert>
useGeneratedKeys="true" keyProperty="userId" 指明主键,返回自增的ID
参考链接
(感谢以下文章的作者)
https://www.ibm.com/support/knowledgecenter/zh/SSAW57_8.5.5/com.ibm.websphere.nd.doc/ae/rweb_webxf.html
http://blog.csdn.net/wlwlwlwl015/article/details/48134763
http://www.cnblogs.com/hzj-/articles/1689836.html
https://stackoverflow.com/questions/28414234/where-can-i-find-the-example-applicationcontext-xml-file/28418012
http://zeusjava.com/2015/09/12/maven-springmvc-demo/
http://www.cnblogs.com/tanglc/p/3664795.html
http://blog.csdn.net/qq_26819733/article/details/76064320
http://blog.csdn.net/liaoxiaohua1981/article/details/6759206