Spring 项目的创建与 Bean对象的使用
目录
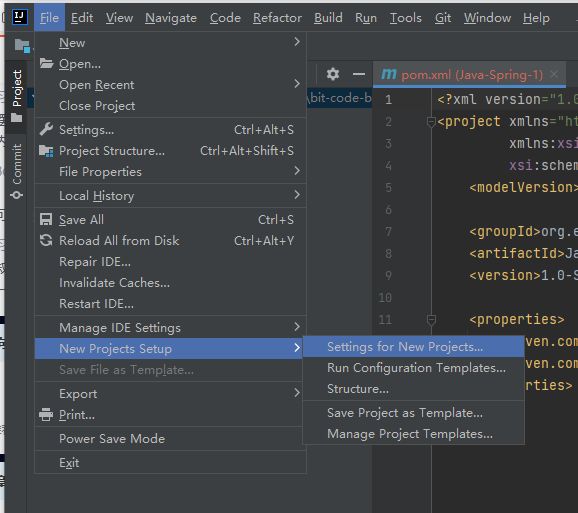
一.创建Spring项目
1.配置Maven国内源
如果没有settings.xml文件
如果已存在settings.xml文件
删除本地所有的jar包,重新下载
2.引入Spring依赖
3.创建启动类
二.将Bean对象存储到Spring(IoC容器)
1.创建bean对象
2.将bean对象存储到Spring中
添加Spring配置文件
注入bean对象
3.读取bean对象
通过ApplicationContext方式
通过BeanFactory方式
两种方式的区别
getBean()的更多用法
一.创建Spring项目
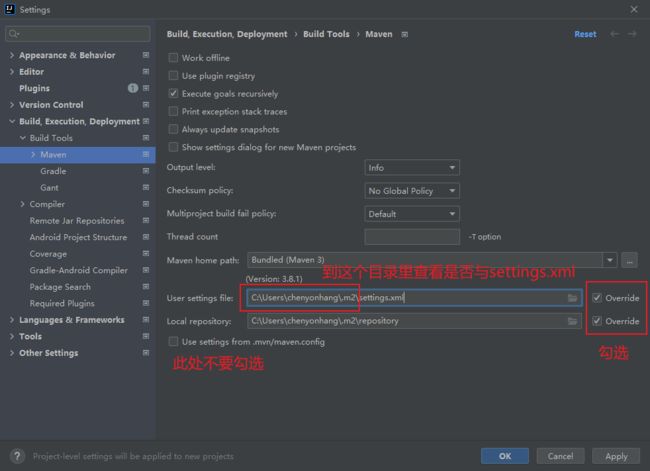
1.配置Maven国内源
如果没有 .m2 文件夹,则自己创建一个 .m2文件夹即可
如果没有settings.xml文件
可以看到我的目录里没有settings.xml文件

创建一个settings.xml文件,然后将以下代码粘贴进去即可
-


-


-


-


-


-

alimaven

aliyun maven

http://maven.aliyun.com/nexus/content/groups/public/

central


-
如果已存在settings.xml文件
则右键这个xml文件,用idea打开,然后找到
        alimaven
        aliyun maven
        http://maven.aliyun.com/nexus/content/groups/public/
        central

此时就完成了Maven国内源的配置
删除本地所有的jar包,重新下载
本地仓库地址:

全部删除

然后再回到idea 的 pom.xml文件里刷新Maven

下载成功后,即可完成

2.引入Spring依赖
在Maven项目里添加Spring框架的支持,在pom.xml文件里添加以下代码:
        org.springframework
        spring-context
        5.2.3.RELEASE


        org.springframework
        spring-beans
        5.2.3.RELEASE
粘贴后,刷新Maven即可完成下载,由此,Maven项目变成了Spring项目

3.创建启动类
java目录里创建个启动类即可

二.将Bean对象存储到Spring(IoC容器)
1.创建bean对象
如图,我们创建了一个学生对象

2.将bean对象存储到Spring中
添加Spring配置文件
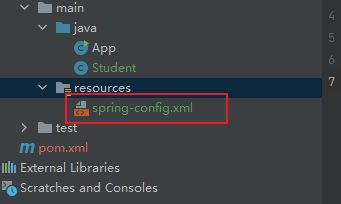
在resources里创建spring-config.xml文件,然后粘贴以下代码
注入bean对象
bean是通过Spring配置文件注入到Spring的

此时,这个bean对象其实并没有真正存入Spring容器中,目前只是设置了,并没有执行
只有到调用了相关的方法后才会真正存入容器里, 类似于单例模式里的懒汉模式
3.读取bean对象
通过ApplicationContext方式
得到Spring上下文对象
ApplicationContext context = new ClassPathXmlApplicationContext("spring-config.xml");通过Spring上下文对象获取指定的bean对象
context.getBean("Student");使用bean对象

通过BeanFactory方式
唯一不同的是获取spring上下文对象的代码
import Spring.demo.Student;
import org.springframework.beans.factory.BeanFactory;
import org.springframework.beans.factory.xml.XmlBeanFactory;
import org.springframework.core.io.ClassPathResource;

import javax.annotation.Resource;
import java.security.cert.X509Certificate;

public class App2 {
    public static void main(String[] args) {
        //得到Spring上下文对象
        BeanFactory beanFactory =
                new XmlBeanFactory(new ClassPathResource("spring-config.xml"));
        //得到指定的bean对象
        Student student = (Student) beanFactory.getBean("Student");
        //使用bean对象
        student.sayHello();
    }
}
两种方式的区别
现在计算机内存充足 , BeanFactory方式已经是过时的方式了
相同点: 都是容器管理对象,都可以获取bean对象
不同点: 1.ApplicationContext 是 BeanFactory 的子类, ApplicationContext 拥有更多的功能 (国际化支持,资源访问支持,事件传播等方面的支持)
2.加载bean的机制不同. BeanFactory是懒加载,按需加载(用到一个bean再加载一个 bean), ApplicationContext 则是一次性加载所有的 bean对象
3.基于第2点,ApplicationContext在启动时很慢,占用的内存大,但启动后获取对象非常
快(性能强) , BeanFactory启动时很快,占用内存很小(按需加载bean),但后续查询慢.
getBean()的更多用法
用法1: 根据名称获取bean对象
使用这种方法需要对getBean()的返回值 进行 类型强转
Student student = (Student) context.getBean("Student");用法2: 根据类型获取bean对象
Student student = context.getBean(Student.class);
只适用于容器中每个类型都是独有的情况
如果存在同一个类型注入到spring容器多次 的情况下,使用此方法就会报错: 无法判断要获取哪个bean
如图,我们在Spring配置文件中 , 将Student类型注入两次 , id 分别为 student 和 student2

此时运行就会报错


用法3: 根据 名称+类型 获取bean对象
Student student = context.getBean("Student",Student.class);推荐使用这种方法,避免了类型强转,使代码看起来更优雅
如图:即使存在两个同样类型bean对象,由于有名称指定唯一的 id,因此不会报错
