Hyperf使用WebSocket 服务
1.安装服务
composer require hyperf/websocket-server
2.配置 Server
修改 config/autoload/server.php,增加以下配置。
<?php

declare(strict_types=1);
/**
 * This file is part of Hyperf.
 *
 * @link     https://www.hyperf.io
 * @document https://hyperf.wiki
 * @contact  [email protected]
 * @license  https://github.com/hyperf/hyperf/blob/master/LICENSE
 */
use Hyperf\Server\Event;
use Hyperf\Server\Server;
use Swoole\Constant;

return [
    'mode' => SWOOLE_PROCESS,
    'servers' => [//监听多个端口
        [
            'name' => 'http',
            'type' => Server::SERVER_HTTP,
            'host' => '0.0.0.0',
            'port' => 9501,
            'sock_type' => SWOOLE_SOCK_TCP,
            'callbacks' => [
                Event::ON_REQUEST => [Hyperf\HttpServer\Server::class, 'onRequest'],
            ],
        ],
        [
            'name' => 'http',
            'type' => Server::SERVER_HTTP,
            'host' => '0.0.0.0',
            'port' => 9508,
            'sock_type' => SWOOLE_SOCK_TCP,
            'callbacks' => [
                Event::ON_REQUEST => [Hyperf\HttpServer\Server::class, 'onRequest'],
            ],
        ],
        [
            'name' => 'ws',
            'type' => Server::SERVER_WEBSOCKET,
            'host' => '0.0.0.0',
            'port' => 9502,
            'sock_type' => SWOOLE_SOCK_TCP,
            'callbacks' => [
                Event::ON_HAND_SHAKE => [Hyperf\WebSocketServer\Server::class, 'onHandShake'],
                Event::ON_MESSAGE => [Hyperf\WebSocketServer\Server::class, 'onMessage'],
                Event::ON_CLOSE => [Hyperf\WebSocketServer\Server::class, 'onClose'],
            ],
        ],
    ],
    'settings' => [
        Constant::OPTION_ENABLE_COROUTINE => true,
        Constant::OPTION_WORKER_NUM => swoole_cpu_num(),
        Constant::OPTION_PID_FILE => BASE_PATH . '/runtime/hyperf.pid',
        Constant::OPTION_OPEN_TCP_NODELAY => true,
        Constant::OPTION_MAX_COROUTINE => 100000,
        Constant::OPTION_OPEN_HTTP2_PROTOCOL => true,
        Constant::OPTION_MAX_REQUEST => 100000,
        Constant::OPTION_SOCKET_BUFFER_SIZE => 2 * 1024 * 1024,
        Constant::OPTION_BUFFER_OUTPUT_SIZE => 2 * 1024 * 1024,
    ],
    'callbacks' => [
        Event::ON_WORKER_START => [Hyperf\Framework\Bootstrap\WorkerStartCallback::class, 'onWorkerStart'],
        Event::ON_PIPE_MESSAGE => [Hyperf\Framework\Bootstrap\PipeMessageCallback::class, 'onPipeMessage'],
        Event::ON_WORKER_EXIT => [Hyperf\Framework\Bootstrap\WorkerExitCallback::class, 'onWorkerExit'],
    ],
];
3.配置路由(目前暂时只支持配置文件的模式配置路由,后续会提供注解模式。)
在 config/routes.php 文件内增加对应 ws 的 Server 的路由配置,这里的 ws 值取决于您在 config/autoload/server.php 内配置的 WebSocket Server 的 name 值。
/**
 * WebSocket相关的路由(目前只支持文件配置设置路由,注解版的目前官方还没有-20230517)
 */
Router::addServer('ws', function () {
    Router::get('/', 'App\Controller\WebSocketController');
});
4.创建对应控制器
<?php

namespace App\Controller;


use Hyperf\Contract\OnCloseInterface;
use Swoole\Http\Response;
use Swoole\WebSocket\Frame;
use Swoole\Server;
use Swoole\WebSocket\Server as WebSocketServer;

class WebSocketController implements \Hyperf\Contract\OnMessageInterface, \Hyperf\Contract\OnOpenInterface,OnCloseInterface
{


    /**
     * @inheritDoc
     */
    public function onMessage($server, Frame $frame): void
    {
        var_dump($frame->data);
        $data = [
            "hello!",
            "hello,叼毛",
            "叼您的啦",
            "做点事,叼毛",
            "中午了,要吃饭了",
            "好烦啊",
            "上班上班",
            "寄",
            "该喝水了,记得喝水,叼毛",
            "还要上班,淦",
            "中午吃啥",
        ];
        $rand = rand(0,10);
        $server->push($frame->fd, '王天佑: ' . $data[$rand]);
    }


    public function onClose($server, int $fd, int $reactorId): void
    {
        echo $fd . '断开连接,处理线程是 ' . $reactorId . PHP_EOL;
    }

    public function onOpen($server, $request): void
    {
        $server->push($request->fd, $request->fd . ' 号客户端已连接!' . PHP_EOL);
    }

}
5.启动

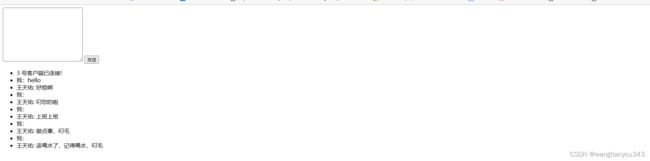
6.来个连接测试一下
<!doctype html>
<html lang="en">
<head>
    <meta charset="UTF-8">
    <meta name="viewport"
          content="width=device-width, user-scalable=no, initial-scale=1.0, maximum-scale=1.0, minimum-scale=1.0">
    <meta http-equiv="X-UA-Compatible" content="ie=edge">
    <title>websocket</title>
</head>
<body>
<div>
    <textarea name="content" id="content" cols="30" rows="10"></textarea>
    <button onclick="send();">发送</button>
</div>
<ul id="messageList"></ul>

<script>
    let ws = new WebSocket('ws://192.168.210.144:9502')
    ws.onopen = event => {
        console.log('连接服务器成功');
    }

    ws.onmessage = event => {
        let data = event.data;
        let ul = document.getElementById('messageList');
        let li = document.createElement('li');
        li.innerHTML = data;
        ul.appendChild(li);
    }

    ws.onclose = event => {
        console.log('客户端连接关闭');
    }

    function send() {
        let obj = document.getElementById('content');
        let content = obj.value;

        let ul = document.getElementById('messageList');
        let li = document.createElement('li');
        li.innerHTML = "我:"+content;
        ul.appendChild(li);

        ws.send(content);
        obj.value = '';
    }
</script>
</body>
</html>
7.效果