RHCE——二十、Ansible及安装与配置
Ansible
-
- 一、自动化运维的背景
-
- 运维自动化
- 二、自动化运维的体系结构及组成
-
- 1、系统预备
- 2、配置管理
- 3、监控报警
- 4、常用工具
- 三、自动化运维的发展概述
-
- 1、运维工作内容分类
- 2、运维自动化标准化
-
- 2.1 物理设备层面
- 2.2 操作系统层面
- 2.3 应用服务层面
- 2.4 运维操作层面
- 四、Ansible的介绍
-
- 1、什么是Ansible
-
- 1.1 Ansible特点
- 1.2 Ansible优点
- 2、Ansible架构模式
-
- 2.1 概述
- 2.2 管理架构
- 3、Ansible系统架构
- 4、Ansible任务执行流程
-
- 1、分类
- 2、过程
- 五、Ansible安装与配置(自定义环境)
-
-
- 1、组成
- 2、设置每台主机的静态IP地址
- 3、每天主机设置主机名
- 4、每台主机设置host映射
- 5、多台主机通过ssh免密登录
- 6、所有主机安全软件关闭
- 7、注意
- 8、安装ansible
-
- 六、管理ansible静态清单
-
- 1、定义主机清单
- 2、两种方式定义主机清单
- 3、使用静态主机清单指定受管主机(默认)
-
- 3.1 产生原因
- 3.2 静态主机清单文件本质
- 3.3 清单内容分析(不分组)
- 3.4 清单内容分析(分组)
- 3.5 通过范围简化主机清单写法
- 七、定义嵌套分组
-
- 1、自定义主机清单
- 2、有选择的查看主机和组
-
- 2.1 先编辑清单在演示
- 2.2 有选择查询
- 八、Ad-hoc命令与模块
-
- 1、概念
- 2、格式
- 3、ansible命令常用参数
- 4、模块类型
-
- 4.1 三种模块类型
- 4.2 Ansible核心模块和附加模块
- 5、示例
一、自动化运维的背景
运维自动化
-
由于网站业务上线,需要运维人员在短时间内完成几百台服务器部署,工作包括:系统安装、系统初始化、软件安装与配置、性能监控等
-
所以需要利用脚本与第三方工具或自行开发的工具在最少的人工干预下,实现证业务系统快速上线以及7*24小时高效稳定的运行
-
不通方式的运维要求
| 各个阶段 | 运维规模(台) | 运维效率 | 技能要求 |
|---|---|---|---|
| 纯手工 | <50 | 低 | 一般 |
| 脚本与文档 | 50–100 | 一般 | 高 |
| 运维工具 | 100–500 | 高 | 一般 |
| 脚本+运维工具 | > 500 | 最高 | 高 |
二、自动化运维的体系结构及组成
1、系统预备
- 自动化安装操作系统及常用软件包
- 自动化安装与升级系统补丁
- 自动化升级相关软件
- ……
2、配置管理
- 自动化部署业务系统软件包并完成配置
- 远程管理服务器
- 变更回滚
- ……
3、监控报警
- 服务器可用性、性能状态、安全监控
- 向管理员发送报警信息
- ……
4、常用工具

三、自动化运维的发展概述
1、运维工作内容分类
-
监控运维(7x24运维值班、故障处理)
-
应用运维(业务熟悉、服务部署、业务部署、版本管理、灰度发布、应用监控)
-
安全运维(整体的安全方案、规范、漏洞检测、安全防护等)
-
系统运维(架构层面的分布式缓存、分布式文件系统、日志收集、环境规划(测试、开发、生产)、架构设计、性能优化)
-
基础服务运维(包含运维开发)(内部DNS、负载均衡、系统监控、资产管理、运维平台)
-
基础设施运维(系统初始化、网络维护、负责设备上下架、巡检、报修、硬件监控)
2、运维自动化标准化
2.1 物理设备层面
- 服务器标签化、设备负责人、设备采购详情、设备摆放标准
- 网络划分、远程控制卡、网卡端口
- 服务器机型、硬盘、内存统一
- 资产命名规范、编号规范、类型规范
- 监控标准
2.2 操作系统层面
- 操作系统版本
- 系统初始化(dns、ntp、内核参数调优、rsyslog、主机名规范)
- 基础agent配置(zabbix agent、logstash agent、saltstack minion)
- 系统监控标准(cpu、内存、硬盘、经常)
2.3 应用服务层面
- web服务选型(apache、nginx)
- 进程启动用户、端口监听规范、日志收集规范(访问日志、错误日志、运行日志)
- 配置管理(配置文件规范、脚本规范)
- 架构规范(nginx+keepalievd、lvs+keeplievd)
- 部署规范(位置、包命名等)
2.4 运维操作层面
- 机房巡检流程(周期、内容、报修流程)
- 业务部署流程(先测试、后生产、回滚)
- 故障处理流程(紧急处理、故障升级、重大故障管理)
- 工作日志标准(如何编写工作日志)
- 业务上线流程(项目发起、系统安装、部署应用、解析域名、测试、加监控、备份)
- 业务下线流程(谁发起、数据如何处理)
- 运维安全规范(密码复杂度、更改周期、使用规范、服务登录规范、文档化)
四、Ansible的介绍
1、什么是Ansible
-
Ansible是一种基于python开发、分布式、无客户端、轻量级、采用YAML配置语言的常用自动运维化工具
-
Ansible 的名称来自科幻小说《安德的游戏》中跨越时空的即时通信工具,使用它可以在相距数光年的距离,远程实时控制前线的舰队战斗

- 2012年2月,程序员Michael DeHaan发布了Ansible的第一个版本,他就职于红帽公司的期间,被各种自动化软件折磨了好久,最终决定自己打造一款集众多软件的优点于一身的自动化工具–Ansible由此诞生,2015年Ansible正式被红帽公司使用1.5亿美元收购,其发展潜力更是不可估量
1.1 Ansible特点
- no agents:不需要在被管控主机上安装任何客户端
- no server:无服务器端,使用时直接运行命令即可
- Ansible是基于模块工作
- 使用yaml语言定制剧本playbook
- 基于ssh工作
- 可实现多级指挥
1.2 Ansible优点
- 轻量级,无需在客户端安装Agent(代理),更新时,只需在操作机上进行一次更新即可
- 批量任务执行可以写成脚本,而且不用分发到远程就可以执行
- 使用Python编写,维护更简单
- 支持sudo
缺点:对于几千台、上万台机器的操作,还不清楚性能、效率情况如何,需要进一步了解
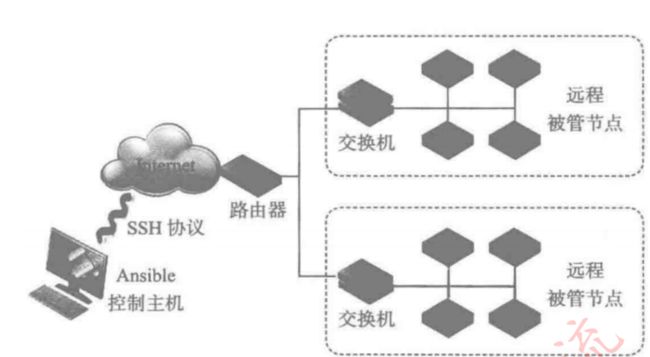
2、Ansible架构模式
2.1 概述
- Ansible 是一个模型驱动的配置管理器, 支持多节点发布、 远程任务执行。
- 默认使用SSH 进行远程连接, 无需在被管节点上安装附加软件, 可使用各种编程语言进行扩展
2.2 管理架构
3、Ansible系统架构
- Ansible本身没有批量部署的能力,是由所运行的模块实现批量部署,Ansible只是提供一种框架
- 组成:
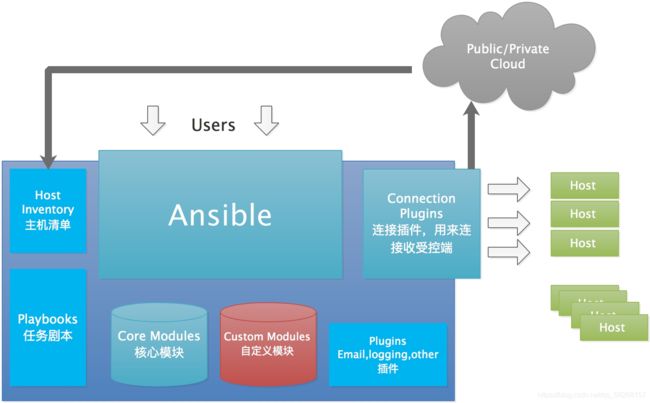
- 解释:
- Ansible:核心:
- Core Modules:核心模块,都是ansible自带的模块
- Custom Modules:扩展模块,若核心模块不足以完成某种功能,可以添加扩展模块
- Plugins:插件,完成模块功能的补充
- Playbooks:剧本,Ansible的任务配置文件,将多个任务定义在剧本中,由Ansible自动执行
- Connectior Plugins:连接插件,Ansible基于连接插件连接到各个主机上,虽然Ansible是使用ssh连接到各个主机的,但是它还支持其他的连接方法,所以需要有连接插件
- Host Inventory:主机群,定义ansible管理的主机
4、Ansible任务执行流程
1、分类
- Ansible系统由控制主机对被管节点的操作方式可分为两类(ad-hoc)和(playbook)
- ad-hoc支持单个模块,支持批量执行单条命令
- playbook通过多个task集合完成一类功能,可以理解为通过组合多条ad-hoc操作的配置文件
2、过程

五、Ansible安装与配置(自定义环境)
1、组成
| 角色 | 主机名 | IP |
|---|---|---|
| 控制机 | server.example.com | 192.168.48.130 |
| 被管理节点 | node1.example.com | 192.168.48.131 |
| 被管理节点 | node2.example.com | 192.168.48.132 |
2、设置每台主机的静态IP地址
# server端操作
[root@server ~]# nmcli  connection modify ens160 ipv4.addresses 192.168.48.130/24  ipv4.gateway 192.168.48.2 ipv4.dns 114.114.114.114  ipv4.method manual
[root@server ~]# nmcli  c  reload
[root@server ~]# nmcli  c  up ens160
连接已成功激活(D-Bus 活动路径:/org/freedesktop/NetworkManager/ActiveConnection/2)
# node1端操作
[root@node1 ~]# nmcli  connection modify ens160 ipv4.addresses 192.168.48.131/24  ipv4.gateway 192.168.48.2 ipv4.dns 114.114.114.114  ipv4.method manual
[root@node1 ~]# nmcli connection reload
[root@node1 ~]# nmcli connection up  ens160
连接已成功激活(D-Bus 活动路径:/org/freedesktop/NetworkManager/ActiveConnection/2)
# node2操作
[root@node2 ~]# nmcli  connection modify ens160 ipv4.addresses 192.168.48.132/24  ipv4.gateway 192.168.48.2 ipv4.dns 114.114.114.114  ipv4.method manual
[root@node2 ~]# nmcli c reload
[root@node2 ~]# nmcli c up ens160
连接已成功激活(D-Bus 活动路径:/org/freedesktop/NetworkManager/ActiveConnection/2)
3、每天主机设置主机名
# server操作
[root@server ~]# hostnamectl  set-hostname  server.example.com
[root@server ~]# reboot
# node1操作
[root@node1 ~]# hostnamectl  set-hostname  node1.example.com
[root@node1 ~]# reboot
# node2操作
[root@node2 ~]# hostnamectl  set-hostname  node2.example.com
[root@node2 ~]# reboot
4、每台主机设置host映射
# server端操作
[root@server ~]# vim  /etc/hosts
# 删除原有内容,输入以下内容
127.0.0.1       server.example.com
192.168.48.130  server.example.com
192.168.48.131  node1.example.com
192.168.48.132  node2.example.com
# node1端操作
[root@node1 ~]# vim  /etc/hosts
# 删除原有内容,输入以下内容
127.0.0.1       node1.example.com
192.168.48.130  server.example.com
192.168.48.131  node1.example.com
192.168.48.132  node2.example.com
# node2端操作
[root@node2 ~]# vim  /etc/hosts
# 删除原有内容,输入以下内容
127.0.0.1       node2.example.com
192.168.48.130  server.example.com
192.168.48.131  node1.example.com
192.168.48.132  node2.example.com
5、多台主机通过ssh免密登录
# server端操作
[root@server ~]# ssh-keygen  -t  rsa    # 之后一路回车
Generating public/private rsa key pair.
Enter file in which to save the key (/root/.ssh/id_rsa):
Created directory '/root/.ssh'.
Enter passphrase (empty for no passphrase):
Enter same passphrase again:
Your identification has been saved in /root/.ssh/id_rsa
Your public key has been saved in /root/.ssh/id_rsa.pub
The key fingerprint is:
SHA256:PJ8WjFa3sQDoMmi9GYUpuAuff79Wt9g64bMolE9yucA [email protected]
The key's randomart image is:
+---[RSA 3072]----+
| .   o ..        |
|. . o o  .       |
| . + o    o o    |
|o o = .. + o +   |
|.+ . B .S.o o    |
|. o o E.+ooo.    |
|   . . * ++= .   |
|    . o +o= o    |
|     . ++.o=     |
+----[SHA256]-----+
[root@server ~]# ssh-copy-id  node1.example.com   # server端向node1分发密钥
The authenticity of host 'node1.example.com (192.168.48.131)' can't be established.
ED25519 key fingerprint is SHA256:K7nvJFkfIh+p9YytEGR44wLbTfpB0Y52oVou0UdG6nc.
This key is not known by any other names
Are you sure you want to continue connecting (yes/no/[fingerprint])? yes # 输入yes
/usr/bin/ssh-copy-id: INFO: attempting to log in with the new key(s), to filter out any that are already installed
/usr/bin/ssh-copy-id: INFO: 1 key(s) remain to be installed -- if you are prompted now it is to install the new keys
[email protected]'s password:     # 输入登录密码123456
Number of key(s) added: 1
Now try logging into the machine, with:   "ssh 'node1.example.com'"
and check to make sure that only the key(s) you wanted were added.
[root@server ~]# ssh-copy-id  node2.example.com   # 向node2分发密钥,过程同上
# 测试
[root@server ~]# ssh node1.example.com   # server端远程登录到node1端
Activate the web console with: systemctl enable --now cockpit.socket
Register this system with Red Hat Insights: insights-client --register
Create an account or view all your systems at https://red.ht/insights-dashboard
Last login: Sat May 13 15:48:01 2023
[root@node1 ~]# exit     # 已成功,注销
注销
Connection to node1.example.com closed.
[root@server ~]# ssh node2.example.com   # # server端远程登录到node2端
Activate the web console with: systemctl enable --now cockpit.socket

Register this system with Red Hat Insights: insights-client --register
Create an account or view all your systems at https://red.ht/insights-dashboard
Last login: Sat May 13 15:48:12 2023
[root@node2 ~]# exit  # 已成功,注销后回到server端
注销
Connection to node2.example.com closed.
[root@server ~]#
6、所有主机安全软件关闭
[root@server ~]# setenforce  0
[root@server ~]# systemctl stop  firewalld
……
7、注意
- node1、node2在学期做实验时可以做快照
- 免密登录时,若为普通账户则使用sudo进行提权
8、安装ansible
- 下载基于RHEL9的epel扩展源
[root@server ~]# yum install https://dl.fedoraproject.org/pub/epel/epel-release-latest-9.noarch.rpm
[root@server yum.repos.d]# yum  makecache
[root@server ~]# yum  list  |  grep  ansible  # 查看可以安装的软件包名及版本号
[root@server ~]# yum  install  ansible.noarch # 安装ansible
- 测试
[root@server ~]# ansible  --version   # 通过查看版本检索安装是否成功
[root@server ~]# vim  /etc/ansible/hosts   # 设置管理机的主机清单,输入受空机
node1.example.com
node2.example.com
[root@server ~]# ansible  all  -m  ping  # 测试受控机是否能管理
- 注意:若无有效yum源可以使用本地光盘源安装ansible
# 设置本地yum源
[root@server ~]# mount  /dev/sr0  /media/   # 挂载光盘
mount: /media: WARNING: source write-protected, mounted read-only.
[root@server ~]# cd  /etc/yum.repos.d/    # 进入yum配置目录
[root@server yum.repos.d]# ls
CentOS-9-Stream.repo
[root@server yum.repos.d]# mv  CentOS-9-Stream.repo CentOS-9-Stream.repo.back   # 将已存在的yum配置文件备份并改扩展名,使其失效,该步骤可选
[root@server yum.repos.d]# vim  dvd.repo  # 编写本地yum配置文件,输入以下内容:
[baseos]
name=from dvd
baseurl=file:///media/BaseOS
enabled=1
gpgcheck=0

[appstream]
name=from dvd
baseurl=file:///media/AppStream
enabled=1
gpgcheck=0
[root@server yum.repos.d]# yum  clean all  # 清除缓存
13 文件已删除
[root@server yum.repos.d]# yum  makecache  # 新建缓存
[root@server yum.repos.d]# yum  list  |  grep  ansible  # 查看安装包
[root@server yum.repos.d]# yum  install  ansible-core.x86_64 -y
[root@server yum.repos.d]# ansible  --version  # 测试
六、管理ansible静态清单
1、定义主机清单
- 作用:主机清单用于定义ansible将要管理的一批主机,这些主机也可以分配到组中,以进行集中管理,组中也可以包含子组,一台主机也可以是多个组中的成员
2、两种方式定义主机清单
-
静态主机清单可以通过文本文件定义
-
动态主机清单可以根据需要通过脚本或其他程序生成
3、使用静态主机清单指定受管主机(默认)
3.1 产生原因
- Ansible服务是用于实现主机批量自动化控制的管理工具,受管的主机一定不是一两台台,而是数十台甚至成百上千台,那么主机清单(inventory)在生产环境中可以起到重要作用
3.2 静态主机清单文件本质
- ansible目标受管主机的文本文件
- 路径:/etc/ansible/hosts
3.3 清单内容分析(不分组)
- 格式:一行书写一个主机ip或主机名
- 例
[root@server ~]#  vim  /etc/ansible/hosts
node1.example.com
node2.example.com
- 查看主机清单内容
[root@server ~]# ansible  all  --list-hosts
  hosts (2):
    node1.example.com
    node2.example.com
- 尝试ping
[root@server ~]# ansible all -m  ping
node2.example.com | SUCCESS => {
    "ansible_facts": {
        "discovered_interpreter_python": "/usr/bin/python3"
    },
    "changed": false,
    "ping": "pong"
}
node1.example.com | SUCCESS => {
    "ansible_facts": {
        "discovered_interpreter_python": "/usr/bin/python3"
    },
    "changed": false,
    "ping": "pong"
}
3.4 清单内容分析(分组)
- 作用:按照主机的地理位置或工作性质进行分组,如:开发机(dev)、测试机(test)、产品(prod)等
- 分组格式:
[组名]
一行一个ip地址或主机名
- 例:
[root@server ~]# vim  /etc/ansible/hosts
[dev]
node1.example.com
[test]
node2.example.com
- 查看分组内容
[root@server ~]# ansible-inventory   --graph
@all:
  |--@ungrouped:    # 未分组的主机,当前无
  |--@dev:
  |  |--node1.example.com
  |--@test:
  |  |--node2.example.com


[root@server ~]# ansible ungrouped  --list-hosts  # 查看未分组的主机信息
[WARNING]: No hosts matched, nothing to do   # 当前无未分组
  hosts (0):
- 分组操作
[root@server ~]# ansible  dev   -m  ping  # dev为组名
node1.example.com | SUCCESS => {
    "ansible_facts": {
        "discovered_interpreter_python": "/usr/bin/python3"
    },
    "changed": false,
    "ping": "pong"
}
[root@server ~]# ansible  test   -m  ping
node2.example.com | SUCCESS => {
    "ansible_facts": {
        "discovered_interpreter_python": "/usr/bin/python3"
    },
    "changed": false,
    "ping": "pong"
}
3.5 通过范围简化主机清单写法
- ip格式
[root@server ~]# vim  /etc/ansible/hosts
192.168.48.[130:135]

[root@server ~]# ansible  all --list-hosts   # 查看
  hosts (6):
    192.168.48.130
    192.168.48.131
    192.168.48.132
    192.168.48.133
    192.168.48.134
    192.168.48.135
# 分组
[root@server ~]# vim  /etc/ansible/hosts

192.168.48.141
192.168.48.142

[dev]
192.168.48.[130:132]

[test]
192.168.48.[133:135]

[prod]
192.168.48.[135:140]

[root@server ~]# ansible-inventory   --graph  # 分组查看
@all:
  |--@ungrouped:                # 未分组
  |  |--192.168.48.141
  |  |--192.168.48.142
  |--@dev:                      # dev组
  |  |--192.168.48.130
  |  |--192.168.48.131
  |  |--192.168.48.132
  |--@test:                     # test组
  |  |--192.168.48.133
  |  |--192.168.48.134
  |  |--192.168.48.135
  |--@prod:                    # prod组
  |  |--192.168.48.135
  |  |--192.168.48.136
  |  |--192.168.48.137
  |  |--192.168.48.138
  |  |--192.168.48.139
  |  |--192.168.48.140
- 名称格式:[a:c].example.com
七、定义嵌套分组
- 格式
[子组1]
主机列表

[子组2]
主机列表

[子组3]
主机列表

[父组:children]   # children关键字表示父组包含子组1字组2
[子组1名]
[子组2名]
……
- 例
[Dev_A]
192.168.48.[130:133]

[Dev_B]
192.168.48.[134:136]

[Dev:children]
Dev_A
Dev_B

[Test]
192.168.48.[137:139]

[Prod]
192.168.48.[140:144]

[Openlab:children]
Test
Prod

[root@server ~]# ansible-inventory   --graph
@all:
  |--@ungrouped:
  |--@Dev:
  |  |--@Dev_A:
  |  |  |--192.168.48.130
  |  |  |--192.168.48.131
  |  |  |--192.168.48.132
  |  |  |--192.168.48.133
  |  |--@Dev_B:
  |  |  |--192.168.48.134
  |  |  |--192.168.48.135
  |  |  |--192.168.48.136
  |--@Openlab:
  |  |--@Test:
  |  |  |--192.168.48.137
  |  |  |--192.168.48.138
  |  |  |--192.168.48.139
  |  |--@Prod:
  |  |  |--192.168.48.140
  |  |  |--192.168.48.141
  |  |  |--192.168.48.142
  |  |  |--192.168.48.143
  |  |  |--192.168.48.144
1、自定义主机清单
- 在/root目录下创建一个名称为inv的自定义主机清单:
[root@server ~]# vim  /root/inv

[web]
node1.example.com
node2.example.com
- 查看自定义主机清单
# 格式:
ansible  all  -i  自定义主机清单名  --list-hosts
[root@server ~]# ansible all -i  /root/inv  --list-hosts
  hosts (2):
    node1.example.com
    node2.example.com
2、有选择的查看主机和组
2.1 先编辑清单在演示
[root@server ~]# vim  /etc/ansible/hosts

192.168.48.254

[web]
192.168.48.[130:133]

[http]
192.168.48.[134:135]

[ftp]
192.168.48.[136:139]

[dns]
192.168.48.[140:145]

[mail]
192.168.48.[143:146]
2.2 有选择查询
- 查看全部主机
[root@server ~]# ansible all --list-hosts
- 匹配单个组
[root@server ~]# ansible  'dns'  --list-hosts
  hosts (6):
    192.168.48.140
    192.168.48.141
    192.168.48.142
    192.168.48.143
    192.168.48.144
    192.168.48.145
[root@server ~]# ansible  'mail'  --list-hosts
  hosts (4):
    192.168.48.143
    192.168.48.144
    192.168.48.145
    192.168.48.146
- 匹配多个组
[root@server ~]# ansible  'dns:&mail'  --list-hosts  # & 表示交集
  hosts (3):
    192.168.48.143
    192.168.48.144
    192.168.48.145

[root@server ~]# ansible  'dns:!mail'  --list-hosts # !表示补集,即属于A组但不属于B组

[root@server ~]# ansible  '!dns:mail'  --list-hosts # 不属于A组但属于B组
  hosts (1):
    192.168.48.146

[root@server ~]# ansible  'ftp:mail'  --list-hosts  #  并集
  hosts (8):
    192.168.48.136
    192.168.48.137
    192.168.48.138
    192.168.48.139
    192.168.48.143
    192.168.48.144
    192.168.48.145
    192.168.48.146
[root@server ~]# ansible  'web:ftp:mail'  --list-hosts
八、Ad-hoc命令与模块
1、概念
-
Ansible提供两种方式去完成任务,一是ad-hoc命令,一是写Ansible playbook(剧本)
-
Ad-hoc命令:即交互式临时命令,是一种单条命令,命令不需要特别保存下来,执行后即结束,可以用于执行简单的临时命令,相当于shell命令
-
Ansible playbook:更适合解决复杂或需固化下来的任务,相当于Linux系统的Shell Scripts
2、格式
ansible 主机或组 -m 模块名 -a '模块参数' -i 清单文件
- 使用ansible命令时,必须指明受管主机的信息,如果已经设置过主机清单文件(/etc/ansible/hosts),则可以使用all参数来指代全体受管控的主机,-a是要传递给模块的参数,只有功能极其简单的模块才不需要额外参数,所以大多情况下-m与-a参数都会同时出现
3、ansible命令常用参数
-k 	手动输入SSH协议密码
-i 	指定主机清单文件
-m 	指定要使用的模块名
-M 	指定要使用的模块路径
-S 	使用su命令
-T 	设置SSH协议连接超时时间
-a 	设置传递给模块的参数
--version 	查看版本信息
-h 	帮助信息
4、模块类型
- Ansible服务的强大之处在于只需要一条命令,便可以操控成千上万台的主机节点,由于Ansible服务实际上只是一个框架,能够完成工作的是模块化功能代码
4.1 三种模块类型
- 核心模块:由Ansible的官方团队提供
- 附加模块:由各个社区提供的,如:openstack社区、docker社区等
- 用户自定义模块:自己设计的模块
4.2 Ansible核心模块和附加模块
有1000+,需要使用帮助文档来查询、记忆、理解
- 查询模块信息:
ansible-doc  模块名称
ansible-doc  ping  # 示例
- 列出所有模块信息:
ansible-doc -l
- 常用模块:

5、示例
# 创建主机清单
[root@server ~]# vim  /etc/ansible/hosts
node1.example.com
node2.example.com

[root@server ~]# ansible all -m  ping

[root@server ~]# ansible all -m  yum -a "name=httpd  state=installed"
node1.example.com | CHANGED => {
    "ansible_facts": {
        "discovered_interpreter_python": "/usr/bin/python3"
    },
    "changed": true,
    "msg": "",
    "rc": 0,
    "results": [
        "Installed: apr-util-bdb-1.6.1-20.el9.x86_64",
        "Installed: httpd-filesystem-2.4.53-11.el9.noarch",
        "Installed: apr-util-openssl-1.6.1-20.el9.x86_64",
        "Installed: httpd-core-2.4.53-11.el9.x86_64",
        "Installed: httpd-tools-2.4.53-11.el9.x86_64",
        "Installed: mod_http2-1.15.19-4.el9.x86_64",
        "Installed: centos-logos-httpd-90.4-1.el9.noarch",
        "Installed: httpd-2.4.53-11.el9.x86_64",
        "Installed: apr-1.7.0-11.el9.x86_64",
        "Installed: mod_lua-2.4.53-11.el9.x86_64",
        "Installed: apr-util-1.6.1-20.el9.x86_64"
    ]
}
node2.example.com | CHANGED => {
    "ansible_facts": {
        "discovered_interpreter_python": "/usr/bin/python3"
    },
    "changed": true,
    "msg": "",
    "rc": 0,
    "results": [
        "Installed: apr-util-bdb-1.6.1-20.el9.x86_64",
        "Installed: httpd-filesystem-2.4.53-11.el9.noarch",
        "Installed: apr-util-openssl-1.6.1-20.el9.x86_64",
        "Installed: httpd-core-2.4.53-11.el9.x86_64",
        "Installed: httpd-tools-2.4.53-11.el9.x86_64",
        "Installed: mod_http2-1.15.19-4.el9.x86_64",
        "Installed: centos-logos-httpd-90.4-1.el9.noarch",
        "Installed: httpd-2.4.53-11.el9.x86_64",
        "Installed: apr-1.7.0-11.el9.x86_64",
        "Installed: mod_lua-2.4.53-11.el9.x86_64",
        "Installed: apr-util-1.6.1-20.el9.x86_64"
    ]
}

[root@server ~]# ansible  all  -a  'df  -h'
[root@server ~]# ansible  all  -a  'date'