Rust-Rocket框架笔记
Rust-Rocket框架笔记
- Rocket-Learn-doc
- Rocket Addr
-
- 视频地址
- What is Rocket
- QuickStart
-
- 下载Rocket-Rust
- 运行Rust-Rocket-Hello-错误-端口占用
-
- 解决
- 查看端口占用情况
- 添加Rocket.toml配置文件更改Rocket默认启动端口
- 启动成功
- GetStart-Hello world
-
- 创建项目
-
- cargo
- IDEA
- 添加依赖
- 添加Rocket.toml配置文件
- main.rs
-
- res
- Rocket-生命周期
- Rocket-请求
-
- 方法
- 动态路径
- 路径保护
- 忽略路径
- 转发
-
- 通过参数类型捕获
- rank默认等级
- 请求守卫
-
- 转发守卫
- Cookie
-
- 隐私Cookie
- 密钥
- 格式Format
- 请求体数据
-
- Json
-
- 开启json特性
- 引入use
- 设置请求体数据体(struct)
- 编写方法
- 临时文件
- 流媒体
- QueryString
-
- 静态参数
- 动态参数
- 尾随参数
- 错误处理器
- Rocket-响应
-
- Responder
- 包装
-
- 例子
- 自定义应答器
-
- 简单示例
- 完整示例
- Responder实现
-
- Option
- Result
- 响应Json
- 模板
-
- 添加依赖
- 修改Cargo.toml
- main.rs
- 添加页面模板
- Rocket-状态管理
- Rocket-连接池连接数据库Mysql
-
- 添加依赖
- 设置数据库连接配置(Rocket.toml)
- main.rs
- 使用Figment提取自定义配置
-
- 添加依赖
- 设置app.toml
- main.rs
Rocket-Learn-doc
- createTime:20230430
- author:[email protected]
- email:[email protected]
Rocket Addr
地址:https://rocket.rs/v0.5-rc/guide/introduction/
视频地址
https://www.bilibili.com/video/BV14h41177Ga/?spm_id_from=333.999.0.0&vd_source=9c2ae08297163e79152407c969f04717
What is Rocket
Rocket是Rust的Web框架。如果你愿意,你可以把火箭看作是一个更灵活,更友好支持热插拔,我们更愿意把火箭看作是一种新的东西。Rocket的目标是快速、简单和灵活,同时尽可能提供有保证的安全性。更重要的是,Rocket还致力于成为乐趣,它通过确保您编写尽可能少的代码来完成任务来实现这一点。
Rocket的设计围绕着三个核心理念:
-
安全性、正确性和开发人员体验至关重要。
阻力最小的路径应该会引导您获得最安全,最正确的Web应用程序,尽管安全性和正确性不应该以降低开发人员体验为代价。Rocket易于使用,同时采取了很好的措施来确保您的应用程序是安全和正确的,而无需认知开销。
-
所有请求处理信息都应该是类型化的,并且是独立的。
因为Web和HTTP本身是无类型的(或弦地 类型的,正如一些人所说的那样),这意味着某些东西或某人必须将字符串转换为本地类型。Rocket可以为你做到这一点,而且编程开销为零。更何况,火箭的请求处理是自足的 零全局状态:处理程序是具有常规参数的常规函数。
-
不应强迫作出决定。
模板、序列化、会话以及几乎所有其他组件都是可插拔的可选组件。虽然Rocket对每一个都有官方支持和库,但它们是完全可选和可交换的。
这三个想法决定了Rocket的界面,你会发现它们都嵌入了Rocket的核心功能
QuickStart
下载Rocket-Rust
git clone https://github.com/SergioBenitez/Rocket
cd Rocket/examples/hello
cargo run
运行Rust-Rocket-Hello-错误-端口占用
Configured for debug.
   >> address: 127.0.0.1
   >> port: 8000
   >> workers: 8
   >> max blocking threads: 512
   >> ident: Rocket
   >> IP header: X-Real-IP
   >> limits: bytes = 8KiB, data-form = 2MiB, file = 1MiB, form = 32KiB, json = 1MiB, msgpack
 = 1MiB, string = 8KiB
   >> temp dir: C:\Users\SYF200~1\AppData\Local\Temp\
   >> http/2: true
   >> keep-alive: 5s
   >> tls: disabled
   >> shutdown: ctrlc = true, force = true, grace = 2s, mercy = 3s
   >> log level: normal
   >> cli colors: true
Routes:
   >> (hello) GET /?<lang>&<opt..>
   >> (wave) GET /wave/<name>/<age>
   >> (mir) GET /hello/мир
   >> (world) GET /hello/world
Fairings:
   >> Shield (liftoff, response, singleton)
   >> Compatibility Normalizer (request)
Error: Rocket failed to bind network socket to given address/port.
   >> 以一种访问权限不允许的方式做了一个访问套接字的尝试。 (os error 10013)
thread 'main' panicked at 'aborting due to socket bind error', E:\Rust\rocket_learn\Rocket\co
re\lib\src\error.rs:204:17
note: run with `RUST_BACKTRACE=1` environment variable to display a backtrace
error: process didn't exit successfully: `E:\Rust\rocket_learn\Rocket\examples\target\debug\h
ello.exe` (exit code: 101)
解决
查看端口占用情况
netstat -ano |findstr 8000
添加Rocket.toml配置文件更改Rocket默认启动端口
添加如下内容修改默认端口:
[default]
address = "127.0.0.1"
port = 8080
启动成功
Configured for debug.
>> address: 127.0.0.1
>> port: 8080
>> workers: 8
>> max blocking threads: 512
>> ident: Rocket
>> IP header: X-Real-IP
>> limits: bytes = 8KiB, data-form = 2MiB, file = 1MiB, form = 32KiB, json = 1MiB, msgpack
= 1MiB, string = 8KiB
>> temp dir: C:\Users\SYF200~1\AppData\Local\Temp\
>> http/2: true
>> keep-alive: 5s
>> tls: disabled
>> shutdown: ctrlc = true, force = true, grace = 2s, mercy = 3s
>> log level: normal
>> cli colors: true
Routes:
>> (hello) GET /?<lang>&<opt..>
>> (wave) GET /wave/<name>/<age>
>> (mir) GET /hello/мир
>> (world) GET /hello/world
Fairings:
>> Compatibility Normalizer (request)
>> Shield (liftoff, response, singleton)
Shield:
>> Permissions-Policy: interest-cohort=()
>> X-Frame-Options: SAMEORIGIN
>> X-Content-Type-Options: nosniff
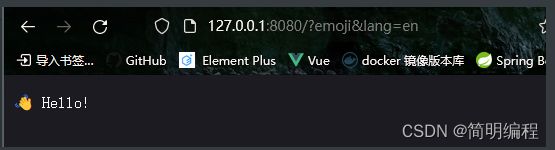
Rocket has launched from http://127.0.0.1:8080
访问:127.0.0.1:8080/?emoji&lang=en
GetStart-Hello world
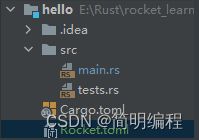
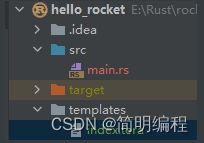
创建项目
cargo
cargo new hello-rocket
IDEA

添加依赖
[dependencies]
rocket = "=0.5.0-rc.3"
添加Rocket.toml配置文件
[default]
port = 8080
main.rs
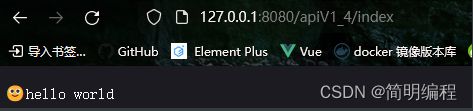
#[macro_use] extern crate rocket;

#[get("/index")]
fn index()->&'static str{
    "hello world"
}

#[launch]
fn rocket()->_{
    rocket::build().mount("/apiV1_4",routes![index])
}
#[get("/")]:表示设置一个Get请求的方法,在括号中设置请求地址#[launch]:替代了fn main()成为Rocket的主入口mount:方法绑定路由,前面第一个参数是路由前缀
res
E:\Rust\rocket_learn\hello_rocket>cargo run
   Compiling hello_rocket v0.1.0 (E:\Rust\rocket_learn\hello_rocket)
    Finished dev [unoptimized + debuginfo] target(s) in 2.04s
     Running `target\debug\hello_rocket.exe`
Configured for debug.
   >> address: 127.0.0.1
   >> port: 8080
   >> workers: 8
   >> max blocking threads: 512
   >> ident: Rocket
   >> IP header: X-Real-IP
   >> limits: bytes = 8KiB, data-form = 2MiB, file = 1MiB, form = 32KiB, json = 1MiB, msgpack
 = 1MiB, string = 8KiB
   >> temp dir: C:\Users\SYF200~1\AppData\Local\Temp\
   >> http/2: true
   >> keep-alive: 5s
   >> tls: disabled
   >> shutdown: ctrlc = true, force = true, grace = 2s, mercy = 3s
   >> log level: normal
   >> cli colors: true
Routes:
   >> (index) GET /apiV1_4/index
Fairings:
   >> Shield (liftoff, response, singleton)
Shield:
   >> X-Frame-Options: SAMEORIGIN
   >> X-Content-Type-Options: nosniff
   >> Permissions-Policy: interest-cohort=()
Rocket has launched from http://127.0.0.1:8080
GET /prefix/index text/html:
   >> No matching routes for GET /prefix/index text/html.
   >> No 404 catcher registered. Using Rocket default.
   >> Response succeeded.
GET /apiV1_4/index text/html:
   >> Matched: (index) GET /apiV1_4/index
   >> Outcome: Success
   >> Response succeeded.
Rocket-生命周期
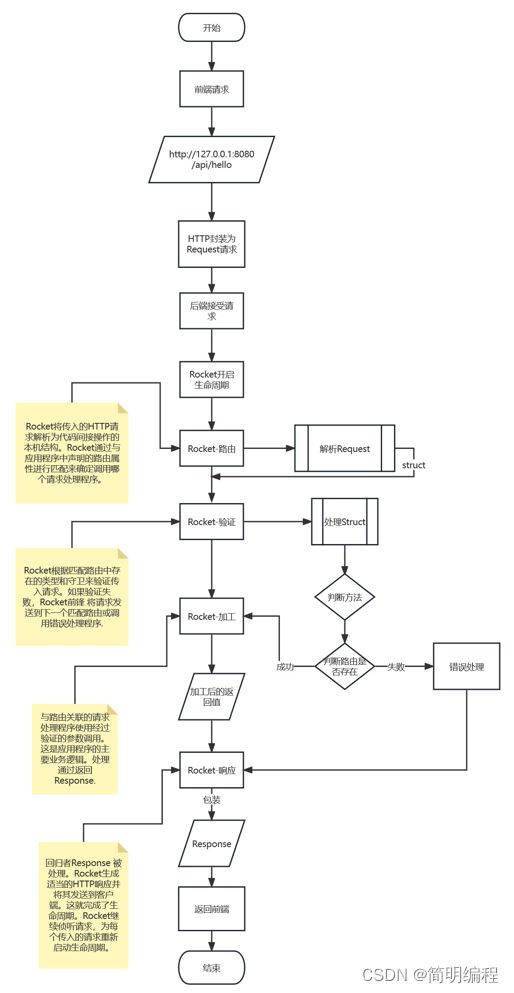
Rocket-请求
方法
以下方法均支持:
`get`、`put`、`post`、`delete`、`head`、`patch`,或`options`
写法:
#[方法类型(路径)]
#[route(方法类型, uri=地址路径)]
例子:
#[get("/")]
#[route(GET , uri = "/")]
动态路径
Restful风格API,使用<>进行设置
#[get("/hello/" )]
fn hello(name: &str) -> String {
format!("Hello, {}!", name)
}
----
#[get("/hello///" )]
路径保护
防止路径遍历攻击,必须写在所有路径的最后面
例子:
use std::path::{Path, PathBuf};
use rocket::fs::NamedFile;
#[get("/" )]
async fn files(file: PathBuf) -> Option<NamedFile> {
NamedFile::open(Path::new("static/").join(file)).await.ok()
}
忽略路径
使用占位符_对路径进行忽略,多路径则使用<_..>表示对路径进行的忽略操作
#[get("/foo/<_>/bar")]
fn foo_bar() -> &'static str {
    "Foo _____ bar!"
}

#[get("/<_..>")]
fn everything() -> &'static str {
    "Hey, you're here."
}
转发
路径相同,但是动态路径类型不同,此时会根据类型进行方法的匹配,当然我们可以使用rank提升优先级#[get("/user/
rank越小优先级越大
// #[macro_use] extern crate rocket;
use rocket::{get, launch,routes};
//rank越小优先级越大->@Order("1")
#[get("/user/" ,rank=3)]
fn get_user(id: i32) -> &'static str {
"get_user"
}
#[get("/user/" , rank = 2)]
fn get_user1(id: bool) -> &'static str {
"get_user1"
}
#[get("/user/" , rank = 1)]
fn get_user2(id: &str) -> &'static str {
"get_user2"
}
#[launch]
fn rocket() -> _ {
rocket::build().mount("/",routes![get_user, get_user1, get_user2])
}
通过参数类型捕获
我们可以通过使用Result或Option类型在传入参数上进行捕获,增加其逻辑
#[get("/user/" )]
fn get_user<'a>(id: Result<i32,&'a str>) -> &'a str {
match id{
Ok(res)=>"res",
Err(e)=>e
}
}
rank默认等级
路径和查询有三种“颜色”:
static,这意味着所有组件都是静态的partial,意味着至少一个组件是动态的wild,意味着所有组件都是动态的
静态路径比静态查询具有更大的权重。对于偏路径和野路径也是如此。这将产生以下默认排名表:

请求守卫
核心:FromRequest trait
我们的守卫需要实现FromRequest trait,守卫不设置在路径中,而是直接放置到参数里
use rocket::request::{self, Request, FromRequest};

#[rocket::async_trait]
impl<'r> FromRequest for Security{
    type Error = ();

    async fn from_request(request: &'r Request<'_>) -> Outcome<Self, Self::Error> {
        todo!()
    }
}

#[get("/")]
fn index(s:Security)->&'static str{
    //...
}
转发守卫
请求防护和转发是强制执行策略的强大组合。为了说明,我们考虑如何使用这些机制来实现一个简单的授权系统。
我们从两个请求守卫开始:
-
User:经过身份验证的常规用户。该
FromRequest实现User检查cookie是否标识用户并返回User值如果是如果没有用户可以通过身份验证,则防护转发。 -
AdminUser:已验证为管理员的用户。该
FromRequest实现AdminUser检查cookie是否标识行政的 用户并返回AdminUser值如果是如果没有用户可以通过身份验证,则防护转发。
我们现在将这两个守卫与转发结合使用,实现以下三条路由,每条路由都通向位于/admin:
use rocket::response::Redirect;

#[get("/login")]
fn login() -> Template { /* .. */ }

#[get("/admin")]
fn admin_panel(admin: AdminUser) -> &'static str {
    "Hello, administrator. This is the admin panel!"
}

#[get("/admin", rank = 2)]
fn admin_panel_user(user: User) -> &'static str {
    "Sorry, you must be an administrator to access this page."
}

#[get("/admin", rank = 3)]
fn admin_panel_redirect() -> Redirect {
    Redirect::to(uri!(login))
}
Cookie
隐私Cookie
一般来说是用于存储一些隐私信息,例如User的信息,防止截获
必须在toml中开启features=["secrets"]
[dependencies]
rocket = { version = "=0.5.0-rc.3", features = ["secrets"] }
示例:
use rocket::{get, launch, routes};
use rocket::request::{self, Request, FromRequest, Outcome};
use rocket::http::{Cookie, CookieJar};
use rocket::response::{Flash, Redirect};

#[get("/user_id")]
fn user_id(cookie: &CookieJar<'_>) -> Option<String> {
    cookie.get_private("user_id")
        .map(|res| format!("user id:{}", res.value()))

}


#[launch]
fn rocket() -> _ {
    rocket::build().mount("/", routes![user_id])
}
示例:
use rocket::http::{Cookie, CookieJar};
use rocket::response::{Flash, Redirect};

/// Retrieve the user's ID, if any.
#[get("/user_id")]
fn user_id(cookies: &CookieJar<'_>) -> Option<String> {
    cookies.get_private("user_id")
        .map(|crumb| format!("User ID: {}", crumb.value()))
}

/// Remove the `user_id` cookie.
#[post("/logout")]
fn logout(cookies: &CookieJar<'_>) -> Flash<Redirect> {
    cookies.remove_private(Cookie::named("user_id"));
    Flash::success(Redirect::to("/"), "Successfully logged out.")
}
密钥
在Rocket.toml中配置secret_key设置需要的密钥,该参数的值可以是256位base64或十六进制字符串,也可以是32字节片。
通常通过以下工具完成openssl.使用openssl,可以使用以下命令生成256位base64密钥openssl rand -base64 32.
https://api.rocket.rs/v0.5-rc/rocket/config/struct.SecretKey.html
格式Format
我们常使用的Format:
- form-data
- x-www-form-urlencoded
- json
- xml
- raw
- binary
https://api.rocket.rs/v0.5-rc/rocket/http/struct.ContentType.html#method.parse_flexible
直接在类属性宏中添加format属性进行设置即可
#[post("/user", format = "application/json", data = "" )]
fn new_user(user: User) { /* ... */ }
请求体数据
对于请求体数据,我们使用data=""进行匹配
#[post("/", data = "")]
fn new(input: T) { /* .. */ }
注意所有能够被Rocket所处理的传入数据体必须要实现FromData,但是这个trait在人工实现下费时费力,所以我们有以下的处理方式
Json
使用Json对于application/json的format进行处理,常见于POST和PUT方法中
开启json特性
rocket = { version = "=0.5.0-rc.3", features = ["secrets","json"] }
引入use
use rocket::serde::{Serialize, Deserialize, json::Json};
设置请求体数据体(struct)
#[derive(Debug, Deserialize)]
#[serde(crate = "rocket::serde")]
struct User {
    username: String,
    password: String,
}
编写方法
Json帮助我们实现FromData
#[post("/login", format = "json", data = "" )]
fn login(user: Json<User>) -> () {
println!("{:#?}", user);
}

临时文件
该TempFile 数据保护直接将数据流传输到临时文件,然后该临时文件可以被持久化。它使接受文件上传变得微不足道:
use rocket::fs::TempFile;
#[post("/upload", format = "plain", data = "" )]
async fn upload(mut file: TempFile<'_>) -> std::io::Result<()> {
file.persist_to(permanent_location).await
}
流媒体
有时候你只想直接处理传入的数据。例如,您可能希望将传入数据流式传输到某个接收器。Rocket通过Data 类型:
use rocket::tokio;
use rocket::data::{Data, ToByteUnit, FromData};
#[post("/debug", data = "")]
async fn debug(data: Data<'_>) -> std::io::Result<()> {
    // Stream at most 512KiB all of the body data to stdout.
    data.open(512.kibibytes())
        .stream_to(tokio::io::stdout())
        .await?;

    Ok(())
}
上面的路由接受任何POST 请求/debug 最多512 KiB的传入数据流输出到stdout如果上传失败,则返回错误响应。上面的处理程序已完成。真的就这么简单!
注意事项: Rocket要求在阅读传入数据时设置限制。
为了帮助防止DoS攻击,请设置为128KB的整数倍
QueryString
出现在请求URL中的URL编码形式。查询参数的声明方式类似于路径参数,但处理方式类似于常规的URL编码表单字段
静态参数
#[get("/?hello&cat=♥")]
fn cats() -> &'static str {
    "Hello, kittens!"
}

// The following GET requests match `cats`. `%E2%99%A5` is encoded `♥`.
"/?cat=%E2%99%A5&hello"
"/?hello&cat=%E2%99%A5"
"/?dogs=amazing&hello&there&cat=%E2%99%A5"
动态参数
#[derive(Debug, PartialEq, FromFormField)]
enum Color {
Red,
Blue,
Green
}
#[derive(Debug, PartialEq, FromForm)]
struct Pet<'r> {
name: &'r str,
age: usize,
}
#[derive(Debug, PartialEq, FromForm)]
struct Person<'r> {
pet: Pet<'r>,
}
#[get("/?&&&" )]
fn hello(name: &str, color: Vec<Color>, person: Person<'_>, other: Option<usize>) {
assert_eq!(name, "George");
assert_eq!(color, [Color::Red, Color::Green, Color::Green, Color::Blue]);
assert_eq!(other, None);
assert_eq!(person, Person {
pet: Pet { name: "Fi Fo Alex", age: 1 }
});
}
// A request with these query segments matches as above.
name=George&\
color=red&\
color=green&\
person.pet.name=Fi+Fo+Alex&\
color=green&\
person.pet.age=1&\
color=blue&\
extra=yes\
尾随参数
use rocket::form::Form;
#[derive(FromForm)]
struct User<'r> {
name: &'r str,
active: bool,
}
#[get("/?hello&&" )]
fn user(id: usize, user: User<'_>) {
assert_eq!(id, 1337);
assert_eq!(user.name, "Bob Smith");
assert_eq!(user.active, true);
}
// A request with these query segments matches as above.
hello&\
name=Bob+Smith&\
id=1337&\
active=yes\
错误处理器
应用程序处理是不可靠的。错误来自以下来源:
- 失败的守卫。
- 一个失败的响应者。
- 路由失败。
如果发生任何这些情况,Rocket会向客户端返回一个错误。为了生成错误,Rocket调用捕集器 对应于错误的状态代码和范围。Catchers类似于routes,除了:
- 捕获器仅在出现错误时调用。
- 捕获器是用
catch属性 - 捕手是注册的 与
register()而不是mount(). - 在调用捕获器之前,清除对cookie的任何修改。
- 错误捕获器不能调用防护。
- 错误捕获器不应该无法产生响应。
- 捕获器的作用域为路径前缀。
若要声明给定状态代码的捕捉器,请使用catch 属性,该属性接受与要捕获的HTTP状态代码对应的单个整数。例如,为404 Not Found 错误
例子:
use rocket::{get, post, launch, routes, catch, catchers};
use rocket::request::{self, Request, FromRequest, Outcome};
use rocket::http::{Cookie, CookieJar};
use rocket::response::{Flash, Redirect};
use rocket::serde::{Serialize, Deserialize, json::Json};
use rocket::fs::TempFile;
use rocket::tokio;
use rocket::data::{Data, ToByteUnit, FromData};

#[get("/login")]
fn login() -> &'static str {
    "login"
}
//404的错误处理器
#[catch(404)]
fn not_found() -> String {
    String::from("Error: Not Found")
}
//构建默认错误处理
#[catch(default)]
fn default_catch() -> String {
    String::from("Error:Default catch")
}

#[launch]
fn rocket() -> _ {
    rocket::build()
        .mount("/user", routes![login])
        .register("/user", catchers![not_found])//注册错误处理器
        .register("/", catchers![default_catch])//注册处理器
}
Rocket-响应
方法的任何类型的值Responder trait可以被返回,包括你自己的
Responder
作为Rocket的响应返回,包装我们的消息体数据,一个Response 包括HTTP状态、报头和正文。尸体可能是固定尺寸的 或流.给定的Responder 实现决定使用哪个
包装
以下是官方提供的已经为我们包装好,可以自己直接调用的:
-
Accepted
Sets the status of the response to 202 (Accepted).
-
BadRequest
Sets the status of the response to 400 (Bad Request).
-
Conflict
Sets the status of the response to 409 (Conflict).
-
Created
Sets the status of the response to 201 (Created).
-
Custom
Creates a response with the given status code and underlying responder.
-
Forbidden
Sets the status of the response to 403 (Forbidden).
-
NoContent
Sets the status of the response to 204 (No Content).
-
NotFound
Sets the status of the response to 404 (Not Found).
-
Unauthorized
Sets the status of the response to 401 (Unauthorized).
例子
use rocket::http::Status;
use rocket::response::{content, status};

#[get("/test")]
fn test() -> Accepted<String> {
    Accepted(Some("test-hello".to_string()))
}

#[get("/custom")]
fn test_custom() -> Custom<RawJson<&'static str>> {
    Custom(Status::Accepted, RawJson("{\"hi\":\"你好\"}"))
}
自定义应答器
该Responder trait文档详细说明了如何通过显式实现trait来实现您自己的自定义响应器。然而,对于大多数用例,Rocket使得自动派生的实现成为可能Responder。特别是,如果您的自定义响应程序包装了现有的响应程序、标头或设置了自定义状态或内容类型,Responder 可以自动导出:
简单示例
use rocket::{Responder};

#[derive(Responder)]
#[response(status = 200, content_type = "json")]
struct Response_default(&'static str);

#[get("/json")]
fn json() -> Response_default {
    Response_default("{ \"hi\": \"world\" }")
}
完整示例
use rocket::{Responder};

#[derive(Debug, Deserialize, Serialize)]
#[serde(crate = "rocket::serde")]
struct User {
    username: String,
    password: String,
}

#[derive(Responder)]
#[response(status = 200, content_type = "json")]
struct MyResponse2 {
    inner: Json<User>,
    headers: ContentType,
    more: Header<'static>,
    #[response(ignore)]
    unrelated: String,
}

#[get("/login")]
fn login() -> MyResponse2 {
    MyResponse2 {
        inner: Json(User {
            username: "zhangsan".to_string(),
            password: "123456".to_string(),
        }),
        headers: ContentType::JSON,
        more: Header::new("userId", "zhangsan"),
        unrelated: "test-ignore".to_string(),
    }
}
于上面的示例,Rocket生成一个Responder 实施方式:
- 将响应的状态设置为
200. - 将Content-Type设置为
application/json. - 添加标题
self.header和/或self.more到回应。 - 完成响应,使用
self.inner.
请注意,第一 字段用作内部响应者,而所有剩余字段(除非使用#[response(ignore)])作为头添加到响应中。可选的#[response] 属性可用于自定义响应的状态和内容类型。因为ContentType 和/或Status 本身是头,您还可以通过简单地包含这些类型的字段来动态设置内容类型和状态。
Responder实现
在Rocket中已经为:String、&str、File、Option,以及Result.实现好了
我们可以在应用中直接进行使用
#[get("/string")]
fn handler() -> &'static str {
    "Hello there! I'm a string!"
}
Option
成功使用Some则响应为200,若出现错误则是404 Not Found
use rocket::fs::NamedFile;
#[get("/" )]
async fn files(file: PathBuf) -> Option<NamedFile> {
NamedFile::open(Path::new("static/").join(file)).await.ok()
}
Result
无论成功还是失败都有返回
use rocket::fs::NamedFile;
use rocket::response::status::NotFound;
#[get("/" )]
async fn files(file: PathBuf) -> Result<NamedFile, NotFound<String>> {
let path = Path::new("static/").join(file);
NamedFile::open(&path).await.map_err(|e| NotFound(e.to_string()))
}
响应Json
我们可以直接是使用为我们包装好的Json进行返回
use rocket::serde::{Serialize, json::Json};

#[derive(Serialize)]
#[serde(crate = "rocket::serde")]
struct Task { /* .. */ }

#[get("/todo")]
fn todo() -> Json<Task> {
    Json(Task { /* .. */ })
}
模板
添加依赖
cargo add rocket_dyn_templates
修改Cargo.toml
[dependencies]
rocket_dyn_templates = { version = "0.1.0-rc.3", features = ["handlebars", "tera"] }
main.rs
use rocket_dyn_templates::{Template,context};

#[get("/index")]
fn index()->Template{
    Template::render("index",context! {
        foo: 123,
    })
}

#[launch]
fn rocket() -> _ {
    rocket::build()
        .mount("/", routes![index])
        .attach(Template::fairing())
}
添加页面模板
在templates下创建index.tera,名字对应 Template::render('template_name',context!...)
index tera
Rocket-状态管理
在 Rust 的 Rocket 框架中,Managed State(管理状态)是一种在应用程序全局范围内共享数据的机制。它允许您在整个应用程序中存储和检索数据,并从多个处理程序中访问该数据,而不必每次使用时都传递它。
Managed State 在以下情况下非常有用:
- 保存全局配置信息:如果您需要将某些配置信息在应用程序的多个部分之间共享,那么 Managed State 是很好的选择。例如,您可能需要保存数据库连接字符串或应用程序运行所需的其他配置变量。
- 缓存数据:Managed State 还可以用于存储应用程序中经常使用的数据,以避免反复查询数据库或重复执行昂贵的操作。将这些数据存储在 Managed State 中可以提高应用程序的性能和响应速度。
- 跨请求共享数据:由于 Managed State 存在于整个应用程序生命周期中,因此您可以在多个请求之间共享数据。这使得在不同请求之间共享数据变得更加容易。
#[derive(Debug,Serialize,Deserialize)]
#[serde(crate="rocket::serde")]
struct SqlServer {
    uri: String,
    port: i32,
    username: String,
    password: String,
    sqlType: SQL,
}
#[derive(Debug,Serialize,Deserialize)]
#[serde(crate="rocket::serde")]
enum SQL {
    MYSQL,
    ORACLE,
    REDIS,
    MONGO,
}

impl SqlServer{
    fn new_mysql()->SqlServer{
        SqlServer{
            uri: "127.0.0.1".to_string(),
            port: 3306,
            username: "root".to_string(),
            password: "root".to_string(),
            sqlType: SQL::MYSQL,
        }
    }
}

#[get("/state")]
fn getState(sql_server_data: &State<SqlServer>) -> Json<&SqlServer> {
    let tmp = sql_server_data.clone().inner();
    Json(tmp)
}


#[launch]
fn rocket() -> _ {
    rocket::build()
        .manage(SqlServer::new_mysql())
        .mount("/", routes![getState])
}
Rocket-连接池连接数据库Mysql
添加依赖
rocket_db_pools = {version ="0.1.0-rc.3",features = ["sqlx_mysql"]}
设置数据库连接配置(Rocket.toml)
[default.databases.mysql_db]
url="mysql://username:password@localhost:3306/数据库名称?ssl-mode=disabled"

#以下都是可以配置的
min_connections = 64
max_connections = 1024
connect_timeout = 5
idle_timeout = 120
main.rs
use rocket::{launch, get, post, State, routes};
use rocket::serde::{json::Json, Serialize, Deserialize};
use rocket_db_pools::{Connection, Database, Pool};
use rocket_db_pools::sqlx::{MySqlPool, query, Row};
use rocket_db_pools::sqlx::mysql::MySqlRow;


#[derive(Database)]
#[database("mysql_db")]
struct MysqlDB(MySqlPool);


#[get("/mysql")]
async fn connect_mysql(mut connect: Connection<MysqlDB>) -> Option<String> {
    let sql = "SELECT * FROM rolelist";

    let rows: Vec<MySqlRow> = query(sql)
        .fetch_all(&mut *connect).await.ok()?;

    for row in rows.iter() {
        let id:i32 = row.get(0);
        let name:String = row.get(1);
        println!("id:{}", id);
        println!("role_name{}", name);
    };
    Some("testOK".to_string())
}

#[launch]
fn rocket() -> _ {
    rocket::build()
        .mount("/", routes![connect_mysql])
        .attach(MysqlDB::init())
}
使用Figment提取自定义配置
添加依赖
figment = "0.10.8"
设置app.toml
app_name="test-rocket"
main.rs
use rocket::serde::{Serialize, Deserialize};
use rocket::{State, fairing::AdHoc,launch,get,routes};
use figment::{Figment, Profile, providers::{Format, Toml, Serialized, Env}};


#[launch]
fn rocket() -> _ {
    let config = Figment::new()
        .merge(Toml::file("app.toml"))
        .select("rocket");
    let app_name = config.extract_inner::<String>("app_name").unwrap();
    println!("{}",app_name);
    rocket::build()
        .mount("/", routes![])

}