Some Cool Tips for .NET
本文转自http://www.codeproject.com/KB/miscctrl/tips.aspx
Introduction
These are some tips for commonly faced problems in .NET . Some of these tips are mine and some of these i have got from different sources. My aim is not to claim the ownership of these tips,but as a newcomer I had faced these problems and had to do lot of googling. So just to help my fellow programmers I am putting this together. One more reason is Codeproject.com ranks quiet ahead as compared to other sites of same nature, but still I was not able to find some basic solutions as below. So it is small effort from my side.Windows Application
.NET Framework
1. How to get the path for "My Documents" and other system folders?2. How to get the path to my running EXE?
3. How to determine which operating system is running?
4. How to get a file's name from the complete path string?
5. How to get a file's extension from the complete path string?
6. What is difference beween VB.NET and C#.NET?
7. How to find whether your system has mouse or the number of buttons, whether it has wheel, or whether the mouse buttons are swapped or size of your monitor and many such information?
8. What is the purpose of the [STA Thread] attribute for the Main method of a C# program?
9. How to import CSV data using .NET application?
10. How to find size of logical drives using .NET?
11. How can I get the index of substring in a sentence irrespective of it's case?
12. How to access value of internal property Rawkind in System.Drawing.Printing.PaperSource in .NET 1.1?
OOPS
1. What are Copy Constructors?2. What are Read-Only Constants?
VS.NET IDE
1. How to manage code snippets in VS.NET IDE?2. How to display Line Numbers in code editor?
3. How to change the color of the regions?
Controls
Forms
1. How to create a form with resizing borders and no title bar?2. How to use XP Themes with Windows Forms using the .NET?
3. How to prevent a form from being shown in the taskbar?
4. How to open default E-mail client on your system with all parameters entered in it,like Outlook Express or Eudora, from your .NET windows or Web Application?
5. How to create Pop-Up Alert windows like messengers?
6. What is difference between Anchoring and Docking?
Buttons
1. How to set the default button for a form?2. How to set the Cancel button for a form?
3. How to trigger a button click event?
Combo Box
1. How to fill a ComboBox with the available fonts?Text Box
1. How to disable the default ContextMenu of a TextBox?2. How to enter multiline text in textbox through code?
3. Some useful TextBox Validations
4. How to unselect the text in textbox after it receives focus?
DateTime Picker
1. How to make the DateTimePicker show empty text if no date is selected?Data Grid
1. How to remove the indeterminate status of checkbox in datagrid?2. How to group columns in DataGrid?
Panel
1. How to make a Panel or Label semi-transparent on a Windows Form?WebBrowser Control
1. How to print the contents of Web Browser control?2. How to assign custom Header and Footer and other page settings while printing the contents of Web Browser control?
ADO.NET
1. How to bind two controls to the same DataTable without having changes in one control also change the other control?Crystal Reports
1. How to hide the status bar of Crystal Report in Report Viewer?2. How to generate PDF version of Crystal Report programmatically?
3. How to select a printer while printing through Crystal Report programmatically?
Deployment
1. How to install database while deploying .NET application ?2. How to install MSDE while deploying .NET application?
3. How to create conditional shortcuts while deploying .NET application?
Add ins
1. How to get a reference to usercontrol in CreateToolWindow2()?Miscellaneous
1. How to enable the mnemonics (underline) being displayed when an application is launched2. An easy way to build connection string.
3. How to add a custom or destination folder to SendTo menu?
Windows Application
.NET Framework
#1. How to get the path for "My Documents" and other system folders?
Use the GetFolderPath method of the System.Environment class to retrieve this information.
MessageBox.Show( Environment.GetFolderPath( Environment.SpecialFolder.Personal ) );
#2. How to get the path to my running EXE?
The Application class has a static member ExecutablePath that has this information.
string appPath = Application.ExecutablePath;
Alternative: The tip below is provided by cbono2000
System.Reflection.Assembly.GetExecutingAssembly().Location
#3. How to determine which operating system is running?
Use System.Environment's OSVersion static (shared) property.
OperatingSystem os = Environment.OSVersion;

MessageBox.Show(os.Version.ToString());

MessageBox.Show(os.Platform.ToString());
#4. How to get a file's name from the complete path string?
Use System.IO.Path.GetFileName and System.IO.Path.GetFileNameWithoutExtension static methods.
#5. How to get a file's extension from the complete path string?
Use System.IO.Path.GetExtension static method.
#6. What is difference beween VB.NET and C#.NET?
Hi friends, click here to find the best comparison ever between VB.NET and C#.NET .
#7. How to find whether your system has mouse or the number of buttons, whether it has wheel, or whether the mouse buttons are swapped or size of your monitor and many such information?
UseSystem.Windows.Forms.SystemInformation.
SystemInformation provides static (Shared in Visual Basic) methods and properties that can be used to get in
formation such as Windows display element sizes, operating system settings, network availability, and the capabilities of hardware installed on the system.This class cannot be instantiated. e.g
MousePresent:    SystemInformation.MousePresent.ToString()

MouseButtonsSwapped:   SystemInformation.MouseButtonsSwapped.ToString()
#8. What is the purpose of the [STA Thread] attribute for the Main method of a C# program?
That marks the thread as being Single

Thread Apartment which means any multiple threaded calls need to be marshaled

over to that thread before they are called. That's there because Windows Forms uses some OLE calls (Clipboard for example), which must be made from the thread that initialized OLE.
#9. How to import CSV data using .NET application?
Importing CSV files using .NET application
#10. How to find size of logical drives using .NET?
- Download source files - 10.0 Kb
- Download demo project - 5.48 Kb
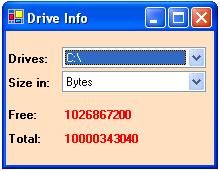 There is direct method in .NET for computing the file size but there is no such method for computing directory size and logical drive size.One may think of just adding file size to get directory size and then drive size. But this method has some drawbacks. But we can use Win32 API function GetDiskFreeSpaceEx for this purpose.
TheGetDiskFreeSpaceExfunction retrieves information about the amount of space that is available on a disk volume, which is the total amount of space, the total amount of free space, and the total amount of free space available to the user that is associated with the calling thread. You can do it as following: Enlist the drives:
string[] tempString = Directory.GetLogicalDrives();

foreach(string tempDrive in tempString)

 {

   cmbDrives.Items.Add(tempDrive);

 }

cmbDrives.SelectedIndex=0;


public sealed class DriveInfo

  {


 [DllImport("kernel32.dll", EntryPoint="GetDiskFreeSpaceExA")]

 private static extern long GetDiskFreeSpaceEx(string lpDirectoryName,

 out long lpFreeBytesAvailableToCaller,

 out long lpTotalNumberOfBytes,

 out long lpTotalNumberOfFreeBytes);


public static long GetInfo(string drive, out long available, out long total, out long free)

  {

    return GetDiskFreeSpaceEx(drive,out available,out total,out free);

  }


public static DriveInfoSystem GetInfo(string drive)

 {

  long result, available, total, free;

  result = GetDiskFreeSpaceEx(drive, out available, out total, out free);

  return new DriveInfoSystem(drive,result,available,total,free);

  }


}


public struct DriveInfoSystem

 {

  public readonly string Drive;

  public readonly long Result;

  public readonly long Available;

  public readonly long Total;

  public readonly long Free;


public DriveInfoSystem(string drive, long result, long available, long total, long free)

 {

  this.Drive = drive;

  this.Result = result;

  this.Available = available;

  this.Total = total;

  this.Free = free;

 }

}
and then you can use it as
DriveInfoSystem info = DriveInfo.GetInfo("c:");
#11. How can I get the index of substring in a sentence irrespective of it's case?
The IndexOf method of the string class is case-sensitive. There are two possible ways to overcome this problem.
1. Convert the case of whole sentence and the substring into any one case and then find the index of particular substring.
string strParent = "The Codeproject site is very informative.";

string strChild = "codeproject";


// The line below will return -1 when expected is 4. int i = strParent.IndexOf(strChild);


// The line below will return proper index int j = strParent.ToLower().IndexOf(strChild.ToLower());
2. Use IndexOf method of CompareInfo class in System.Globalization namespace. This is a more professional and elegant way of doing this.
using System.Globalization;


string strParent = "The Codeproject site is very informative.";

string strChild = "codeproject";


// We create a object of CompareInfo class for a neutral culture or a culture insensitive object CompareInfo Compare = CultureInfo.InvariantCulture.CompareInfo;


int i = Compare.IndexOf(strParent,strChild,CompareOptions.IgnoreCase);
#12. How to access value of internal property Rawkind in System.Drawing.Printing.PaperSource in .NET 1.1?
System.Drawing.Printing.PaperSource class gives us information about available trays on selected printer. A public property Kind gives us a value of type PaperSourceKind which is a enumeration that gives us unique numbers for different kind of trays. But there is a limitation with this property that when tray type is custom it gives a same value i.e, 257. But when you debug you may find a internal property RawKind which gives unique numbers to even custom tray types. And we need these values actually to send print to correct trays. This is a bug in .NET 1.1 but in .NET 2.0 this has been corrected and RawKind propety is made pulic. Still there is workaround for this problem in 1.1 and you can access a private field kind, which actually sets value to Rawkind property, using Reflection to get proper tray codes.Following is the code snippet to be used.
private int GetRawKind(PaperSource psource)

{

    Type t = psource.GetType();

    FieldInfo fi = t.GetField("kind", BindingFlags.NonPublic | BindingFlags.Instance);

    return (int)fi.GetValue(psource);

}
OOPS
#1. What are Copy Constructors?
We know that a constructor is a special method that has the same name as the class and returns no value.
It is used to initialize the data in the object we're creating.
There's another kind of constructor�the copy constructor. When we copy one object to another, C# will copy the reference to the first object to the new object, which means that we now have two references to the same object. To make an actual copy, we can use a copy constructor, which is just a standard constructor that takes an object of the current class as its single parameter. For example, here's what a copy constructor for the Student class might look like. Note that we're copying the name field to the new object.
public Student(Student student)

{

 this.name = student.name;

}
Now we can use this constructor to create copies. The copy will be a separate object, not just a reference to the original object.
class Student

{

     private string name;


     public Student(string name)

       {

           this.name = name;

       }


     public Student(Student student)

        {

            this.name = student.name;

        }


    public string Name

        {

            get

           {

              return name;

           }

            set

           {

               name = value;

           }

       }

}
class Final

{

    static void Main()

      {

        Student student = new Student ("A");

        Student NewStudent = new Student (student);

        student.Name = "B";

        System.Console.WriteLine("The new student's name is {0}", NewStudent.Name);

      }

}


The new student's name is A.
#2. What are Read-Only Constants?
There are situations where we would like to decide the value of a constant member at run-time. We may also like to have different constant values for different objects of class. To overcome these shortcomings, C# provides another modifier known as readonly to be used with data members. This modifier is designed to set the value of the member using a constructor method, but cannot be modified later. The readonly members may be declared as either static fields or instance fields. When they are declared as instance fields, they can take different values with different objects. Consider the code below:
class Numbers

   {

    public readonly int m;

              public static readonly int n;

              public Numbers (int x)

    {

       m=x;

    }


              static Numbers ()

    {

        n=100;

    }

   }
The value for m is provided at the time of creation of an object using the constructor with parameter x. This value will remain constant for that object. Remember, the variable n is assigned a value of 100,even before the creation of any objects of Numbers.
VS.NET IDE
#1. How to manage code snippets in VS.NET IDE?
In VS.NET Editor in Code View you can select and drag code to a Tab (other than the Clipboard ring) in the ToolBox and then you can drag the code from the Tab to the desired location.
#2. How to display Line Numbers in code editor?
In the VS.NET IDE , from Menu select TOOLS > OPTIONS>TEXT EDITOR (in left window) >ALL LANGUAGES > LINE NUMBERS You can show Line Numbers depending on languages by selecting specific language in TEXT EDITOR like C# or Basic and checking Line Numbers option
#3. How to change the color of the regions?
In the VS.NET IDE , from Menu select TOOLS > OPTIONS > ENVIRONMENT (in left window) > FONTS AND COLORS > DISPLAY ITEMS (on right side) >COLLAPSIBLE TEXT . After selecting this you can set the color.
Controls
Forms
#1. How to create a form with resizing borders and no title bar?
Set the form's Text and ControlBox properties.
form1.Text = string. Empty;

form1.ControlBox = false;
#2. How to use XP Themes with Windows Forms using the .NET?
You need to install XP on your machine and the theme should be set to XP.You also need to ensure that the FlatStyle property of the control is changed to System and then add following line of code in your Main() method
static void Main()

{

  Application.EnableVisualStyles();

  Application.DoEvents();

  Application. Run(new Form1());

}
#3. How to prevent a form from being shown in the taskbar?
Set the form's ShowInTaskbar property to False to prevent it from being displayed in the Windows taskbar.
#4. How to open default E-mail client on your system with all parameters entered in it,like Outlook Express or Eudora, from your .NET windows or Web Application?
This can be achieved very easily though it seems complicated in beginning. Use
MailTo command for this .I had faced this problem while developing Windows Application. This is very common command and known to many web developers but the great thing about this command is that it works as smoothly with windows application as it works with Web Application.
Syntax:
MailTo:[email protected]Some other features of this commands are discussed below:
| Features | Syntax |
| Address message to multiple recipients | , (comma separating e-mail addresses) |
| Add entry in the "Subject" field | ?subject=Subject Field Text |
| Add entry in the "Copy To" or "CC" field | &[email protected]; |
| Add entry in the "Blind Copy To" or "BCC" field | &[email protected] |
| Add entry in the "Body" field | &body=Your message here |
Web Applications:
A href="mailto:[email protected],[email protected][email protected]&Subject=Hello&body=Happy New Year"
Windows Application:
UseSystem.Diagnostics.Process
Process process = new Process();

process.StartInfo.FileName = "mailto:[email protected],[email protected]?subject=Hello&[email protected] &[email protected]&body=Happy New Year" ;

process.Start();
#5. How to create Pop-Up Alert windows like messengers?

I always thought about the ways to create alert windows like messenger pop-ups.This is one such attempt. The logic is simple. Just open the form below taskbar and slowly bring it up using timer so we can have the animated effect. Similarly you can close it. One thing we should be careful about is the 'Resolution' of monitor, since the location of form will change accordingly. So instead of directly locating the form with pre-defined co-ordinates, we will calculate the working area of the screen and place our form accordingly. To calculate the working area of the screen we can use Screen. GetWorkingArea(control), which gives the working area of the screen without taskbar.
X=Screen.GetWorkingArea(this).Width; // This line gives the width of working area Y=Screen.GetWorkingArea(this).Height; // This line gives the width of working area this.Location=new Point(X-this.Width,Y+this.Height); // This line sets the initial location of the formNow we will open the form as below:
int i = this.Location.Y;


  if(i>Y-this.Height)

 {

    this.Location=new Point(X-this.Width,i-8);

 }

else

  {

     timer1.Stop();

     timer1.Enabled=false;


     timer3.Start();

     timer3.Enabled=true;

 }
Similarly we'll close the form
   timer3.Stop();

   timer3.Enabled=false;

int i = this.Location.Y;


  if(i<Y)

 {

    this.Location=new Point(X-this.Width,i+8);

 }

else

  {

     timer2.Stop();

     timer2.Enabled=false;

     this.Close();

 }
#6. What is difference between Anchoring and Docking?
Though both Anchoring and Docking are helpful while resizing application windows, Anchoring helps control in retaining its size and location with respect to container controls when the container is not attached to particulae edge of the container but somewhere in middle.
The Docking feature attaches a control to the edge of its container. When a control is docked to an edge of it's container, it will always stick to that edge. The control will also resize itself to fully fit the edge of the container and also resizes as the container is resized. The Dock property of the Form control can be set to any one of the six values, Top, Bottom, Left, Right, Fill, and None.
In simple words, there cannot be gap between edge of child control and edge of container control when docked.
Anchoring specifies how a control anchors to the edges of its container. When a control is anchored to an edge of its container, the distance between the control and the specified edge remains constant when the container resizes. For example, if a control is anchored to the right edge of its container, the distance between the right edge of the control and the right edge of the container remains constant when the container resizes. A control can be anchored to any combination control edges. If the control is anchored to opposite edges of its container (for example, to the top and bottom), it resizes when the container resizes.
In simple words, there can be or cannot be gap between edge of child control and edge of container control when anchored.
Buttons
#1. How to set the default button for a form?
Default Button of a form means that button on form whose click event fires when Enter key is pressed. To make a button on form as default set the form's AcceptButton property. You can do this either through the designer, or through code such as
form1.AcceptButton = button1;
#2. How to set the Cancel button for a form?
Cancel Button of a form means that button on form whose click event fires when ESC key is pressed. To make a button on form as Cancel set the form's CancelButton property. You can do this either through the designer, or through code such as
form1.CancelButton = button1;
#3. How to trigger a button click event?
In VB 6.0 it was possible to call CommandButton click event from anywhere like any other method or function (Sub). But in .NET it is not possible in same way. But .NET provides a very simple way to do this. Just use the button's public method PerformClick.
button1.PerformClick();
Alternative: The tip below is provided by
kaminm
You can trigger a button (Web and Win) by calling
Buttonclick with null parameters
btnClear_Click(null,null)Alternative: The tip below is provided by Paul Brower
You can use it this way, if you're planning on doing something with the sender object, you have a reference to it.
button1_click(button1,EventArgs.Empty)
Combo Box
#1. How to fill a ComboBox with the available fonts?
comboBox1.Items.AddRange (FontFamily.Families);
Text Box
#1. How to disable the default ContextMenu of a TextBox?
To prevent the default context menu of a TextBox from showing up, assign a empty context menu as shown below:
textBox1.ContextMenu = new ContextMenu ();
#2. How to enter multiline text in textbox through code?
Sometimes it is needed to show data on different lines. The first idea that comes is to set MULTILINE Property to true and use '\n' escape sequence for this. But this escape sequence is not supported in .NET textbox. Still it very easy to overcome this problem. To assign multiline text at design time, in the designer window use the LINES property of TextBox control. For achieving this at runtime, create an array of string and assign it to LINES property of Textbox as shown below.
string [] strAddress = {"Mukund Pujari","Global Transformation Technologies","Pune, India"};

textBox1.MultiLine=true;

textBox1.Lines=strAddress;
Alternative: The tip below is provided by joelycat
.NET text boxes don't recognize \n but they do recognize \r\n. Try: textBox1.Text="Line 1\r\nLine2\r\nLine3.";Alternative: The tip below is provided by Robert Rohde
Actually "System.Environment.NewLine" should be used instead. This way you are platform independant.Alternative: The tip below is provided by Redgum
simply use a "RichTextBox" for those areas on your form that require multiple lines

of randomly output text, and use a simple text box for those that do not.
#3. Some useful TextBox Validations
Numeric TextBox
private void textBox1_KeyPress(object sender, System.Windows.Forms.KeyPressEventArgs e)

  {

    if ( !( char.IsDigit( e.KeyChar ) || char.IsControl( e.KeyChar ) ) )

     {

       e.Handled = true;

     }

}
Numeric TextBox with Decimals
private void textBox1_KeyPress(object sender, System.Windows.Forms.KeyPressEventArgs e)

  {

   if ( !( char.IsDigit( e.KeyChar) || char.IsControl( e.KeyChar ) ||(e.KeyChar== (char )46)) )

     {

       e.Handled = true;

     }

}
TextBox Allowing Characters Only
private void textBox1_KeyPress(object sender, System.Windows.Forms.KeyPressEventArgs e)

  {

    if ( !( char.IsLetter( e.KeyChar ) || char.IsControl( e.KeyChar ) ) )

     {

       e.Handled = true;

     }

}
TextBox Allowing Upper Case Characters Only
private void textBox1_KeyPress(object sender, System.Windows.Forms.KeyPressEventArgs e)

  {

    if ( !( char.IsUpper( e.KeyChar ) || char.IsControl( e.KeyChar )) )

     {

       e.Handled = true;

     }

}
TextBox Allowing Lower Case Characters Only
private void textBox1_KeyPress(object sender, System.Windows.Forms.KeyPressEventArgs e)

  {

    if ( !( char.IsLower( e.KeyChar ) || char.IsControl( e.KeyChar )) )

     {

       e.Handled = true;

    }

}
Check For Unfilled TextBox
// Call this function and pass the Textbox as parameter to this function public static bool ChkEmpty(params System.Windows.Forms.TextBox[ ] tb)

  {

    int i;

    for (i = 0; i < tb.Length; i++)

     {

       if (tb[i].Text.Trim() == "")

      {

        MessageBox.Show("Don't keep field empty");

        tb[i].Focus();

        return false;

      }

    }

   return true;

}
Localizing Validations - Country Specific Decimal Character
The tip below is provided by curtHere he tells us, how different characters can be used for decimals depending upon the countries. For e.g. people in France may use character other than dot (.) for decimal point.
string DecimalSeparator = Thread.CurrentThread.CurrentCulture.NumberFormat.NumberDecimalSeparator;


private void textBox1_KeyPress(object sender, System.Windows.Forms.KeyPressEventArgs e)

{

if ( !( char.IsDigit( e.KeyChar) || char.IsControl( e.KeyChar ) || (DecimalSeparator.IndexOf(e.KeyChar) != -1 ) ) )

{

e.Handled = true;

}

}
#4. How to unselect the text in textbox after it receives focus?
Whenever a textbox having text gets focus, the text in it is selected. To avoid this just set the SelectionStart property of this textbox to length of the text in it, mostly in ENTER. event of the textbox.If anyone has better idea please suggest.
textBox1.SelectionStart = textBox1.Text.Length;
DateTime Picker
#1. How to make the DateTimePicker show empty text if no date is selected?
Use following code in some Button Click event:
dateTimePicker1.CustomFormat=" ";

dateTimePicker1.Format=DateTimePickerFormat.Custom;
Data Grid
#1. How to remove the indeterminate status of checkbox in datagrid?
The checkbox in checkbox column of datagrid shows indeterminate status by default. To remove this behaviour set AllowNull property of the CheckBox column to false as below:
DataGridTableStyle ts1 = new DataGridTableStyle(); // Create New TableStyle ts1.MappingName = "Items"; // Assign the name of Data Table to which Style is applied DataGridColumnStyle boolCol = new DataGridBoolColumn(); // Create a CheckBox column boolCol.MappingName = "ch"; // Assign the name of Data Column boolCol.AllowNull=false; // This property actually removes the indeterminate status of checkboxes
#2. How to group columns in DataGrid?
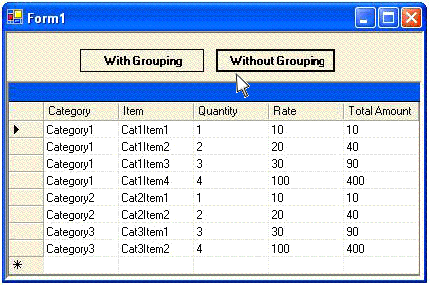
Hi friends, you may be knowing better ways of doing it, but I managed to find this solution in the time limit I had been given. The logic is that, while looping through datatable we save the values of current column and previous column and we compare it. If Current Value is same as Previous Value, we don't show it in grid and if it is not same then we show it.
/* The logic is that, while looping through datatable we save the values of current column and previous column and we compare it. If Current Value is same as Previous Value, we don't show it in grid and if it is not same then we show it. 1. We save value of current column in variable 'strCurrentValue'. 2. After the loop we assign the value in 'strCurrentValue' to variable 'strPreviousValue'. 3. And in next loop, we get new value in 'strCurrentValue'. 4. Now we can compare value in 'strCurrentValue' and 'strPreviousValue' and accordingly show or hide values in the column. */

int m;

for(m=0;m<8;m++)

 {


object cellValue = dt.Rows[m]["Category"]; // Here we catch the value form current column strCurrentValue=cellValue.ToString().Trim(); // We assign the above value to 'strCurrentValue'

if(strCurrentValue!=strPreviousValue) // Now compare the current value with previous value {

   dt.Rows[m]["Category"]=strCurrentValue; // If current value is not equal to previous // value the column will display current value  }

  else

 {

  dt.Rows[m]["Category"]=string.Empty;    // If current value is equal to previous value // the column will be empty }

strPreviousValue=strCurrentValue;   // assign current value to previous value     }

strCurrentValue=string.Empty;    // Reset Current and Previous Value strPreviousValue=string.Empty;
Panel
#1. How to make a Panel or Label semi-transparent on a Windows Form?
You can make a panel or label transparent by specifying the alpha value for the Background color.
panel1.BackColor = Color.FromArgb(65, 204, 212, 230);


NOTE:In the designer you have to enter these values

manually in the edit box. Don't select the color using the ColorPicker.
WebBrowser Control
#1. How to print the contents of Web Browser control?
Though there is no direct Print method for printing the contents of web browser but there is very easy way which does more than printing. Use ExecWB method of Web Browser control. This method executes a command on an OLE object and returns the status of the command execution using the IOleCommandTarget interface. By using this method you can print, preview ,set up the page and do many more things. You can also decide whether the dialogs should be prompted to user or not.
For details of syntax and values of attributes please refer MSDN.
In the example given below, we are printing the contents by specifying it in first parameter and we are prompting the Printer Selection Dialog to user by passing second parameter
object em =null;

axWebBrowser1.ExecWB (SHDocVw.OLECMDID.OLECMDID_PRINT,SHDocVw.OLECMDEXECOPT.OLECMDEXECOPT_PROMPTUSER,

ref em, ref em);
Similarly you can use this for setting Page Set Up. E.g.
object em =null;

axWebBrowser1.ExecWB (SHDocVw.OLECMDID.OLECMDID_PAGESETUP,SHDocVw.OLECMDEXECOPT.OLECMDEXECOPT_PROMPTUSER,

ref em, ref em);
#2. How to assign custom Header and Footer and other page settings while printing the contents of Web Browser control?
I came across many codes on codeproject itself where people have suggested very good ways of assigning custom Header and Footer. But all these code were in C++. So, I being a C# programmer felt it difficult to convert this code. But I came across an alternative and very easy way of doing it. Just change the values of header and footer in registry programmatically. Web Browser control shares same page settings as Internet Explorer. You can see the header and footer of IE by going to File > Page Set Up �> Header & Footer.The following steps outline how Microsoft Internet Explorer accesses the printer settings:
1. Internet Explorer tries to obtain the values from the following registry key: HKEY_CURRENT_USER\Software\Microsoft\Internet Explorer\PageSetup
2. If the key in step 1 does not exist, Internet Explorer tries to create this key by copying the values from the following key: HKEY_LOCAL_MACHINE\Software\Microsoft\Internet Explorer\PageSetup
3. If the key in step 2 does not exist, default values are provided. <NOTE: These registry values are system-wide and affect all instances of the WebBrowser control and Internet Explorer for the current user. Following e.g. shows how to set custom header for IE or WebBrowser control.
public void SetupHeaderWB()

{

  string strPath = "Software\\Microsoft\\Internet Explorer\\PageSetup";

  Microsoft.Win32.RegistryKey oKey = null;


  /* The following lines of code takes care that error does not occur if registry settings are not at proper path.*/

  oKey = Microsoft.Win32.Registry.CurrentUser.OpenSubKey (strPath, true);

  if (oKey! =null)

   {

    oKey = microsoft.Win32.Registry.CurrentUser.OpenSubKey (strPath, true);

   }

  else

   {

    oKey = Microsoft.Win32.Registry.LocalMachine.OpenSubKey (strPath, true);

   }


   string strKey = "header";

   object oValue = "Test header";

   oKey.SetValue (strKey, oValue);

   /* You can also get the value in registry by following line of code string strValue=oKey.GetValue (strKey).ToString();*/

   oKey.Close();

}
ADO.NET
#1. How to bind two controls to the same DataTable without having changes in one control also change the other control?
This is very common problem, as a newcomer I had spent great deal of time to solve this. Suppose you have two controls viz, Combobox and Listbox on same form and Datasource property of both these controls is same. Then the selection in one control selects same item in other control. This problem occurs because ofBindingContext property of controls. By default the BindingContext member of each of the two controls is set to the
Form's BindingContext. Thus, the default behavior is for the ComboBox and Listbox to share the same BindingContext, and that's why the selection in the ComboBox is synchronized with the current item of Listbox. If you do not want this behavior, create a new BindingContext member for at least one of the controls.
comboBox1.DataSource = dataset.Tables[ "Items" ];

comboBox1.ValueMember = "CustomerID";

comboBox1.DisplayMember = "CustomerID";


listBox1.BindingContext = new BindingContext(); // Set the BindingContext property of ListBox to new BindingContext listBox1.DataSource = dataset.Tables[ "Items" ];

listBox1.ValueMember = "CustomerID";

listBox1.DisplayMember = "CustomerID";
Crystal Reports
#1. How to hide the status bar of Crystal Report in Report Viewer?
The following block makes the status bar of Crystal Report invisible.foreach(object obj in this.crystalReportViewer1.Controls) { if( obj.GetType()== typeof(System.Windows.Forms.StatusBar)) { StatusBar sBar=(StatusBar)obj; sBar.Visible=false; } }
#2. How to generate PDF version of Crystal Report programmatically?
Following block of code generates PDF version of Crystal Report programmatically.ReportDocument O_Report=new ReportDocument(); ExportOptions exportOpts = new ExportOptions(); PdfRtfWordFormatOptions pdfFormatOpts = new PdfRtfWordFormatOptions (); DiskFileDestinationOptions diskOpts = new DiskFileDestinationOptions(); exportOpts = O_Report.ExportOptions; // Set the PDF format options. exportOpts.ExportFormatType = ExportFormatType.PortableDocFormat; exportOpts.FormatOptions = pdfFormatOpts; // Set the disk file options and export. exportOpts.ExportDestinationType = ExportDestinationType.DiskFile; diskOpts.DiskFileName = "C://Trial.pdf"; // This is the path where the file will be saved exportOpts.DestinationOptions = diskOpts; O_Report.Export ();
#3. How to select a printer while printing through Crystal Report programmatically?
You can accomlish this using PrintDialog control and get the computer name usingprintDialog1.PrinterSettings.PrinterName
// Create a Report Document ReportDocument O_Report=new ReportDocument();


private void btnPrint_Click(object sender, System.EventArgs e)

{

   try

    {    // Create a Print Dialog     PrintDialog printDialog1 = new PrintDialog();


    // Create a Print Document     PrintDocument pd = new PrintDocument();


    printDialog1.Document=pd;

    printDialog1.ShowNetwork=true;

    printDialog1.AllowSomePages=true;


    DialogResult result = printDialog1.ShowDialog();

    if (result == DialogResult.OK)

    {

        PrintReport(printDialog1.PrinterSettings.PrinterName);

    }

      }


   catch(Exception ex)

     {

    MessageBox.Show(ex.Message);

     }


  }


private void PrintReport(string printerName)

 {

// Select the printer. O_Report.PrintOptions.PrinterName = printerName;


/* Print the report. Set the startPageN and endPageN parameters to 0 to print all pages.*/

O_Report.PrintToPrinter(1, false,0,0);

}
Deployment
#1. How to install database while deploying .NET application ?
Solution 1Solution 2
#2. How to install MSDE while deploying .NET application?
Installing MSDE with .NET Application#3. How to create conditional shortcuts while deploying .NET application?
Creating Conditional shortcutsAdd ins
#1. How to get a reference to usercontrol in CreateToolWindow2()?
Windows2.CreateToolWindow2() is a method used to host user control in VS 2005 toolwindow via Add-in.
Window CreateToolWindow2 (

    AddIn Addin,

    string Assembly,

    string Class,

    string Caption,

    string GuidPosition,

    [InAttribute] out Object ControlObject

    )
The last parameter
ControlObject of this method returns a reference to hosted user control. There are two ways to get a reference to hosted user control.
- The User Control should be in a same assembly as the Add in. (i.e the User Contol should be created in same Add in project)
- If User Control is not in the same assembly then set the attributes on the User control to make it fully visible to COM. This is achieved by following:
- Import
System.Runtime.InteropServices - Set class attribute as shown below. There are other attributes also. But for me only this attribute did the work.
namespace MyControl

       {


        [ComVisibleAttribute(true)]

        public partial class UserControl1 : UserControl

        {

          public UserControl1()

          {

            InitializeComponent();

          }

        }

       }
- Check the Register for COM interop option in the project's compile options before compiling.
Miscellaneous
#1. How to enable the mnemonics (underline) being displayed when an application is launched?
Usually the underline appears only after you press the Alt Key, but you can enable it by changing the Operating System Settings. On Windows XP, Right Click Desktop to bring up the Display Properties Dialog and then choose Appearance tab and then the Effects Button and uncheck the checkbox"Hide Underlined letters for keyboard navigation until I press the ALT Key".
#2. An easy way to build connection string.
Though this in not related to .NET directly but it is useful while working with ADO.NET1) Open a New notepad and save it with "udl" extension, suppose "New.udl". 2) Now you will see that it's icon is changed. 3) Open it, you will find Data Link properties dialog box. 4) For SQl Server connection string select <CODE>Microsoft OLE DB Provider For SQL Server in Provider Tab. 5) Click button "Next" or select Connection Tab 6) Here you can select all connection details and press button Test Connection. If it is successful close this dialog box. 7) Now open this file using "Notepad", you will find the connection string. Though it is built for OLE DB type of connection, you can use for SQL Server connection by removing Provider attribute. NOTE: If you are using SQL Authentication with password, then check the checkbox Allow Saving Password. This is necessary so that password appears in connection string.
#3. How to add a custom or destination folder to SendTo menu?
Every one knows about SendTo menu that appears after right click on any file.By default there are 4 options or destinations in this menu. But you can add custom destinations to this menu. Adding other locations to the Send To menu is convenient if you frequently per form the same file management tasks. For example, if you back up files on another network computer or on same machine where you have to navigate through a deep path every day, having the computer on the Send To menu can save you time.To add a destination to the Send To menu follow the steps given below:
- Open My Computer.
- Double-click the drive where Windows is installed (usually drive C, unless you have more than one drive on your computer). If you can't see the items on your drive when you open it, under System Tasks, click Show the contents of this drive.
- Double-click the Documents and Settings folder.
- Double-click the folder of a specific user.
- Double-click the SendTo folder. The SendTo folder is hidden by default. If it is not visible, on the Tools menu, click Folder Options. On the View tab, click Show hidden files and folders.
- On the File menu, point to New, and then click Shortcut.
- Follow the instructions on your screen.