11、DataBinding
数据绑定,依然去繁就简
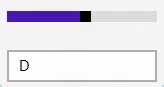
1、数据绑定小示例:
当滑动 slider 的时候,动态改变文本框中的数据
代码:
  <StackPanel Margin="5">

//实例化一个 Converter 对象

                        <StackPanel.Resources>

                            <local:S2Formatter x:Key="GradeConverter"/>

                        </StackPanel.Resources>


                          <Slider x:Name="sliderValueConverter" Minimum="1" Maximum="100" Value="70" Margin="5"/>


                        <TextBox x:Name="tbValueConverterDataBound"


 Text="{Binding ElementName=sliderValueConverter, Path=Value, Mode=OneWay,


 Converter={StaticResource GradeConverter}}"

                                 Margin="5" Width="150"/>

                    </StackPanel>
 public class S2Formatter : IValueConverter

    {

        //转化 slider 中的值为相应的等级

        public object Convert(object value, System.Type type, object parameter, string language)

        {

            int _value;

            string _grade = string.Empty;

            //把值转化为 int 类型

            if (Int32.TryParse(value.ToString(), out _value))

            {

                if (_value < 50)

                    _grade = "F";

                else if (_value < 60)

                    _grade = "D";

                else if (_value < 70)

                    _grade = "C";

                else if (_value < 80)

                    _grade = "B";

                else if (_value < 90)

                    _grade = "A";

                else if (_value < 100)

                    _grade = "A+";

                else if (_value == 100)

                    _grade = "SUPER STAR!";

            }


            return _grade;

        }


        public object ConvertBack(object value, System.Type type, object parameter, string language)

        {

            throw new NotImplementedException();

        }

    }
2、Indexers:
本示例展示 用数据绑定到集合中的固定数据,分别通过 集合的数组索引 和 集合的 字符串索引(键),显示在 UI 上。
结果:

 <StackPanel x:Name="LayoutRoot">

                <Border BorderBrush="LightBlue" BorderThickness="4" CornerRadius="20" Margin="5">

                    <StackPanel>

                        <StackPanel Orientation="Horizontal">

                            <TextBlock Text="Team name:" Style="{StaticResource BasicTextStyle}"

 Margin="5" FontWeight="Bold"/>


                                //绑定到集合中的第三个 Team 对象 的名字属性

                                      <TextBlock Text="{Binding Path=[3].Name }" Style="{StaticResource BasicTextStyle}" Margin="5" />


                        </StackPanel>

                        <StackPanel Orientation="Horizontal">

                           <TextBlock Text="Team manager:" Style="{StaticResource BasicTextStyle}" Margin="5" FontWeight="Bold"/>


                           //绑定到数据源中的 键为 “Gaffer” 的对象上

                                <TextBlock Text="{Binding Path=[3][Gaffer]}" Style="{StaticResource BasicTextStyle}" Margin="5"/>


                        </StackPanel>

                    </StackPanel>

                </Border>

          </StackPanel>
相应的 C# 代码:
//添加到页面的构造函数中

rootPage.DataContext = new Teams();
数据源 (同时也是 3、中的数据源):
 // Team 对象

    public class Team //Has a custom string indexer

    {

        Dictionary<string, object> _propBag;

        public Team()

        {

            _propBag = new Dictionary<string, object>();

        }


        public string Name { get; set; }

        public string City { get; set; }

        public SolidColorBrush Color { get; set; }


        // 用 C# 创建一个自定义的索引

        public object this[string indexer]

        {

            get

            {

                return _propBag[indexer];

            }

            set

            {

                _propBag[indexer] = value;

            }

        }


        public void Insert(string key, object value)

        {

            _propBag.Add(key, value);

        }


    }


    // 数据源

    public class Teams : List<Team>

    {

        public Teams()

        {

            //数据集合

            Add(new Team() { Name = "The Reds", City = "Liverpool", Color = new SolidColorBrush(Colors.Green) });

            Add(new Team() { Name = "The Red Devils", City = "Manchester", Color = new SolidColorBrush(Colors.Yellow) });

            Add(new Team() { Name = "The Blues", City = "London", Color = new SolidColorBrush(Colors.Orange) });


         //索引为 3 的 Team 对象,并向对象的“字典”中添加两个 键值对

             Team _t = new Team() { Name = "The Gunners", City = "London", Color = new SolidColorBrush(Colors.Red) };

            _t["Gaffer"] = "le Professeur";

            _t["Skipper"] = "Mr Gooner";


            Add(_t);

        }


    }
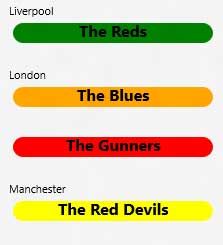
3、CollectionViewSource:
本示例讲解如何在页面中使用 CollectionViewSource 对象,进行分组绑定数据。
如图:
页面的 xaml :
 <Grid x:Name="Output" HorizontalAlignment="Left" VerticalAlignment="Top" Grid.Row="1">

            <Grid>

                <Grid.Resources>


              //声明一个名叫“groupInfoCVS” 的 CollectionViewSource 对象

                    <CollectionViewSource x:Name="groupInfoCVS" IsSourceGrouped="true" ItemsPath="Items"/>

                </Grid.Resources>


                <ListView x:Name="lvGroupInfoCVS" ItemsSource="{Binding Source={StaticResource groupInfoCVS}}">//数据绑定到 groupInfoCVS

                    <ListView.GroupStyle>

                        <GroupStyle>


                       //分组的标题的模版
                       <GroupStyle.HeaderTemplate>

                                <DataTemplate>

                                    <TextBlock Text="{Binding Key}" />

                                </DataTemplate>

                            </GroupStyle.HeaderTemplate>

                        </GroupStyle>

                    </ListView.GroupStyle>


                //列表中每项数据的模版

                    <ListView.ItemTemplate>

                        <DataTemplate>

                            <Border Background="{Binding Color}" Width="200" CornerRadius="10" HorizontalAlignment="Left">

                                <TextBlock Text="{Binding Name}" Style="{StaticResource BasicTextStyle}"
                                                                 HorizontalAlignment="Center" FontWeight="Bold"/>

                            </Border>

                        </DataTemplate>

                    </ListView.ItemTemplate>

                </ListView>

            </Grid>

        </Grid>
在 C# 页面绑定到 xaml 页面的 groupInfoCVS 对象:
       // 对 Teams 集合中的数据进行分组

       // Teams 和 2、 中的是相同一个
         Teams teams = new Teams();

            var result = from t in teams

                         group t by t.City into g

                         orderby g.Key

                         select new { Key = g.Key, Items = g }; ;


            groupInfoCVS.Source = result;
4、Collection changes:
本示例和 3、 基本相同,唯一不同的是把 3、 中的 Teams 集合添加到 继承了 INotifyCollectionChanged 接口的 ObservableCollection<Team> 泛型集合中
(方法: ObservableCollection<Team> ocTeams = new ObservableCollection<Team>(new Teams());),从而当删除泛型集合中的数据时, UI
上面的元素跟着动态删除。
上代码,不做过多解释:
页面的 xaml :
  <StackPanel>

                <StackPanel.Resources>

                    <CollectionViewSource x:Name="teamsCVS"/>

                </StackPanel.Resources>

                <ListView x:Name="lvTeams" Height="200" ItemsSource="{Binding Source={StaticResource teamsCVS}}">

                    <ListView.ItemTemplate>

                        <DataTemplate>

                            <Border Background="{Binding Color}" Width="200" CornerRadius="10" HorizontalAlignment="Left">

                                <TextBlock Text="{Binding Name}" Style="{StaticResource BasicTextStyle}"

                                                   HorizontalAlignment="Center" FontWeight="Bold"/>

                            </Border>

                        </DataTemplate>

                    </ListView.ItemTemplate>

                </ListView>

              //删除泛型集合中的数据

              <Button x:Name="btnRemoveTeam" Content="Remove teamm"  Click = BtnRemoveTeam_Click/>

              //显示集合中对象的数目

                <TextBlock x:Name="tbCollectionChangeStatus" Style="{StaticResource BasicTextStyle}"/>

            </StackPanel>
 private ObservableCollection<Team> ocTeams = new ObservableCollection<Team>(new Teams());


        //页面构造函数

        public  Page1()

       {

            ocTeams.CollectionChanged += _ocTeams_CollectionChanged;


            teamsCVS.Source = ocTeams;


        }


      //删除选中的列表中的对象,获取该对象的 索引 然后删除泛型集合中的数据

        void BtnRemoveTeam_Click(object sender, RoutedEventArgs e)

        {

            if (ocTeams.Count > 0)

            {

                int index=0;

                if (lvTeams.SelectedItem != null)

                    index = lvTeams.SelectedIndex;

                ocTeams.RemoveAt(index);

            }

        }


      // 当泛型集合中的数据发生改变时,将集合中对象的数目显示在页面上

        void _ocTeams_CollectionChanged(object sender, System.Collections.Specialized.NotifyCollectionChangedEventArgs e)

        {

            tbCollectionChangeStatus.Text = String.Format("Collection was changed. Count = {0}", ocTeams.Count);

        }
5、Incremental Loading:
代码量较多,直接看工程代码。