一、前言
实现基于keepalived+nginx+Varnish+LAMP企业架构,在后端LAMP部署wordpress站点,用nginx做反代,并且nginx反代服务器做keepalived主备架构;在nginx反代服务器后部署varnish缓存服务器,设置缓存规则,做压测测试检验效果。

二、环境准备
1、安装服务
在对应的服务器上安装相应服务程序包:
- 在RS1和RS2 上安装httpd服务:
~]#yum install -y httpd
- 在RS1和RS2上下载wordpress安装包:
~]# cd /var/www/html/
html]# wget https://cn.wordpress.org/wordpress-4.9.4-zh_CN.tar.gz
- 在RS1 上安装mariadb-server服务,让RS1提供数据库服务:
~]# yum install -y mariadb-server
- 在RS2上安装PHP-fpm的相关服务程序,让RS2负责动态内容的解析:
~]# yum install -y epel-release
~]# yum install -y php-fpm php-mysql php-mbstring php-mcrypt
- 在DR1和DR2 上安装keepalived和nginx服务:
~]#yum install -y epel-release
~]#yum install -y keepalived nginx
- 在DR1和DR2上安装psmisc服务,提供killall命令:
~]# yum install -y psmisc
- 在varnish上安装varnish服务:
~]#yum install -y epel-release
~]#yum install -y varnish
2、同步ntp时间及时区
在各服务器的/etc/profile文件中添加下面命令后,重新登录完成时区更改:
 ~]# vim /etc/profile
TZ='Asia/Shanghai'; export TZ
然后安装ntpdate命令,同步网络时间:
~]# yum install -y ntpdate
~]# ntpdate ntp1.aliyun.com
3、关闭各服务器的firewalld和selinux
为避免iptables和selinux的影响,建议关闭系统中的firewalld和selinux:
~]#systemctl stop firewalld
~]#systemctl disable firewalld
~]# vim /etc/selinux/config    #永久变更selinux状态
SELINUX=permissive
~]#setenforce 0    #临时变更为selinux为permissive状态
最后按照拓扑调整各虚拟机的网卡及IP即可。
三、配置RS1和RS2
1、配置RS1
解压wordpress安装包并生成软连接:
[root@RS1 ~]# cd /var/www/html/
[root@RS1 html]# tar xf wordpress-4.9.4-zh_CN.tar.gz
[root@RS1 html]# ln -sv wordpress blog
‘blog’ -> ‘wordpress’
创建默认主页index.html:
[root@RS1 html]# vim index.html
创建php主页index.php:
[root@RS1 html]# vim index.php
编辑创建httpd的vhost配置文件:
[root@RS1 html]# vim /etc/httpd/conf.d/vhost.conf

        servername www.ilinux.io
        DirectoryIndex index.html index.php
        Documentroot /var/www/html
        ProxyRequests off
        ProxyPassMatch ^/(.*\.php)$ fcgi://10.10.10.12:9000/var/www/html/$1
        ProxyPassMatch ^/(ping|status)$ fcgi://10.10.10.12:9000/$1

                options FollowSymlinks
                Allowoverride none
                Require all granted
配置完成后启动httpd服务:
[root@RS1 html]# systemctl start httpd
接着编辑配置/etc/my.cnf数据库配置文件:
[root@RS1 html]# vim /etc/my.cnf
[mysqld]
...
#添加下面两个语句
skip-name-resolve=ON
innodb-file-per-table=ON
...
启动mariadb-server服务:
[root@RS1 html]# systemctl start mariadb
更改mysql的root密码:
[root@RS1 html]# mysql_secure_installation

NOTE: RUNNING ALL PARTS OF THIS SCRIPT IS RECOMMENDED FOR ALL MariaDB
      SERVERS IN PRODUCTION USE!  PLEASE READ EACH STEP CAREFULLY!

In order to log into MariaDB to secure it, we'll need the current
password for the root user.  If you've just installed MariaDB, and
you haven't set the root password yet, the password will be blank,
so you should just press enter here.

Enter current password for root (enter for none):
OK, successfully used password, moving on...

Setting the root password ensures that nobody can log into the MariaDB
root user without the proper authorisation.

Set root password? [Y/n] y
New password:
Re-enter new password:
Password updated successfully!
Reloading privilege tables..
 ... Success!
登录到数据库中创建数据库wordpress并授权wordpress服务远程登录用户:
MariaDB [(none)]> CREATE DATABASE wordpress;
Query OK, 1 row affected (0.00 sec)

MariaDB [(none)]> GRANT ALL ON wordpress.* to 'wpuser'@'10.10.10.%' IDENTIFIED BY "magedu";
Query OK, 0 rows affected (0.00 sec)

MariaDB [(none)]> FLUSH PRIVILEGES;
Query OK, 0 rows affected (0.00 sec)
至此RS1 配置完毕。
2、配置RS2
解压wordpress安装包并生成软连接:
[root@RS2 ~]# cd /var/www/html/
[root@RS2 html]# tar xf wordpress-4.9.4-zh_CN.tar.gz
l[root@RS2 html]# ln -sv wordpress blog
‘blog’ -> ‘wordpress’
创建默认主页index.html:
[root@RS2 html]# vim index.html
This is RS2 10.10.10.12
创建php主页index.php:
[root@RS2 html]# vim index.php
编辑创建httpd服务的vhost配置文件:
[root@RS2 html]# vim /etc/httpd/conf.d/vhost.conf

        servername www.ilinux.io
        DirectoryIndex index.html index.php
        Documentroot /var/www/html
        ProxyRequests off
        ProxyPassMatch ^/(.*\.php)$ fcgi://127.0.0.1:9000/var/www/html/$1
        ProxyPassMatch ^/(ping|status)$ fcgi://127.0.0.1:9000/$1

                options FollowSymlinks
                Allowoverride none
                Require all granted
配置完成后启动httpd服务:
[root@RS2 html]# systemctl start httpd
接着配置php-fpm,编辑/etc/php-fpm.d/www.conf文件:
[root@RS2 html]# vim /etc/php-fpm.d/www.conf
listen = 0.0.0.0:9000
;listen.allowed_clients = 127.0.0.1  #注释掉此句,默认允许Ip访问
pm.status_path = /status
ping.path = /ping
ping.response = pong
创建PHP会话目录,并修改目录的属主和属组:
[root@RS2 html]# mkdir /var/lib/php/session
[root@RS2 html]# chown apache:apache /var/lib/php/session
最后启动php-fpm服务:
[root@RS2 html]# systemctl start php-fpm
至此RS2的配置也完成了。
四、配置DR1和DR2
1、配置DR1
编辑/etc/nginx/nginx.conf文件:
[root@DR1 ~]# vim /etc/nginx/nginx.conf
http {
        ......
        upstream apservers {
                server 10.10.10.11:80;
                server 10.10.10.12:80;
                server 127.0.0.1:80 backup;    #在本地提供备用通知页面
        }

      ......
    server {
        ......
        location / {
                proxy_pass http://apservers;
                proxy_set_header host $http_host;
                proxy_set_header X-Forward-For $remote_addr;
        }
        ......
    }
更改本地的默认主页:
[root@DR1 ~]# vim /usr/share/nginx/html/index.html
Under Maintenance DR1
最后检查nginx配置无误后启动nginx服务:
[root@DR1 ~]# nginx -t
nginx: the configuration file /etc/nginx/nginx.conf syntax is ok
nginx: configuration file /etc/nginx/nginx.conf test is successful
[root@DR1 ~]# systemctl start nginx
接着配置keepalived服务:
[root@DR1 ~]# vim /etc/keepalived/keepalived.conf
global_defs {
   notification_email {
        root@localhost
   }
   notification_email_from keepalived@localhost
   smtp_server 127.0.0.1
   smtp_connect_timeout 30
   router_id DR1
   vrrp_mcast_group4 224.1.101.33
   vrrp_garp_interval 0
   vrrp_gna_interval 0
}

vrrp_script chk_ngx {    #用于检查在此服务器上的nginx进程是否存在,如果不存在则做减权,keepalived将做主备切换
        script "killall -0 nginx && exit 0 || exit 1"
        weight -10
        interval 1
        fall 3
        rise 3
}

vrrp_instance VI_1 {
    state MASTER    #DR1作为keepalived的主机,因此设置state为MASTER
    interface eno16777736
    virtual_router_id 51
    priority 100
    advert_int 1
    authentication {
        auth_type PASS
        auth_pass asli#@09
    }
        track_script {
                chk_ngx
        }

    virtual_ipaddress {
        192.168.0.99/24 dev eno16777736 label eno16777736:0
    }
}
最后启动keepalived服务:
[root@DR1 ~]# systemctl start keepalived
至此DR1配置完毕。
2、配置DR2
编辑/etc/nginx/nginx.conf文件:
[root@DR2 ~]# vim /etc/nginx/nginx.conf
http {
        ......
        upstream apservers {
                server 10.10.10.11:80;
                server 10.10.10.12:80;
                server 127.0.0.1:80 backup;    #在本地提供备用通知页面
        }

      ......
    server {
        ......
        location / {
                proxy_pass http://apservers;
                proxy_set_header host $http_host;
                proxy_set_header X-Forward-For $remote_addr;
        }
        ......
    }
更改本地的默认主页:
[root@DR1 ~]# vim /usr/share/nginx/html/index.html
Under Maintenance DR2
最后检查nginx配置无误后启动nginx服务:
[root@DR2 ~]# nginx -t
nginx: the configuration file /etc/nginx/nginx.conf syntax is ok
nginx: configuration file /etc/nginx/nginx.conf test is successful
[root@DR2 ~]# systemctl start nginx
接着配置keepalived服务:
[root@DR2 ~]# vim /etc/keepalived/keepalived.conf

global_defs {
   notification_email {
        root@localhost
   }
   notification_email_from keepalived@localhost
   smtp_server 127.0.0.1
   smtp_connect_timeout 30
   router_id DR2
   vrrp_mcast_group4 224.1.101.33
   vrrp_garp_interval 0
   vrrp_gna_interval 0
}

vrrp_script chk_ngx {
        script "killall -0 nginx && exit 0 || exit 1"
        weight -10
        interval 1
        fall 3
        rise 3
}

vrrp_instance VI_1 {
    state BACKUP
    interface ens33
    virtual_router_id 51
    priority 98
    advert_int 1
    authentication {
        auth_type PASS
        auth_pass asli#@09
    }
        track_script {
                chk_ngx
        }

    virtual_ipaddress {
        192.168.0.99/24 dev ens33 label ens33:0
    }
}
最后启动keepalived服务:
[root@DR1 ~]# systemctl start keepalived
至此DR2 也配置完毕。
目前我们已经搭建好了keepalived+nginx反代+LAMP的环境,在配置varnish缓存前,我们先来测试下目前这种架构访问默认主页及wordpress页面的情况。
[root@client ~]# for i in {1..10}; do curl http://192.168.0.99 ; done
This is RS2 10.10.10.12
This is RS1 10.10.10.11
This is RS2 10.10.10.12
This is RS1 10.10.10.11
This is RS2 10.10.10.12
This is RS1 10.10.10.11
This is RS2 10.10.10.12
This is RS1 10.10.10.11
This is RS2 10.10.10.12
This is RS1 10.10.10.11
从上述的测试情况来看,nginx反代的负载均衡是工作正常的。那么接着我们对默认主页进行压测看看访问速率:
[root@client ~]# ab -c 200 -n 10000 http://192.168.0.99/
This is ApacheBench, Version 2.3 <$Revision: 1430300 $>
Copyright 1996 Adam Twiss, Zeus Technology Ltd, http://www.zeustech.net/
Licensed to The Apache Software Foundation, http://www.apache.org/

Benchmarking 192.168.0.99 (be patient)
Completed 1000 requests
Completed 2000 requests
Completed 3000 requests
Completed 4000 requests
Completed 5000 requests
Completed 6000 requests
Completed 7000 requests
Completed 8000 requests
Completed 9000 requests
Completed 10000 requests
Finished 10000 requests


Server Software:        nginx/1.12.2
Server Hostname:        192.168.0.99
Server Port:            80

Document Path:          /
Document Length:        33 bytes

Concurrency Level:      200
Time taken for tests:   2.906 seconds
Complete requests:      10000
Failed requests:        0
Write errors:           0
Total transferred:      2840000 bytes
HTML transferred:       330000 bytes
Requests per second:    3441.17 [#/sec] (mean)
Time per request:       58.120 [ms] (mean)
Time per request:       0.291 [ms] (mean, across all concurrent requests)
Transfer rate:          954.39 [Kbytes/sec] received

Connection Times (ms)
              min  mean[+/-sd] median   max
Connect:        0    8  88.1      0    1004
Processing:     7   39  57.1     35    1628
Waiting:        3   39  57.1     35    1628
Total:         27   48 129.2     35    2630

Percentage of the requests served within a certain time (ms)
  50%     35
  66%     36
  75%     37
  80%     37
  90%     38
  95%     42
  98%     55
  99%    235
 100%   2630 (longest request)
从压测情况来说,访问默认主页的速度大概是在每秒3000个情况。
那么接着我们来看看访问wordpress的情况。
在此我就不做wordpress页面的压测了,因为每次一对wordpress页面做压测,php-fpm虚拟机都会死机,性能不够真难受。后面完成了varnish的配置的时候,我们再来对wordpress页面做压测,那时候因为有缓存的存在,对后端的虚拟机压力不会太大,应该能完成压测。
五、配置varnish代理缓存
1、配置varnish
首先修改/etc/varnish/varnish.params文件:
[root@varnish ~]# vim /etc/varnish/varnish.params
RELOAD_VCL=1
VARNISH_VCL_CONF=/etc/varnish/default.vcl  #调用默认的vcl配置文件
VARNISH_LISTEN_PORT=6081  #varnish服务监听的端口
VARNISH_ADMIN_LISTEN_ADDRESS=10.10.10.13  #varnish监听的地址
VARNISH_ADMIN_LISTEN_PORT=6082  #varnish监听的管理端口
VARNISH_SECRET_FILE=/etc/varnish/secret  #varnish管理接口的密钥文件
VARNISH_STORAGE="file,/data/cache,1G"  #设置varnish缓存数据的方式为文件及缓存大小。
VARNISH_USER=varnish
VARNISH_GROUP=varnish
接着修改varnish的配置文件/etc/varnish/default.vcl,首先添加与调度后端服务器相关的配置
[root@varnish ~]# vim /etc/varnish/default.vcl
import directors;    #加载调度相关的模块
probe backend_healthcheck {  #定义后端服务器的健康检查机制
        .url = "/index.html";
        .window = 5;
        .threshold = 4;
        .interval = 2s;
        .timeout = 1s;
}
backend RS1 {    #定义后端服务器RS1并调用健康检查
        .host = "10.10.10.11";
        .port = "80";
        .probe = backend_healthcheck;
}
backend RS2 {  #定义后端福气RS2并调用健康检查
        .host = "10.10.10.12";
        .port = "80";
        .probe = backend_healthcheck;
}
sub vcl_init {  #初始化创建后端服务器组
        new BE = directors.round_robin();
        BE.add_backend(RS1);
        BE.add_backend(RS2);
}
acl purgers {  #定义可访问的来源IP,用作权限
        "127.0.0.1";
        "10.10.10.0"/16;
}
接着我们继续在此配置文件中需要添加相应vcl配置,那么在此之前我们先来看看下面的图片,回顾下varnish的工作流程。
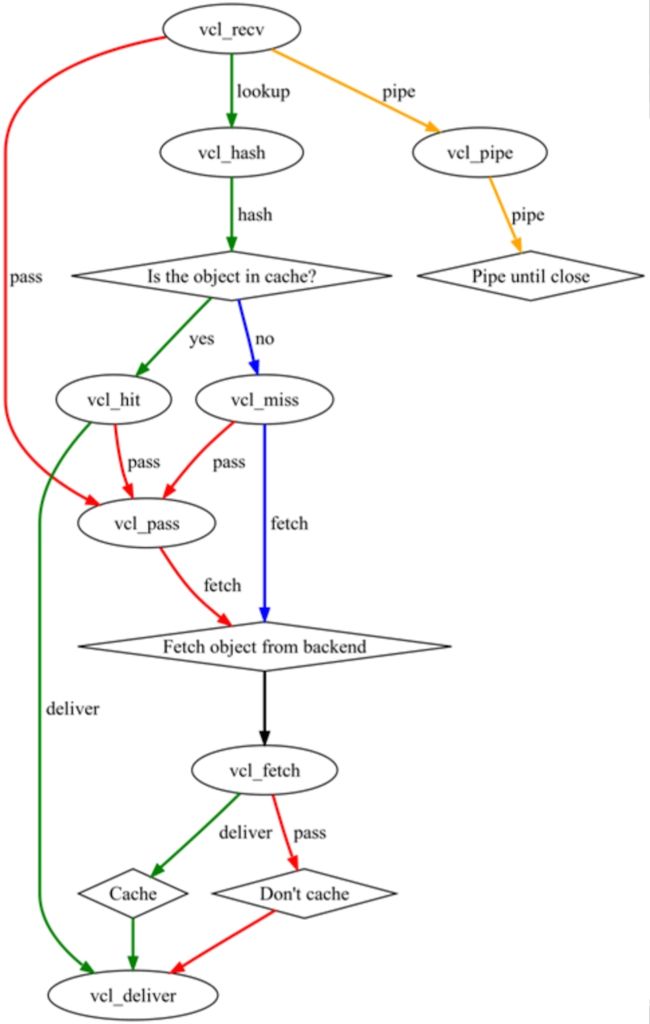
首先请求到达varnish服务器后,负责接收处理请求的是vcl_recv引擎,vcl_recv会根据vcl规则来判断请求应该是传递给vcl_pass还是vcl_pipe或者进入vcl_hash进行本地查询。而数据请求一旦进入到Lookup状态(vcl_hash)后,服务器就会在本地hash表中查找是否有与之对应的数据,如果有则进入到vcl_hit引擎,否则则进入vcl_miss引擎。接着没有命中缓存或则被pass掉的请求都会进入到vcl_pass引擎,vcl_pass会将请求直接传递给vcl_fetch引擎进行处理。而vcl_fetch引擎会根据请求进行后端请求资源的获取,并根据设置判断是否进行本地缓存,最后由vcl_deliver引擎将获取到的数据响应发给客户端,完成http请求。
varnish的工作流程中的每一个引擎,其实相当于一个函数,每个函数均可以有自己独立的规则来处理响应的请求。
接着我们来配置相应的vcl配置:
[root@varnish ~]# vim /etc/varnish/default.vcl
#继续添加下述vcl配置
sub vcl_recv {
if (req.method == "GET" && req.http.cookie) { # 带cookie首部的GET请求也缓存
return(hash);
}
if (req.url ~ "index.php") { #将index.php页面直接pass到后端服务器处理
return(pass);
}
if (req.method == "PURGE") { #定义用于清理缓存
if (client.ip ~ purgers) {
return(purge);
}
}
if (req.http.X-Forward-For) { #为发往后端主机的请求添加X-Forward-For首部
set req.http.X-Forward-For = req.http.X-Forward-For + "," + client.ip;
} else {
set req.http.X-Forward-For = client.ip;
}
set req.backend_hint = BE.backend(); #调用之前定义的后端服务器组,测试发现不调用的话,只能匹配第一个后端服务器
return(hash);
}
sub vcl_hash { #定义hash引擎,对请求的url做hash处理
hash_data(req.url);
}
sub vcl_backend_response { #自定义缓存文件的缓存时长
if (bereq.url ~ "\.(jpg|jpeg|gif|png)$") {
set beresp.ttl = 1d;
}
if (bereq.url ~ "\.(html|css|js)$") {
set beresp.ttl = 12h;
}
if (beresp.http.Set-Cookie) { #定义带Set-Cookie首部的后端响应不缓存,直接返回给客户端
set beresp.grace = 30m;
return(deliver);
}
}
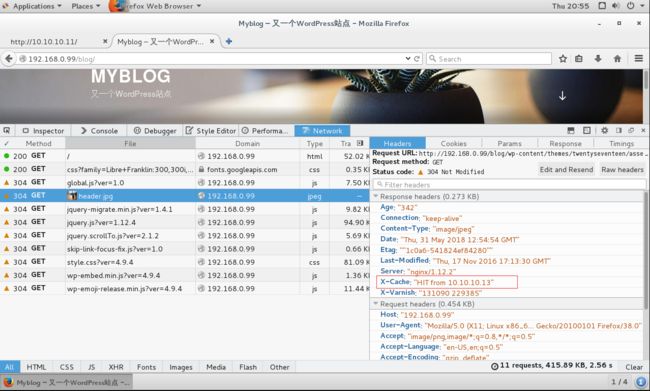
sub vcl_deliver {
if (obj.hits > 0) { #为响应添加X-Cache首部,显示缓存是否命中
set resp.http.X-Cache = "HIT from " + server.ip;
} else {
set resp.http.X-Cache = "MISS";
}
}
最后启动varnish服务:
[root@varnish ~]# systemctl start varnish
2、修改DR1和DR2的nginx配置
在前面的配置中,我们在DR1和DR2中配置的负载均衡目标是后端的RS1和RS2的IP,因此此处需要将其更改为varnish监听的Ip和端口。
[root@DR1 ~]# vim /etc/nginx/nginx.conf
.....
        upstream apservers {
                #server 10.10.10.11:80;
                #server 10.10.10.12:80;
                server 10.10.10.13:6081  #注释掉后端的RS1和RS2 ,添加varnish的监听Ip和端口
                server 127.0.0.1:80 backup;
        }
[root@DR1 ~]# nginx -t
nginx: the configuration file /etc/nginx/nginx.conf syntax is ok
nginx: configuration file /etc/nginx/nginx.conf test is successful
[root@DR1 ~]# nginx -s reload
.....
重复上述操作把DR2的配置也修改过来即可。
六、测试
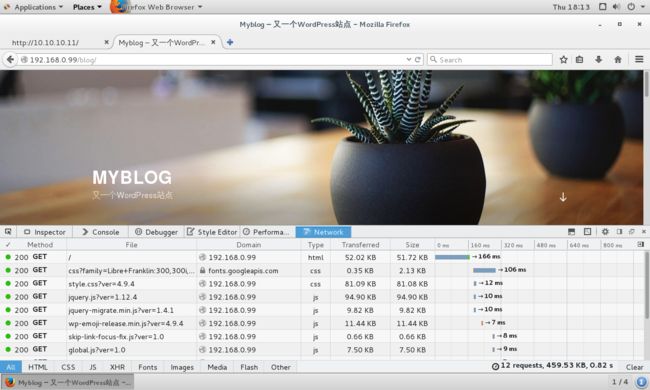
配置完成varnish缓存后,由client访问,http://192.168.0.99/blog/,能正常访问wordpress页面。
此时再次对默认主页进行压测测试:
[root@client ~]# ab -c 200 -n 10000 http://192.168.0.99/index.html
This is ApacheBench, Version 2.3 <$Revision: 1430300 $>
Copyright 1996 Adam Twiss, Zeus Technology Ltd, http://www.zeustech.net/
Licensed to The Apache Software Foundation, http://www.apache.org/

Benchmarking 192.168.0.99 (be patient)
Completed 1000 requests
Completed 2000 requests
Completed 3000 requests
Completed 4000 requests
Completed 5000 requests
Completed 6000 requests
Completed 7000 requests
Completed 8000 requests
Completed 9000 requests
Completed 10000 requests
Finished 10000 requests


Server Software:        nginx/1.12.2
Server Hostname:        192.168.0.99
Server Port:            80

Document Path:          /index.html
Document Length:        33 bytes

Concurrency Level:      200
Time taken for tests:   2.720 seconds
Complete requests:      10000
Failed requests:        0
Write errors:           0
Total transferred:      3529957 bytes
HTML transferred:       330000 bytes
Requests per second:    3676.49 [#/sec] (mean)
Time per request:       54.400 [ms] (mean)
Time per request:       0.272 [ms] (mean, across all concurrent requests)
Transfer rate:          1267.37 [Kbytes/sec] received

Connection Times (ms)
              min  mean[+/-sd] median   max
Connect:        0    7  78.0      0    1003
Processing:    18   40  96.8     33    1626
Waiting:        3   40  96.8     32    1625
Total:         24   47 165.2     33    2628

Percentage of the requests served within a certain time (ms)
  50%     33
  66%     34
  75%     34
  80%     35
  90%     36
  95%     42
  98%     55
  99%     68
 100%   2628 (longest request)
默认主页的压测情况,在启动缓存前后感觉没啥区别,可能是页面大小了?
接着我们来尝试下压测wordpress页面,之前没启用varnish之前,对wordpress压测会对后端php-fpm造成太大压力,导致虚拟机死机,那么现在我们来看看情况如何。
[root@client ~]# ab -c 200 -n 10000 http://192.168.0.99/blog/
This is ApacheBench, Version 2.3 <$Revision: 1430300 $>
Copyright 1996 Adam Twiss, Zeus Technology Ltd, http://www.zeustech.net/
Licensed to The Apache Software Foundation, http://www.apache.org/

Benchmarking 192.168.0.99 (be patient)
Completed 1000 requests
Completed 2000 requests
Completed 3000 requests
Completed 4000 requests
Completed 5000 requests
Completed 6000 requests
Completed 7000 requests
Completed 8000 requests
Completed 9000 requests
Completed 10000 requests
Finished 10000 requests


Server Software:        nginx/1.12.2
Server Hostname:        192.168.0.99
Server Port:            80

Document Path:          /blog/
Document Length:        53268 bytes

Concurrency Level:      200
Time taken for tests:   7.752 seconds
Complete requests:      10000
Failed requests:        0
Write errors:           0
Total transferred:      536468855 bytes
HTML transferred:       532680000 bytes
Requests per second:    1290.00 [#/sec] (mean)
Time per request:       155.038 [ms] (mean)
Time per request:       0.775 [ms] (mean, across all concurrent requests)
Transfer rate:          67582.69 [Kbytes/sec] received

Connection Times (ms)
              min  mean[+/-sd] median   max
Connect:        0   18 181.1      0    3008
Processing:    14   81 115.0     74    6427
Waiting:       13   80 115.0     74    6425
Total:         28   99 254.7     74    7429

Percentage of the requests served within a certain time (ms)
  50%     74
  66%     75
  75%     76
  80%     77
  90%     79
  95%     84
  98%    104
  99%   1076
 100%   7429 (longest request)
居然压测成功了,而且后端php-fpm主机也没有像之前那样死机了,这说明了varnish缓存还是在一定程度上为源站点主机分担了不少的负载压力。
此时停止掉RS1或者RS2上的httpd服务,也是能正常访问到wordpress页面的。