opencv入门基础(六)基于Haar级联的人脸检测
opencv入门基础(六)基于Haar级联的人脸检测
一.Haar Cascade哈尔级联
核心原理:
- 使用Haar-like特征做检测
- Integral Image积分图加速特征计算
- AdaBoost选择关键特征,进行人脸和非人脸分类
- Cascade级联,弱分类器成为强分类器
论文:Rapid Object Detection using a Boosted Cascade of Simple Features
二.本地图片检测具体过程
1.下载库文件
2.解压下载好的库文件,在data—haarcascades中找到与人脸检测有关的库文件,将它们复制之后放到你新建好的python(Python Package)项目文件中

3.把要检测效果的图片也放入到项目文件中,以上就完成了准备工作

4.编写程序
# 导入库
import cv2
import numpy as np
import matplotlib.pyplot as plt
# 显示图片
def show_image(image,title,pos):
    # BGR to RGB
    img_RGB = image[:,:,::-1]
    plt.subplot(2,2,pos)
    plt.title(title)
    plt.imshow(img_RGB)
    plt.axis("off")
# 绘制图片中检测到的人脸,矩形框框出
def plot_rectangle(image,faces):
    # 拿到检测到的人脸数据,返回四个值:坐标(x,y),矩形框宽和高width,height
    for (x,y,w,h) in faces:
        cv2.rectangle(image,(x,y),(x+w,y+h),(255,255,255),3)  # 画矩形框需要对角线点的坐标
    return image
  # 主函数
def main():
  # 读取一张图片
  image = cv2.imread("university.jpg")
  # 转换为灰度图片
  gray = cv2.cvtColor(image,cv2.COLOR_BGR2GRAY)
  # 通过opencv自带的方法cv2.CascadeClassifiter()加载级联分类器
  face_alt2 = cv2.CascadeClassifier("haarcascade_frontalface_alt2.xml")
  # 通过上一步对图像中的人脸进行检测
  face_alt2_detect = face_alt2.detectMultiScale(gray)
  # 绘制图片中检测到的人脸
  face_alt2_result = plot_rectangle(image.copy(),face_alt2_detect)  # copy以下防止原来文件被改动
  # 创建画布
  plt.figure(figsize=(9,6))
  plt.suptitle("Face detection with Haar Cascade",fontsize=14,fontweight="bold")
  # 最终显示检测到的人脸
  show_image(face_alt2_result,"face_alt2",1)
  plt.show()

main()
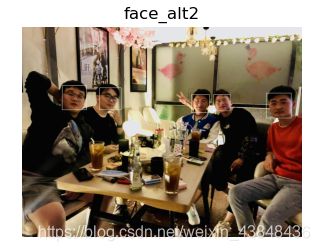
5.评价
基于Harr级联的人脸检测方法,是近20年前的算法了,效果不好,局限性很高,对一些侧脸,角度不好的人脸检测效果很不好,如果想要提高精度,更多的是用深度学习的方法。
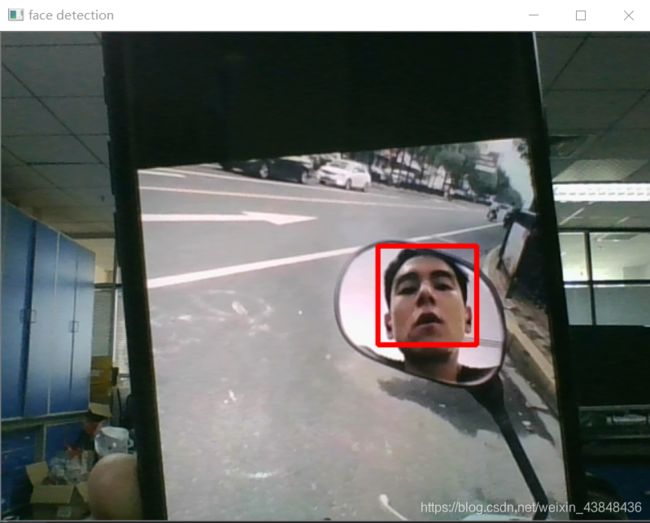
三.本地摄像头实时检测人脸
将获取图片的方式从读取本地图片的方式更换到读取本机自带摄像头,而进行实时监测,代码更改如下:
# 导入库
import cv2
# 绘制图片中检测到的人脸,矩形框框出
def plot_rectangle(image,faces):
    # 拿到检测到的人脸数据,返回四个值:坐标(x,y),矩形框宽和高width,height
    for (x,y,w,h) in faces:
        cv2.rectangle(image,(x,y),(x+w,y+h),(0,0,255),3)  # 画矩形框需要对角线点的坐标
    return image
  # 主函数
def main():
  # 读取摄像头
  capture = cv2.VideoCapture(0)
  # 通过opencv自带的方法cv2.CascadeClassifiter()加载级联分类器
  face_alt2 = cv2.CascadeClassifier("haarcascade_frontalface_alt2.xml")
  # 判断摄像头是否能正常工作
  if capture.isOpened() is False:
      print("Camera is Error!")
  while True:
      # 获取每一帧
      ret,frame = capture.read()
      if ret:
          gray = cv2.cvtColor(frame,cv2.COLOR_BGR2GRAY)
          # 通过上一步对图像中的人脸进行检测
          face_alt2_detect = face_alt2.detectMultiScale(gray)
          # 绘制图片中检测到的人脸
          face_alt2_result = plot_rectangle(frame.copy(),face_alt2_detect)  # copy以下防止原来文件被改动
          cv2.imshow("face detection",face_alt2_result)
          if cv2.waitKey(10) & 0xFF == ord('q'):
              break
  capture.release()
  cv2.destroyAllWindows()

main()