3.Unity_CG_Shader光照之——漫反射(lambert模型以及Half lambert模型)
兰伯特光照模型:
逐顶点漫反射
// Upgrade NOTE: replaced '_World2Object' with 'unity_WorldToObject'

Shader "Ycb/04_diffuse" {
	Properties{
		_Diffuse("Diffuse_Color",Color)=(1,1,1,1)
	}
	SubShader{
		Pass{
			CGPROGRAM
			//顶点函数  从顶点坐标-》裁剪窗口(游戏环境->摄像机)
			#pragma vertex vert
			//片元函数  返回模型上对应屏幕上的像素的颜色
			#pragma fragment frag
#include "Lighting.cginc"//取到第一个直射光的颜色 _LightColor0    _WorldSpaceLightPos0第一个直射光的位置
			fixed4 _Diffuse;
			//application to vertex
			struct a2v {
				float4 vertex:POSITION;
				float3 normal:NORMAL;
			};
			//vertex to fragment
			struct v2f{
				float4 position : SV_POSITION;
				fixed3 color:Color;
			};

			v2f vert(a2v v) {
				v2f f;
				f.position = mul(UNITY_MATRIX_MVP,v.vertex);  //UNTIY_MATRIX_MVP 把一个顶点的矩阵从模型空间到剪裁空间

				fixed3 ambient=UNITY_LIGHTMODEL_AMBIENT.rgb;
				//为了下面的夹角cos计算,统一到一个坐标系中,这里将法线方向从模型坐标系转化到世界坐标系中,因此下面试v * w2o
				fixed3 normalDir=normalize(mul(v.normal,(float3x3)unity_WorldToObject));//unity_WorldToObject从世界空间转化到模型空间

				fixed3 lightDir=normalize(_WorldSpaceLightPos0.xyz);//光源的位置就是光的方向

				fixed3 diffuse=_LightColor0.rgb*max(0,dot(normalDir,lightDir));		//漫反射计算公式= 光照颜色*cos(法线*光照方向)
				diffuse*=_Diffuse.rgb; //与原有的颜色融合,直接相乘
				f.color=diffuse;
				f.color+=ambient;//叠加直接相加
				return f;
			}
			fixed4 frag(v2f f):SV_Target{
				return fixed4(f.color,1);
			}
			ENDCG
		}
	}


	Fallback "VertexLit"

}// Upgrade NOTE: replaced '_World2Object' with 'unity_WorldToObject'
Shader "Ycb/05_Fg_diffuse" {
Properties{
_Diffuse("Diffuse_Color",Color)=(1,1,1,1)
}
SubShader{
Pass{
CGPROGRAM
//顶点函数 从顶点坐标-》裁剪窗口(游戏环境->摄像机)
#pragma vertex vert
//片元函数 返回模型上对应屏幕上的像素的颜色
#pragma fragment frag
#include "Lighting.cginc"//取到第一个直射光的颜色 _LightColor0 _WorldSpaceLightPos0第一个直射光的位置
fixed4 _Diffuse;
//application to vertex
struct a2v {
float4 vertex:POSITION;
float3 normal:NORMAL;
};
//vertex to fragment
struct v2f{
float4 position : SV_POSITION;
fixed3 worldNormalDir:COLOR0;
};
v2f vert(a2v v) {
v2f f;
f.position = mul(UNITY_MATRIX_MVP,v.vertex); //UNTIY_MATRIX_MVP 把一个顶点的矩阵从模型空间到剪裁空间
f.worldNormalDir=mul(v.normal,(float3x3)unity_WorldToObject);//unity_WorldToObject从世界空间转化到模型空间
return f;
}
fixed4 frag(v2f f):SV_Target{
fixed3 ambient=UNITY_LIGHTMODEL_AMBIENT.rgb;
//为了下面的夹角cos计算,统一到一个坐标系中,这里将法线方向从模型坐标系转化到世界坐标系中,因此下面试v * w2o
fixed3 normalDir=normalize(f.worldNormalDir);
fixed3 lightDir=normalize(_WorldSpaceLightPos0.xyz);//光源的位置就是光的方向
fixed3 diffuse=_LightColor0.rgb*max(0,dot(normalDir,lightDir)); //漫反射计算公式= 光照颜色*cos(法线*光照方向)
diffuse*=_Diffuse.rgb; //与原有的颜色融合,直接相乘
fixed3 tmpColor=diffuse;
tmpColor+=ambient;//叠加直接相加
return fixed4(tmpColor,1);
}
ENDCG
}
}
Fallback "VertexLit"
}二者比较 左侧逐顶点,右侧逐片元
显然右侧平滑,但是逐片元每个像素都需要计算,耗费性能较高

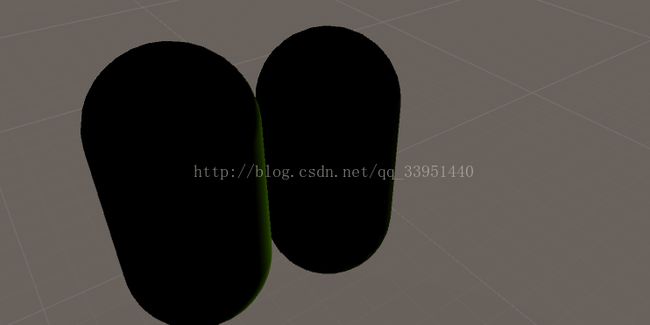
反面则是全黑,这样虽然有3D效果,但是游戏体验极差。。。那么引入:
半兰伯特光照模型:(有3D效果但是背面并不全黑)
计算公式: Diffuse=直射光颜色*(cosα *0.5+0.5)
这样的范围在(0~1)之间
只需改变上面代码的计算公式即可 ,效果如下
// Upgrade NOTE: replaced '_World2Object' with 'unity_WorldToObject'

Shader "Ycb/06_Fg_diffuse HalfLambert" {
	Properties{
		_Diffuse("Diffuse_Color",Color)=(1,1,1,1)
	}
	SubShader{
		Pass{
			CGPROGRAM
			//顶点函数  从顶点坐标-》裁剪窗口(游戏环境->摄像机)
			#pragma vertex vert
			//片元函数  返回模型上对应屏幕上的像素的颜色
			#pragma fragment frag
#include "Lighting.cginc"//取到第一个直射光的颜色 _LightColor0    _WorldSpaceLightPos0第一个直射光的位置
			fixed4 _Diffuse;
			//application to vertex
			struct a2v {
				float4 vertex:POSITION;
				float3 normal:NORMAL;
			};
			//vertex to fragment
			struct v2f{
				float4 position : SV_POSITION;
				fixed3 worldNormalDir:COLOR0;
			};

			v2f vert(a2v v) {
				v2f f;
				f.position = mul(UNITY_MATRIX_MVP,v.vertex);  //UNTIY_MATRIX_MVP 把一个顶点的矩阵从模型空间到剪裁空间
				f.worldNormalDir=mul(v.normal,(float3x3)unity_WorldToObject);//unity_WorldToObject从世界空间转化到模型空间
				return f;
			}
			fixed4 frag(v2f f):SV_Target{
				fixed3 ambient=UNITY_LIGHTMODEL_AMBIENT.rgb;
				//为了下面的夹角cos计算,统一到一个坐标系中,这里将法线方向从模型坐标系转化到世界坐标系中,因此下面试v * w2o
				fixed3 normalDir=normalize(f.worldNormalDir);

				fixed3 lightDir=normalize(_WorldSpaceLightPos0.xyz);//光源的位置就是光的方向

				fixed3 diffuse=_LightColor0.rgb*(0.5+0.5*dot(normalDir,lightDir));		//漫反射计算公式= 光照颜色*cos(法线*光照方向)
				diffuse*=_Diffuse.rgb; //与原有的颜色融合,直接相乘
				fixed3 tmpColor=diffuse;
				tmpColor+=ambient;//叠加直接相加
				return fixed4(tmpColor,1);
			}
			ENDCG
		}
	}


	Fallback "VertexLit"

}