编译适用于mt7620a的OpenWrt
本篇博客同时发布于:https://lyq.blogd.club/2018/11/08/build-openwrt/
OpenWrt
OpenWRT是一个高度模块化、自动化的嵌入式Linux系统,拥有强大的网络组建和扩展性,常常被用于工控设备、电话、小型机器人、智能家居、路由器以及VOIP设备中,其中在智能路由器上有广泛使用。同时它还提供了100多个已编译好的软件,而且数量还在不断增加。
OpenWRT支持各种处理器架构,无论是ARM、X86、PowerPC或者MIPS都有很好的支持。其多达3000多种软件包,囊括从工具链(toolchain),到内核(Linux Kernel),到软件包(packages),再到根文件系统(rootfs)整个体系,是的开发者只需要简单的一个make命令就可以方便快速的定制一个具有特定功能的嵌入式系统。
对于想学习嵌入式Linux开发的工程师来说,OpenWRT是非常适合的。引用
我第一次接触Openwrt是在2013年,那是正是高二,家里有一个Tp-Link的wr740路由器,mips架构,4M的Flash,16M的内存,当时刷过dd-wrt和openwrt。
第二次是在大二了,当时为了用路由器上校园网,撸了几台k2,研究了如何在openwrt等第三方路由器固件下实现锐捷和安腾的认证。
今天我要给k2编译一下Openwrt最新的Snapshot固件,顺便解决一下不识别16M闪存的问题。
编译环境
- Ubuntu 18.06 Windows SubSystem Linux
- 硬盘 > 100G
- 编译所需dependencies就不说了
同步源码
git clone https://github.com/lede-project/source.git
并不很大,几百Mb。主要是后面编译的时候还要在线下载很多东西。
目录结构如下
.
├── tools – automake, autoconf, sed, cmake
├── toolchain/binutils – as, ld, …
├── toolchain/gcc – gcc, g++, cpp, …
├── target/linux – kernel modules
├── package – core and feed packages
├── target/linux – kernel image
└── target/linux/image – firmware image file generation
Feeds
更新源:
./scripts/feeds update -a
依据feeds.conf.default文件中的仓库地址来下载相应的软件,它提供了一些额外的扩展。
安装源:
./scripts/feeds install -a
如果少了一些依赖会提示:
WARNING: Makefile 'package/utils/busybox/Makefile' has a dependency on 'libpam', which does not exist
WARNING: Makefile 'package/utils/busybox/Makefile' has a build dependency on 'libpam', which does not exist
WARNING: Makefile 'package/network/utils/curl/Makefile' has a dependency on 'libgnutls', which does not exist
WARNING: Makefile 'package/network/utils/curl/Makefile' has a dependency on 'libopenldap', which does not exist
WARNING: Makefile 'package/network/utils/curl/Makefile' has a dependency on 'libidn2', which does not exist
WARNING: Makefile 'package/network/utils/curl/Makefile' has a dependency on 'libssh2', which does not exist
WARNING: Makefile 'package/boot/kexec-tools/Makefile' has a dependency on 'liblzma', which does not exist
WARNING: Makefile 'package/network/services/lldpd/Makefile' has a dependency on 'libnetsnmp', which does not exist
WARNING: Makefile 'package/network/utils/nftables/Makefile' has a dependency on 'jansson', which does not exist
这时候我谷歌了一番
“And re-run ./scripts/feeds update -a
successful, no error out.”
于是我也re-run了一番。。。
Collecting package info: done
Installing all packages from feed packages.
Installing all packages from feed luci.
Installing all packages from feed routing.
Installing all packages from feed telephony.
结果没报错。。。这真的是玄学吗
下载之后的文件位于feeds文件夹内。
编译
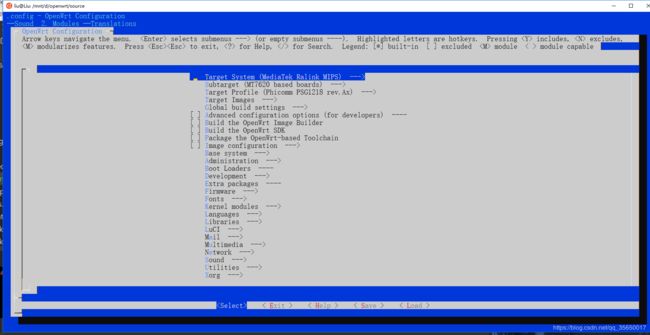
然后就是编译了,执行make menuconfig,menuconfig拥有一个文本界面,包括处理的目标平台,要编译的软件包,要被包含进固件的软件包和一些内核设置,长这样:

这边有三种选项:
< >该代码将不会被编译
K2,故选择Target System 为(MediaTek Ralink MIPS),Subtarget为(MT 7620 based boards),由于K2是有官方资瓷的,所以Target Profile选择(Phicomm PSG1218 rev.A,rev.B应该是K2P)
同时LuCi要勾一下(Luci - Collections - luci和Luci - modules - translation - Chinese)
弄完save一下,保存为默认的.config
按两下exit退出,输入
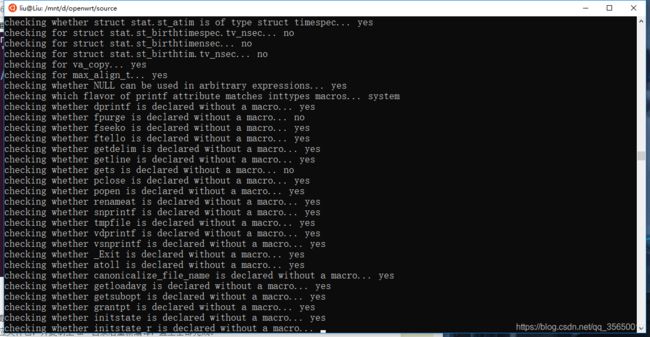
make V=99 -j1
开始编译,这里最好不要用多线程编译,我一开始-j4总是出错,编译的时候不能断网,会下载很多东西,然后就是漫长的等待了。
支持16Mb闪存
之前刷OP官方提供的固件,闪存只识别为8M,所以要修改一下 \source\target\linux\ramips\dts\PSG1218.dtsi
	m25p80@0 {
		compatible = "jedec,spi-nor";
		reg = <0>;
		spi-max-frequency = <10000000>;

		partitions {
			compatible = "fixed-partitions";
			#address-cells = <1>;
			#size-cells = <1>;

			partition@0 {
				label = "u-boot";
				reg = <0x0 0x30000>;
				read-only;
			};

			partition@20000 {
				label = "u-boot-env";
				reg = <0x30000 0x10000>;
				read-only;
			};

			factory: partition@30000 {
				label = "factory";
				reg = <0x40000 0x10000>;
				read-only;
			};

			partition@40000 {
				label = "firmware";
				reg = <0x50000 0x7b0000>;
			};
		};
	};
这个dts(devives tree source)定义了一系列板载参数,拉出来这一段代码与分区有关,<>第一个参数表示起始地址,第二个参数表示大小。
从0x0 -> 0x2FFFF,一共是196608个地址,每个地址里面存放一个字节的数据,196608 / 1024 = 192, 192Kbit的存储空间保存的是u-boot,即引导文件所在分区。
同理,0x30000 -> 0x3FFFF,的64Kbit存储空间保存的是u-boot-env,保存的是u-boot的环境变量(不太了解)。
0x40000 -> 0x4FFFF的64Kbit保存的是factory,不知道是什么,估计存放的是MAC地址和一些原厂增益参数。
从0x50000 -> 0x7FFFFF的7.6875Mbit空间是固件可用存储空间大小,总地址0x0 -> 0x7FFFFF,0x800000个地址,8Mbit。
所以为了加大对存储空间的支持,把<0x50000 0x7b0000>这个参数改成<0x50000 0xfb0000>,再重新编译一下,这样就可以了。
验证一下是否识别16M闪存
刷入未修改dts编译出来的img镜像:
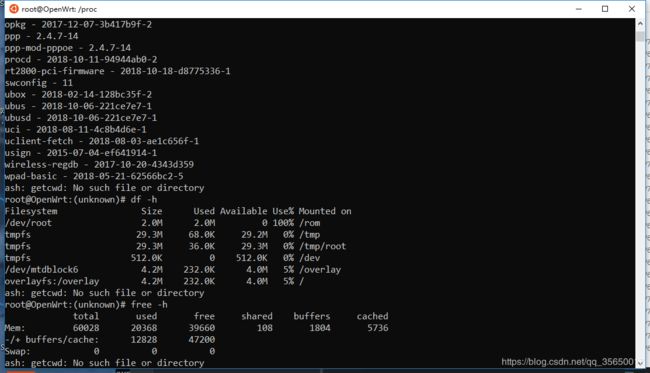
可用空间只有可怜的4M…
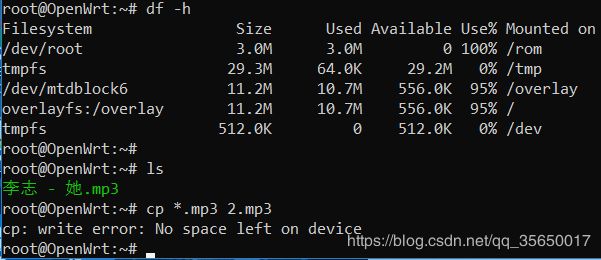
刷入修改过的dts编译出来的img镜像:
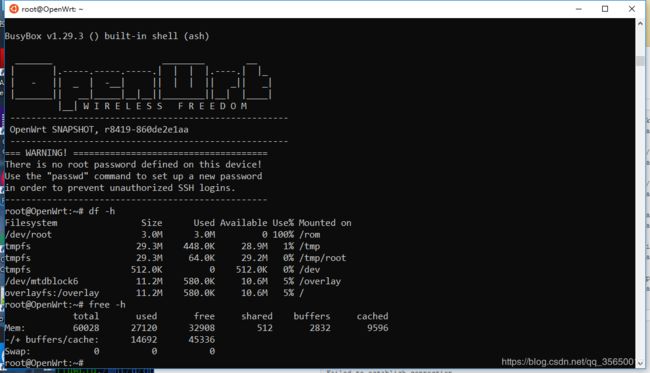
可以看到有11M的可用空间,顺手scp上传了一首我B的歌到/root下,9.58M,证明确实可用10M空间。
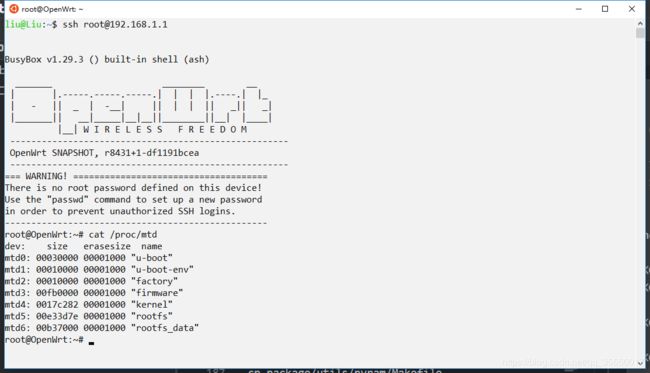
如果输入cat /proc/mtd那么看到详细的分区大小,第一层分别是u-boot、u-boot(env)、factory、firmware,我们刷写固件就是刷写firmware分区。第二层分区kernel和rootfs,第三层分区rootfs_data。
Breed不死u-boot的原理就是在刷写的时候去除固件中的u-boot分区,达到自身不被覆盖、不死的效果。
添加编译自己的软件
首先于package/utils创建一个helloworld文件夹,然后
cp package/utils/nvram/Makefile package/utils/helloworld
拷贝一份写好的Makefile。
然后 nano Makeile
可以看到
#
# Copyright (C) 2009-2010 Jo-Philipp Wich
#
# This is free software, licensed under the GNU General Public License v2.
# See /LICENSE for more information.
#

include $(TOPDIR)/rules.mk

PKG_NAME:=nvram
PKG_RELEASE:=10

PKG_BUILD_DIR := $(BUILD_DIR)/$(PKG_NAME)

PKG_FLAGS:=nonshared

include $(INCLUDE_DIR)/package.mk

define Package/nvram
  SECTION:=utils
  CATEGORY:=Base system
  TITLE:=Userspace port of the Broadcom NVRAM manipulation tool
  MAINTAINER:=Jo-Philipp Wich
  DEPENDS:=@TARGET_brcm47xx||@TARGET_bcm53xx||@TARGET_ar71xx||@TARGET_ath79
endef

define Package/nvram/description
 This package contains an utility to manipulate NVRAM on Broadcom based devices.
 It works on bcm47xx (Linux 2.6) without using the kernel api.
endef

define Build/Compile
        $(MAKE) -C $(PKG_BUILD_DIR) \
                CC="$(TARGET_CC)" \
                CFLAGS="$(TARGET_CFLAGS) -Wall" \
                LDFLAGS="$(TARGET_LDFLAGS)"
endef

define Package/nvram/install
        $(INSTALL_DIR) $(1)/usr/sbin
        $(INSTALL_BIN) $(PKG_BUILD_DIR)/nvram $(1)/usr/sbin/
ifneq ($(CONFIG_TARGET_brcm47xx),)
        $(INSTALL_DIR) $(1)/etc/init.d
        $(INSTALL_BIN) ./files/nvram.init $(1)/etc/init.d/nvram
endif
endef
我们只要修改一些必要的东西即可。
修改后的Makefile:
include $(TOPDIR)/rules.mk

PKG_NAME:=helloworld
PKG_RELEASE:=1

PKG_BUILD_DIR := $(BUILD_DIR)/$(PKG_NAME)

include $(INCLUDE_DIR)/package.mk

define Package/helloworld
  SECTION:=utils
  CATEGORY:=Utilities
  TITLE:=helloworld
  MAINTAINER:[email protected]
endef

define Package/helloworld/description
  This is a Demo to test build-in package.
endef

define Build/Prepare
        mkdir -p $(PKG_BUILD_DIR)
        $(CP) ./src/* $(PKG_BUILD_DIR)/
endef

define Build/Configure
endef

define Build/Compile
        $(MAKE) -C $(PKG_BUILD_DIR) \
          CC="$(TARGET_CC)" \
          CFLAGS="$(TARGET_CFLAGS) -Wall" \
          LDFLAGS="$(TARGET_LDFLAGS)"
endef

define Package/helloworld/install
        $(INSTALL_DIR) $(1)/bin
        $(INSTALL_BIN) $(PKG_BUILD_DIR)/helloworld $(1)/bin/
endef

$(eval $(call BuildPackage,helloworld))
再创建一个src文件夹,其中创建一个helloworld.c和Makefile。
helloworld.c:
#include
#include

int main(int argc,char *argv[]){
    printf("Hello World!");
    return 0;
}
Makefile:
APP_NAME =  helloworld
OBJ = helloworld.o
ORC = helloworld.c

$(APP_NAME):$(OBJ)
%(OBJ):$(ORC)
        $(CC) $(CFLAGS) -c $(ORC)

clean:
        rm $(OBJ) $(APP_NAME)
目录结构如下:
.
├── Makefile
└── src
    ├── Makefile
    └── helloworld.c

1 directory, 3 files
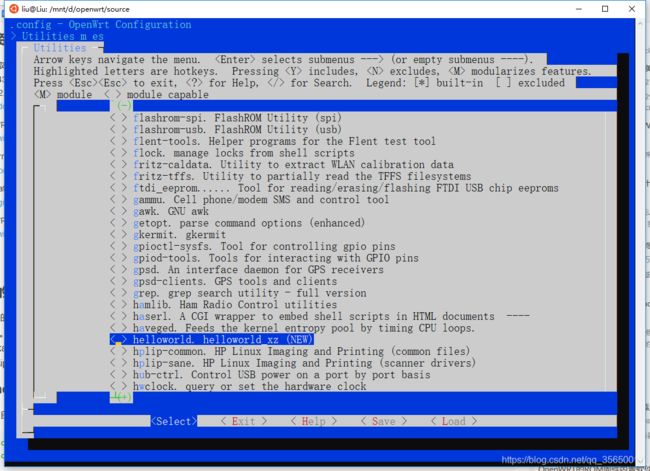
返回顶层目录执行make menuconfig,选择Utilities,可以看到helloworld出现了,这时候可以选择编译进系统或者只编译单独的ipk。
当然,这样重新编译也太麻烦了,回到顶层目录执行
make package/utils/helloworld/compile V=99
可单独编译出ipk文件,这个文件位于bin/packages/mipsel_24kc/base/helloworld_1_mipsel_24kc.ipk
把这个文件上传到路由器上并安装:
scp bin/packages/mipsel_24kc/base/helloworld_1_mipsel_24kc.ipk [email protected]:/tmp
ssh [email protected]
cd /tmp
opkg install helloworld_1_mipsel_24kc.ipk
安装完成输出:
Installing helloworld (1) to root...
Configuring helloworld.
这时候输入helloworld,运行一下:
root@OpenWrt:/tmp# helloworld
Hello World!
OK,这样就完成了编译自己的*.ipk程序。
当然,值得一提的是,如果你只需要交叉编译自己的软件,并不需要下载整个源码,可以去openwrt官网下载对应的sdk,例如mt7620 openwrt v18.06.01的sdk下载地址是:这里
,大体结构与openwrt源码一样。解压之后将要编译的程序放到package目录,执行
make menuconfig
make package/helloworld/compile V=99
即可生成ipk。
这种方法与我之前的交叉编译不同(见:1,2),虽略为繁琐,但是可以生成ipk文件,方便包管理。
这里的helloworld使用的是Makefile进行编译,如果对于一些使用Automake,需要./configure才能生成Makefile的程序,那么就要修改上一层目录的Makefile了。
添加编译远程仓库的软件
假设在github上有一个软件,想要交叉编译成ipk安装,例如atclient
此程序需要编译三部曲:
./configure
make
make install
那么于package/utils/新建一个openwrt-atclient文件夹,目录结构如下:
utils
└── openwrt-atclient
    └── Makefile
Makefile内容:
#
# Copyright (C) 2007-2009 OpenWrt.org
#
# This is free software, licensed under the GNU General Public License v2.
# See /LICENSE for more information.
#

include $(TOPDIR)/rules.mk

PKG_NAME:=atclient
PKG_VERSION:=2.0.0
PKG_RELEASE:=1
PKG_REV:=249c959

PKG_SOURCE:=$(PKG_NAME)-$(PKG_VERSION)-r$(PKG_REV).tar.bz2
PKG_SOURCE_SUBDIR:=$(PKG_NAME)-$(PKG_VERSION)
PKG_SOURCE_PROTO:=git
PKG_SOURCE_VERSION:=$(PKG_REV)
PKG_SOURCE_URL:=https://github.com/lyq1996/atclient.git

PKG_BUILD_DIR:=$(BUILD_DIR)/$(PKG_NAME)-$(PKG_VERSION)

include $(INCLUDE_DIR)/package.mk
include $(INCLUDE_DIR)/nls.mk

define Package/atclient
  SECTION:=utils
  CATEGORY:=Utilities
  TITLE:=A 3-party ANTENG BAS client
endef

define Package/atclient/install
	$(INSTALL_DIR) $(1)/bin
	$(INSTALL_BIN) $(PKG_BUILD_DIR)/src/atclient $(1)/bin/
endef

$(eval $(call BuildPackage,atclient))
其中PKG_SOURCE_URL是仓库地址,PKG_REV是项目的head,PKG_VERSION是项目的版本,其他的都与上面相同。
执行
make menuconfig
make package/openwrt-atclient/compile V=99
此时会先从远程仓库clone项目源码下来,然后根据head,切换至对应分支。
然后才会进行编译。
添加自己的文件到固件中
如果有一个文件,hello.config想放到路由器固件目录的/etc/config/,那么把它移动到buildroot下的/files/etc/config/目录再执行make即可。文件夹不存在就自己创建。
烧录一下编译出来的bin:

执行ls /files/etc/config/hello.config看一下是否把文件编译进了系统:

Image Builder的使用
openwrt官方提供了一个imagebuilder工具,顾名思义,用来构建固件img的。根据官方介绍,这个东西对于以下方面很有用:
- 想在小Flash机器中塞入更多软件
- 想跟随snapshots开发版本
- 设备RAM小于等于32MB,OPKG不能正常工作
- 大闪存设备,想要一个特殊的固件。
Image Builder在编译系统时候会自动生成(编译需要生成img镜像,所以这个是必须的),可以在make menuconfig中勾选,这样在编译固件的时候会同时在bin/targets/ramips/mt7620/中生成Image Builder。当然,也可以自己下载,例如mt7620 openwrt v18.06.01的imgbuilder下载地址是:这里。
在这个目录里,package的源是由repositories.conf所指定的,是opkg配置格式。
## Place your custom repositories here, they must match the architecture and version.
# src/gz %n http://downloads.openwrt.org/releases/18.06.0-rc2
# src custom file:///usr/src/openwrt/bin/ramips/packages

## Remote package repositories
src/gz openwrt_core http://downloads.openwrt.org/releases/18.06.0-rc2/targets/ramips/mt7621/packages
src/gz openwrt_base http://downloads.openwrt.org/releases/18.06.0-rc2/packages/mipsel_24kc/base
src/gz openwrt_luci http://downloads.openwrt.org/releases/18.06.0-rc2/packages/mipsel_24kc/luci
src/gz openwrt_packages http://downloads.openwrt.org/releases/18.06.0-rc2/packages/mipsel_24kc/packages
src/gz openwrt_routing http://downloads.openwrt.org/releases/18.06.0-rc2/packages/mipsel_24kc/routing
src/gz openwrt_telephony http://downloads.openwrt.org/releases/18.06.0-rc2/packages/mipsel_24kc/telephony

## This is the local package repository, do not remove!
src imagebuilder file:packages
所以如果想加入本地项目,添加一行:
src custom file:///yours/bin/ramips/packages
添加远端项目同理,像src/gz这样既可。
编译固件img用make image ***这个命令,由于暂时没有使用过,所以就不写了。