机器人仿真导航
1.导航功能包
(1)move_base:实现机器人导航中的最优路径规划
(2)amcl:实现二维地图中的机器人定位
命令安装
$ sudo apt-get install ros-kinetic-navigation
move_base功能包
创建fake文件夹
mkdir -p ~/catkin_ws/src/mrobot_navigation/config/fake
2.代价地图的配置
一种用于全局路径规划(globa——costmap),一种用于本地路径规划和实时避障(local_costmap)
(1)通用配置文件(Common Configuration, local_costmap & global_costmap)
代价地图用来储存周围环境的障碍信息,其中需要声明地图关注的机器人传感器消息,以便于地图信息的更新。创建 costmap_common_params.yaml的配置文件。
# obstacle_range设置机器人检测障碍物的最大范围2.5m;raytrace_range检测自由空间的最大范围为3m。
obstacle_range: 2.5
raytrace_range: 3.0
# footprint: [[0.165, 0.165], [0.165, -0.165], [-0.165, -0.165], [-0.165, 0.165]],设置机器人的外形半径以及障碍物的膨胀参数
robot_radius: 0.165
inflation_radius: 0.1
#障碍物的最大和最小高度
max_obstacle_height: 0.6
min_obstacle_height: 0.0
# observation_sources参数列出了代价地图需要关注的所有传感器信息
observation_sources: scan
scan: {data_type: LaserScan, topic: /scan, marking: true, clearing: true, expected_update_rate: 0}
(2)全局规划配置文件(Global Configuration, global_costmap)
global_costmap:
 global_frame: /map
 robot_base_frame: /base_footprint
 update_frequency: 1.0
 publish_frequency: 0
 static_map: true
 rolling_window: false
 resolution: 0.01
 transform_tolerance: 1.0
 map_type: costmap
# global_frame参数用来表示全局代价地图需要在哪个参考系下运行,这里选择map参考系; robot_base_frame参数用来表示代价地图可以参考的机器人本体的坐标; update_frequency参数用来决定全局地图信息的更新频率(HZ);static_map参数用来决定代价地图是否需要根据map_server提供的地图信息进行初始化。
(3)本地规划配置文件(Local Configuration, local_costmap)
local_costmap:
 global_frame: map
 robot_base_frame: base_footprint
 update_frequency: 3.0
 publish_frequency: 1.0
 static_map: true
 rolling_window: false
 width: 6.0
 height: 6.0
 resolution: 0.01
 transform_tolerance: 1.0
3.本地规划器配置
创建base_local_planner_params.yaml配置文件
clearing_rotation_allowed: false

TrajectoryPlannerROS:
	 max_vel_x: 0.3
 	min_vel_x: 0.05
 	max_vel_y: 0.0 # zero for a differential drive robot
	 min_vel_y: 0.0
	 min_in_place_vel_theta: 0.5
 	escape_vel: -0.1
 	acc_lim_x: 2.5
 	acc_lim_y: 0.0 # zero for a differential drive robot
	 acc_lim_theta: 3.2

	holonomic_robot: false
	 yaw_goal_tolerance: 0.1 # about 6 degrees
	 xy_goal_tolerance: 0.1 # 10 cm
 	latch_xy_goal_tolerance: false
 	pdist_scale: 0.9
	 gdist_scale: 0.6
	 meter_scoring: true

	heading_lookahead: 0.325
	 heading_scoring: false
	 heading_scoring_timestep: 0.8
	 occdist_scale: 0.1
	 oscillation_reset_dist: 0.05
	 publish_cost_grid_pc: false
	 prune_plan: true

	sim_time: 1.0
	 sim_granularity: 0.025
	 angular_sim_granularity: 0.025
	 vx_samples: 8
	 vy_samples: 0 # zero for a differential drive robot
	 vtheta_samples: 20
	 dwa: true
	 simple_attractor: false
4.在rviz中仿真机器人导航
创建启动文件mrobot_navigation/launch/fake_move_base.launch启动move_base节点,并加载所有配置文件。
然后创建一个运行所有导航功能节点的顶层launch文件mrobot_navigation/launch/fake_nav_demo.launch
此外,为了启动机器人模型,创建mrobot_bringup/launch/fake_mrobot_with_laser.launch文件
在mrobot_bringup的config里创建fake_mrobot_arbotix.yaml文件
port: /dev/ttyUSB0
baud: 115200
rate: 20
sync_write: True
sync_read: True
read_rate: 20
write_rate: 20

controllers: {
   #  Pololu motors: 1856 cpr = 0.3888105m travel = 4773 ticks per meter (empirical: 4100)
   base_controller: {type: diff_controller, base_frame_id: base_footprint, base_width: 0.26, ticks_meter: 4100, Kp: 12, Kd: 12, Ki: 0, Ko: 50, accel_limit: 1.0 }
}
运行启动文件
$ roscore
$ roslaunch mrobot_bringup fake_mrobot_with_laser.launch
$ roslaunch mrobot_navigation fake_nav_demo.launch
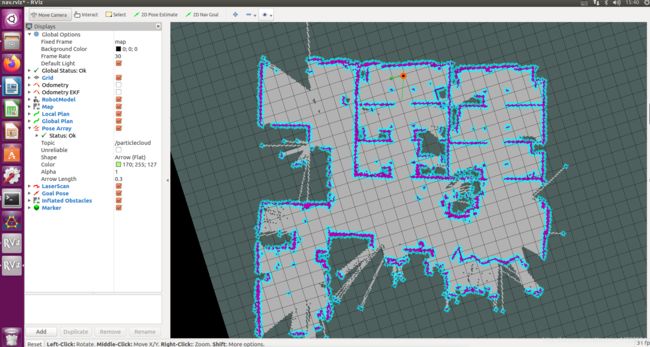
如图所示
手动导航:
用鼠标点击菜单中“2D Nav Goal”,但是由于机器人物理参数的限制,机器人不能完全按照最优路径移动
自动导航:
因为mrobot_navigation.py没有运行权限,用一下命令
$ cd ~/catkin_ws/src/mrobot_navigation/scripts
$ chmod +x random_navigation.py
$ roscore
$ roslaunch mrobot_bringup fake_mrobot_with_laser.launch
$ roslaunch mrobot_navigation fake_nav_demo.launch
$ rosrun mrobot_navigation random_navigation.py
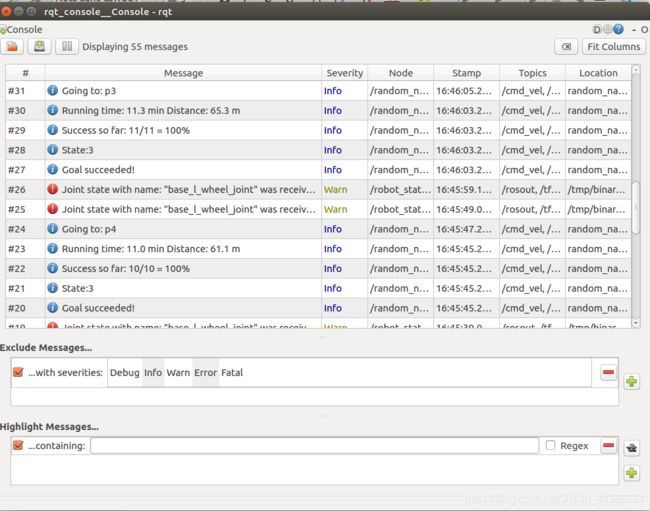
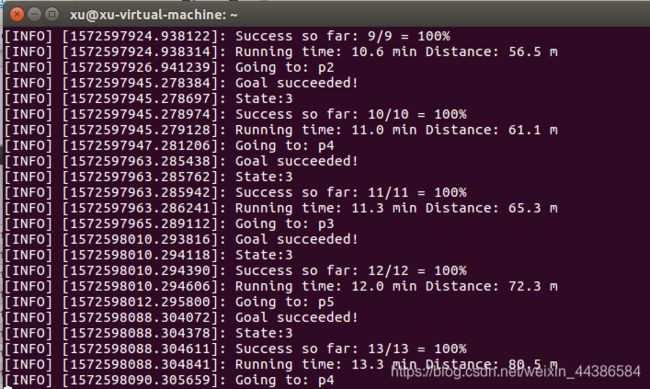
打开日志监控的可视化终端,可以看到机器人发布的距离信息、状态信息、目标点编号、成功率和速度等日志。
$ rqt_console
链接:https://pan.baidu.com/s/1cdUhkGwKz-FiRZ-1axvYLg
提取码:81t9