IMX6的LINUX下的IIC驱动(一)

IMX6的LINUX下的IIC驱动(一)

这一篇主要是使用IMX6处理器驱动AT24C16(24LC16B)芯片。第一篇介绍设备驱动层:

1.IMX6的IIC控制器

IMX6有三个IIC控制器。
IMX6芯片手册截图
我在这里使用的是IIC3控制器。

2.IIC3总线上挂接的其他芯片

2.1 RX8025-SA时钟芯片

RX8025-SA

RX8025-SA地址

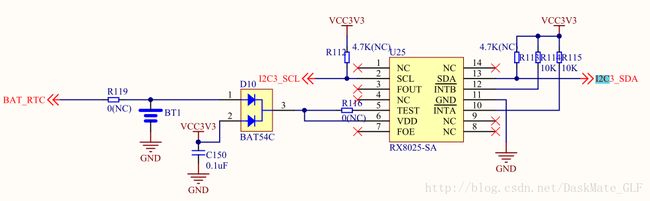
根据RX8025-SA芯片手册,确定RX8025-SA的IIC地址使用的是0x32。为什么不是0x60???因为最后一位是读写位,在linux中右移一位,就是0x32了,在具体发送时,如果是读就会发送0x65,写的话发送0x64。

2.2 ts2003芯片

在我使用的开发板中IIC3还连接这触摸屏要用到的芯片。

ts2003

ts2003地址

ts2003地址就不重复说啦。。。

2.3 AT24C16芯片

在我使用的开发板中,没有实际的AT24C16芯片,我将IIC3的SDA与SCL两个引脚引出,自己焊接了一块AT24C16的最小单元,并且A2/A1/A0都接地。

AT24C16地址

AT24C16的地址为0x50。

3.IIC3总线设备树文件修改

在imx6qdl-sabresd.dtsi文件中找到&i2c3。添加上AT24C16信息。如下:
i2c3

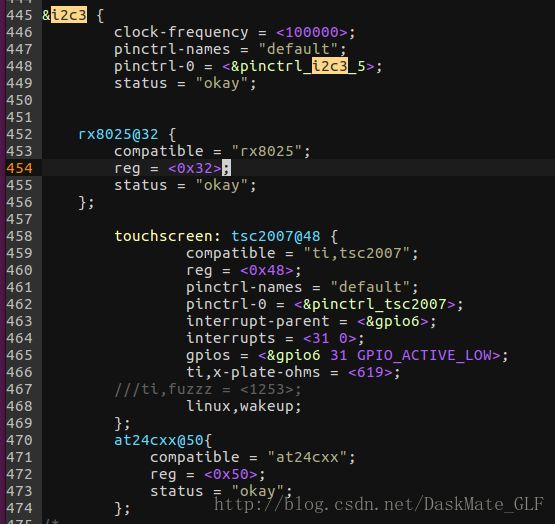
compatible的字符串为:”at24cxx”。之后的match就是匹配的该字符串。

4.IIC3设备驱动

#include 
#include 
#include 
#include 
#include 
#include 
#include 
#include 
#include 
#include 
#include 
#include 
#include 
#include 
#include 
#include 
#include 


MODULE_LICENSE("GPL");

const struct i2c_device_id at24cxx_id[] = 
{
    {"at24cxx", 0 },//i2c控制器的第三个控制器i2c3
    {},//结束标志
};

dev_t dev;
struct at24cxx_dev
{
    struct cdev cdev_at24;
    struct i2c_client *client;
};
struct at24cxx_dev *at24cxx_devp = NULL;
struct class *dev_class = NULL;
struct device *dev_device = NULL;

/*
    ./a.out w 0 0x55
*/
ssize_t at24cxx_write(struct file *filp, const char __user *buff, size_t size, loff_t *offset)
{
    int ret;
    unsigned char val[2];
    struct i2c_msg msg[1];
    if(size != 2){
        return -EINVAL;
    }
    ret = copy_from_user(val, buff, size);

    //组织要发送的消息
    msg[0].addr = 0x50;//从设备地址
    //msg[0].addr = at24cxx_devp->client->addr;
    msg[0].flags = 0;//0表示写入
    msg[0].buf = val;
    msg[0].len = 2;

    //产生 start  addr+w ack offset ack val ack stop 这些信号
    //i2c_transfer(struct i2c_adapter * adap,struct i2c_msg * msgs,int num)(struct i2c_adapter * adap,struct i2c_msg * msgs,int num)
    i2c_transfer(at24cxx_devp->client->adapter, msg, 1);

    return 2;//写入两个字节,就返回2
}

/*
    ./a.out r 100
*/
ssize_t at24cxx_read(struct file *filp, char __user *buff, size_t count, loff_t *offset)
{
    unsigned char address;
    unsigned char data;
    struct i2c_msg msg[2];//msg个数可以参考i2c的start信号的个数
    int ret;

    ret = copy_from_user(&address, buff, 1);

    msg[0].addr = at24cxx_devp->client->addr;
    msg[0].flags = 0;//写
    msg[0].buf = &address;//要读哪个地址
    msg[0].len = 1;

    msg[1].addr = at24cxx_devp->client->addr;
    msg[1].flags = 1;//读
    msg[1].buf = &data;//读到的数据存到data里去
    msg[1].len = 1;


    i2c_transfer(at24cxx_devp->client->adapter, msg, ARRAY_SIZE(msg));

    ret = copy_to_user(buff, &data, 1);

    return 1;
}


struct file_operations at24cxx_fops = 
{
    .owner = THIS_MODULE,
    .read = at24cxx_read,
    .write = at24cxx_write,
};


int at24cxx_probe(struct i2c_client *client, 
                            const struct i2c_device_id *id)
{
    printk("at24cxx_probe \n");
    printk("client->name = %s  client->addr = %d \n", client->name, client->addr);
    printk("i2c_device_id->name = %s  i2c_device_id->driver_data = %ld \n", id->name, id->driver_data);

    //注册设备号
    alloc_chrdev_region(&dev, 0, 1, "AT24C02");

    //申请cdev空间
    at24cxx_devp = kzalloc(sizeof(struct at24cxx_dev), GFP_KERNEL);
    at24cxx_devp->client = client;

    //初始化cdev并添加到内核
    cdev_init(&at24cxx_devp->cdev_at24, &at24cxx_fops);
    cdev_add(&at24cxx_devp->cdev_at24, dev, 1);

    //创建设备文件
    dev_class = class_create(THIS_MODULE, "AT24CXX");
    dev_device = device_create(dev_class, NULL,dev,NULL,"at24cxx0");

    return 0;
}

int at24cxx_remove(struct i2c_client *client)
{
    printk("at24cxx_remove \n");
    device_destroy(dev_class, dev);
    class_destroy(dev_class);
    cdev_del(&at24cxx_devp->cdev_at24);
    kfree(at24cxx_devp);
    unregister_chrdev_region(dev, 1);

    return 0;
}


struct i2c_driver at24cxx_driver = 
{
    .driver = 
    {
        .name = "AT24C02",
        .owner = THIS_MODULE,   
    },
    .probe = at24cxx_probe,
    .remove = at24cxx_remove,
    /*i2c match 会使用到*/
    .id_table = at24cxx_id,
};

int __init at24cxx_init(void)
{
    i2c_add_driver(&at24cxx_driver);
    return 0;
}

void __exit at24cxx_exit(void)
{
    i2c_del_driver(&at24cxx_driver);
}

module_init(at24cxx_init);
module_exit(at24cxx_exit);

5.IIC3设备驱动测试程序

#include 
#include 
#include 
#include 
#include 
#include 

void print_usage(char *file)
{
    printf("%s r addr \n", file);
    printf("%s w addr val \n", file);
}

/*
    ./a.ount w 10 0x55   写的格式  在10 地址上写0x55值
    ./a.ount r 10             读的格式

*/
int main(int argc, char **argv){
    int fd;
    unsigned char buf[2];
    unsigned char buf1[2];

    if(argc!=3 && argc!=4){
        print_usage(argv[0]);
    }


    fd = open("/dev/at24cxx0", O_RDWR);

    if(strcmp(argv[1], "r") == 0){
        buf[0] = strtoul(argv[2], NULL, 0);//字符串转换
        read(fd, buf, 1);
        printf("data: %c %d 0x%2x \n", buf[0], buf[0], buf[0]);
    }
    else if(strcmp(argv[1], "w") == 0){
        buf[0] = strtoul(argv[2], NULL, 0);
        buf[1] = strtoul(argv[3], NULL, 0);
        write(fd, buf, 2);
    }
    else{
        print_usage(argv[0]);
        return -1;
    }
    return 0;
}

6.IIC3设备驱动测试截图

这里写图片描述

你可能感兴趣的:(linux驱动程序开发实例)