React.js终探(七)(完)
我们在前面介绍了组件的各种特性,这一节我们来说说多组件的情况。
在实际开发中,我们的组件难免会遇到有公共部分的情况,如果是个别情况还好,但如果数量比较多的话,那这时候,就需要公用了。
怎么公用呢?
React为我们提供了它的方法。
mixin:复用代码
可以把部分代码提出来公用。mixin是掺合混合的意思,即可以把一个对象的属性拷贝到另一个对象上。
使用mixin有两步:
- 定义一个mixin对象,即如
1 var EzLoggerMixin = {

2     log:function(){

3         //sth. happened here.

4     }

5 };
- 使用React.createClass时,给传入的原型对象设置mixins属性
1 React.createClass({

2     mixins:[EzLoggerMixin],

3     render:function(){

4         //your render stuff.

5     }

6 });
可以看出,mixins属性是一个数组,表示可以传多个mixin对象,但是注意注意,传入的mixin对象中,不要有同名属性
来个例子:
定义一个日志的mixin对象,React组件使用mixin获得日志的输入能力。
上代码:
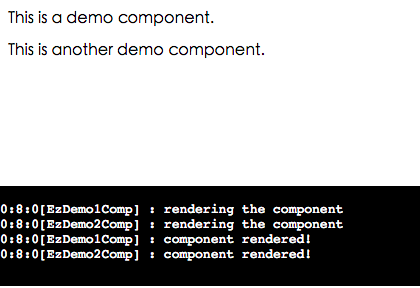
 1 <!DOCTYPE html>

 2 <html>

 3 <head>

 4     <meta charset="utf-8">

 5     <title>Component Mixins</title>

 6     <script src="lib/react.js"></script>

 7     <script src="lib/JSXTransformer.js"></script>

 8     <style>

 9         .ez-logger{

10             position:fixed;

11             left:0px;

12             bottom:0px;

13             height:100px;

14             width:100%;

15             background:#000;

16             color:#fff;

17         }

18     </style>

19 </head>

20 <body>

21     <div id="content"></div>

22     <script type = "text/jsx">

23         //日志mixin

24         var EzLoggerMixin = {

25             log:function(txt){

26                 //按需撞见日志板DOM对象

27                 if(!window._logger_){

28                     var el = window._logger_  = document.createElement("pre");

29                     el.className = "ez-logger";

30                     document.body.appendChild(el);

31                 }

32                 //计算时间戳

33                 var time = new Date,

34                     h = time.getHours(),

35                     m = time.getMinutes(),

36                     s = time.getSeconds(),

37                     ts = [h,m,s].join(":");

38

39                 //this.constructor.displayName表示组件的显示名,React自动设置该属性

40                 var compName = "[" + this.constructor.displayName + "]";

41

42                 //输出到日志板

43                 window._logger_.innerText = [window._logger_.innerText, ts + compName + " : " + txt].join("\n");

44             }

45         };

46         //组件1定义

47         var EzDemo1Comp = React.createClass({

48             mixins : [EzLoggerMixin], //使用日志mixin

49             componentDidMount : function(){

50                 this.log("component rendered!");

51             },

52             render : function(){

53                 this.log("rendering the component");

54                 return     <div>

55                             <p>This is a demo component.</p>

56                         </div>;

57             }

58         });

59         //组件2定义

60         var EzDemo2Comp = React.createClass({

61             mixins : [EzLoggerMixin],  //使用日志mixin

62             componentDidMount : function(){

63                 this.log("component rendered!");

64             },

65             render : function(){

66                 this.log("rendering the component");

67                 return     <div>

68                             <p>This is another demo component.</p>

69                         </div>;

70             }

71         });

72         //渲染

73         React.render(

74             <div>

75                 <EzDemo1Comp/>

76                 <EzDemo2Comp/>

77             </div>,

78             document.querySelector("#content"));

79     </script>

80 </body>

81 </html>
值得一提的是:
this.constructor.displayName是获得当前组件的显示名,这个是React自动设置的属性
好了,探索React的学习的系列大体就到这里了。之后必要的话,会继续深入写React相关的。谢谢大家思密达