asp.net core 使用SignalR推送消息--【简单在线聊天功能】 以及 【推送消息给指定用户】
asp.net core 使用SignalR推送消息,本篇文章实现两个功能:1、简单在线聊天;2、推送消息给指定用户。
一、使用SignalR前准备工作:
1、使用Visual Studio Code 创建mvc项目
2、mvc项目添加Microsoft.AspNetCore.SignalR引用
3、下载signalr.js,放在wwwroot文件下任意位置
4、自定义类继承Hub,如下:
using System;
using System.Threading.Tasks;
using Microsoft.AspNetCore.SignalR;
using web.Model;

namespace web.Core
{
    public class MyHub : Hub
    {
        //发送消息--发送给所有连接的客户端
        public Task SendMessage(string msg)
        {
            return Clients.All.SendAsync("ReceiveMessage", msg);
        }

        //发送消息--发送给指定用户
        public Task SendPrivateMessage(string userId, string message)
        {
            return Clients.User(userId).SendAsync("ReceiveMessage", message);
        }
    }
}
4、mvc项目配置 SignalR 服务、设置 SignalR 路由
在Startup.cs中的ConfigureServices方法添加代码
services.AddSignalR();在Startup.cs中的Configure方法添加SignalR路由配置代码,路由指向自定义类MyHub,如下:
app.UseSignalR(routes=>{
   routes.MapHub("/MyHub");
});
5、客户端js中创建连接、启动连接代码,如下:
//创建连接对象connection
const signalr_connection = new signalR.HubConnectionBuilder()
            .withUrl("/MyHub")
            .configureLogging(signalR.LogLevel.Information)
            .build();

//启动connection
signalr_connection.start()
                    .then(function(){
                        console.log("连接成功");
                    }).catch(function(ex){
                        console.log("连接失败"+ex);
                        //SignalR JavaScript 客户端不会自动重新连接,必须编写代码将手动重新连接你的客户端
                        setTimeout(() => start(), 5000);
                    });

async function start() {
    try {
        await signalr_connection.start();
        console.log("connected");
    } catch (err) {
        console.log(err);
        setTimeout(() => start(), 5000);
    }
};
这里准备工作差不多了。
二、简单在线聊天功能:
1、在HomeController 创建一个Action,如下:
public IActionResult Chat()
{
   return View();
}
html代码如下:
说明:
a、signalr_connection.on() 绑定事件时,第一个参数对应MyHub类中的SendMessage方法中“Clients.All.SendAsync("ReceiveMessage", msg)”的第一个参数。
b、signalr_connection.invoke()发送消息时,第一个参数对应MyHub类中的SendMessage方法名。
效果如下:
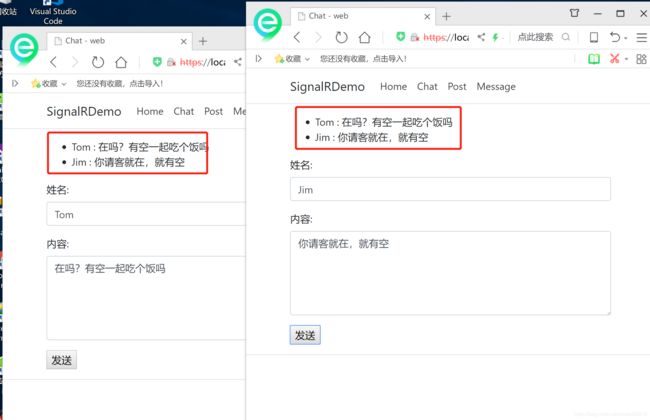
三、推送消息给指定用户:
1、SignalR推送消息到指定用户(也可以时组)时,默认情况下,使用 SignalR的SignalRClaimTypes.NameIdentifier与用户标识符相关联,所以这里使用自带授权Authorize登陆(记得Startup中配置Authorize),把用户id保存在NameIdentifier中,登陆代码如下:
[HttpPost]
        public async Task LoginPost()
        {
            var username = Request.Form["username"];
            var userpwd = Request.Form["userpwd"];

            //本demo没连接数据库,就不做用户验证了,用户id就用Guid生成了

            //登陆授权
            string userId=Guid.NewGuid().ToString().Replace("-","");
            var claims =new List()
            {
                new Claim(ClaimTypes.Name,username),   //储存用户name
                new Claim(ClaimTypes.NameIdentifier,userId)  //储存用户id
            };

            var indentity = new ClaimsIdentity(claims,"formlogin");
            var principal = new ClaimsPrincipal(indentity);

            await HttpContext.SignInAsync(CookieAuthenticationDefaults.AuthenticationScheme,principal);

            //验证是否授权成功
            if (principal.Identity.IsAuthenticated)
            {
                return Json(new { code = "success", msg = "登陆成功" });
            }
            else
                return Json(new { code = "failed", msg = "登陆失败" });
        }
上述代码使用new Claim(ClaimTypes.NameIdentifier,userId) 储存用户id。
2、发送消息Action代码
首先在HomeController中注入IHubContext实例:
private readonly IHubContext myHub;
public HomeController(IHubContext _myHub)
{
    myHub=_myHub;
}
然后发送消息Action代码:
[Authorize,HttpPost]
public async Task PostData()
{
     var userId = Request.Form["userid"];
     var message = Request.Form["message"];

     if(!string.IsNullOrWhiteSpace(userId))
         await myHub.Clients.User(userId).SendAsync("ReceiveMessage", new {message=message});

     return Json(new { code = "success", msg = "发送成功" });
}
3、接受消息页面和上面聊天功能页面的js代码类似。
4、我用360和谷歌浏览器分别用两个用户登陆,效果如下:

UserID:3300127337da407ca311c89ca5b1abdc是360浏览器登陆时Guid生成的用户id,用另一个用户在谷歌浏览器登陆,发送消息指定用户id即可。
注:我是实现功能后写的博客,所以博客的逻辑符合自己的思路,对于旁人可能会有些混乱,所以附上源码
1、https://gitee.com/qk2017/NetCoreSignalRDemo
2、https://download.csdn.net/download/coderk2014/11072034