转载:https://cloud.tencent.com/info/f2105bd1c69780987178a30bbdcc8987.html
一、问题描述:
客户重装Vcenter之后(Hostname与之前保持一致)出现如下报错:
1.计算机目录显示无法联系到vCenter server
2.VM电源状态未知
3.测试connection出现如下错误:
Attempting to connect to the VCenter server failed due to a certificate error.
Check that the appropriate certificates are installed on the VCenter server and on the same machine as all instances of the Host service.
- 无法在现有计算机目录中添加删除虚拟机
二、解决目标:
-
无需新建Connection,修复现有的连接
-
所有VM电源处于可管理状态
- 现有的计算机目录(包括MCS)可以正常添加机器
三、Workaround:
根据新的vcenter地址新建新的连接并将现有站点中的机器删除后已现有的方式通过新的vcenter地址添加到现有站点中进行管理,具体方法可以参考Citrix官方文档:
Xenserver:
http://support.citrix.com/article/CTX139041
Vmware:
https://support.citrix.com/article/CTX216898
四、根本解决方案
***Note:此方案非citrix官方支持,谨慎使用!
问题一:修复现有的连接,修复现有虚拟机电源状态
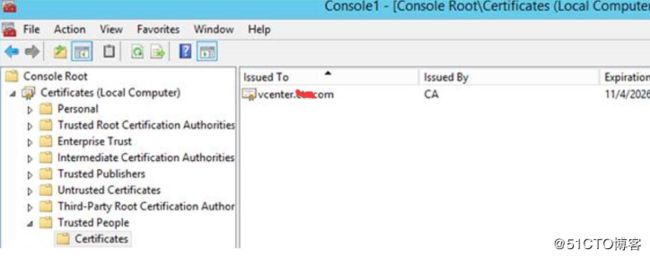
1. 在每一台DDC的证书中心中删除原来的vcenter证书
通过MMC加载证书并浏览到路径:证书>受信任的根证书颁发机构>受信任的人
2.在每一台DDC中安装新的vCenter证书(包括根证书)安装方法有两种:
方式一:
a. 将vCenter Server证书拷贝到所有DDC中
证书路径:
vCenter server for Windows:
C:\ProgramData\VMware\vCenterServer\cfg\vmware-vpx\ssl\rui.crt
VCSA:
/etc/vmware-vpx/ssl/rui.crt
b. 导入证书,MMC->Add/Remove Snap-in->Certificates->Add->Computer account->Local computer->Trusted People->Certificates->Import above Certificates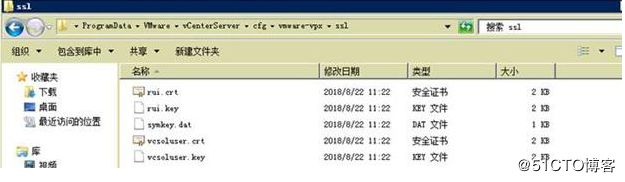
方式二:
浏览器访问vCenter Server, 访问地址如https://server1.domain1.com.
vCenter证书显示于该路径中:Accept the security warnings->Click on the address bar
点击“Install certificate”,选择“Local Machine”,并点击继续
在证书中心中点击“Place all certificates”,并点击“浏览”
1) 如果你使用的是Windows Server 2008 R2:
a. 选择Show physical stores checkbox
b. 展开 Trusted People
c. 选择Local Computer
d. 点击Next,然后点击Finish
2) 如果你使用的是 Windows Server 2012 或者 Windows Server 2012 R2,则:
a. 选择Trusted People, 然后点击 OK.
b. 点击Next, 直接点击Finish即可
**Note: 证书导入后请务必验证https访问不再报证书错误,如果还有错考虑将站点加入到本地信任站点列表。
3.更新在Citrix Virtual Desktop数据库中更新新证书的指纹,
a. 通过查看证书详细信息并下拉到指纹(Thumbprint)选项查看指纹(请将指纹信息拷贝到TXT中去除空格并将字母替换成大写后备用):
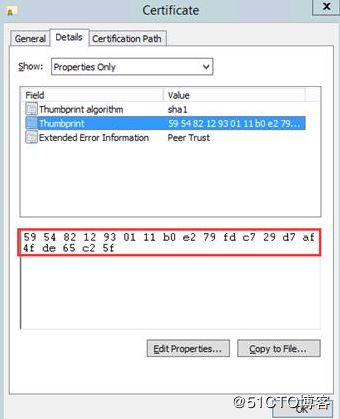
b. Citrix Virtual Desktop数据库中替换新证书指纹方法一:直接更新数据库表格
Update [XDSiteDB].[HostingUnitServiceSchema].[HypervisorConnectionSSLThumbprint]
Set SSLThumbprint = '59548212930111B0E279FDC729D7AF4FDE65C25F'
Where Id = 2

**Note: Hypervisor ConnectionUid可以在DDC上运行Powershell Get-BrokerHypervisorConnection来查看相关信息
方法二:通过DDC Powershell更新a) $cred = Get-Credential
b) Set-Item -LiteralPath "

**Note:证书指纹须大写!
- 在Citrix Studio中,编辑现有的hosting connection并更新connection address(如果地址更改的话)
上述四个步骤做完之后,虚拟机电源状态恢复,同时现有连接也被修复。
问题二:无法向现有计算机目录中添加机器
我们在完成以上步骤后虽然能够解决现有环境中的连接问题,但是用户无法在新的计算机目录中添加新的计算机。导致问题的根本原因是因为替换vcenter之后,vcenter管理的network /storage/resouregoup id信息都将改变,而原有的计算机目录仍然关联旧的vcenter下面的id.
解决思路是将XD数据库中相关联的网络/存储/资源组 ID均替换成现有正确的ID.
如何查看当前新的vcenter下的网络/存储/资源组 ID?两种方法:
-
根据原来的托管主机新建托管主机并使用相同的存储和网络,这样在DB中可以查看到对应的ID
- 通过vcenter server mob来查看(推荐方式)
浏览器访问vcenter server地址并选择浏览管理对象

路径为:Browse objects managed by vShpere->Content->rootFolder(Datacenters)->ChileEntity(Real Datacenter Name,此目录下正常可以看到storage ID和network ID)->HostFolder->ChildEntity(此时可以看到cluster名称或者主机)->点击进入,页面为ManagedObjectReference:ComputeResource(此页面中能看到看到storage ID和network ID,下拉找到resourcePool可以查询到对应的ID)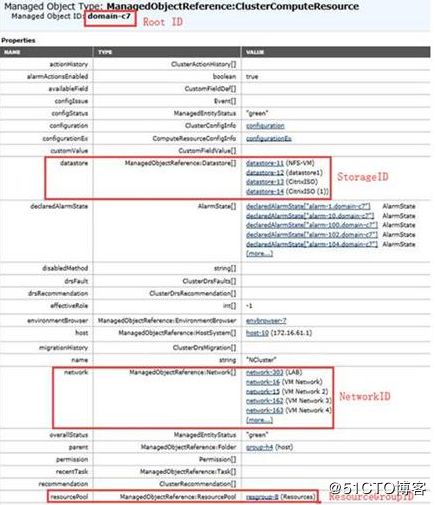
网络ID:
用户在添加计算机的时候会提示以下错误:
Terminating Error:
An unknown error occurred while creating the virtual machines.
Stack Trace:
at Citrix.Console.PowerShellSdk.ProvisioningSchemeService.BackgroundTasks.ProvisioningSchemeTask.CheckForTerminatingError(SdkProvisioningSchemeAction sdkProvisioningSchemeAction)
at Citrix.Console.PowerShellSdk.ProvisioningSchemeService.BackgroundTasks.ProvisioningSchemeTask.WaitForProvisioningSchemeActionCompletion(Guid taskId, Action`1 actionResultsObtained)
at Citrix.Console.PowerShellSdk.ProvisioningSchemeService.BackgroundTasks.MachineProvisioningTask.RunTask()
at Citrix.Console.PowerShellSdk.BackgroundTaskService.BackgroundTask.Task.Run()
DesktopStudio_ErrorId : ProvisioningTaskError
ErrorCategory : NotSpecified
ErrorID : NetworkNotPermitted
TaskErrorInformation : A NIC device is tied to a disallowed network.
InternalErrorMessage : A NIC device is tied to a disallowed network.
Machine Failures:
: Failed to create the virtual machine; .
Inner Error:
A NIC device is tied to a disallowed network.
ErrorID : System.InvalidOperationException
TaskErrorInformation : System.InvalidOperationException: A NIC device is tied to a disallowed network.
at Citrix.MachineCreation.NewProvVMSupport.NewProvVMLogic.DoValidation(NewVirtualMachineWorkflow context)
网络的更改会涉及到数据中的三张表,如下:
[HostingUnitServiceSchema].[HostingUnit]
[HostingUnitServiceSchema].[HostingUnitNetwork]
[DesktopUpdateManagerSchema].[ProvisioningSchemeNetworkMap]
[HostingUnitServiceSchema].[HostingUnit] 主要定义了当前托管主机中对应的RootID/RootPath/NetworkPath/NetworkID等,如果只是替换vcenter(datacenter, cluster没有变化)则只需要更改networkID即可,如果更换以上路径则还需要替换出现问题的Hostingunits对应的RootID和Rootpath等。
Update [CitrixXDSiteDB].[HostingUnitServiceSchema].[HostingUnit]
Set RootPath = 'xxxxx', RootID = 'new rootid', NetworkID = 'NewNetworkID'
Where hostingUnitName = 'vcenter'
[HostingUnitServiceSchema].[HostingUnitNetwork] 定义了托管主机中每个网络对应的名称和id(有可能用户的托管中配置了多个网络,但是每个计算机目录只会选择一个网络)
语句:
Update [HostingUnitServiceSchema].[HostingUnitNetwork]
Set NetworkID= 'Newnetwork id'
where networkpath='networkpath'
[DesktopUpdateManagerSchema].[ProvisioningSchemeNetworkMap] 定义了每个计算机目录对应的scheme中使用的网络路径和ID.
语句:
Update [DesktopUpdateManagerSchema].[ProvisioningSchemeNetworkMap]
Set NetworkId = 'New networkID'
Where ProvsioningSchemeUid='xxxxx-xxxxxx-xxxxxxxxxxxxxx'

**Note: 如何查看计算机目录对应的ProvsionningScheme
DDC上运行Powershell: Get-BrokerCatalog
- Storage ID
用户在修改为以上三张表关联的网络ID之后再次添加机器仍然提示报错: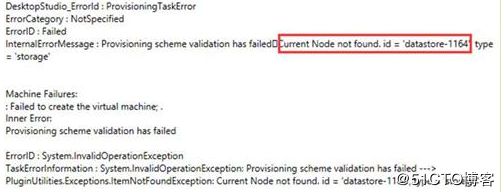
从以上报错我们可以明显看到创建机器过程中找不到对应的存储,这里的存储“datastore-1164"在新的vCenter管理下此存储的id已经变更为新的id,我们需要在数据库中进行替换。
[HostingUnitServiceSchema].[HostingUnitStorageLocation] 此表中记录了托管存储中每个存储对应的路径和storage ID
语句:
Update [CitrixXDSiteDB].[HostingUnitServiceSchema].[HostingUnitStorageLocation]
set StorageId = 'datastore-15'
Where StorageId = 'datastore-1164'
- ResouceGroup ID
用户在更新完storage ID后再次重新添加新虚拟机:
Machine Failures:
Domain\RDVDI21$: Could not locate the master disk image; /VDI-ITUser-Template.vm/ITUserVDA.snapshot/set IE proxy.snapshot to create the virtual machine; Domain\RDVDI21$
Inner Error:
Attempt to lookup property [parent] failed as the object [resgroup-1162] does not exist
ErrorID : PluginUtilities.Exceptions.ItemNotFoundException
TaskErrorInformation : PluginUtilities.Exceptions.ItemNotFoundException: Attempt to lookup property [parent] failed as the object [resgroup-1162] does not exist ---> PluginUtilities.Exceptions.ItemNotFoundException: Attempt to lookup property [parent] failed as the object [resgroup-1162] does not exist ---> PluginUtilities.Exceptions.WrappedPluginException: 对象已删除或未完全创建
以上报错我们可以看到对用的resouregroup-1162已经改变,我们需要更新数据库中对应的值
[DesktopUpdateManagerSchema].[ProvisioningSchemeVMImageLocation] 此表中记录了计算机目录再每个存储中的Basedisk的信息,如果ResourceGroup信息改变则需要在这里更改
语句:
Update [DBName][DesktopUpdateManagerSchema].[ProvisioningSchemeVMImageLocation]
Set DiskId= replace (DiskId,'resgroup-35002_old','resgroup-3xxxx_new')
Where ProvsioningSchemeID = XXX
还需要更改此表中的StorageID
Update [DBName].[DesktopUpdateManagerSchema].[ProvisioningSchemeVMImageLocation]
Set StorageId = 'datastore-15'
Where StorageId = 'datastore-1164'
再次回到DDC针对有问题的计算机目录添加计算机,此时可以重新添加!
**Note: 所有针对数据库的操作请务必先进行数据库的备份操作