Core Data
Core Data
一、Core Data简介
Core Data是iOS5之后才出现的一个框架,它提供了对象-关系映射(ORM)的功能,即能够将OC对象转化成数据,保存在SQLite数据库文件中,也能够将保存在数据库中的数据还原成OC对象。在此数据操作期间,我们不需要编写任何SQL语句。另外,这里不介绍Core Data和SQLite、FMDB的区别,如若需要请另行google。
二、Core Data使用步骤
- 创建模型文件(相当于数据库)
- 添加实体(相当表)
- 创建实体类(相当于模型类)
- 生成上下文,关联模型文件,生成数据库
- 数据操作
三、代码编写
创建模型文件、添加实体、创建实体类等步骤非常简单,这里不作介绍。
3.1 生成上下文
-(void)setupContext{

    // 1.生成上下文,关联模型文件
    NSManagedObjectContext *context = [[NSManagedObjectContext alloc] init];

    // 2.创建一个模型对象
    // 如果只有一个数据库,使用下面这条注释的语句即可
    //NSManagedObjectModel *model = [NSManagedObjectModel mergedModelFromBundles:nil];
    //Company是你生成的模型文件的名字,
    NSURL *url = [[NSBundle mainBundle] URLForResource:@"Company" withExtension:@"momd"];
    NSManagedObjectModel *model = [[NSManagedObjectModel alloc] initWithContentsOfURL:url];

    // 3.持久化存储调度器
    NSPersistentStoreCoordinator *store = [[NSPersistentStoreCoordinator alloc] initWithManagedObjectModel:model];

    // 4.数据库保存的路径
    NSString *doc = [NSSearchPathForDirectoriesInDomains(NSDocumentDirectory, NSUserDomainMask, YES) lastObject];

    //company.sqlite是在手机中创建的数据库文件的名字
    NSString *sqlitePath = [doc stringByAppendingPathComponent:@"Company.sqlite"];

    NSError *error = nil;
    [store addPersistentStoreWithType:NSSQLiteStoreType configuration:nil URL:[NSURL fileURLWithPath:sqlitePath] options:nil error:&error];

    context.persistentStoreCoordinator = store;

    self.context = context;
}
3.2 插入数据
#pragma mark 添加员工信息
- (IBAction)addEmployee:(id)sender {

    // 创建员工,Employee是数据库Company中的一个表的名字,也是需要添加的实体类
    Employee *emp1 = [NSEntityDescription insertNewObjectForEntityForName:@"Employee" inManagedObjectContext:self.context];

    // 设置员工属性
    emp1.name = @"lisi";
    emp1.age = @28;
    emp1.height = @2.10;

    //保存
    NSError *error = nil;
    [self.context save:&error];

    if (!error) {
        NSLog(@"success");
    }else{
        NSLog(@"%@",error);
    }

}
3.3 查询数据
#pragma mark 查找某个员工
-(NSArray *)findEmployeeWithName:(NSString *)name{
    // 1.查找员工
    NSFetchRequest *request = [NSFetchRequest fetchRequestWithEntityName:@"Employee"];
    // 2.过滤条件
    NSPredicate *pre = [NSPredicate predicateWithFormat:@"name=%@",name];
    request.predicate = pre;

    return [self.context executeFetchRequest:request error:nil];
}

#pragma mark 读取员工信息
- (IBAction)readEmployee:(id)sender {

    //创建一个请求对象 (填入要查询的表名-实体类)
    NSFetchRequest *request = [NSFetchRequest fetchRequestWithEntityName:@"Employee"];

    // 过滤查询
    // 查找名为张三且身高大于1.8的Employee对象
    NSPredicate *pre = [NSPredicate predicateWithFormat:@"name=%@ AND height > %@",@"zhangsan",@(1.8)];
    request.predicate = pre;

    //以身高进行升序排序
    NSSortDescriptor *sort = [NSSortDescriptor sortDescriptorWithKey:@"height" ascending:NO];
    request.sortDescriptors = @[sort];

    // 分页查询 假设总共13条数据 每页显示5条数据(fetchLimit),从第几条数据开始查找(fetchOffset)
    // 第一页的数据
    request.fetchLimit = 5;
    request.fetchOffset = 0;

    //读取信息
    NSError *error = nil;
    NSArray *emps = [self.context executeFetchRequest:request error:&error];

    if (!error) {
        NSLog(@"emps: %@",emps);
        for (Employee *emp in emps) {
            NSLog(@"%@ %@ %@",emp.name,emp.age,emp.height);
        }
    }else{
        NSLog(@"%@",error);
    }
}
3.4 更新数据
#pragma mark 更新员工信息
- (IBAction)updateEmployee:(id)sender {

    // 把wangwu的身高更改成 1.7
    // 1.查找wangwu
    NSArray *emps = [self findEmployeeWithName:@"wangwu"];

    // 2.更新身高
    if (emps.count == 1) {
        Employee *emp = emps[0];
        emp.height = @1.7;
    }

    // 3.同步(保存)到数据
    [self.context save:nil];
}
3.5 删除数据
#pragma mark 删除员工
- (IBAction)deleteEmployee:(id)sender {
    [self deleteEmployeeWithName:@"lisi"];
}

-(void)deleteEmployeeWithName:(NSString *)name{
    // 删除lisi
    // 1.查找到lisi
    NSFetchRequest *request = [NSFetchRequest fetchRequestWithEntityName:@"Employee"];

    NSPredicate *pre = [NSPredicate predicateWithFormat:@"name=%@",name];
    request.predicate = pre;

    // 2.删除lisi
    NSArray *emps = [self.context executeFetchRequest:request error:nil];

    for (Employee *emp in emps) {
        NSLog(@"删除员工 %@",emp.name);
        [self.context deleteObject:emp];
    }

    // 3.用context同步下数据库
    //所有的操作暂时都是在内存里,调用save 同步数据库
    [self.context save:nil];
}
3.6 模糊查询
#pragma mark 模糊查询
- (IBAction)likeSearcher:(id)sender {
// 查询
NSFetchRequest *request = [NSFetchRequest fetchRequestWithEntityName:@"Employee"];
// 过滤
// 1.查询以wang开头员工
NSPredicate *pre1 = [NSPredicate predicateWithFormat:@"name BEGINSWITH %@",@"wang"];
// 2.以si 结尾
NSPredicate *pre2 = [NSPredicate predicateWithFormat:@"name ENDSWITH %@",@"si"];
// 3.名字包含 g
NSPredicate *pre3 = [NSPredicate predicateWithFormat:@"name CONTAINS %@",@"g"];
// 4.like,以li开头
NSPredicate *pre4 = [NSPredicate predicateWithFormat:@"name like %@",@"li*"];
request.predicate = pre1;
//读取信息
NSError *error = nil;
NSArray *emps = [self.context executeFetchRequest:request error:&error];
if (!error) {
NSLog(@"emps: %@",emps);
for (Employee *emp in emps) {
NSLog(@"%@ %@ %@",emp.name,emp.age,emp.height);
}
}else{
NSLog(@"%@",error);
}
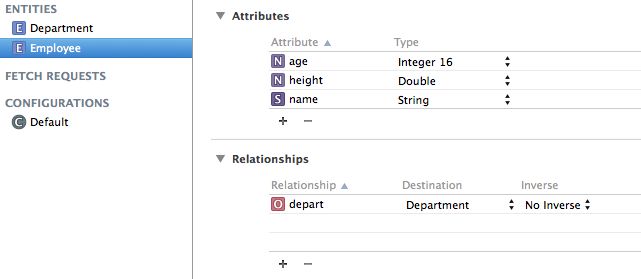
}3.7 多表关联
加入一个表关联另一个表,如图:
则插入操作:
#pragma mark 添加员工信息
- (IBAction)addEmployee:(id)sender {

    // 创建员工
    // 1.添加zhangsan 属于ios部门
    Employee *emp1 = [NSEntityDescription insertNewObjectForEntityForName:@"Employee" inManagedObjectContext:self.context];
    emp1.name = @"zhangsan";
    emp1.height = @1.7;
    emp1.age = @27;

    // 创建ios部门
    Department *dep1 = [NSEntityDescription insertNewObjectForEntityForName:@"Department" inManagedObjectContext:self.context];
    dep1.name = @"ios";
    dep1.createDate = [NSDate date];
    dep1.departNo = @"D001";

    //关联
    emp1.depart = dep1;

    //一次保存
    [self.context save:nil];
}
查询操作:
#pragma mark 读取员工信息
- (IBAction)readEmployee:(id)sender {

    NSFetchRequest *request = [NSFetchRequest fetchRequestWithEntityName:@"Employee"];

    // 过滤查询,查找ios部门的员工
    NSPredicate *pre = [NSPredicate predicateWithFormat:@"depart.name = %@",@"ios"];
    request.predicate = pre;
其他功能同理,这里不再详述。值得一提的是,即使一个数据库里有多个表,代码的编写还是没什么区别的,唯一不同的是数据表的管理变得麻烦了。比如两个关联的表,一个表更新了数据,另一个表是跟着更新还是插入新的数据,或者在已有的数据中选择另一个与之相关联,这些才是真正要考虑的。