第六章 view controller
2,负责和window交互
3,本来是view直接和window交互,现在是通过viewController和window,中间多了一层,目的何在?
更有弹性。类似于android的activity。
4,懒加载,只要不去访问uiController的view属性,就不会调用loadview方法,这样就可以实现懒加载效果,也就是只需要在需要显示的时候才调用view属性;
5,调用window的setViewController最终也会调用ui viewController的view属性
6,loadView的默认方法会inflater NIB view,最终调用view的drawRectIn Chapter 5, you created a view hierarchy (a scroll view with two subviews) and presented it on screen
by explicitly adding the scroll view as a subview of the application’s window. It is more common to do
this using a view controller.
在第五章中,创建一个view的hierarchy,创建了一个scroll-view,并在其中添加了2个子view,最后将其加入到
window中,并在屏幕中显示。 还有一个更通用的方法是使用view-controller.
A view controller is an instance of a subclass of UIViewController. A view controller manages a view
hierarchy. It is responsible for creating view objects that make up the hierarchy, for handling events
associated with the view objects in its hierarchy, and for adding its hierarchy to the window.
一个view controller是UIViewController子类对象实例,它负责管理视图树。 包括:负责创建所有视图树中的视图,
负责处理视图树中视图相关联的事件,负责将视图树加入到窗口中;(类似于android Activity)
In this chapter, you will create an application named HypnoNerd. In HypnoNerd, the user will be able
to switch between two view hierarchies – one for being hypnotized and the other for setting a reminder
for hypnosis on a future date.
在这一节中,将会实现一个HyponoNerd应用。在这个应用中,你可以在2个视图树之间切换,一个是hypnotized,另外
一个是设置一个闹钟唤醒hypnosis
Figure 6.1 The two faces of HypnoNerd

BNRHypnosisViewController and BNRReminderViewController. You will use the
UITabBarController class to allow the user to switch between the view hierarchies of the two view controllers.
创建2个UIViewController的子类:BNRHypnosisViewController和BNRReminderViewController,并使用UITabBarController
用于在2个视图树中切换。
Create a new iOS project (Command-Shift-N) from the Empty Application template. Name this project
HypnoNerd and configure the project as shown in Figure 6.2.

You created the class with the NSObject template to start with the simplest
Open BNRHypnosisViewController.h and change the superclass to UIViewController.
@interface BNRHypnosisViewController : NSObject //删除这一行
@interface BNRHypnosisViewController : UIViewController
@end
创建一个继承于UIViewController的子类BNRHypnosisViewController。
The view of a view controller
As a subclass of UIViewController, BNRHypnosisViewController inherits an important property:
@property (nonatomic, strong) UIView *view;
作为UIViewController的一个子类,它也继承一个重要的property:view
This property points to a UIView instance that is the root of the view controller’s view hierarchy. When
the view of a view controller is added as a subview of the window, the view controller’s entire view
hierarchy is added.
这个property指针指向一个UIView实例,并且这个view是view control中视图树的根节点,当这个view加入到一个
window中时候,view control中的视图树就加入到window中。 (因为它们都在同一个视图树中)
Figure 6.5 Object diagram for HypnoNerd

A view controller’s view is not created until it needs to appear on the screen. This optimization is
called lazy loading, and it can often conserve memory and improve performance.
view controller中的view属性在需要显示到屏幕之前都不应当被创建,这个优化叫做懒加载,
它可以优化内存和提高性能。
There are two ways that a view controller can create its view hierarchy:
有2中方法可以创建view controller的视图树。
• programmatically, by overriding the UIViewController method loadView.
编程的方法,重写loadView方法。
• in Interface Builder, by loading a NIB file. (Recall that a NIB file is the file that gets loaded and
the XIB file is what you edit in Interface Builder.)
在interface builder中,加载一个NIB文件(回顾下,xib是在interface builder编辑的文件,nib文件是xib编译后生成的文件)
Because the view hierarchy of BNRHypnosisViewController consists of only one view, it is a good
candidate for being created programmatically.
因为BNRHypnosisViewController的视图树中只有一个视图,所以选择使用编程的方法
Creating a view programmatically
Open BNRHypnosisViewController.m and import the header file for BNRHypnosisView. Then override
loadView to create a screen-sized instance of BNRHypnosisView and set it as the view of the view
controller.
打开BNRHypnosisViewController.m, importBNRHypnosisView的头文件。然后重写Loadview方法,在这个方法中
创建一个屏幕大小的BNRHypnosisView实例,并将其赋值给view controller的view.
#import "BNRHypnosisViewController.h"
#import "BNRHypnosisView.h"
@implementation BNRHypnosisViewController
- (void)loadView
{
// Create a view
BNRHypnosisView *backgroundView = [[BNRHypnosisView alloc] init];
// Set it as *the* view of this view controller
self.view = backgroundView;
}
@end
When a view controller is created, its view property is nil. If a view controller is asked for its view and
its view is nil, then the view controller is sent the loadView message.
当一个view controller创建的时候,它的view属性时nil。如果要获得view controller的view,但view却是nil,
那view controller就会发送loadView消息。
The next step is to add the view hierarchy of the BNRHypnosisViewController to the application
window so that it will appear on screen to users.
下一步就是将view controller的视图树添加到window中,这样就可以显示在屏幕中。
Setting the root view controller
设置视图树的根节点
There is a convenient method for adding a view controller’s view hierarchy to the window: UIWindow’s
setRootViewController:. Setting a view controller as the rootViewController adds that view
controller’s view as a subview of the window. It also automatically resizes the view to be the same size
as the window.
有一个便利的方法去添加一个视图树到window中,调用UIWindow的setRootViewController.
它会将自动设置view controller中的view为window的subview,并调整view的大小为window的大小。
In BNRAppDelegate.m, import BNRHypnosisViewController.h at the top of the file. Then create an
instance of BNRHypnosisViewController and set it as the rootViewController of the window.
在BNRAppDelagate.m中,importBNRHyposisViewController.h, 创建一个BNRHypnosisViewController
的实例,并将它设置为window的rootViewController.
#import "BNRAppDelegate.h"
#import "BNRHypnosisViewController.h"
@implementation BNRAppDelegate
- (BOOL)application:(UIApplication *)application
didFinishLaunchingWithOptions:(NSDictionary *)launchOptions
{
self.window = [[UIWindow alloc] initWithFrame:[[UIScreen mainScreen] bounds]];
// Override point for customization after application launch
BNRHypnosisViewController *hvc = [[BNRHypnosisViewController alloc] init];
self.window.rootViewController = hvc;
self.window.backgroundColor = [UIColor whiteColor];
[self.window makeKeyAndVisible];
return YES;
}
The view of the root view controller appears at the start of the run of the application. Thus, the window
asks for it when setting the view controller as its rootViewController.
这样就可以将view controller中的view加入到window中,并在屏幕中显示了。
Given what you learned in Chapter 4, you can imagine what the core of setRootViewController:
looks like:
你可以想象到setRootViewController这个方法做了什么:

UIWindow中setViewController的功能首先获取controller的view, 由于这是view为nil,所以会调用controller的loadView方法;
接着设置view的大小为window的大小,最后设置window的rootViewController属性;
接着我们使用视图化工具创建viewController,它是一个闹钟,它在时间触发的时候会发送一个通知,即使应用不是处于当前,
用户也可以收到这个通知(这是由系统管理的);
subclass of NSObject.
In BNRReminderViewController.h, change the superclass to UIViewController.
@interface BNRReminderViewController : NSObject //删除这一行
@interface BNRReminderViewController : UIViewController
The BNRReminderViewController’s view will be a full-screen UIView with two subviews – an instance
of UIDatePicker and an instance of UIButton (Figure 6.7).

Figure 6.7 Object diagram of BNRReminderViewController’s view hierarchy
In addition, the view controller will have a datePicker property that points to the UIDatePicker
object. Finally, the view controller will be the target of the UIButton and must implement its action
method addReminder:.
另外,这个view controller有一个dataPicker的属性;
并且view controller也会监听UIButton,它的onClick回调是addReminder:
Because BNRReminderViewController’s view has subviews, it will be easier to create this view
controller’s view hierarchy in Interface Builder.
因为BNRReminderViewController有子view,所以比较简单的方法是在Interface Builder中创建布局.
Creating a view in Interface Builder
First, open BNRReminderViewController.m. Add a class extension for BNRReminderViewController
that includes a declaration of the datePicker property. Then add a simple implementation for
addReminder: that logs the picked date.
首先在BNRReminderViewController.m中的类扩展中,创建一个dataPicker的属性,接着实现一个简单的
addReminder方法:目前只是简单得现实选择的时间。
#import "BNRReminderViewController.h"
@interface BNRReminderViewController ()
@property (nonatomic, weak) IBOutlet UIDatePicker *datePicker;
@end
@implementation BNRReminderViewController
- (IBAction)addReminder:(id)sender
{
NSDate *date = self.datePicker.date;
NSLog(@"Setting a reminder for %@", date);
}
@end
Recall from Chapter 1 that the IBOutlet and IBAction keywords tell Xcode that you will be making
these connections in Interface Builder. The first step is creating a XIB file.
回顾第一章里的IBOutlet和IBAction关键字的作用,你可以在interface Builder中创建这些链接。
第一步是创建一个XIB文件。
Create a new XIB file by selecting File → New → File.... From the iOS section, select User Interface,
choose the Empty template, and click Next (Figure 6.8).
创建一个XIB文件的方法是选择File → New → File....,在ios的章节中,选择User Interface,
选择空模板,并点击Next.
Figure 6.8 Creating an empty XIB

Select iPhone from the pop-up menu that appears and click Next.
Name this file BNRReminderViewController.xib and save it. (It is important to name this and other
files as we tell you. Sometimes, people will name files something different as they are working through
this book. This is not a good idea. Many of the names are based on assumptions built into the iOS
SDK.)
给这个文件命名为BNRReminderViewController.xib 然后保存。(要注意xib文件的命名,最好和它的owner
一致,原因后面有介绍)
You now have a new file: BNRReminderViewController.xib. Select this file in the project navigator to
open it in Interface Builder.
在interface Builder中打开BNRReminderViewController.xib.
Creating view objects
In the object library (at the bottom of Xcode’s righthand pane), search for UIView. Drag a View object
onto the canvas. By default, it will be screen-sized, which is what you want.
Next, find a Date Picker and a Button in the library and drag them onto the view. Position and resize the
subviews as shown in Figure 6.9. Remember that you can double-click the button to change its title.
在object的库中(通常是在Xcode的右手),找到UIView,拖拽一个view对象到canvas里。默认,它是全屏的,当然
这也是符合我们的需求的。然后找到Date Picker和Button,拖拽到view中,并调整它们的大小和位置,双击
button可以改变它的标题。
Figure 6.9 BNRReminderViewController’s XIB file
In the document outline to the left of the canvas, you can see your view hierarchy: the View is the root
and the Picker and Button are its subviews.
在canvas左边,可以看到布局的摘要,可以看到view是根节点,button和date picker是view的子节点。
Figure 6.10 Hierarchy in BNRReminderViewController.xib
Loading a NIB file
When a view controller gets its view hierarchy by loading a NIB file, you do not override loadView.
当使用NIB文件创建布局时,不需要重写loadView方法。
The default implementation of loadView knows how to handle loading a NIB file.
loadView的默认实现知道怎么加载NIB文件。
The BNRReminderViewController does need to know which NIB file to load. You can do this in
UIViewController’s designated initializer:
BNRReminderViewController 需要去知道去加载哪个NIB文件,可以在UIViewController的构造函数中指定。
- (instancetype)initWithNibName:(NSString *)nibName bundle:(NSBundle *)nibBundle;
In this method, you pass the name of the NIB file to be loaded and the bundle in which to look for that file.
在这个方法中,传入NIB文件的名字和如何找到NIB文件的bundle.
In BNRAppDelegate.m, import BNRReminderViewController.h. Then create an instance
of BNRReminderViewController and tell it where to find its NIB file. Finally, make the
BNRReminderViewController object the rootViewController of the window.
BNRAppDelegate.m中创建一个BNRReminderViewController实例,并告诉它怎么去找到它的NIB文件。
最后设置BNRReminderViewController为window的rootViewController.
#import "BNRReminderViewController.h"
@implementation BNRAppDelegate
- (BOOL)application:(UIApplication *)application
didFinishLaunchingWithOptions:(NSDictionary *)launchOptions
{
self.window = [[UIWindow alloc] initWithFrame:[[UIScreen mainScreen] bounds]];
// Override point for customization after application launch
// This line will generate a warning, ignore it for now
BNRHypnosisViewController *hvc = [[BNRHypnosisViewController alloc] init];
// This will get a pointer to an object that represents the app bundle
NSBundle *appBundle = [NSBundle mainBundle];
// Look in the appBundle for the file BNRReminderViewController.xib
BNRReminderViewController *rvc =
[[BNRReminderViewController alloc] initWithNibName:@"BNRReminderViewController" bundle:appBundle];
self.window.rootViewController = hvc; //删除这一行self.window.rootViewController = rvc;
self.window.backgroundColor = [UIColor whiteColor];
[self.window makeKeyAndVisible];
return YES;
}
The bundle that you are getting by sending the mainBundle message is the application bundle. This
bundle is a directory on the filesystem that contains the application’s executable as well as resources
(like NIB files) that the executable will use. This is where BNRReminderViewController.xib will be.
bundle对象时通过给NSBundle发送mainBundle消息取得的,它代表应用的bundle。
bundle是文件系统中的一个目录,它包含了一些资源,比如NIB文件。
You have created and configured the objects in the view hierarchy. You have written an initializer for
the view controller so that it can find and load the correct NIB file. You have set the view controller to
be the root view controller to add it to the window’s view hierarchy. But if you build and run now, the
application will crash. Try it and see. When the application crashes, notice the exception in the console:
'-[UIViewController _loadViewFromNibNamed:bundle:] loaded the
"BNRReminderViewController" nib but the view outlet was not set.'
你已经创建了布局,已经调用initWithNibName对view controller进行布局设置,已经将view controller设置为
window的root controller。 万事俱备了,但是运行后却出现断错误,为什么? (提示view outlet未设置)
When the corresponding NIB file was loaded, these objects were instantiated. But you have not made
connections to link the instantiated objects with the BNRReminderViewController in the running
application. This includes the view controller’s view property. Thus, when the view controller tries to
get its view added to the screen, an exception is thrown because view is nil.
当NIB文件加载后,它里面的对象都被实例化了。但是你还没有初始化BNRReminderViewController中和布局相关的对象,
比如view属性。(类似于android要通过findViewById) 所以程序运行后,会出现断错误,因为view还是Nil。
How can you associate a view object created in a XIB file with a view controller in a running
application? This is where the File's Owner object comes in.
如何对view属性进行初始化? 这就需要XIB的Owner对象
Connecting to File's Owner
The File's Owner object is a placeholder – it is a hole intentionally left in the XIB file. Loading a NIB,
then, is a two-part process: instantiate all of the objects archived in the XIB and then drop the object
that is loading the NIB into the File's Owner hole and establish the prepared connections (Figure 6.11).
XIB文件的owner只是一个占位符。加载一个XIB文件分为2步:首先实例化XIB文件中的对象,给它设置一个
Owner hole.(用途?) 最后将加载这个NIB的对象放入到这个Owner hole中。

为什么需要file owner, 是为了使用nib初始化viewcontroller的view,在nib加载过程中,并加加载nib的对象指定为它的owner,
这是就相当于替换file owner为view controller,并设定controller的view的值。
So if you want to connect to the object that loads the NIB at runtime, you connect to the File's Owner
when working in the XIB. The first step is to tell the XIB file that the File's Owner is going to be an
instance of BNRReminderViewController.
第一步是告示xib文件,文件的Owner即将为一个BNRReminderViewController对象。
Reopen BNRReminderViewController.xib. Select the File's Owner object in the document outline.
重新打开BNRReminderViewController.xib. 在文档的概述中选择文件的Owner对象。
Then click the tab in the inspector area to show the identity inspector. Change the Class for File's
Owner to BNRReminderViewController (Figure 6.12).
设置xib的owner为BNRReminderViewController
Figure 6.12 Identity inspector for File's Owner
Now you can make the missing connections. Let’s start with the view outlet.
现在你就可以在BNRReminderViewController和xib文件建立连接关系了。
In the dock, Control-click File's Owner to bring up the panel of available connections. Drag from view
to the UIView object in the canvas to set the view outlet to point at the UIView (Figure 6.13).
在dock中,Control-click文件的Owner可以看到目前可用的连接,将其中view拖拽到xib的UIView对象,
这样它们就建立了连接关系。(outlet)
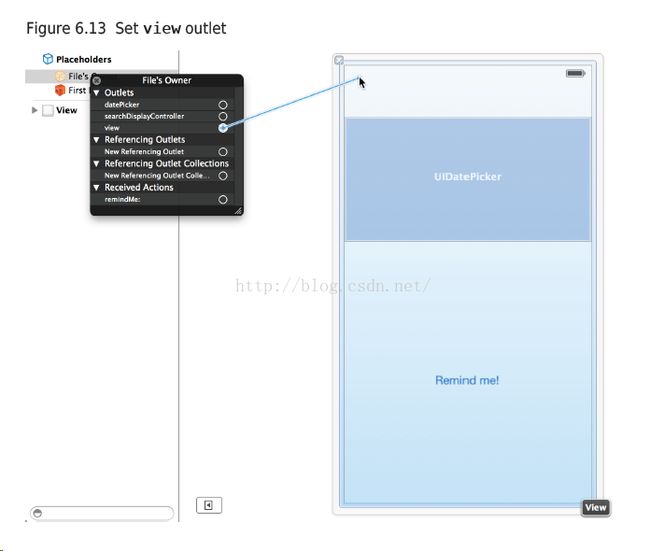
这一步是设置view controller的view;
Now when the BNRReminderViewController loads the NIB file, it will be able to load its view. Build
and run the application to confirm that the BNRReminderViewController’s view that you created in
BNRReminderViewController.xib now appears and that the application no longer crashes right away.
这样这个view属性就可以初始化了(不用像android一样,调用findViewById),程序也不会crash。
Finish by making the remaining connections (Figure 6.14). Right-click to reveal the File's Owner’s
outlets and drag to connect the datePicker outlet to the UIDatePicker. Then Control-drag from the
UIButton in the canvas to the File's Owner and select addReminder: to set the action.
同样建立dataPicker属性和UIDatePicker之间的连接,并建立addReminder和UIButton之间的action连接
Build and run the application. Select a time, tap the Remind Me button, and check the console for your
reminder date. Later in the chapter, you will update addReminder: to register a local notification.
这样你就可以在点击button后显示提示的日期了。以后的章节中,我们还会去注册一个本地的通知。
Earlier in BNRReminderViewController.m, you declared the datePicker outlet as weak. Declaring
outlets as weak is a convention from earlier versions of iOS. In these versions, a view controller’s
view was automatically destroyed any time that system memory was low and then was recreated later
if needed. Ensuring that the view controller only had weak ownership of the subviews meant that
destroying the view also destroyed all of its subviews and avoided memory leaks.
在前面的BNRReminderViewController.m中,声明了一个weak的dataPicker。 在ios中,view controller
中的view会自动在系统内存不足的时候,被自动销毁,然后会在需要的时候被创建。要注意的是,view controller
只是拥有子view的弱引用(已经对最顶层的view强引用,所以对view之下的子view弱引用,避免内存无法回收),就是说,顶层的view被回收后,
那么所有的view hierarchy中的view对象都会被销毁。
UITabBarController
View controllers become more interesting when the user’s actions can cause another view controller
to be presented. In this book, you will learn a number of ways to present view controllers. You
will start with a UITabBarController that will allow the user to swap between instances of
BNRHypnosisViewController and BNRReminderViewController.
在本书中,有很多方法可以显示多个view controller。现在,使用UITabBarController在BNRHypnosisViewController
和BNRReminderViewController之间切换。
UITabBarController keeps an array of view controllers. It also maintains a tab bar at the bottom of the
screen with a tab for each view controller in this array. Tapping on a tab results in the presentation of
the view of the view controller associated with that tab.
UITabBarController保存有view controller的列表。 它也会在屏幕的下方显示一个tab-bar,用于控制view
controller的显示。
In BNRAppDelegate.m, create an instance of UITabBarController, give it both view controllers, and
install it as the rootViewController of the window.
- (BOOL)application:(UIApplication *)application
didFinishLaunchingWithOptions:(NSDictionary *)launchOptions
{
self.window = [[UIWindow alloc] initWithFrame:[[UIScreen mainScreen] bounds]];
// Override point for customization after application launch
BNRHypnosisViewController *hvc = [[BNRHypnosisViewController alloc] init];
// This will get a pointer to an object that represents the app bundle
NSBundle *appBundle = [NSBundle mainBundle];
// Look in the appBundle for the file BNRReminderViewController.xib
BNRReminderViewController *rvc = [[BNRReminderViewController alloc]
initWithNibName:@"BNRReminderViewController"
bundle:appBundle];
UITabBarController *tabBarController = [[UITabBarController alloc] init];
tabBarController.viewControllers = @[hvc, rvc]; //这一行是关键
self.window.rootViewController = rvc; //删除这一行
self.window.rootViewController = tabBarController;
self.window.backgroundColor = [UIColor whiteColor];
[self.window makeKeyAndVisible];
return YES;
}
Build and run the application. The bar at the bottom is actually two tabs. Tap on the left and right sides
of the tab bar to switch between the two view controllers. In the next section, you will create tab bar
items to make the two tabs obvious.
这样可以实现使用tab切换view controller了。
UITabBarController is itself a subclass of UIViewController. A UITabBarController’s view is a
UIView with two subviews: the tab bar and the view of the selected view controller (Figure 6.15).
UITabBarController 继承于UIViewController,这个controller的view是一个UIView包含有2个子view:
tab-bar和一个已选定的view controller的view。
Tab bar items
Each tab on the tab bar can display a title and an image. Each view controller maintains a tabBarItem
property for this purpose. When a view controller is contained by a UITabBarController, its tab bar
item appears in the tab bar. Figure 6.16 shows an example of this relationship in the iPhone’s Phone
application.
在tab-bar上的每个tab都可以显示一个标题和图片,每个view controller对对应一个tabBarItem property;
当一个view controller添加到UITabBarController的时候,对应的tab就会在tab-bar上显示。
First, you need to add a few files to your project that will be the images for the tab bar items. Open the
Asset Catalog by opening Images.xcassets in the project navigator. Then, find Hypno.png, Time.png,
[email protected], and [email protected] in the Resources directory of the file that you downloaded earlier
(http://www.bignerdranch.com/solutions/iOSProgramming4ed.zip). Drag these files into the
images set list on the left side of the Asset Catalog.
首先添加一些tab-bar items需要的图片,放入到Images.xcassets的目录中。
In BNRHypnosisViewController.m, override UIViewController’s designated initializer,
initWithNibName:bundle:, to get and set a tab bar item for BNRHypnosisViewController.
重载BNRHypnosisViewController.m的默认构造函数initWithNibName:bundle:,设置和tab相关的信息。
- (instancetype)initWithNibName:(NSString *)nibNameOrNil
bundle:(NSBundle *)nibBundleOrNil
{
self = [super initWithNibName:nibNameOrNil
bundle:nibBundleOrNil];
if (self) { //直接在view controller设置tab相关信息? title和图片? 这样不是耦合了吗?
// Set the tab bar item's title
self.tabBarItem.title = @"Hypnotize"; //viewController有tabBarItem属性?
// Create a UIImage from a file
// This will use [email protected] on retina display devices
UIImage *i = [UIImage imageNamed:@"Hypno.png"];
// Put that image on the tab bar item
self.tabBarItem.image = i;
}
return self;
}
In BNRReminderViewController.m, do the same thing.
- (instancetype)initWithNibName:(NSString *)nibNameOrNil
bundle:(NSBundle *)nibBundleOrNil
{
self = [super initWithNibName:nibNameOrNil
bundle:nibBundleOrNil];
if (self) {
// Get the tab bar item
UITabBarItem *tbi = self.tabBarItem;
// Give it a label
tbi.title = @"Reminder";
// Give it an image
UIImage *i = [UIImage imageNamed:@"Time.png"];
tbi.image = i;
}
return self;
}
Build and run the application, and you will see helpful images and titles in the tab bar. (Figure 6.17).
Figure 6.17 Tab bar items with labels and icons
UIViewController Initializers
When you created a tab bar item for BNRHypnosisViewController, you overrode
initWithNibName:bundle:. However, when you initialized the BNRHypnosisViewController
instance in BNRAppDelegate.m, you sent it init and still got the tab bar items. This is because
initWithNibName:bundle: is the designated initializer of UIViewController. Sending init to a view
controller calls initWithNibName:bundle: and passes nil for both arguments.
当你为BNRHypnosisViewController创建tab bar item的时候,跳过了initWithNibName:bundle:. 方法;但是你在BNRAppDelegate.m初始化
BNRHypnosisViewController对象的时候,虽然只调用了它的init方法,却依然调用initWithNibName:bundle:. ;这是因为这个方法是UIViewController的
命名构造函数。发送init消息给controller对象,最终也会调用initWithNibName:bundle:. ,并且2个参数的值都是nil。
BNRHypnosisViewController does not use a NIB file to create its view, so the filename parameter is
irrelevant. What happens if you send init to a view controller that does use a NIB file? Let’s find out.
BNRReminderViewController 如果调用initWithNibName:bundle:. ,并以nil为参数,会发生什么?
In BNRAppDelegate.m, change your code to initialize the BNRReminderViewController with init
rather than initWithNibName:bundle:.
BNRHypnosisViewController *hvc = [[BNRHypnosisViewController alloc] init];
//从这里开始删除代码
// This will get a pointer to an object that represents the app bundle
NSBundle *appBundle = [NSBundle mainBundle];
// Look in the appBundle for the file BNRReminderViewController.xib
BNRReminderViewController *rvc =
[[BNRReminderViewController alloc] initWithNibName:@"BNRReminderViewController"
bundle:appBundle];
//结束删除代码
BNRReminderViewController *rvc = [[BNRReminderViewController alloc] init];
UITabBarController *tabBarController = [[UITabBarController alloc] init];
Build and run the application, and it will work just as before. When a view controller is initialized
with nil as its NIB name, it searches for a NIB file with the name of the class. Passing nil
as the bundle means that the view controller will look in the main application bundle. Thus,
BNRReminderViewController will still search for BNRReminderViewController.xib in the main
bundle.
虽然没有显式调用initWithNibName:,但是运行还是正常的,因为init默认调用initWithNibName:,
当我们的参数是Nil的时候,它会根据文件查找相关的nil文件,传送nil的bundle参数也会使用系统
默认的bundle,因此显示效果还是和之前一样的!
This is why we warned you earlier about sticking to the given names when naming files. If you are
creating a FidoViewController class that fetches its view from a NIB file, then the only appropriate
name for that XIB file is FidoViewController.xib.
这也就是前面所说的nil的名字要和view controller的名字一样的原因。(但不推荐这样做,因为代码很难读)
Adding a Local Notification
Now you are going to implement the reminder feature using a local notification. A local notification is
a way for an application to alert the user even when the application is not currently running.
现在我们学习如何使用本地通知创建一个reminder. 本地通知可以在程序不是当前运行的时候也能通知用户。
(An application can also use push notifications that are implemented using a backend server. For more
about push notifications, read Apple’s Local and Push Notification Programming Guide.)
(也可以使用push notifications的机制创建有后端server的通知)
Getting a local notification to display is easy. You create a UILocalNotification and give it some
text and a date. Then you schedule the notification with the shared application – the single instance of
UIApplication.
创建一个本地的通知很简单,创建一个UILocalNotification,并设置text和date,然后调用
[[UIApplication sharedApplication] scheduleLocalNotification:note]就可以显示Note了。
Update the addReminder: method to do this:
- (IBAction)addReminder:(id)sender
{
NSDate *date = self.datePicker.date;
NSLog(@"Setting a reminder for %@", date);
UILocalNotification *note = [[UILocalNotification alloc] init];
note.alertBody = @"Hypnotize me!";
note.fireDate = date;
[[UIApplication sharedApplication] scheduleLocalNotification:note];
}
Build and run the application. Use the date picker to select a time in the very near future and tap the
Remind Me button. To see the notification, HypnoNerd needs to not be in the foreground. Press the
Home button at the bottom of the device or select Hardware → Home in the simulator. When the time
that you picked is reached, a notification banner will appear at the top of the screen (Figure 6.18).
编译并运行了,即使将应用放到后台,也能在时间到达的时候收到本地通知。(APP完全退出能收到吗?)
There is an issue: the user can select a time in the past. It would be nice if the date picker did not allow
this. You will take care of this shortly.
Loaded and Appearing Views
Now that you have two view controllers, the lazy loading of views that you learned about earlier
becomes more important.
要注意的你现在有了2个view controllers
When the application launches, the tab bar controller defaults to loading the view of the
first view controller in its array, the BNRHypnosisViewController. This means that the
BNRReminderViewController’s view is not needed and will only be needed when (or if) the user taps
the tab to see it.
当应用启动时,tab bar controller会默认加载数组中的第一个view controller的view:BNRHypnosisViewController.
也就是说BNRReminderViewController只会在用户点击tab之后加载。
You can test this behavior for yourself – when a view controller finishes loading its view, it is sent the
message viewDidLoad.
你可以进行测试,当view controller加载完它的view时候,会调用viewDidLoad。
In BNRHypnosisViewController.m, override viewDidLoad to log a statement to the console.
- (void)viewDidLoad
{
// Always call the super implementation of viewDidLoad
[super viewDidLoad];
NSLog(@"BNRHypnosisViewController loaded its view.");
}
In BNRReminderViewController.m, override the same method.
- (void)viewDidLoad
{
[super viewDidLoad];
NSLog(@"BNRReminderViewController loaded its view.");
}
Build and run the application. The console reports that BNRHypnosisViewController loaded its view
right away. Tap BNRReminderViewController’s tab, and the console will report that its view is now
loaded. At this point, both views have been loaded, so switching between the tabs now will no longer
trigger the viewDidLoad method. (Try it and see.)
重新编译并运行,你可以看到相关的log。 当用户点击第二个tab后,2个都已经加载了,这时候再切换就不会调用
viewDidLoad]了。(如果长期不使用,view controller会回收吗?)
To preserve the benefits of lazy loading, you should never access the view property of a view controller
in initWithNibName:bundle:. Asking for the view in the initializer will cause the view controller to
load its view prematurely.
为了拥有懒加载的功能,在view controller的initWithNibName:bundle:. 中不要去访问view属性,不然就会
调用loadView函数。
Accessing subviews
访问子view
Often, you will want to do some extra initialization of the subviews that are defined in the XIB file
before they appear to the user. However, you cannot do this in the view controller’s initializer because
the NIB file has not yet been loaded. If you try, any pointers that the view controller declares that will
eventually point to subviews will be pointing to nil. The compiler will not complain if you send a
message to one of these pointers, but whatever you intended to happen to that view object will not
happen.
有时候,你需要在视图显示之前,对在xib中定义的子view做一些格外的初始化工作。但你却无法在
controller的构造函数中完成,因为这时NIB文件还没有被加载。
如果你去做的时候,你会发现你所有的关于view的指针(outlet)都是nil。 编译器不会报错,但你想要完成的功能都无法实现。
So where can you access a subview? There are two main options, depending on what you need to
do. The first option is the viewDidLoad method that you overrode to spot lazy loading. The view
controller receives this message after the view controller’s NIB file is loaded, at which point all of the
view controller’s pointers will be pointing to the appropriate objects. The second option is another
UIViewController method viewWillAppear:. The view controller receives this message just before its
view is added to the window.
那么你可以在哪里加载呢? 一种是在viewDidLoad中,一种是在viewWillAppear:. 中,取决于你想要达到的效果;
第一种只会被调用一次,在view加载完成的时候调用;另外一种是在每次视图显示的时候都会被调用。
What is the difference? You override viewDidLoad if the configuration only needs to be done once
during the run of the app. You override viewWillAppear: if you need the configuration to be done and
redone every time the view controller appears on screen.
There is a subview of the BNRReminderViewController’s view that needs some extra work – the date
picker. Currently, users can pick reminder times in the past. You are going to configure the date picker
to only allow users to select a time that is at least 60 seconds in the future.
我们需要在BNRReminderViewController显示之前,对它的data picker视图进行一些初始化工作,以保证它的最早时间
是当前的时间之后的60秒。
This is something that will need to be done every time the view appears, not just once after the view is
loaded, so you are going to override viewWillAppear:.
这个效果明显是每次显示的时候都需要设定,所以我们重写viewWillAppear:.
In BNRReminderViewController.m, override viewWillAppear: to set the minimumDate of the date
picker.
- (void)viewWillAppear:(BOOL)animated
{
[super viewWillAppear:animated];
self.datePicker.minimumDate = [NSDate dateWithTimeIntervalSinceNow:60];
}
Build and run the application. Select the Reminder tab and confirm that the date picker will only allow
the user to select a date in the future.
重新编译并运行程序, 这样你在datePicker中只能选择未来的时间了。
If you had overridden viewDidLoad instead, then datePicker’s minimumDate would be set to 60
seconds after the view was initially loaded and would likely remain unchanged for the entire run of
the application. If the app ran for very long, then users would soon be able to select times in the past.
Sometimes a view controller’s view may get destroyed and reloaded, but that is not the typical behavior
on newer devices.
如果你重写的是viewDidLoad,那么你只能在第一次显示的时候是正确的,以后如果你停留在其他页面比较长的时间,
回到这个页面时,显示的时间就会是错误的。 虽然有时候view也会被回收,但这样在新的手机上,设备比较好的手机
上,是很难出现的。
Wondering about the animated flag on this method? It indicates whether the appearance or
disappearance transition is animated or not. In the case of UITabBarController, the transition is not
animated. Later in the book, in Chapter 10, you will use UINavigationController, which animates
view controllers being pushed on and off screen.
注意在这个方法中的animated参数,它表示这个view显示或者消失的时候是否有动画。目前我们不需要,在第10章中,
我们会使用UINavigationController,到那时就会在view controller显示或者消失的时候添加动画。
Interacting with View Controllers and Their Views
Let’s look at some methods that are called during the lifecycle of a view controller and its view. Some
of these methods you have already seen, and some are new:
让我们看看view controller以及其视图的生命周期。
• application:didFinishLaunchingWithOptions: is where you instantiate and set an
application’s root view controller.
This method gets called exactly once when the application has launched. Even if you go to
another app and come back, this method does not get called again. If you reboot your phone and
start the app again, application:didFinishLaunchingWithOptions: will get called again.
application:didFinishLaunchingWithOptions: 在这里你实例化一个view controller并设置为应用的
root view controller;
这个回调只是在应用初始启动的时候运行(这点和android类似;创建进程?)
• initWithNibName:bundle: is the designated initializer for UIViewController.
When a view controller instance is created, its initWithNibName:bundle: gets called once. Note
that in some apps, you may end up creating several instances of the same view controller class.
This method will get called once on each as it is created.
initWithNibName:bundle: 是UIViewController默认构造函数,它是在每次创建UIViewController.的时候
被调用,要注意的是一个应用可能会创建多个UIViewController.实例,它在当UIViewController新创建的时候都会被调用。
• loadView: is overridden to create a view controller’s view programmatically.
loadView 用于代码的方式创建view controller的view树,在访问ui viewcontroller中view属性的时候
• viewDidLoad can be overridden to configure views created by loading a NIB file. This method
gets called after the view of a view controller is created.
viewDidLoad可以被加载,用于使用NIB的场景中需要对view进行一些定制的时候,它在这个文件加载完成的时候调用,可以重写方法配置view。
• viewWillAppear: can be overridden to configure views created by loading a NIB file.
This method and viewDidAppear: will get called every time your view controller is moved on
screen. viewWillDisappear: and viewDidDisappear: will get called every time your view
controller is moved offscreen. So if you launch the app you are working on and hop back and
forth between Hypnosis and Reminder, BNRReminderViewController’s viewDidLoad method will
be called once, but viewWillAppear: will be called dozens of times.
viewWillAppear: 和viewDidDisappear: 在每次view显示或者消失的时候调用。 (类似于android的onPause onResume)
Bronze Challenge: Another Tab
Give the UITabBarController a third tab that presents a quiz to the user. (Hint: you can reuse files
from your Quiz project for this challenge.)
课外作业: 给UITabBarController 添加第三个tab:quiz;
Silver Challenge: Controller Logic
Add a UISegmentedControl to BNRHypnosisViewController’s view with segments for Red,
Green, and Blue. When the user taps the segmented control, change the color of the circles in
BNRHypnosisView. Be sure to create a copy of the project and work from that copy while attempting
this challenge.
白银作业:控制逻辑
深入一步:介绍键值对。
通过键值对的方法访问对象的属性或者成员变量。
When a NIB file is read in, the outlets are set using a mechanism called Key-value coding (or KVC).
当NIB文件读取后,outlets使用kvc的机制进行设置。
Key-value coding is a set of methods defined in NSObject that enable you to set and get the values of
properties by name. Here are two of the methods:
kvc编程模式是值在NSObject有一系列的函数通过属性名字的方法去访问属性。
- (id)valueForKey:(NSString *)k;
- (void)setValue:(id)v forKey:(NSString *)k;
valueForKey: is a universal getter method. You can ask any object for the value of its fido property
like this:
id currentFido = [selectedObj valueForKey:@"fido"];
If there is a fido method (the fido-specific getter), it will be called and the returned value will be used.
If there is no fido method, the system will go looking for an instance variable named _fido or fido. If
either instance variable exists, the value of the instance variable will be used. If neither an accessor nor
an instance variable exists, an exception is thrown.
使用valueForKey:取得键的值,如果有相关的getter会调用;如果没有,则会去取_fido或者fido成员变量,
如果没有则会报异常。
setValue:forKey: is a universal setter method. It lets you set the value of an object’s fido property
like this:
[selectedObject setValue:userChoice forKey:@"fido"];
If there is a setFido: method, it will be called. If there is no such method, the system will go looking
for a variable named _fido or fido and set the value of that variable directly. If neither the accessor
nor either instance variable exists, an exception will be thrown.
setValue:forKey: 来设置键的值,它的查找规则和get函数相同。(有成员变量但没有set方法也会设置值?)
When the NIB file is being loaded, the outlets are set using setValue:forKey:. Thus, if you set
an outlet rex for an object in Interface Builder, that object must have an accessor called setRex:,
an instance variable called rex, or an instance variable called _rex. If you have none of those, an
exception will be thrown when the NIB file is read in at runtime. The error will look like this:
[<BNRSunsetViewController 0x68c0740> setValue:forUndefinedKey:]:
this class is not key value coding-compliant for the key rex.'
当一个NIB文件加载后,所有的outlet都已经通过调用setValue:forKey:. 设置,也就是说,如果你
在interface builder中设置了一个rex的outlet,那么你就需要声明一个setRex的方法,或者有一个实例
变量rex或者_rex(只有实例变量没有setRex也可以吗?) 否则就会报异常错误。
Typically, a developer sees this error when he creates an outlet property, connects it in Interface Builder,
and then renames the property.
一个有经验的编程人员看到这个错误就会创建一个outlet的property,并和Interface Builder建立连接,
然后改变property的名字?
The most important moral of this section: Using the accessor method naming conventions is more
than just something nice you do for other people who might read your code. The system expects that a
method called setFido: is the setter for the fido property. The system expects that the method fido is
the getter for the fido property. Bad things happen when you violate the naming conventions.
这一节最重要的一点是: 要有好的命名规则。property的get/set都要符合命名规范。
Let me give you an example. When I was a young buck, I created a controller class with an outlet
called clock that pointed to a clock-like view. I also had a button that triggered an action method (in
that same controller) that went out to the Internet, got the correct time, and updated the clock-like view.
当我还是初学者的时候,我曾经因为命名问题犯过错;我创建了一个名为clock的outlet,并将其指向一个类似clock的
视图,同时我也创建了一个action,当点击button的时候,触发这个action,从网络取得正确的时间,并设置clock视图。
I, being dumb, named this action method thusly:
- (IBAction)setClock:(id)sender;
但是我犯错了,将action的命名为setClock。
This generated the strangest bug: When the NIB file was loaded, the action method was triggered
immediately. And the clock outlet never got set properly, even though I had connected it correctly in
the NIB file. Why? The system was trying to use my setClock: action method as if it were an accessor
for setting my clock outlet.
这样就出现了一个严重的问题,当nib被加载的时候,就会去调用SetClock方法,因为当Nib初始化的时候会使用
KVC对属性进行初始化;而这个set方法会和我定义的action方法一致。 所以代码要符合命名规范。
I renamed the method updateClock:, and everything worked perfectly – but that was four hours of my
life that I will never get back. Following naming conventions is really important for iOS developers.
For the More Curious: Retina Display
With the release of iPhone 4, Apple introduced the Retina display for the iPhone and iPod touch. The
Retina display has much higher resolution – 640x1136 pixels (on a 4-inch display) and 640x960 pixels
(on a 3.5-inch display) compared to 320x480 pixels on earlier devices. Let’s look at what you should
do to make graphics look their best on both displays.
anything; the same code will render as crisply as the device allows. However, if you draw using Core
Graphics functions, these graphics will appear differently on different devices. In Core Graphics, also
called Quartz, lines, curves, text, etc. are described in terms of points. On a non-Retina display, a point
is 1x1 pixel. On a Retina display, a point is 2x2 pixels (Figure 6.19).
Figure 6.19 Rendering to different resolutions
Given these differences, bitmap images (like JPEG or PNG files) will be unattractive if the image is
not tailored to the device’s screen type. Say your application includes a small image of 25x25 pixels. If
this image is displayed on a Retina display, then the image must be stretched to cover an area of 50x50
pixels. At this point, the system does a type of averaging called anti-aliasing to keep the image from
looking jagged. The result is an image that is not jagged – but it is fuzzy (Figure 6.20).
Figure 6.20 Fuzziness from stretching an image
You could use a larger file instead, but the averaging would then cause problems in the other direction
when the image is shrunk for a non-Retina display. The only solution is to bundle two image files with
your application: one at a pixel resolution equal to the number of points on the screen for non-Retina
displays and one twice that size in pixels for Retina displays.
你可以使用更大的图片,但有可能会在非ritina屏幕上出现显示的问题,解决的方法是在不同的分辨率对应不同的图片
Fortunately, you do not have to write any extra code to handle which image gets loaded on which
device. All you have to do is suffix the higher-resolution image with @2x. Then, when you use
UIImage’s imageNamed: method to load the image, this method looks in the bundle and gets the file that
is appropriate for the particular device.
幸运的是,你不需要在代码中指定图片,而可以在高分辨率的图片上加@2x前缀,这样系统就可以根据不同的分辨率加载不同的图片了。
(类似于android,不同的分辨率的图片放置在不同的目录中)