Android Fragment Demo(适合初学者)
Android3.0以后引进了新的控件Fragment(碎片),Fragment较Activity,使Android的布局显得更灵活。一方面使用Fragment的时候,不必像Activity每个都需要在Manifest.xml文件中配置,另一方面可以在Activity中动态的添加Fragment并且,一个Fragment可以重复使用。
下面总结的这个Demo适合初学Fragment的程序员使用,讲到了静态添加Fragment和动态添加Fragment两种Fragment的使用方式。
一、静态添加Fragment:
静态效果实现:


布局文件activity_main:
这种方法直接将两个Fragment写在该布局文件中属性name中。
<LinearLayout xmlns:android="http://schemas.android.com/apk/res/android"
    xmlns:tools="http://schemas.android.com/tools"
    android:layout_width="match_parent"
    android:layout_height="match_parent"
    android:paddingBottom="@dimen/activity_vertical_margin"
    android:paddingLeft="@dimen/activity_horizontal_margin"
    android:paddingRight="@dimen/activity_horizontal_margin"
    android:paddingTop="@dimen/activity_vertical_margin"
    tools:context=".MainActivity" >

    <fragment
        android:id="@+id/fragment01"
        android:name="com.fragmentdemo.Fragment01"
        android:layout_width="0dp"
        android:layout_height="match_parent"
        android:layout_weight="1"
        />
    <fragment
        android:id="@+id/fragment02"
        android:name="com.fragmentdemo.Fragment02"
        android:layout_width="0dp"
        android:layout_height="match_parent"
        android:layout_weight="1"/>

</LinearLayout>
布局文件fragment01:
<?xml version="1.0" encoding="utf-8"?>
<LinearLayout xmlns:android="http://schemas.android.com/apk/res/android"
    android:layout_width="match_parent"
    android:layout_height="match_parent"
    android:background="@android:color/holo_blue_dark"
    android:gravity="center"
    android:orientation="vertical" >

    <TextView
        android:layout_width="wrap_content"
        android:layout_height="wrap_content"
        android:text="fragment01" />

</LinearLayout>
布局文件fragment02:
<?xml version="1.0" encoding="utf-8"?>
<LinearLayout xmlns:android="http://schemas.android.com/apk/res/android"
    android:layout_width="match_parent"
    android:layout_height="match_parent"
    android:background="@android:color/holo_green_light"
    android:gravity="center"
    android:orientation="vertical" >

    <TextView
        android:layout_width="wrap_content"
        android:layout_height="wrap_content"
        android:text="fragment02" />

</LinearLayout>
代码:
MainActivity:
package com.fragmentdemo;

import android.os.Bundle;
import android.app.Activity;
import android.view.Menu;
/**
 * 静态创建Fragment
 *
 */
public class MainActivity extends Activity {

	@Override
	protected void onCreate(Bundle savedInstanceState) {
		super.onCreate(savedInstanceState);
		setContentView(R.layout.activity_main);
	}

}
Fragment01:
package com.fragmentdemo;

import android.app.Fragment;
import android.os.Bundle;
import android.view.LayoutInflater;
import android.view.View;
import android.view.ViewGroup;

public class Fragment01 extends Fragment {

    @Override
    public View onCreateView(LayoutInflater inflater, ViewGroup container,
            Bundle savedInstanceState) {
        return inflater.inflate(R.layout.fragment01, null);
    }

}
Fragment02:
package com.fragmentdemo;

import android.app.Fragment;
import android.os.Bundle;
import android.view.LayoutInflater;
import android.view.View;
import android.view.ViewGroup;

public class Fragment02 extends Fragment {

    @Override
    public View onCreateView(LayoutInflater inflater, ViewGroup container,
            Bundle savedInstanceState) {
        return inflater.inflate(R.layout.fragment02, null);
    }

}
二、动态添加Fragment:
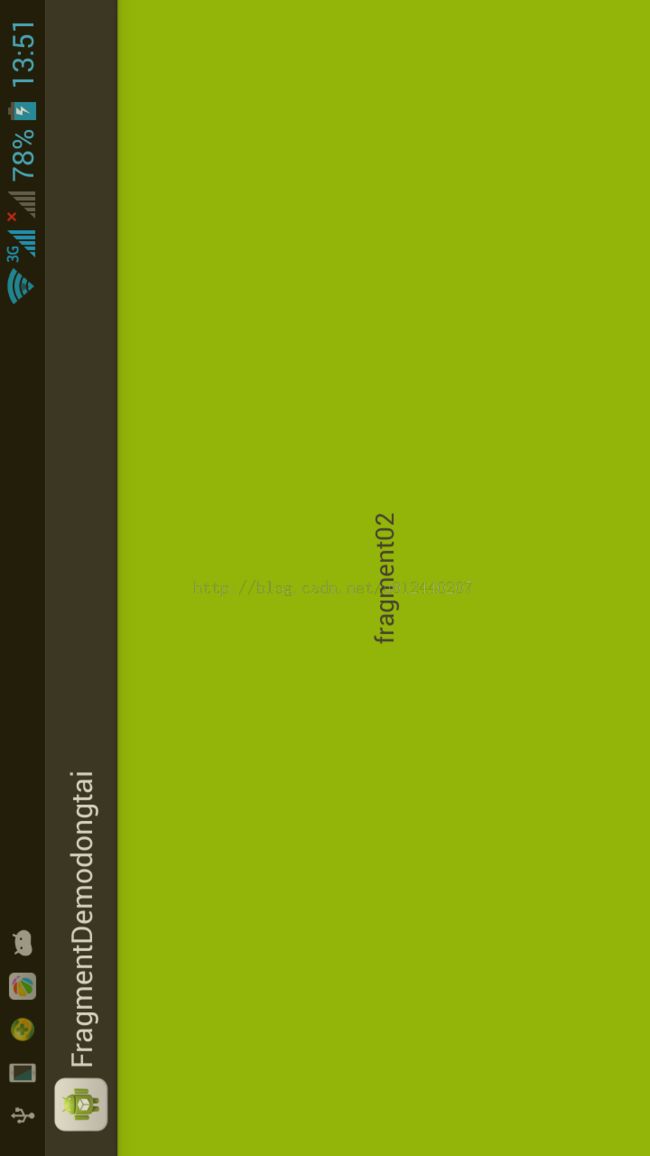
动态添加Fragment可以比较灵活的添加删除Fragment,横竖屏使用了不同的Fragment。
效果实现(竖屏Fragment01):

效果实现(横屏Fragment02):
布局文件:activity_main:
<LinearLayout xmlns:android="http://schemas.android.com/apk/res/android"
    xmlns:tools="http://schemas.android.com/tools"
    android:layout_width="match_parent"
    android:layout_height="match_parent"
    android:paddingBottom="@dimen/activity_vertical_margin"
    android:paddingLeft="@dimen/activity_horizontal_margin"
    android:paddingRight="@dimen/activity_horizontal_margin"
    android:paddingTop="@dimen/activity_vertical_margin"
    tools:context=".MainActivity" >

</LinearLayout>
fragment01:
<?xml version="1.0" encoding="utf-8"?>
<LinearLayout xmlns:android="http://schemas.android.com/apk/res/android"
    android:layout_width="match_parent"
    android:layout_height="match_parent"
    android:orientation="vertical"
    android:gravity="center"
    android:background="@android:color/holo_blue_dark">

    <TextView
        android:text="fragment01"
        android:layout_width="wrap_content"
        android:layout_height="wrap_content"
        />

</LinearLayout>
fragment02:
<?xml version="1.0" encoding="utf-8"?>
<LinearLayout xmlns:android="http://schemas.android.com/apk/res/android"
    android:layout_width="match_parent"
    android:layout_height="match_parent"
    android:orientation="vertical"
    android:gravity="center"
    android:background="@android:color/holo_green_light">

    <TextView
        android:text="fragment02"
        android:layout_width="wrap_content"
        android:layout_height="wrap_content"
        />

</LinearLayout>
代码:
MainActivity:
package com.fragmentdemodongtai;

import android.app.Activity;
import android.app.FragmentManager;
import android.app.FragmentTransaction;
import android.os.Bundle;

public class MainActivity extends Activity {

	@Override
	protected void onCreate(Bundle savedInstanceState) {
		super.onCreate(savedInstanceState);
		setContentView(R.layout.activity_main);

		int width = getWindowManager().getDefaultDisplay().getWidth();
		int height = getWindowManager().getDefaultDisplay().getHeight();

		Fragment01 fragment01 = new Fragment01();
		Fragment02 fragment02 = new Fragment02();

		FragmentManager fm = getFragmentManager();
		FragmentTransaction ft = fm.beginTransaction();
		if (width < height) {
			//竖屏
			ft.replace(android.R.id.content,fragment01);

		}else {
			//横屏
			ft.replace(android.R.id.content, fragment02);
		}
		ft.commit();
	}

}
Fragment01:
package com.fragmentdemodongtai;

import android.app.Fragment;
import android.os.Bundle;
import android.view.LayoutInflater;
import android.view.View;
import android.view.ViewGroup;

public class Fragment01 extends Fragment {

	@Override
	public View onCreateView(LayoutInflater inflater, ViewGroup container,
			Bundle savedInstanceState) {
		return inflater.inflate(R.layout.fragment01, null);
	}

}
Fragment02:
package com.fragmentdemodongtai;

import android.app.Fragment;
import android.os.Bundle;
import android.view.LayoutInflater;
import android.view.View;
import android.view.ViewGroup;

public class Fragment02 extends Fragment {

	@Override
	public View onCreateView(LayoutInflater inflater, ViewGroup container,
			Bundle savedInstanceState) {
		return inflater.inflate(R.layout.fragment02, null);
	}

}
源代码下载:
点击下载源码