Django RESF framework(官方教程)
快速起步
尝试创建一简单 API 对 users 和groups进行查看修改操作.
项目起步
创建一项目,其名 tutorial, t之后建一app quickstart.
# Set up a new project django-admin.py startproject tutorial cd tutorial # Create a virtualenv to isolate our package dependencies locally virtualenv env source env/bin/activate # On Windows use `env\Scripts\activate` # Install Django and Django REST framework into the virtualenv pip install django pip install djangorestframework # Create a new app python manage.py startapp quickstart 之后配置数据库并进行syncdb操作. 如果使用的是 SQLite, 那么你可以配置 tutorial/settings.py如下所示:
DATABASES = { 'default': { 'ENGINE': 'django.db.backends.sqlite3', 'NAME': 'database.sql', 'USER': '', 'PASSWORD': '', 'HOST': '', 'PORT': '' } }进行数据库更新:
python manage.py syncdb一旦配置好数据库并同步数据,之后就可以打开app目录进行编码了...
序列化
首先我们将在quickstart/serializers.py进行序列化, 这将被用于显示数据.
from django.contrib.auth.models import User, Group from rest_framework import serializers class UserSerializer(serializers.HyperlinkedModelSerializer): class Meta: model = User fields = ('url', 'username', 'email', 'groups') class GroupSerializer(serializers.HyperlinkedModelSerializer): class Meta: model = Group fields = ('url', 'name') Notice 我们使用远程连接进行操作 HyperlinkedModelSerializer. 当然你可以使用主键和其他关系,但是hyperlinking是一种好的restful设计.
视图
Right, 之后我们将写更好的视图. 打开 quickstart/views.py 继续coding.
from django.contrib.auth.models import User, Group from rest_framework import viewsets from quickstart.serializers import UserSerializer, GroupSerializer class UserViewSet(viewsets.ModelViewSet): """ API endpoint that allows users to be viewed or edited. """ queryset = User.objects.all() serializer_class = UserSerializer class GroupViewSet(viewsets.ModelViewSet): """ API endpoint that allows groups to be viewed or edited. """ queryset = Group.objects.all() serializer_class = GroupSerializer 不仅是写多视图而且将其组合在到一个类中,其称之为ViewSets.
URLs
Okay, 现在布置API URLs. 转到 tutorial/urls.py...
from django.conf.urls import patterns, url, include from rest_framework import routers from quickstart import views router = routers.DefaultRouter() router.register(r'users', views.UserViewSet) router.register(r'groups', views.GroupViewSet) # Wire up our API using automatic URL routing. # Additionally, we include login URLs for the browseable API. urlpatterns = patterns('', url(r'^', include(router.urls)), url(r'^api-auth/', include('rest_framework.urls', namespace='rest_framework')) )Because we're using viewsets instead of views, we can automatically generate the URL conf for our API, by simply registering the viewsets with a router class.
Again, if we need more control over the API URLs we can simply drop down to using regular class based views, and writing the URL conf explicitly.
Finally, we're including default login and logout views for use with the browsable API. That's optional, but useful if your API requires authentication and you want to use the browsable API.
Settings设置
我们将设置全局setting. 我们显示分页, 我们希望API只能访问admin. setting设置到 tutorial/settings.py
INSTALLED_APPS = ( ... 'rest_framework', ) REST_FRAMEWORK = { 'DEFAULT_PERMISSION_CLASSES': ('rest_framework.permissions.IsAdminUser',), 'PAGINATE_BY': 10 }Okay, 做好了.
测试我们的API
现在测试我们写的API. 让我们从浏览器开始.
python ./manage.py runserver 我们可以接触api通过命令行使用如 curl这样的...
bash: curl -H 'Accept: application/json; indent=4' -u admin:password http://127.0.0.1:8000/users/ { "count": 2, "next": null, "previous": null, "results": [ { "email": "[email protected]", "groups": [], "url": "http://127.0.0.1:8000/users/1/", "username": "admin" }, { "email": "[email protected]", "groups": [ ], "url": "http://127.0.0.1:8000/users/2/", "username": "tom" } ] }或直接使用浏览器...
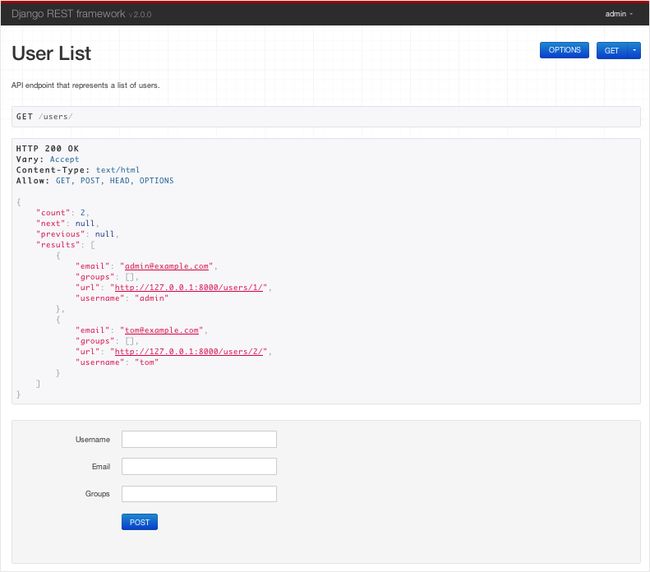
太easy了!
I如果想深入rest就请移驾the tutorial, 或者 API guide.