cxf+spring 例子代码
cxf2.3.3
eclipse helios
spring cxf2.3.3自带spring3.0.5
包的引用和配置神马的不解释了
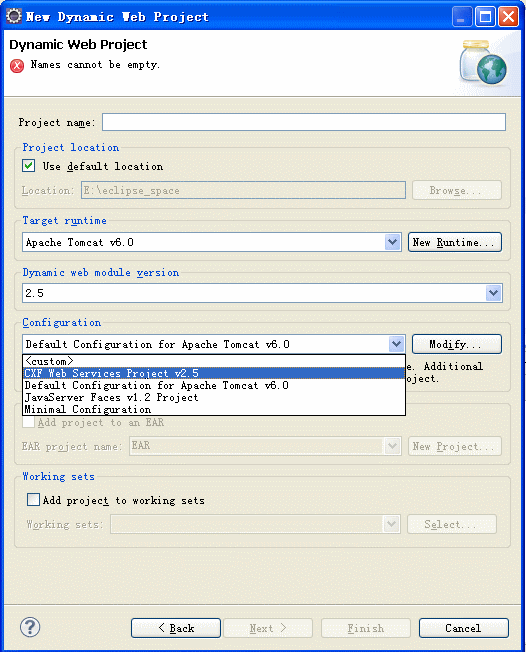
首先创建一个项目,如图,选择CXF 会添加cxf支持
如下图,参照网上例子创建cxftest接口和其实现类cxftestimpl并实现其方法hello
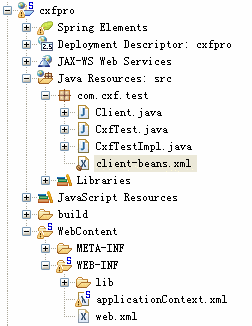
然后创建spring文件,applicationContext.xml 如下
<?xml version="1.0" encoding="UTF-8"?>
<beans xmlns="http://www.springframework.org/schema/beans"
	xmlns:xsi="http://www.w3.org/2001/XMLSchema-instance" xmlns:jaxws="http://cxf.apache.org/jaxws"
	xsi:schemaLocation="http://www.springframework.org/schema/beans http://www.springframework.org/schema/beans/spring-beans-3.0.xsd http://cxf.apache.org/jaxws http://cxf.apache.org/schemas/jaxws.xsd">

    <import resource="classpath:META-INF/cxf/cxf.xml" />
    <import resource="classpath:META-INF/cxf/cxf-extension-soap.xml" />
    <import resource="classpath:META-INF/cxf/cxf-servlet.xml" />

    <jaxws:endpoint id="cxftest" implementor="com.cxf.test.CxfTestImpl" address="/cxftest" />
</beans>
于webcontent目录下
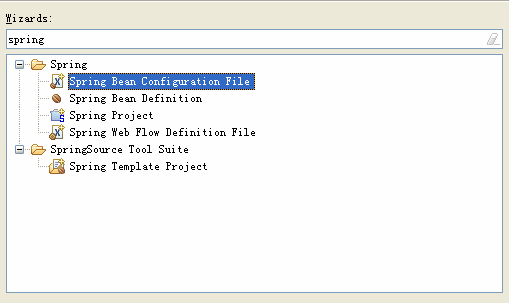
接着创建客户端配置文件,这个主要用来测试用作对客户端的支持
如下:
<?xml version="1.0" encoding="UTF-8"?>
<beans xmlns="http://www.springframework.org/schema/beans"
	xmlns:xsi="http://www.w3.org/2001/XMLSchema-instance" xmlns:jaxws="http://cxf.apache.org/jaxws"
	xsi:schemaLocation="http://www.springframework.org/schema/beans http://www.springframework.org/schema/beans/spring-beans-3.0.xsd http://cxf.apache.org/jaxws http://cxf.apache.org/schemas/jaxws.xsd">

<bean id="client" class="com.cxf.test.CxfTest"
        factory-bean="clientFactory" factory-method="create" />

    <bean id="clientFactory"
        class="org.apache.cxf.jaxws.JaxWsProxyFactoryBean">
        <property name="serviceClass" value="com.cxf.test.CxfTest" />
        <property name="address" value="http://localhost:8080/cxfpro/cxftest" />
        </bean>
</beans>
然后创建Client测试类
package com.cxf.test;

import org.springframework.context.ApplicationContext;
import org.springframework.context.support.ClassPathXmlApplicationContext;

public class Client {
	 public static Client self = new Client();
     private CxfTest client = null;

    private Client() {
           // START SNIPPET: client
           ApplicationContext context = new ClassPathXmlApplicationContext(
                   new String[]{"com/cxf/test/client-beans.xml"});
           client = (CxfTest) context.getBean("client");
       }


       public CxfTest getServer() {

           return client;

       }

       public String getText(String text) throws Exception {
           String response = getServer().hello(text);
           return response;
       }


   /**
    * @param args
    */
   public static void main(String[] args) {
       // TODO Auto-generated method stub
       try {

           System.out.println(self.getText("你是个锤子!"));
       } catch (Exception e) {
           // TODO Auto-generated catch block
           e.printStackTrace();
       }

   }

}
最后肯定要配置WEB.XML
添加cxf支持
  <!-- 添加CXF支持 -->
   <servlet>
        <servlet-name>CXFServlet</servlet-name>
        <display-name>CXF Servlet</display-name>
        <servlet-class>
            org.apache.cxf.transport.servlet.CXFServlet
        </servlet-class>
        <load-on-startup>1</load-on-startup>
    </servlet>

    <servlet-mapping>
        <servlet-name>CXFServlet</servlet-name>
        <url-pattern>/*</url-pattern>
    </servlet-mapping>
添加spring支持
  <!-- 添加spring支持 -->
	<context-param>
		<param-name>contextConfigLocation</param-name>
		<param-value>/WEB-INF/applicationContext.xml</param-value>
	</context-param>
	<!-- spring监听器,初始化web应用上下文 -->
	<listener>
		<listener-class>org.springframework.web.context.ContextLoaderListener</listener-class>
	</listener>
	<!-- 扩展spring bean的作用域有request,session,global session等 -->
	<listener>
		<listener-class>org.springframework.web.context.request.RequestContextListener</listener-class>
	</listener>
	<!-- Spring 刷新Introspector防止内存泄露 -->
	<listener>
		<listener-class>org.springframework.web.util.IntrospectorCleanupListener</listener-class>
	</listener>

	<!-- spring字符编码过滤器 -->
	<filter>
		<filter-name>encoding</filter-name>
		<filter-class>org.springframework.web.filter.CharacterEncodingFilter</filter-class>
		<init-param>
			<param-name>encoding</param-name>
			<param-value>UTF-8</param-value>
		</init-param>
	</filter>
	<filter-mapping>
		<filter-name>encoding</filter-name>
		<url-pattern>/*</url-pattern>
	</filter-mapping>
除红色部分外,其他可不要,我这省事呢!
接着用ECLIPSE创建一个SERVERS
选择TOMCAT6.0
将项目添加到SERVERS中,运行项目,这时启动了服务端。如果不抛异常,运行客户端CLASS(有main入口),直接作为APPLICATION运行。
一串红色信息输出后就是你想要的结果。很快,如果eclipse成功配置了CXF环境。
接着我知道服务端和客户端是相对独立运行的,一般情况下客户端需要发布出去。于是
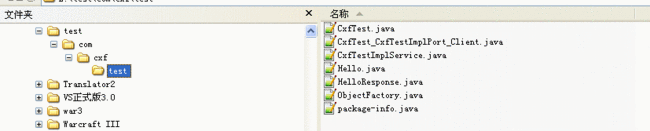
通过wsdl2java可获得其client resources
命令如下:进入到cxf ->bin
wdsl2java -d e:\test -client http://localhost:8080/cxfpro/cxftest?wsdl
在e盘的test目录下就生成了如下
或许更为简单的地方在这里:http://blogold.chinaunix.net/u2/73798/showart_2002108.html,希望可以一起探讨,我是刚入门的小菜!3KS