Flex用RemoteObject方式与Java通信是最常用的方式,这是一种最直观的方式。当然Flex也可以用HttpService与服务器类如servlet通信,这也是本次学习的重点。
这次学习是在上节的基础上进行的。本节学习用到的LoginEvent.as,LoginModule.sa文件代码如上节所示。
好了,新建一个servlet类LoginServlet.java,代码如下所示:
|
1
2
3
4
5
6
7
8
9
10
11
12
13
14
15
16
17
18
19
20
21
22
23
24
25
26
27
|
package
com.it161.servlet;
import
java.io.IOException;
import
java.io.PrintWriter;
import
javax.servlet.ServletException;
import
javax.servlet.http.HttpServlet;
import
javax.servlet.http.HttpServletRequest;
import
javax.servlet.http.HttpServletResponse;
publicclass LoginServlet
extends
HttpServlet {
@Override
protectedvoid service(HttpServletRequest req, HttpServletResponse resp)
throws
ServletException, IOException {
// TODO Auto-generatedmethod stub
req.setCharacterEncoding(
"utf-8"
);
resp.setCharacterEncoding(
"utf-8"
);
PrintWriter out=resp.getWriter();
String username=req.getParameter(
"username"
);
String passworld=req.getParameter(
"passworld"
);
//System.out.println(username+":"+passworld);
if
(username.equals(
"admin"
)&&passworld.equals(
"123"
)){
out.print(
true
);
}
else
{
out.print(
false
);
}
}
}
|
这个servlet在web.xml中的配置如下所示:
|
1
2
3
4
5
6
7
8
|
<servlet>
<servlet-name>LoginServlet</servlet-name>
<servlet-
class
>com.yqsn.servlet.LoginServlet</servlet-
class
>
</servlet>
<servlet-mapping>
<servlet-name>LoginServlet</servlet-name>
<url-pattern>/LoginServlet</url-pattern>
</servlet-mapping>
|
将MyEclipse切换到flash视图,新建一个application文件HttpServiceDemo.mxml,代码如下所示:
|
1
2
3
4
5
6
7
8
9
10
11
12
13
14
15
16
17
18
19
20
21
22
23
24
25
26
27
28
29
30
31
32
33
34
35
36
37
38
39
40
41
42
43
44
45
46
47
48
49
50
51
52
53
54
55
56
57
58
59
60
61
62
63
64
65
66
67
68
69
70
71
72
73
|
<?
xmlversion
=
"1.0"
encoding
=
"utf-8"
?>
<
fx:Script
>
<![CDATA[
import com.flex.ases.LoginEvent;
import com.flex.ases.LoginMess;
import com.flex.module.LoginModule;
import mx.controls.Alert;
import mx.managers.PopUpManager;
import mx.rpc.events.FaultEvent;
import mx.rpc.events.ResultEvent;
privatevar loginModule:LoginModule=new LoginModule();
[Bindable]
private var username:String;
[Bindable]
private varpassworld:String;
protectedfunction login_clickHandler(event:MouseEvent):void
{
// TODOAuto-generated method stub
PopUpManager.addPopUp(loginModule,this,true);
PopUpManager.centerPopUp(this.loginModule);
loginModule.addEventListener(LoginEvent.LOGIN_EVENT,loginHander);
}
publicfunction loginHander(event:LoginEvent):void{
//varobj:Object=event.loginMess as Object;
username=event.loginMess['username'];
passworld=event.loginMess['passworld'];
httpServiceSend.send();
}
protectedfunction httpServiceSend_faultHandler(event:FaultEvent):void
{
// TODOAuto-generated method stub
Alert.show(event.fault.message as String,"提示");
}
protectedfunction httpServiceSend_resultHandler(event:ResultEvent):void
{
// TODOAuto-generated method stub
var result:Boolean=event.result as Boolean;
if(result==true){
Alert.show(username+",欢迎您回来!","提示");
aaa.text=username+",欢迎您回来!";
login.label="";
bbb.text="";
}else{
Alert.show("对不起,用户名或密码不存在!","提示");
}
//Alert.show("成功了!");
}
]]>
</
fx:Script
>
<
fx:Declarations
>
<!-- Place non-visualelements (e.g., services, value objects) here -->
<
s:HTTPService
id
=
"httpServiceSend"
url
=
"http://localhost:8000/JavaAndFlexDemo/LoginServlet"
useProxy
=
"false"
fault
=
"httpServiceSend_faultHandler(event)"
result
=
"httpServiceSend_resultHandler(event)"
>
<
s:request
>
<
username
>{username}</
username
>
<
passworld
>{passworld}</
passworld
>
</
s:request
>
</
s:HTTPService
>
</
fx:Declarations
>
<
s:Label
x
=
"200"
y
=
"150"
width
=
"182"
height
=
"27"
fontSize
=
"18"
id
=
"aaa"
text
=
"您还没有登陆,现在就"
verticalAlign
=
"middle"
/>
<
mx:LinkButton
x
=
"393"
y
=
"150"
width
=
"57"
height
=
"27"
label
=
"登陆"
id
=
"login"
fontSize
=
"18"
click
=
"login_clickHandler(event)"
/>
<
s:Label
x
=
"459"
y
=
"150"
width
=
"37"
height
=
"27"
id
=
"bbb"
fontSize
=
"18"
text
=
"吧!"
verticalAlign
=
"middle"
/>
</
s:Application
>
|
从代码中我们可以看出,我们先定义一个HttpServlet发送请求httpServiceSend,然后通过下面这种方式存值:
|
1
2
3
4
|
<
s:request
>
<
username
>{username}</
username
>
<
passworld
>{passworld}</
passworld
>
</
s:request
>
|
这种方式很简单,我们在后台通过request. getParameter(“参数名”)取值就可以了,当然我们也可以在loginHander(event:LoginEvent)函数中通过下面方式存值并发送请求:
|
1
2
3
4
5
6
7
8
9
|
public
functionloginHander(event:LoginEvent):
void
{
//varobj:Object=event.loginMess as Object;
username=event.loginMess[
'username'
];
passworld=event.loginMess[
'passworld'
];
var
obj:
Object
=
new
Object
;
obj.username=username;
obj.passworld=passworld;
httpServiceSend.send(obj);
}
|
运行结果是一样的,你可以试试。
好了,程序算是完成了,现在开始验收结果。
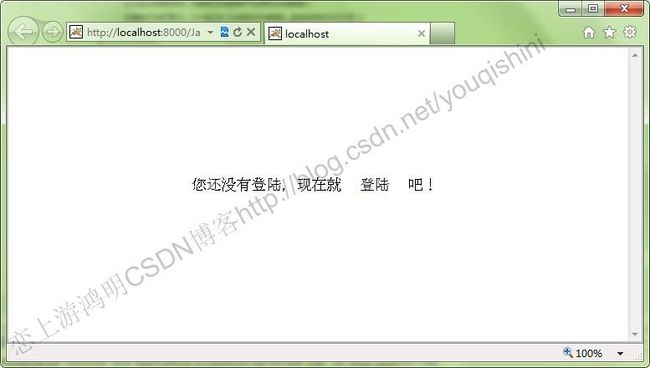
打开服务器并部署项目,运行felx页面RemoteObjectDemo.mxml,如下所示:
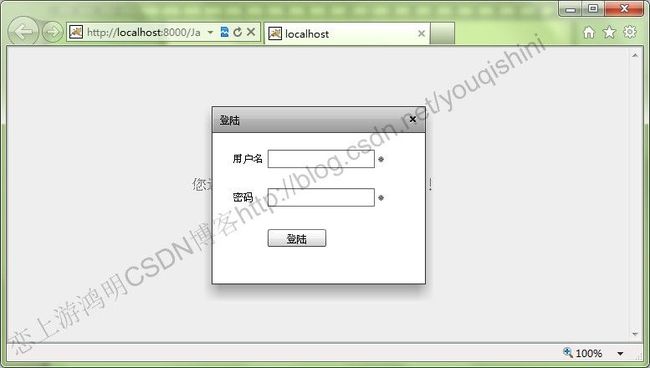
当我们点击“登陆”按钮后,弹出module页面,如下所示:
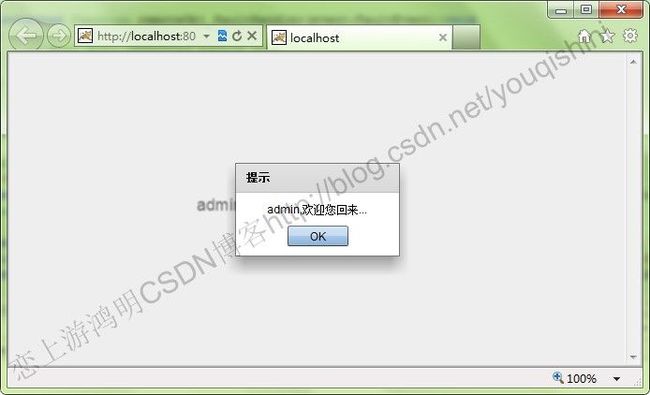
当我们输入的用户名和密码都正确时则提示你登陆正确:
输入错误则提示你输入不正确:
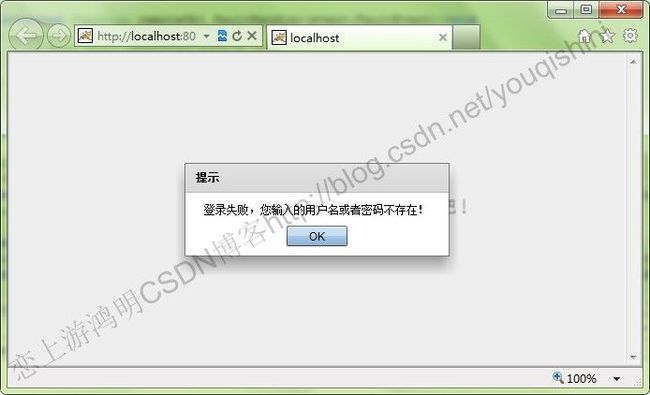
可以看出,我们输入的用户名与密码已经用httpservice方式发送到后台并且成功接受了并将结果返回给前台了。
好了,就学习这么多,下节将学习WebService方式。
原创文章,转载请注明出处:http://www.it161.com/article/webDetail?articleid=140111230433
更多原创内容,请访问:http://www.it161.com/