TreeListView
此功能诸多代码来源于国外的网站和某些项目,地址为http://www.codeproject.com/Articles/30721/WPF-TreeListView-Control
我只是站在别人的楼顶,顶着风,尿了一把。
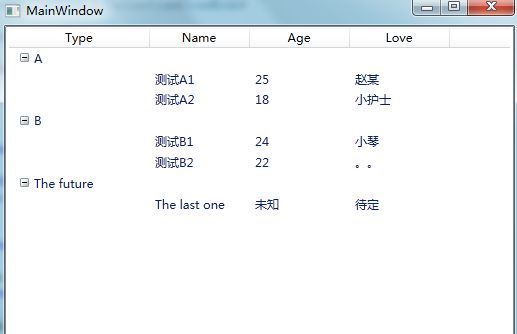
废话不多说,直接上效果图,一幕了然:
接下来上的就是我这个代码的整体结构了。
TreeListViewModel是CodeProject里面的人写的,为项目框架核心。
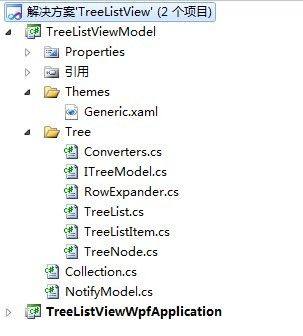
TreeListViewWpfApplication为TreeListView的主要实现,下面我主要介绍怎么实现
(TreeListViewModel里面代码能力有限,目前为止也没看出个什么东西)
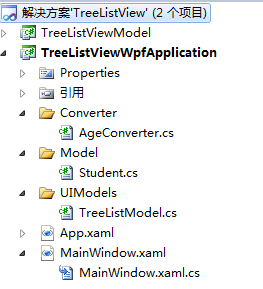
先给大家介绍Model下面的Student类的代码吧
using System.Collections.Generic;
using System.Linq;
using System.Text;
namespace TreeListViewWpfApplication
{
public class Student
{
public Student( string types, string name, int age, string love, List<Student> listStudent)
{
Types = types;
Name = name;
Age = age;
Love = love;
Childs = listStudent;
}
public Student() { }
public string Types { get; set; }
public string Name { get; set; }
public int Age { get; set; }
public string Love { get; set; }
public List<Student> Childs { get; set; }
}
}
下面要说的是绑定的数据的格式。
其实要实现TreeListView效果,绑定的数据类型必须实现接口ITreeModel。
接下来就需要我们来定义一个用来存储数据方式的类了(我这样说肯定有错误),这个类的名字为TreeListModel。
那接下贴上TreeListModel的代码。
using System.Collections.Generic;
using System.Linq;
using System.Text;
using TreeListViewModel.Tree;
using System.Collections;
namespace TreeListViewWpfApplication
{
public class SubTreeModel<T> : ITreeModel
{
List<TreeModel<T>> _trees = new List<TreeModel<T>>();
public SubTreeModel(List<TreeModel<T>> trees)
{
_trees = trees;
}
public IEnumerable GetChildren( object parent)
{
if (parent == null)
{
foreach ( var item in _trees)
{
yield return item;
}
}
else
{
var parentModel = parent as TreeModel<T>;
if (parentModel != null)
{
foreach ( var item in parentModel.Childs)
{
yield return item;
}
}
}
}
public bool HasChildren( object parent)
{
var parentModel = parent as TreeModel<T>;
if (parentModel != null)
return parentModel.Childs.Count > 0;
return false;
}
}
public class TreeModel<T>
{
T item;
public T Item
{
get { return item; }
set { item = value; }
}
List<TreeModel<T>> childs = new List<TreeModel<T>>();
public List<TreeModel<T>> Childs
{
get { return childs; }
set { childs = value; }
}
}
}
如果对迭代器不是很懂的,下面的这个地址可以简单的了解一下迭代器的作用。
TreeModel<T>这个数据类型和Student一一对应。
WPF前台绑定的数据类型为 SubTreeModel<T> 类型。
接下来我们看看WPF前台的代码
xmlns ="http://schemas.microsoft.com/winfx/2006/xaml/presentation"
xmlns:x ="http://schemas.microsoft.com/winfx/2006/xaml"
xmlns:tree ="clr-namespace:TreeListViewModel.Tree;assembly=TreeListViewModel"
xmlns:local ="clr-namespace:TreeListViewWpfApplication"
Title ="MainWindow" Height ="350" Width ="525" >
< Window.Resources >
< local:AgeConverter x:Key ="AgeConverter" />
</ Window.Resources >
< Grid >
< tree:TreeList Name ="treeList" >
< tree:TreeList.View >
< GridView >
< GridView.Columns >
< GridViewColumn Width ="140" Header ="Type" >
< GridViewColumn.CellTemplate >
< DataTemplate >
< StackPanel Orientation ="Horizontal" >
< tree:RowExpander />
< TextBlock Text =" {Binding Item.Types} " ></ TextBlock >
</ StackPanel >
</ DataTemplate >
</ GridViewColumn.CellTemplate >
</ GridViewColumn >
< GridViewColumn Header ="Name" Width ="100" DisplayMemberBinding =" {Binding Item.Name} " />
< GridViewColumn Header ="Age" Width ="100" DisplayMemberBinding =" {Binding Item.Age,Converter={StaticResource AgeConverter}} " />
< GridViewColumn Header ="Love" Width ="100" DisplayMemberBinding =" {Binding Item.Love} " />
</ GridView.Columns >
</ GridView >
</ tree:TreeList.View >
</ tree:TreeList >
</ Grid >
</ Window >
这里我就不把AgeConverter的代码帖出来了。
直接看MainWindow的后台代码吧。
MainWindow主要是给Student赋值并把数据填充到数据类型为 SubTreeModel<T>中。
即SubTreeModel<Student> ,对应SubTreeModel<T>中的List<TreeModel<T>>即List<TreeModel<Student>>
TreeModel<Student>对应的是TreeModel<T>类,而TreeModel<T>
里面包含 Item,和Childs属性,与Student类的Types字段和Childs字段刚好吻合。
下面是后台代码的实现
using System.Collections.Generic;
using System.Linq;
using System.Text;
using System.Windows;
using System.Windows.Controls;
using System.Windows.Data;
using System.Windows.Documents;
using System.Windows.Input;
using System.Windows.Media;
using System.Windows.Media.Imaging;
using System.Windows.Navigation;
using System.Windows.Shapes;
namespace TreeListViewWpfApplication
{
/// <summary>
/// MainWindow.xaml 的交互逻辑
/// </summary>
public partial class MainWindow : Window
{
public MainWindow()
{
InitializeComponent();
Loaded += new RoutedEventHandler(MainWindow_Loaded);
}
void MainWindow_Loaded( object sender, RoutedEventArgs e)
{
Reload();
treeList.Model = ListGasConfig;
}
private SubTreeModel<Student> _listGasConfig;
public SubTreeModel<Student> ListGasConfig
{
get { return _listGasConfig; }
set
{
_listGasConfig = value;
}
}
private void Reload()
{
var configs = new List<Student>(){
new Student ()
{
Types= " A ", Childs= new List<Student>()
{
new Student(){ Name= " 测试A1 ", Age= 25, Love= " 赵某 ", Childs= null},
new Student(){ Name= " 测试A2 ", Age= 18, Love= " 小护士 ", Childs= null},
}
},
new Student ()
{
Types= " B ", Childs= new List<Student>()
{
new Student(){ Name= " 测试B1 ", Age= 24, Love= " 小琴 ", Childs= null},
new Student(){ Name= " 测试B2 ", Age= 22, Love= " 。。 ", Childs= null},
}
},
new Student()
{
Types= " The future ",Childs= new List<Student>()
{
new Student(){ Name= " The last one ", Age=- 1, Love= " 待定 ", Childs= null}
}
}
};
var treeModels = new List<TreeModel<Student>>();
foreach (Student item in configs)
{
if (item.Childs != null)
{
treeModels.Add(BuildTreeModels(item, item.Childs));
}
}
ListGasConfig = new SubTreeModel<Student>(treeModels);
}
private TreeModel<Student> BuildTreeModels(Student GasConfig, List<Student> liststudent)
{
var treeModel = new TreeModel<Student>();
treeModel.Item = new Student() { Types = GasConfig.Types, Childs = liststudent };
if (liststudent.Count > 0)
{
foreach (Student item in liststudent)
{
treeModel.Childs.Add( new TreeModel<Student>() { Item = item });
}
}
return treeModel;
}
}
}
下面是我的DEMO,有码有真相,/Files/xuliangjie/TreeListView.rar
再次申明,上述核心代码有很大一部分来自国外网站,我只是借鉴别人的核心,和我们项目中实际的运用,此篇文章不代表本人任何立场,我只是做个总结,分享一下,这个功能很实用。