win10 环境进行 python + pytorch + yolov8 + tensorRT( c++版 ) 测试过程记录
参考博客:
    1. YOLOv8模型转换pt->onnx(附上代码):https://blog.csdn.net/2303_80018785/article/details/138194961
    2. yolov8的TensorRT部署(C++版本):https://blog.csdn.net/liujiahao123987/article/details/133892746
        test.cpp 就是使用此博客的 detect.cpp,但是需要将模型序列化部分的如下行:
std::ifstream ifs(engine_file_path);换成:
std::ifstream ifs(engine_file_path,std::ios::binary);否则报错:
[runtime.cpp::nvinfer1::Runtime::parsePlan::315] Error Code 1: Serialization (Serialization assertion plan->header.size == blobSize failed.)因为模型 文件是二进制文件,需要以二进制方式读取,c++ 的 ifstream 不加 std::ios::binary 参数默认表示以文本方式读取。
ps:我没有按照该博主以 cmake 的方式编译,而是使用纯 cl.exe 编译的,因为 CMakeLists.txt 语法看不懂。
3. 部署实战 | 手把手教你在Windows下用TensorRT部署YOLOv8:https://blog.csdn.net/CV_Autobot/article/details/129002357
1. 安装 conda:略
2. 使用 conda 新建 python3.8的环境:略
3. 使用 conda 查询环境:
 conda env  list:
 env_yolov9_python_3_8
4. 进入 env_yolov9_python_3_8 环境:conda activate env_yolov9_python_3_8
5. 确认 python 的版本号:
    python  --version
    Python 3.8.19
6. 确认 cuda 的版本:
nvcc -V:
        nvcc: NVIDIA (R) Cuda compiler driver
        Copyright (c) 2005-2022 NVIDIA Corporation
        Built on Thu_Feb_10_19:03:51_Pacific_Standard_Time_2022
        Cuda compilation tools, release 11.6, V11.6.112
        Build cuda_11.6.r11.6/compiler.30978841_0
7. 安装 pytorch:
输入以下命令安装PyTorch(以CUDA 11.6为例):
pip3 install torch torchvision torchaudio --extra-index-url https://download.pytorch.org/whl/cu1168. 安装 ultralytics:
pip install ultralytics -i https://pypi.tuna.tsinghua.edu.cn/simple/9. 准备好 yolov8n.pt 文件放到 test.py 所在目录下。
10. 新建 test.py 文件,内容如下:
    from ultralytics import YOLO
    # 加载模型
    model = YOLO('yolov8n.pt')  # 加载官方模型(示例)
    # model = YOLO('D:/Web page download/best2.pt')  # 加载自定义训练模型(示例)
    # 导出模型( Valid formats are ('torchscript', 'onnx', 'openvino', 'engine', 'coreml', 'saved_model', 'pb', 'tflite', 'edgetpu', 'tfjs', 'paddle', 'ncnn') )
    model.export(format='onnx')
11. 执行 python test.py 在当前目录下成功生成了 yolov8n.onnx
12. 使用 tensorRT 命令将 yolov8n.onnx 转换为 yolov8n.trt:
D:\install\tensorRT\TensorRT-8.6.1.6\bin\trtexec --onnx=yolov8n.onnx --saveEngine=yolov8n.trt最后成功生成了 yolov8n.trt 文件
13. 新建 test.cpp 文件:
#include
#include
#include
#include
#include
#include "NvInfer.h"
#include "processing.hpp"
//#include "logging.h"
using namespace nvinfer1;
using namespace std;
const int model_width = 640;
const int model_height = 640;
class MyLogger : public nvinfer1::ILogger
{
public:
explicit MyLogger(nvinfer1::ILogger::Severity severity =nvinfer1::ILogger::Severity::kWARNING) : severity_(severity) {}
void log(nvinfer1::ILogger::Severity severity, const char *msg) noexcept override
{
if (severity <= severity_) {
std::cerr << msg << std::endl;
}
}
nvinfer1::ILogger::Severity severity_;
};
int main()
{
//一、图像处理
string image_path = "./street.jpg"; //填写自己图片路径(需要绝对路径)
cv::Mat input_image = cv::imread(image_path);
float* input_blob = new float[model_height * model_width * 3];
cv::Mat resize_image;
//比例
const float _ratio = std::min(model_width / (input_image.cols * 1.0f),
model_height / (input_image.rows * 1.0f));
// 等比例缩放
const int border_width = input_image.cols * _ratio;
const int border_height = input_image.rows * _ratio;
// 计算偏移值
const int x_offset = (model_width - border_width) / 2;
const int y_offset = (model_height - border_height) / 2;
//将输入图像缩放至resize_image
cv::resize(input_image, resize_image, cv::Size(border_width, border_height));
//复制图像并且制作边界
cv::copyMakeBorder(resize_image, resize_image, y_offset, y_offset, x_offset,
x_offset, cv::BORDER_CONSTANT, cv::Scalar(114, 114, 114));
// 转换为RGB格式
cv::cvtColor(resize_image, resize_image, cv::COLOR_BGR2RGB);
//归一化
const int channels = resize_image.channels();
const int width = resize_image.cols;
const int height = resize_image.rows;
for (int c = 0; c < channels; c++) {
for (int h = 0; h < height; h++) {
for (int w = 0; w < width; w++) {
input_blob[c * width * height + h * width + w] =
resize_image.at(h, w)[c] / 255.0f; //at 是 OpenCV 中用于访问图像像素的一种方法,使用 at 获取彩色图像中特定位置的像素颜色值
}
}
}
//二、模型反序列化
MyLogger logger;
//读取trt信息
const std::string engine_file_path = "./yolov8n.trt"; //填写自己trt文件路径(需要绝对路径)
std::stringstream engine_file_stream;
engine_file_stream.seekg(0, engine_file_stream.beg); //从起始位置偏移0个字节,指针移动到文件流的开头
std::ifstream ifs(engine_file_path,std::ios::binary);
engine_file_stream << ifs.rdbuf(); //将读取到的数据流交给engine_file_stream
ifs.close();
engine_file_stream.seekg(0, std::ios::end); //先把文件输入流指针定位到文档末尾来获取文档的长度
const int model_size = engine_file_stream.tellg(); //获取文件流的总长度
engine_file_stream.seekg(0, std::ios::beg);
void *model_mem = malloc(model_size); //开辟一样长的空间
engine_file_stream.read(static_cast(model_mem), model_size); //将内容读取到model_mem中
nvinfer1::IRuntime *runtime = nvinfer1::createInferRuntime(logger);
nvinfer1::ICudaEngine *engine = runtime->deserializeCudaEngine(model_mem, model_size);
free(model_mem);
//三、模型推理
nvinfer1::IExecutionContext *context = engine->createExecutionContext();
void *buffers[2];
// 获取模型输入尺寸并分配GPU内存
nvinfer1::Dims input_dim = engine->getBindingDimensions(0);
int input_size = 1;
for (int j = 0; j < input_dim.nbDims; ++j) {
if(input_dim.d[j] < 0)
input_size *= -input_dim.d[j];
else
input_size *= input_dim.d[j];
}
cudaMalloc(&buffers[0], input_size * sizeof(float));
// 获取模型输出尺寸并分配GPU内存
nvinfer1::Dims output_dim = engine->getBindingDimensions(1);
int output_size = 1;
for (int j = 0; j < output_dim.nbDims; ++j) {
if(output_dim.d[j] < 0)
output_size *= -output_dim.d[j];
else
output_size *= output_dim.d[j];
}
cudaMalloc(&buffers[1], output_size * sizeof(float));
// 给模型输出数据分配相应的CPU内存
float *output_buffer = new float[output_size];
//数据投入
cudaStream_t stream;
cudaStreamCreate(&stream);
// 拷贝输入数据
cudaMemcpyAsync(buffers[0], input_blob, input_size * sizeof(float),
cudaMemcpyHostToDevice, stream);
// 执行推理
if(context->enqueueV2(buffers, stream, nullptr))
{
cout << "enqueueV2执行推理成功" << endl;
}
else{
cout << "enqueueV2执行推理失败" << endl;
return -1;
}
// 拷贝输出数据
cudaMemcpyAsync(output_buffer, buffers[1], output_size * sizeof(float),
cudaMemcpyDeviceToHost, stream);
cudaStreamSynchronize(stream);
delete context;
delete engine;
delete runtime;
delete[] input_blob;
//四、输出结果output_buffer,放入objs xywh为中心点坐标 和宽高
float *ptr = output_buffer; // 1x84x8400 = 705600
vector> temp(84, vector(8400));
vector> outVec(8400, vector(84));
for(int i = 0; i < 705600; i++)
{
temp[i/8400][i%8400] = *ptr;
ptr++;
}
for(int i = 0; i < 84; i++)
{
for(int j = 0; j < 8400; j++)
{
outVec[j][i] = temp[i][j];
}
}
std::vector 14. 新建 processing.hpp 文件:
#include
#include
#include
using namespace std;
//以coco数据集为例
string names[] = {"person", "bicycle", "car", "motorcycle", "airplane", "bus", "train", "truck", "boat", "traffic light",
"fire hydrant", "stop sign", "parking meter", "bench", "bird", "cat", "dog", "horse", "sheep", "cow",
"elephant", "bear", "zebra", "giraffe", "backpack", "umbrella", "handbag", "tie", "suitcase", "frisbee",
"'skis'", "'snowboard'", "'sports ball'", "'kite'", "'baseball bat'", "'baseball glove'", "'skateboard'", "'surfboard'",
"'tennis racket'", "'bottle'", "'wine glass'", "'cup'", "'fork'", "'knife'", "'spoon'", "'bowl'", "'banana'", "'apple'",
"'sandwich'", "'orange'", "'broccoli'", "'carrot'", "'hot dog'", "'pizza'", "'donut'", "'cake'", "'chair'", "'couch'",
"'potted plant'", "'bed'", "'dining table'", "'toilet'", "'tv'", "'laptop'", "'mouse'", "'remote'", "'keyboard'", "'cell phone'",
"'microwave'", "'oven'", "'toaster'", "'sink'", "'refrigerator'", "'book'", "'clock'", "'vase'", "'scissors'", "'teddy bear'",
"'hair drier'", "'toothbrush'"};
struct BOX
{
float x;
float y;
float width;
float height;
};
struct Object
{
BOX box; // lu点和wh
int label;
float confidence; //这里的confidence实际指的是score 即 objectness*confidence
};
bool cmp(Object &obj1, Object &obj2){
return obj1.confidence > obj2.confidence;
}
float iou_of(const Object &obj1, const Object &obj2)
{
float x1_lu = obj1.box.x;
float y1_lu = obj1.box.y;
float x1_rb = x1_lu + obj1.box.width;
float y1_rb = y1_lu + obj1.box.height;
float x2_lu = obj2.box.x;
float y2_lu = obj2.box.y;
float x2_rb = x2_lu + obj2.box.width;
float y2_rb = y2_lu + obj2.box.height;
//交集左上角坐标i_x1, i_y1
float i_x1 = std::max(x1_lu, x2_lu);
float i_y1 = std::max(y1_lu, y2_lu);
//交集右下角坐标i_x2, i_y2
float i_x2 = std::min(x1_rb, x2_rb);
float i_y2 = std::min(y1_rb, y2_rb);
//交集框宽高
float i_w = i_x2 - i_x1;
float i_h = i_y2 - i_y1;
//并集左上角坐标
float o_x1 = std::min(x1_lu, x2_lu);
float o_y1 = std::min(y1_lu, y2_lu);
//并集右下角坐标
float o_x2 = std::max(x1_rb, x2_rb);
float o_y2 = std::max(y1_rb, y2_rb);
//并集宽高
float o_w = o_x2 - o_x1;
float o_h = o_y2 - o_y1;
return (i_w*i_h) / (o_w*o_h);
}
std::vector hardNMS(std::vector
16. 新建 cl_build.bat,内容如下( 使用纯 cl.exe 编译 ):
cl ^
-I"D:\install\VisualStudio2022_comm\VC\Tools\MSVC\14.40.33807\include" ^
-I"C:\Program Files (x86)\Windows Kits\10\Include\10.0.26100.0\ucrt" ^
-I"D:\install\opencv\opencv\build\include" ^
-I"C:\Program Files\NVIDIA GPU Computing Toolkit\CUDA\v11.6\include" ^
test.cpp ^
-link libcpmt.lib ^
-link kernel32.lib ^
-link libucrt.lib ^
-link cudart.lib ^
-link nvinfer.lib ^
-link opencv_world4100.lib ^
-link opencv_world4100d.lib ^
-LIBPATH:"D:\install\VisualStudio2022_comm\VC\Tools\MSVC\14.40.33807\lib\x64" ^
-LIBPATH:"C:\Program Files (x86)\Windows Kits\10\Lib\10.0.26100.0\um\x64" ^
-LIBPATH:"C:\Program Files (x86)\Windows Kits\10\Lib\10.0.26100.0\ucrt\x64" ^
-LIBPATH:"C:\Program Files\NVIDIA GPU Computing Toolkit\CUDA\v11.6\lib\x64" ^
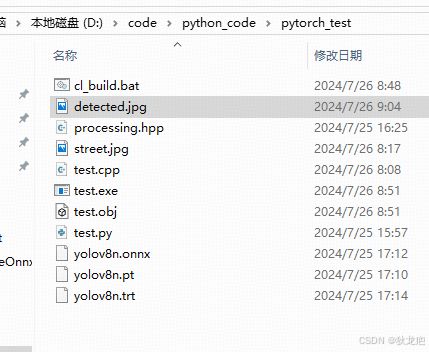
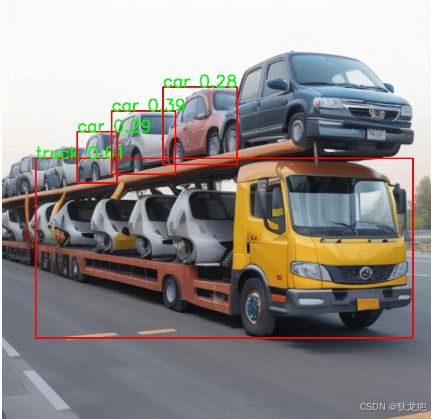
-LIBPATH:"D:\install\opencv\opencv\build\x64\vc16\lib"17. 执行 cl_build.bat 成功生成了 test.exe,准备一张图片修改名称为 street.jpg,执行 test.exe,生成了 detected.jpg:
street.jpg:

detected.jpg:
17. 分析 cl_build.bat 中 cl 编译语句为什么这样写可以生效:
ps:cl 指的是 xxx自带的 msvc 中的 cl.exe,比如我安装的是 Visual Studio 2022社区版,即 D:\install\VisualStudio2022_comm\VC\Tools\MSVC\14.40.33807\bin\Hostx64\x64下面的 cl.exe,我已经将 D:\install\VisualStudio2022_comm\VC\Tools\MSVC\14.40.33807\bin\Hostx64\x64 加入环境变量 PATH 了,所以这里可以直接使用 cl 命令。
最开始执行 cl test.cpp,报错 "test.cpp(1): fatal error C1034: iostream: 不包括路径集",使用 Everything 搜索 iostream 文件,找到所在位置为 D:\install\VisualStudio2022_comm\VC\Tools\MSVC\14.40.33807\include,于是向 cl 编译语句中加入:
-I"D:\install\VisualStudio2022_comm\VC\Tools\MSVC\14.40.33807\include" ^后面使用同样的方法陆陆续续需要向 cl 编译语句加入:
-I"C:\Program Files (x86)\Windows Kits\10\Include\10.0.26100.0\ucrt" ^
-I"D:\install\opencv\opencv\build\include" ^
-I"C:\Program Files\NVIDIA GPU Computing Toolkit\CUDA\v11.6\include" ^
现在执行如下 cl 编译语句:
cl ^
	-I"D:\install\VisualStudio2022_comm\VC\Tools\MSVC\14.40.33807\include" ^
    -I"C:\Program Files (x86)\Windows Kits\10\Include\10.0.26100.0\ucrt" ^
    -I"D:\install\opencv\opencv\build\include" ^
    -I"C:\Program Files\NVIDIA GPU Computing Toolkit\CUDA\v11.6\include" ^
    test.cpp
执行,现在已经不包 xxx 头文件不包括在路径集了,而是报无法打开文件 xxx.lib,例如 "LINK : fatal error LNK1104: 无法打开文件“libcpmt.lib”",搜索 libcpmt.lib 所在位置为 D:\install\VisualStudio2022_comm\VC\Tools\MSVC\14.40.33807\lib\x64,于是向 cl 编译语句中加入:
-link libcpmt.lib ^
-LIBPATH:"D:\install\VisualStudio2022_comm\VC\Tools\MSVC\14.40.33807\lib\x64" ^
使用同样的方式,陆陆续续需要向 cl 编译语句加入:
 -link kernel32.lib ^
 -link libucrt.lib ^
 -LIBPATH:"C:\Program Files (x86)\Windows Kits\10\Lib\10.0.26100.0\um\x64" ^
 -LIBPATH:"C:\Program Files (x86)\Windows Kits\10\Lib\10.0.26100.0\ucrt\x64" ^
感觉这种方式挺爽的,也不需要学习什么知识,就完全按照错误提示,使用 Everything 搜索,就知道加入什么,但是好日子到头了,现在执行,报错就不那么明显了:
test.obj
LINK : warning LNK4044: 无法识别的选项“/link”;已忽略
LINK : warning LNK4044: 无法识别的选项“/link”;已忽略
test.obj : error LNK2019: 无法解析的外部符号 "public: __cdecl cv::Mat::Mat(void)" (??0Mat@cv@@QEAA@XZ),函数 main 中引用了该符号
test.obj : error LNK2019: 无法解析的外部符号 "public: __cdecl cv::Mat::~Mat(void)" (??1Mat@cv@@QEAA@XZ),函数 main 中引用了该符号
test.obj : error LNK2019: 无法解析的外部符号 "void __cdecl cv::copyMakeBorder(class cv::_InputArray const &,class cv::_OutputArray const &,int,int,int,int,int,class cv::Scalar_ const &)" (?copyMakeBorder@cv@@YAXAEBV_InputArray@1@AEBV_OutputArray@1@HHHHHAEBV?$Scalar_@N@1@@Z),函数 main 中引用了该符号
test.obj : error LNK2019: 无法解析的外部符号 "class cv::Mat __cdecl cv::imread(class std::basic_string,class std::allocator > const &,int)" (?imread@cv@@YA?AVMat@1@AEBV?$basic_string@DU?$char_traits@D@std@@V?$allocator@D@2@@std@@H@Z),函数 main 中引用了该符号
test.obj : error LNK2019: 无法解析的外部符号 "bool __cdecl cv::imwrite(class std::basic_string,class std::allocator > const &,class cv::_InputArray const &,class std::vector > const &)" (?imwrite@cv@@YA_NAEBV?$basic_string@DU?$char_traits@D@std@@V?$allocator@D@2@@std@@AEBV_InputArray@1@AEBV?$vector@HV?$allocator@H@std@@@3@@Z),函数 main 中引用了该符号
test.obj : error LNK2019: 无法解析的外部符号 "void __cdecl cv::resize(class cv::_InputArray const &,class cv::_OutputArray const &,class cv::Size_,double,double,int)" (?resize@cv@@YAXAEBV_InputArray@1@AEBV_OutputArray@1@V?$Size_@H@1@NNH@Z),函数 main 中引用了该符号
test.obj : error LNK2019: 无法解析的外部符号 "void __cdecl cv::cvtColor(class cv::_InputArray const &,class cv::_OutputArray const &,int,int)" (?cvtColor@cv@@YAXAEBV_InputArray@1@AEBV_OutputArray@1@HH@Z),函数 main 中引用了该符号
test.obj : error LNK2019: 无法解析的外部符号 "void __cdecl cv::rectangle(class cv::_InputOutputArray const &,class cv::Point_,class cv::Point_,class cv::Scalar_ const &,int,int,int)" (?rectangle@cv@@YAXAEBV_InputOutputArray@1@V?$Point_@H@1@1AEBV?$Scalar_@N@1@HHH@Z),函数 main 中引用了该符号
test.obj : error LNK2019: 无法解析的外部符号 "void __cdecl cv::putText(class cv::_InputOutputArray const &,class std::basic_string,class std::allocator > const &,class cv::Point_,int,double,class cv::Scalar_,int,int,bool)" (?putText@cv@@YAXAEBV_InputOutputArray@1@AEBV?$basic_string@DU?$char_traits@D@std@@V?$allocator@D@2@@std@@V?$Point_@H@1@HNV?$Scalar_@N@1@HH_N@Z),函数 main 中引用了该符号
test.obj : error LNK2019: 无法解析的外部符号 cudaStreamCreate,函数 main 中引用了该符号
test.obj : error LNK2019: 无法解析的外部符号 cudaStreamSynchronize,函数 main 中引用了该符号
test.obj : error LNK2019: 无法解析的外部符号 cudaMalloc,函数 main 中引用了该符号
test.obj : error LNK2019: 无法解析的外部符号 cudaMemcpyAsync,函数 main 中引用了该符号
test.obj : error LNK2019: 无法解析的外部符号 createInferRuntime_INTERNAL,函数 "class nvinfer1::IRuntime * __cdecl nvinfer1::`anonymous namespace'::createInferRuntime(class nvinfer1::ILogger &)" (?createInferRuntime@?A0xa97d2c6f@nvinfer1@@YAPEAVIRuntime@2@AEAVILogger@2@@Z) 中引用了该符号
test.exe : fatal error LNK1120: 14 个无法解析的外部命令
没有很直观的信息说缺少什么头文件、库文件,但是我们想啊,此测试用例用的不就是 tensorRT、opencv、cuda 老三件嘛,看报错中有 :
无法解析的外部符号 "class cv::xxxcv 指的应该是 opencv 吧,于是尝试将 opencv 的库文件链接进来,向 cl 编译语句加入:
-link opencv_world4100.lib ^
-link opencv_world4100d.lib ^
-LIBPATH:"D:\install\opencv\opencv\build\x64\vc16\lib" ^
目前的 cl 编译语句为:
cl ^
	-I"D:\install\VisualStudio2022_comm\VC\Tools\MSVC\14.40.33807\include" ^
    -I"C:\Program Files (x86)\Windows Kits\10\Include\10.0.26100.0\ucrt" ^
    -I"D:\install\opencv\opencv\build\include" ^
    -I"C:\Program Files\NVIDIA GPU Computing Toolkit\CUDA\v11.6\include" ^
    test.cpp ^
	-link libcpmt.lib ^
    -link kernel32.lib ^
    -link libucrt.lib ^
	-link opencv_world4100.lib ^
    -link opencv_world4100d.lib ^
	-LIBPATH:"D:\install\VisualStudio2022_comm\VC\Tools\MSVC\14.40.33807\lib\x64" ^
    -LIBPATH:"C:\Program Files (x86)\Windows Kits\10\Lib\10.0.26100.0\um\x64" ^
    -LIBPATH:"C:\Program Files (x86)\Windows Kits\10\Lib\10.0.26100.0\ucrt\x64" ^
	-LIBPATH:"D:\install\opencv\opencv\build\x64\vc16\lib"
执行,现在还是报错,但是没有 opencv 的报错了,现在的报错信息为:
test.obj
LINK : warning LNK4044: 无法识别的选项“/link”;已忽略
LINK : warning LNK4044: 无法识别的选项“/link”;已忽略
LINK : warning LNK4044: 无法识别的选项“/link”;已忽略
LINK : warning LNK4044: 无法识别的选项“/link”;已忽略
test.obj : error LNK2019: 无法解析的外部符号 cudaStreamCreate,函数 main 中引用了该符号
test.obj : error LNK2019: 无法解析的外部符号 cudaStreamSynchronize,函数 main 中引用了该符号
test.obj : error LNK2019: 无法解析的外部符号 cudaMalloc,函数 main 中引用了该符号
test.obj : error LNK2019: 无法解析的外部符号 cudaMemcpyAsync,函数 main 中引用了该符号
test.obj : error LNK2019: 无法解析的外部符号 createInferRuntime_INTERNAL,函数 "class nvinfer1::IRuntime * __cdecl nvinfer1::`anonymous namespace'::createInferRuntime(class nvinfer1::ILogger &)" (?createInferRuntime@?A0xa97d2c6f@nvinfer1@@YAPEAVIRuntime@2@AEAVILogger@2@@Z) 中引用了该符号
test.exe : fatal error LNK1120: 5 个无法解析的外部命令
感觉都是 cuda 相关的,于是尝试链接 cuda 的库文件,-LIBPATH 我们知道填什么,即:
-LIBPATH:"C:\Program Files\NVIDIA GPU Computing Toolkit\CUDA\v11.6\lib\x64" ^但是 C:\Program Files\NVIDIA GPU Computing Toolkit\CUDA\v11.6\lib\x64 下面有很多的 .lib 呀,都添加进去吗?其实都添加进去也ok,确实能编译通过,其实我看参考博客 https://blog.csdn.net/liujiahao123987/article/details/133892746 中的 CMakeLists.txt 中有:
target_link_libraries(Demo nvinfer cudart ${OpenCV_LIBRARIES})应该是只需要 cuda 的 nvinfer.lib、 cudart.lib 就可以,于是最终的 cl 编译语句为:
cl ^
	-I"D:\install\VisualStudio2022_comm\VC\Tools\MSVC\14.40.33807\include" ^
    -I"C:\Program Files (x86)\Windows Kits\10\Include\10.0.26100.0\ucrt" ^
    -I"D:\install\opencv\opencv\build\include" ^
    -I"C:\Program Files\NVIDIA GPU Computing Toolkit\CUDA\v11.6\include" ^
    test.cpp ^
	-link libcpmt.lib ^
    -link kernel32.lib ^
    -link libucrt.lib ^
	-link opencv_world4100.lib ^
    -link opencv_world4100d.lib ^
	-link cudart.lib ^
	-link nvinfer.lib ^
	-LIBPATH:"D:\install\VisualStudio2022_comm\VC\Tools\MSVC\14.40.33807\lib\x64" ^
    -LIBPATH:"C:\Program Files (x86)\Windows Kits\10\Lib\10.0.26100.0\um\x64" ^
    -LIBPATH:"C:\Program Files (x86)\Windows Kits\10\Lib\10.0.26100.0\ucrt\x64" ^
	-LIBPATH:"D:\install\opencv\opencv\build\x64\vc16\lib" ^
	-LIBPATH:"C:\Program Files\NVIDIA GPU Computing Toolkit\CUDA\v11.6\lib\x64"
其实也可以一个一个删除看是否报错,估计最后剩下来的也是 nvinfer.lib、 cudart.lib 这两个库文件不能删。
上述只是自己好奇自己测试玩一下,正规的方式还是看官方文档,官方文档上应该提供了 tensorRT、cuda 的用法,例如提供了标准的 CMakeLists.txt 文件 或者 .sln、.vcxproj 文件,这些文件中都有信息说明应该包含什么头文件目录和链接库文件目录,只不过具体的语法不通而已罢了,这样转换为纯 cl 编译语句也不用使用Everything 搜索的方式一个一个试了。