Windows Presentation Foundation 数据绑定:第二部分
绑定到数据库数据
在本系列的第一部分中,我们探究了原始绑定语法以及如何将简单对象绑定到 XAML 对象。虽然这是该难题的一个重要部分,但大多数情况下,实际的要求是绑定到数据库中存储的数据。在大多数情况下,它支持两种不同方案中的绑定:数据库数据(例如,DataSet、DataTable 和 DataRow)和自定义业务对象。
绑定到数据库数据
目前,数据库仍然是进行大多数开发工作的中心,特别是企业开发。为了举例说明,我们可以使用一个简单的 WPF 对话框示例,它将允许用户浏览数据库中的雇员。我们希望能够在浏览器中显示一小部分信息,包括雇员照片。还需要加载一个包含所需全部信息的表。通过新建一个包含数据库信息的 DataTable,我们可以实现该操作:
在 C# 中:
DataTable theTable = new DataTable();

string connString =

  ConfigurationManager.ConnectionStrings["Northwind"].ConnectionString;

string query = @"SELECT EmployeeID, FirstName, LastName, Title, HireDate, Photo

                 FROM Employees";


// Fill the Set with the data

using (SqlConnection conn = new SqlConnection(connString))

{

  SqlDataAdapter da = new SqlDataAdapter(query, conn);

  da.Fill(theTable);

}
我们拥有数据之后,可以使用这些数据设置 DataContext 以允许在 XAML 中对其进行绑定:
在 C# 中:
// Set the Data Context

DataContext = theTable;
既然我们要获得数据并将其输出到窗口,我们就可以在 XAML 中进行数据绑定。ComboBox 中的 Binding 仅指示绑定从父级的 DataContext(在本例中,它沿控件树向上,直至在 Window 中找到一个 DataContext)获得数据:
<ComboBox Name="theCombo"

         IsSynchronizedWithCurrentItem="True"

         ItemsSource="{Binding}"

         ... />
IsSynchronizedWithCurrentItem 属性很重要,因为当选择发生变化时,就窗口而言,是该属性更改"当前项"。它告诉 WPF 引擎将使用该对象更改当前项。如果没有该属性,DataContext 中的当前项不会改变;因此,您的文本框将假定当前项仍然是列表中的第一项。
要在组合框中显示雇员姓名,我们在 ItemsTemplate 中创建绑定以显示 DataTable 中的 FirstName 和 LastName:
<DataTemplate x:Key="EmployeeListTemplate">

  <StackPanel Orientation="Horizontal">

  <TextBlock Text="{Binding Path=FirstName}" />

  <TextBlock Text=" " />

  <TextBlock Text="{Binding Path=LastName}" />

  </StackPanel>

</DataTemplate>
接下来,我们添加文本框以显示我们的姓名、头衔和雇佣日期:
<TextBlock Canvas.Top="5">First Name:</TextBlock>

<TextBox Canvas.Top="5" Text="{Binding Path=FirstName}" />

<TextBlock Canvas.Top="25">Last Name:</TextBlock>

<TextBox Canvas.Top="25" Text="{Binding Path=LastName}" />

<TextBlock Canvas.Top="45">Title:</TextBlock>

<TextBox Canvas.Top="45" Text="{Binding Path=Title}" />

<TextBlock Canvas.Top="65">Hire Date:</TextBlock>

<TextBox Canvas.Top="65" Text="{Binding Path=HireDate}" />
由于我们也需要照片,因此需要向 XAML 添加一个图像:
<Image Name="theImage" Canvas.Top="5" Canvas.Left="5" Width="75"/>
图像唯一的问题在于,它不支持将照片数据自动绑定到图像。为了便于该操作,我们可以处理 ComboBox 的 SelectionChanged 事件以填充我们的 Image:
   <ComboBox Name="theCombo"

                IsSynchronizedWithCurrentItem="True"

                Width="200"

                ItemsSource="{Binding}"

                ItemTemplate="{StaticResource EmployeeListTemplate}"

                SelectionChanged="theCombo_OnSelectionChanged" />
在代码中,我们需要从 DataTable 加载图像,然后创建一个 BitmapImage 对象来填写 Image 标记。请注意,这不是 GDI+ (System.Drawing) 中的 Bitmap,而是 WPF 中新增的 Bitmap 对象:
// Handler to show the image

void theCombo_OnSelectionChanged(object sender, RoutedEventArgs e)

{

  ShowPhoto();

}


// Shows the Photo for the currently selected item

void ShowPhoto()

{

  object selected = theCombo.SelectedItem;

  DataRow row = ((DataRowView)selected).Row;


  // Get the raw bytes of the image

  byte[] photoSource = (byte[])row["Photo"];


  // Create the bitmap object

  // NOTE: This is *not* a GDI+ Bitmap object

  BitmapImage bitmap = new BitmapImage();

  MemoryStream strm = new MemoryStream();


  // Well-known work-around to make Northwind images work

  int offset = 78;

  strm.Write(photoSource, offset, photoSource.Length - offset);


  // Read the image into the bitmap object

  bitmap.BeginInit();

  bitmap.StreamSource = strm;

  bitmap.EndInit();


  // Set the Image with the Bitmap

  theImage.Source = bitmap;


}
我们从 ComboBox 中抽取 SelectedItem 并将其转换成 DataRow,这样我们就可以获得自己的数据。然后,我们从 Photo 列抽取字节数组。这是存储在 Northwind 数据库中的照片。我们可以使用内存中流将照片字节流入到 BitmapImage 对象中。唯一的改动是常用的替代方案,即跳过 Northwind 图像头的前 78 个字节,因为不再使用这些字节。一旦我们将流读入位图中,就可以将其作为源分配给 Image 对象。
我希望确保数据绑定是双向的,因此需要生成一个显示当前信息的按钮,这样我们就可以知道它在我们的 DataRow 中:
在 C# 中:
void SaveButton_OnClick(object sender, RoutedEventArgs e)

{

  object selected = theCombo.SelectedItem;

  DataRow row = ((DataRowView)selected).Row;


  MessageBox.Show(string.Format("{0} {1} {2} - {3:d}",

    row["Title"], row["FirstName"], row["LastName"],  row["HireDate"]));

}
完整的 XAML 文件其结尾部分如下所示:
<Window x:Class="ExampleCS.EmployeeBrowser"

    xmlns="http://schemas.microsoft.com/winfx/avalon/2005"

    xmlns:x="http://schemas.microsoft.com/winfx/xaml/2005"

    Title="Employee Browser"

    Loaded="OnLoaded"

    Width="300"

    Height="170"

    WindowStartupLocation="CenterScreen"

    >

  <Window.Resources>

    <DataTemplate x:Key="EmployeeListTemplate">

      <StackPanel Orientation="Horizontal">

        <TextBlock Text="<b>{Binding Path=FirstName}</b>" />

        <TextBlock Text=" " />

        <TextBlock Text="<b>{Binding Path=LastName}</b>" />

      </StackPanel>

    </DataTemplate>

  </Window.Resources>

  <Window.Background>

    <LinearGradientBrush StartPoint="0,0" EndPoint="1,1">

      <LinearGradientBrush.GradientStops>

        <GradientStop Color="DarkGray" Offset="0" />

        <GradientStop Color="White" Offset=".75" />

        <GradientStop Color="DarkGray" Offset="1" />

      </LinearGradientBrush.GradientStops>

    </LinearGradientBrush>

  </Window.Background>

  <StackPanel Name="theStackPanel"

              VerticalAlignment="Top">

    <ComboBox Name="theCombo"

              IsSynchronizedWithCurrentItem="True"

              Width="200"

              ItemsSource="<b>{Binding}</b>"

              ItemTemplate="{StaticResource EmployeeListTemplate}"

              SelectionChanged="<b>theCombo_OnSelectionChanged</b>" />

    <Canvas>

      <Canvas.Resources>

        <Style TargetType="{x:Type TextBox}">

          <Setter Property="Canvas.Left" Value="160" />

          <Setter Property="Padding" Value="0" />

          <Setter Property="Height" Value="18" />

          <Setter Property="Width" Value="120" />

        </Style>

        <Style TargetType="{x:Type TextBlock}">

          <Setter Property="Canvas.Left" Value="90" />

          <Setter Property="Padding" Value="0" />

          <Setter Property="Height" Value="18" />

          <Setter Property="FontWeight" Value="Bold" />

        </Style>

      </Canvas.Resources>

      <Image Name="theImage" Canvas.Top="5" Canvas.Left="5" Width="75"/>

      <TextBlock Canvas.Top="5">First Name:</TextBlock>

      <TextBox Canvas.Top="5" Text="<b>{Binding Path=FirstName}</b>" />

      <TextBlock Canvas.Top="25">Last Name:</TextBlock>

      <TextBox Canvas.Top="25" Text="<b>{Binding Path=LastName}</b>" />

      <TextBlock Canvas.Top="45">Title:</TextBlock>

      <TextBox Canvas.Top="45" Text="<b>{Binding Path=Title}</b>" />

      <TextBlock Canvas.Top="65">Hire Date:</TextBlock>

      <TextBox Canvas.Top="65" Text="<b>{Binding Path=HireDate}</b>" />

      <Button Canvas.Top="85" Canvas.Left="90" Width="190"

              Name="SaveButton" Click="SaveButton_OnClick">Save</Button>

    </Canvas>

  </StackPanel>

</Window>
现在,如果我们运行浏览器,将获得如图 1 所示的界面:
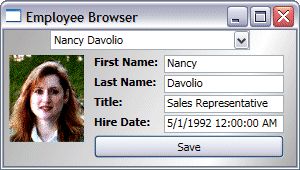
图 1. 雇员浏览器
这个简单的示例相当简单易懂,但如果我们在 DataSet 中使用相关的 DataTable,该怎么办呢?我们看看是否一样简单。
绑定相关的 DataTable
我们可以扩展雇员浏览器以包括业务员的定单。为此,我们需要获得定单信息。我们可以在每次切换用户时利用一个新查询来实现该操作,不过,我们还是将数据随 Employee 一起加载到 DataSet 中,并使用 DataRelation 使这两部分信息相关:
在 C# 中:
DataSet theSet = new DataSet();


string connString = ConfigurationManager.ConnectionStrings["Northwind"].ConnectionString;

string employeeQuery = @"

  SELECT EmployeeID, FirstName, LastName, Title, HireDate, Photo

  FROM Employees

";

string orderQuery = @"

  SELECT o.OrderID, EmployeeID, CompanyName, OrderDate, SUM((UnitPrice * Quantity)* (1-Discount)) as OrderTotal

  FROM Orders o

  JOIN [Order Details] od on o.OrderID = od.OrderID

   JOIN Customers c on c.CustomerID = o.CustomerID

  GROUP BY o.OrderID, o.EmployeeID, o.OrderDate, CompanyName";


// Fill the Set with the data

using (SqlConnection conn = new SqlConnection(connString))

{

  SqlDataAdapter da = new SqlDataAdapter(employeeQuery, conn);

  da.Fill(theSet, "Employees");

  da.SelectCommand.CommandText = orderQuery;

  da.Fill(theSet, "Orders");

}


// Create the relationship

DataTable empTable = theSet.Tables["Employees"];

DataTable ordTable = theSet.Tables["Orders"];

theSet.Relations.Add("Emp2Ord",

                     empTable.Columns["EmployeeID"],

                     ordTable.Columns["EmployeeID"],

                     false);


// Set the Context of the Window to be the

// DataTable we've created

DataContext = empTable;
这段代码将创建一个具有两个表的 DataSet:Employees 和 Orders。这两个表通过 Emp2Ord 关系与 EmployeeID 相关。我们仍然可以绑定到 Employee DataTable,这样 XAML 中的原始数据绑定即可以正常工作。与 Windows 窗体或 ASP.NET 数据绑定非常类似,我们可以绑定到关系的名称,从而使我们能够绑定到一组相关记录:
 <ListBox Name="OrderList" Width="280" Height="200"

     ItemsSource="{Binding Emp2Ord}"

     ItemTemplate="{StaticResource OrderListTemplate}" />
该列表框仍然使用与雇员浏览器的其余部分相同的 DataContext;它仅通过关系指定绑定。一旦将列表框绑定到关系,我们就可以像在雇员组合框中那样绑定到 ItemTemplate 中的各个字段:
 <DataTemplate x:Key="OrderListTemplate">

    <StackPanel Orientation="Horizontal">

      <TextBlock VerticalAlignment="Top" Width="100"

                    Text="{Binding Path=CompanyName}" />

    <StackPanel>

      <TextBlock Text="{Binding Path=OrderID}" />

      <TextBlock Text="{Binding Path=OrderDate}" />

      <TextBlock Text="{Binding Path=OrderTotal}" />

      </StackPanel>

    </StackPanel>

 </DataTemplate>
通过这个额外的数据绑定,我们现在正在显示一个列表框,仅包括与所选用户有关的定单信息:
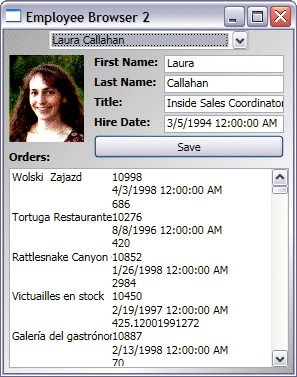
图 2. 改进的雇员浏览器
这使我们能够绑定到更复杂的数据,而不仅仅是简单的成块数据。在许多组织中,它们使用自定义的 .NET 类型(或业务对象)来保存其数据和业务逻辑。WPF 会像 DataSet 一样轻松地绑定到这些对象吗?
绑定到"业务对象"
在 .NET 的最初表现形式(包括 Windows 窗体和 ASP.NET)中,DataSet 及其相关的对象是一等公民。它们简单地绑定数据,正常地工作。如果选择构建对象模型或业务对象来保存数据,您只能手动将对象中的数据绑定到控件。在 .NET 2.0 中,对象升级为一等公民,从而可以简化到对象的绑定。在 WPF 中也是一样。就像将对象作为 WPF 中的 DataSet 绑定一样简单。
要用业务对象创建喜爱的雇员浏览器,我们先创建一个类来保存 Employee。
在 C# 中:
public class Employee

{

  // Fields

  int _employeeID;

  string _firstName;

  string _lastName;

  string _title;

  DateTime _hireDate;

  BitmapImage _photo;


  // Constructor

  public Employee(IDataRecord record)

  {

    _employeeID = (int) record["EmployeeID"];

    _firstName = (string) record["FirstName"];

    _lastName = (string)record["LastName"];

    _title = (string)record["Title"];

    _hireDate = (DateTime)record["HireDate"];

    CreatePhoto((byte[])record["Photo"]);

  }


  // BitmapImage creation

  void CreatePhoto(byte[] photoSource)

  {

    // Create the bitmap object

    // NOTE: This is *not* a GDI+ Bitmap object

    _photo = new BitmapImage();

    MemoryStream strm = new MemoryStream();


    // Well-known hack to make Northwind images work

    int offset = 78;

    strm.Write(photoSource, offset, photoSource.Length - offset);


    // Read the image into the bitmap object

    _photo.BeginInit();

    _photo.StreamSource = strm;

    _photo.EndInit();


  }

}
该类接受一个 IDataRecord 类(DataReader 的单一结果,不过我们马上就会对此进行介绍),并填写我们在本文前面的 DataTable 示例中使用的那些字段。请注意,我们已经将此处的 BitmapImage 创建移至业务对象,从而可以在 UI 类中更简单地使用雇员。
接下来,我们将需要这些字段的属性访问器:
在 C# 中:
// Read-Only

public int EmployeeID

{

  get { return _employeeID; }

}


public string FirstName

{

  get { return _firstName; }

  set { _firstName = value; }

}


public string LastName

{

  get { return _lastName; }

  set { _lastName = value; }

}


public string Title

{

  get { return _title; }

  set { _title = value; }

}


public DateTime HireDate

{

  get { return _hireDate; }

  set { _hireDate = value; }

}


// Read-Only

public BitmapImage Photo

{

  get { return _photo; }

}
在这些代码中,我们仅允许对类中的字段进行读写(或只读)访问。现在,可以编写一个集合来保存我们的雇员:
在 C# 中:
public class EmployeeList : ObservableCollection

{

  public EmployeeList()

  {

    string connString =

           ConfigurationManager.ConnectionStrings["Northwind"].ConnectionString;

    string query = @"

      SELECT EmployeeID, FirstName, LastName, Title, HireDate, Photo

      FROM Employees

    ";


    // Fill the Set with the data

    using (SqlConnection conn = new SqlConnection(connString))

    {

      try

      {

        SqlCommand cmd = conn.CreateCommand();

        cmd.CommandText = query;


        conn.Open();

        SqlDataReader rdr = cmd.ExecuteReader();

        while (rdr.Read())

        {

          Add(new Employee(rdr));

        }

      }

      finally

      {

        if (conn.State != ConnectionState.Closed) conn.Close();

      }

    }

  }

}
该集合的基类是 ObservableCollection 类,它提供一种机制,使得 UI 可以知道该集合中是否添加了新成员。我们已经将数据访问从 UI 页移至 Collection 类。创建该类后,我们查询数据库并通过 DataReader 向该集合添加新雇员。既然我们具有了集合和单个对象,就可以通过映射将���导入 XAML 中(本系列文章的第一部分对此进行了详细解释):
<Window

     ...

     xmlns:e="Example"

     DataContext="{StaticResource EmployeeList}"

     >

  <Window.Resources>

     <e:EmployeeList x:Key="EmployeeList" />

     ...

  </Window.Resources>

  ...

</Window>
我们用 ?Mapping 声明将该类导入 XAML 文档中,并在 Resources 中指定 EmployeeList,这样我们就可以将其用作窗口的 DataContext。这样,XAML 文件的其余部分就与原始雇员浏览器完全相同了,因为我们仍将尝试在 DataSet 示例中使用的那些字段名。唯一的改动是绑定 XAML 文档中的 BitmapImage,而不是在隐藏代码中进行该操作:
...

   <Image Name="theImage" Canvas.Top="5" Canvas.Left="5" Width="75"

             Source="{Binding Path=Photo}"

   /> ...
现在,我们具有一个行为相同的雇员浏览器:
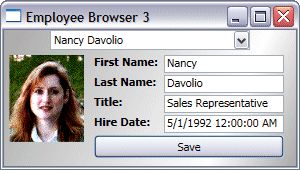
图 3. 基于业务对象的雇员浏览器
除了使用类型映射,您还可以使用 ObjectDataProvider 将对象置于 XAML 中。正如我在本文第一部分中介绍的那样,只需指定一个键和类型名称:
<ObjectDataProvider x:Key="EmployeeList"

                                   TypeName="Example.Data.EmployeeList, ExampleCS"/>
x:Key 只是一个要在绑定中使用的名字对象,Typename 是类名和程序集(在本例中是我们的 UI 所在的程序集)。XAML 的其余部分保持不变,因为我们要加载相同的数据。

我们所处的位置
现在,我们可以使用 DataSet 或自定义对象从数据库下载数据,然后将数据直接绑定到 WPF 对象。您应该准备好探究您的第一个 WPF 数据库项目。