ESP32开发之外部中断
第一篇我进行了GPIO实验,那么本章我们进行外部中断实验。在GPIO设置的基础上我们继续进行实验操作。首先还是查看手册:这个函数用于安装GPIO的中断驱动,nice正好是我们需要的
外部中断安装函数
/**
  * @brief Install the GPIO driver's ETS_GPIO_INTR_SOURCE ISR handler service, which allows per-pin GPIO interrupt handlers.
  *
  * This function is incompatible with gpio_isr_register() - if that function is used, a single global ISR is registered for all GPIO interrupts. If this function is used, the ISR service provides a global GPIO ISR and individual pin handlers are registered via the gpio_isr_handler_add() function.
  *
  * @param intr_alloc_flags Flags used to allocate the interrupt. One or multiple (ORred)
  *            ESP_INTR_FLAG_* values. See esp_intr_alloc.hesp_intr_alloc.h for more info.
  *
  * @return
  *     - ESP_OK Success
  *     - ESP_ERR_NO_MEM No memory to install this service
  *     - ESP_ERR_INVALID_STATE ISR service already installed.
  *     - ESP_ERR_NOT_FOUND No free interrupt found with the specified flags
  *     - ESP_ERR_INVALID_ARG GPIO error
  */
esp_err_t gpio_install_isr_service(int intr_alloc_flags);
中断回调函数
通常我们使用中断都是有中断回调函数的,通常表现如下:

所以我们进行中断处理是需要去解决别的事情然后跳回到原本的执行函数运行所以需要继续寻找一个函数去增加添加我们的中断回调函数:查看用处是给GPIO添加一个ISR handle那么就是它了。
/**
  * @brief Add ISR handler for the corresponding GPIO pin.
  *
  * Call this function after using gpio_install_isr_service() to
  * install the driver's GPIO ISR handler service.
  *
  * The pin ISR handlers no longer need to be declared with IRAM_ATTR,
  * unless you pass the ESP_INTR_FLAG_IRAM flag when allocating the
  * ISR in gpio_install_isr_service().
  *
  * This ISR handler will be called from an ISR. So there is a stack
  * size limit (configurable as "ISR stack size" in menuconfig). This
  * limit is smaller compared to a global GPIO interrupt handler due
  * to the additional level of indirection.
  *
  * @param gpio_num GPIO number
  * @param isr_handler ISR handler function for the corresponding GPIO number.
  * @param args parameter for ISR handler.
  *
  * @return
  *     - ESP_OK Success
  *     - ESP_ERR_INVALID_STATE Wrong state, the ISR service has not been initialized.
  *     - ESP_ERR_INVALID_ARG Parameter error
  */
esp_err_t gpio_isr_handler_add(gpio_num_t gpio_num, gpio_isr_t isr_handler, void *args);
对这个函数的参数进行解析:esp_err_t gpio_isr_handler_add(gpio_num_t gpio_num, gpio_isr_t isr_handler, void *args)
参数1:gpio_num_t gpio_num:这个是我们的老朋友了是gpio的的端口所以我们只需要填入端口号。
参数2:gpio_isr_t isr_handler:要了解这个参数我们需要跳转到gpio_isr_t的类型typedef void (*gpio_isr_t)(void *arg); 那么这是一个函数指针使用了typedef进行重定义因此这个位置应该是传入函数的参数名字且返回值类型为void类型函数的形参为void*arg.
参数3:void *args形参是ISR的参数void *类型的指针可以指向任何数据类型,因此它可以用作通用指针,允许在函数间传递不同类型的数据。
因此该函数我们实际只用关注参数1和参数2就可以实现功能。所以我们来写一下代码吧我们将boot0复用为按键的外部中断按键按下的时候可以将gpio4电平拉高:
整体代码实现
#include
#include "driver/gpio.h"
#include "esp_log.h"
#include "freertos/FreeRTOS.h"
#include "freertos/task.h"


void pinConfiguration() //此处是设置gpio4的引脚进行配置详情参考gpio配置章节
{
    const gpio_config_t Pin_config={
        .intr_type=GPIO_INTR_DISABLE,
        .mode=GPIO_MODE_OUTPUT,
        .pin_bit_mask=(1ULL<
实验现象
按键按下时拉高:
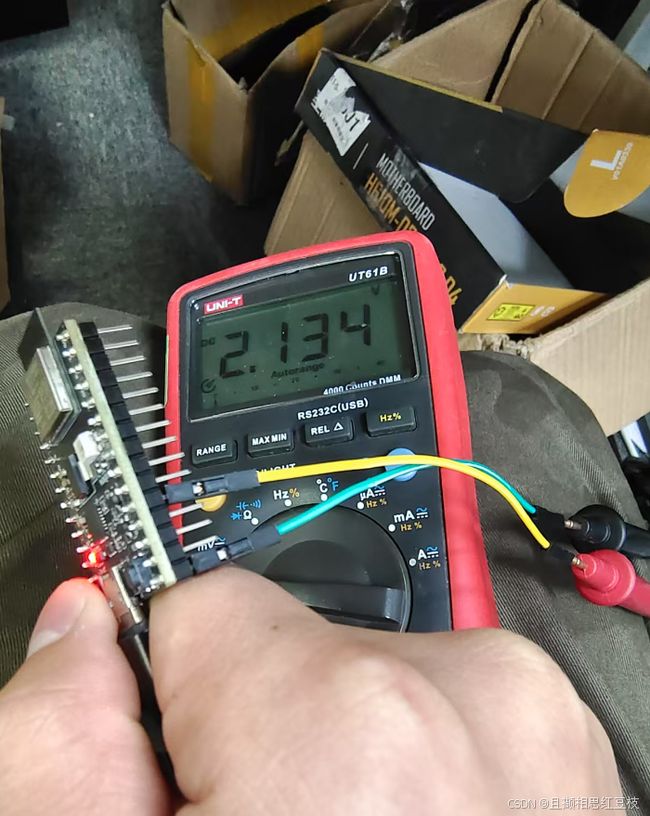
松开按键直接拉低: