Android Xfermode 实战 实现圆形、圆角图片
2、原理
====
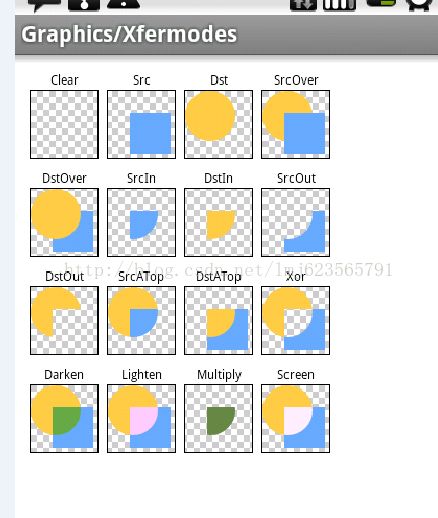
原理就不多说了,这张图在我博客里出现的次数大概有3次以上了,我们这次使用的模式DST_IN;也就是先绘制图片,再绘制形状了~~
3、Xfermode实战
============
1、自定义属性
首先依然是自定义属性,和上篇一致。
2、构造中获取属性
public class RoundImageViewByXfermode extends ImageView
{
private Paint mPaint;
private Xfermode mXfermode = new PorterDuffXfermode(Mode.DST_IN);
private Bitmap mMaskBitmap;
private WeakReference mWeakBitmap;
/**
- 图片的类型,圆形or圆角
*/
private int type;
public static final int TYPE_CIRCLE = 0;
public static final int TYPE_ROUND = 1;
/**
- 圆角大小的默认值
*/
private static final int BODER_RADIUS_DEFAULT = 10;
/**
- 圆角的大小
*/
private int mBorderRadius;
public RoundImageViewByXfermode(Context context)
{
this(context,null);
mPaint = new Paint();
mPaint.setAntiAlias(true);
}
public RoundImageViewByXfermode(Context context, AttributeSet attrs)
{
super(context, attrs);
mPaint = new Paint();
mPaint.setAntiAlias(true);
TypedArray a = context.obtainStyledAttributes(attrs,
R.styleable.RoundImageViewByXfermode);
mBorderRadius = a.getDimensionPixelSize(
R.styleable.RoundImageViewByXfermode_borderRadius, (int) TypedValue
.applyDimension(TypedValue.COMPLEX_UNIT_DIP,
BODER_RADIUS_DEFAULT, getResources()
.getDisplayMetrics()));// 默认为10dp
Log.e(“TAG”, mBorderRadius+“”);
type = a.getInt(R.styleable.RoundImageViewByXfermode_type, TYPE_CIRCLE);// 默认为Circle
a.recycle();
}
获取自定义属性,然后还写些成员变量~~
3、onMeasure
@Override
protected void onMeasure(int widthMeasureSpec, int heightMeasureSpec)
{
super.onMeasure(widthMeasureSpec, heightMeasureSpec);
/**
- 如果类型是圆形,则强制改变view的宽高一致,以小值为准
*/
if (type == TYPE_CIRCLE)
{
int width = Math.min(getMeasuredWidth(), getMeasuredHeight());
setMeasuredDimension(width, width);
}
}
在onMeasure中,如果是圆形则重新设置view大小。
4、onDraw
@SuppressLint(“DrawAllocation”)
@Override
protected void onDraw(Canvas canvas)
{
//在缓存中取出bitmap
Bitmap bitmap = mWeakBitmap == null ? null : mWeakBitmap.get();
if (null == bitmap || bitmap.isRecycled())
{
//拿到Drawable
Drawable drawable = getDrawable();
//获取drawable的宽和高
int dWidth = drawable.getIntrinsicWidth();
int dHeight = drawable.getIntrinsicHeight();
if (drawable != null)
{
//创建bitmap
bitmap = Bitmap.createBitmap(getWidth(), getHeight(),
Config.ARGB_8888);
float scale = 1.0f;
//创建画布
Canvas drawCanvas = new Canvas(bitmap);
//按照bitmap的宽高,以及view的宽高,计算缩放比例;因为设置的src宽高比例可能和imageview的宽高比例不同,这里我们不希望图片失真;
if (type == TYPE_ROUND)
{
// 如果图片的宽或者高与view的宽高不匹配,计算出需要缩放的比例;缩放后的图片的宽高,一定要大于我们view的宽高;所以我们这里取大值;
scale = Math.max(getWidth() * 1.0f / dWidth, getHeight()
- 1.0f / dHeight);
} else
{
scale = getWidth() * 1.0F / Math.min(dWidth, dHeight);
}
//根据缩放比例,设置bounds,相当于缩放图片了
drawable.setBounds(0, 0, (int) (scale * dWidth),
(int) (scale * dHeight));
drawable.draw(drawCanvas);
if (mMaskBitmap == null || mMaskBitmap.isRecycled())
{
mMaskBitmap = getBitmap();
}
// Draw Bitmap.
mPaint.reset();
mPaint.setFilterBitmap(false);
mPaint.setXfermode(mXfermode);
//绘制形状
drawCanvas.drawBitmap(mMaskBitmap, 0, 0, mPaint);
mPaint.setXfermode(null);
//将准备好的bitmap绘制出来
canvas.drawBitmap(bitmap, 0, 0, null);
//bitmap缓存起来,避免每次调用onDraw,分配内存
mWeakBitmap = new WeakReference(bitmap);
}
}
//如果bitmap还存在,则直接绘制即可
if (bitmap != null)
{
mPaint.setXfermode(null);
canvas.drawBitmap(bitmap, 0.0f, 0.0f, mPaint);
return;
}
}
/**
-
绘制形状
-
@return
*/
public Bitmap getBitmap()
{
Bitmap bitmap = Bitmap.createBitmap(getWidth(), getHeight(),
Bitmap.Config.ARGB_8888);
Canvas canvas = new Canvas(bitmap);
Paint paint = new Paint(Paint.ANTI_ALIAS_FLAG);
paint.setColor(Color.BLACK);
if (type == TYPE_ROUND)
{
canvas.drawRoundRect(new RectF(0, 0, getWidth(), getHeight()),
mBorderRadius, mBorderRadius, paint);
} else
{
canvas.drawCircle(getWidth() / 2, getWidth() / 2, getWidth() / 2,
paint);
}
return bitmap;
}
在onDraw中拿到drawable,然后获取drawable的宽和高,根据当前的type和view的宽和高,进行适当的缩放。具体原理:参考上篇的matrix的scale计算,原理一致。
然后就是设置Xfermode,getBitmap会根据type返回图形,直接绘制到内存中的bitmap上即可。最后把bitmap缓存起来,避免每次onDraw都分配内存和重启绘图。
大家可以进行扩展type,绘制心形、三角形什么的,直接在getBitmap里面添加分支就可以。
最后记得invalidate中做一些处理:
@Override
public void invalidate()
{
mWeakBitmap = null;
if (mMaskBitmap != null)
{
mMaskBitmap.recycle();
mMaskBitmap = null;
}
super.invalidate();
}
主要是因为我们缓存了,当调用invalidate时,将缓存清除。
4、布局文件及效果图
==========
xmlns:tools=“http://schemas.android.com/tools” xmlns:zhy=“http://schemas.android.com/apk/res/com.zhy.variousshapeimageview” android:layout_width=“match_parent” android:layout_height=“wrap_content” > android:layout_width=“match_parent” android:layout_height=“match_parent” android:orientation=“vertical” > android:layout_width=“130dp” android:layout_height=“130dp” android:layout_margin=“10dp” android:src=“@drawable/qiqiu” > android:layout_width=“wrap_content” android:layout_height=“wrap_content” android:layout_margin=“10dp” android:src=“@drawable/aa” zhy:borderRadius=“30dp”