STM32HAL库-移植Unity针对微控制器编写测试框架
概述
本篇文章介绍如何使用STM32HAL库,移植Unity 是一个为C语言构建的单元测试框架,侧重于使用嵌入式工具链。
GitHub:https://github.com/ThrowTheSwitch/Unity
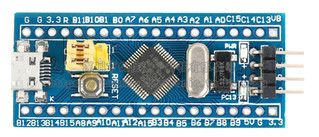
硬件:STM32F103CBT6最小系统板
软件:Keil 5.29 + STM32CubeMX6.20
一、使用方法
把Unity源码下载下来,具体步骤,请移步到官网详解。https://github.com/ThrowTheSwitch/Unity
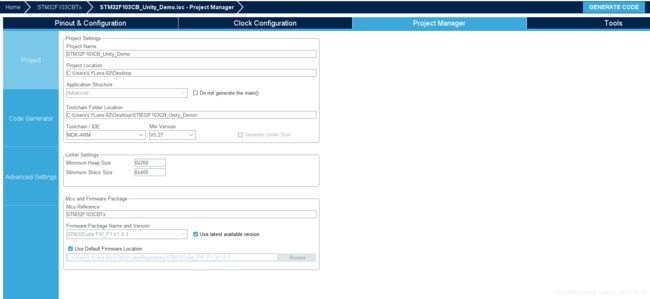
二、STM32CubeMx配置

三、Examples
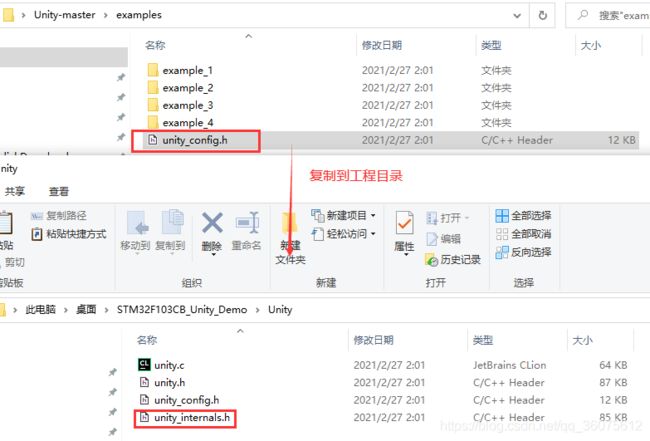
1、打开STM32CubeMx生成的keil工程,新建Unity文件夹,把下来的源码目录下的unity.c、unity.h、unity_internals.h、unity_config.h四个文件,复制到工程目录中来,并添加keil工程中来即可。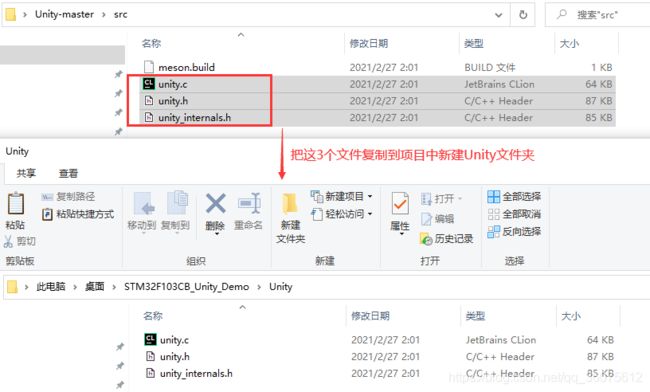
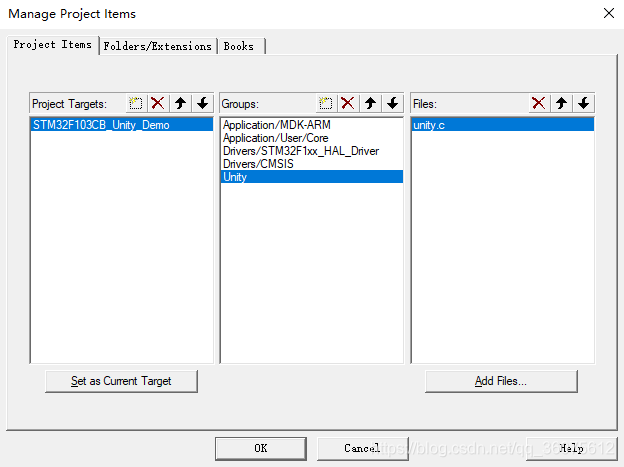
2、添加头文件路径
3、编译工程
4、解决出错问题
新建test_unity_code.c文件
#include "unity.h"


void setUp(void)
{
}

void tearDown(void)
{
}
再次编译
注意:在不同目标平台来配置unity_config.h文件,我使用的是Cortex-m3,配置如下:
/* Unity Configuration
 * As of May 11th, 2016 at ThrowTheSwitch/Unity commit 837c529
 * Update: December 29th, 2016
 * See Also: Unity/docs/UnityConfigurationGuide.pdf
 *
 * Unity is designed to run on almost anything that is targeted by a C compiler.
 * It would be awesome if this could be done with zero configuration. While
 * there are some targets that come close to this dream, it is sadly not
 * universal. It is likely that you are going to need at least a couple of the
 * configuration options described in this document.
 *
 * All of Unity's configuration options are `#defines`. Most of these are simple
 * definitions. A couple are macros with arguments. They live inside the
 * unity_internals.h header file. We don't necessarily recommend opening that
 * file unless you really need to. That file is proof that a cross-platform
 * library is challenging to build. From a more positive perspective, it is also
 * proof that a great deal of complexity can be centralized primarily to one
 * place in order to provide a more consistent and simple experience elsewhere.
 *
 * Using These Options
 * It doesn't matter if you're using a target-specific compiler and a simulator
 * or a native compiler. In either case, you've got a couple choices for
 * configuring these options:
 *
 *  1. Because these options are specified via C defines, you can pass most of
 *     these options to your compiler through command line compiler flags. Even
 *     if you're using an embedded target that forces you to use their
 *     overbearing IDE for all configuration, there will be a place somewhere in
 *     your project to configure defines for your compiler.
 *  2. You can create a custom `unity_config.h` configuration file (present in
 *     your toolchain's search paths). In this file, you will list definitions
 *     and macros specific to your target. All you must do is define
 *     `UNITY_INCLUDE_CONFIG_H` and Unity will rely on `unity_config.h` for any
 *     further definitions it may need.
 */

#ifndef UNITY_CONFIG_H
#define UNITY_CONFIG_H

/* ************************* AUTOMATIC INTEGER TYPES ***************************
 * C's concept of an integer varies from target to target. The C Standard has
 * rules about the `int` matching the register size of the target
 * microprocessor. It has rules about the `int` and how its size relates to
 * other integer types. An `int` on one target might be 16 bits while on another
 * target it might be 64. There are more specific types in compilers compliant
 * with C99 or later, but that's certainly not every compiler you are likely to
 * encounter. Therefore, Unity has a number of features for helping to adjust
 * itself to match your required integer sizes. It starts off by trying to do it
 * automatically.
 **************************************************************************** */

/* The first attempt to guess your types is to check `limits.h`. Some compilers
 * that don't support `stdint.h` could include `limits.h`. If you don't
 * want Unity to check this file, define this to make it skip the inclusion.
 * Unity looks at UINT_MAX & ULONG_MAX, which were available since C89.
 */
 #define UNITY_EXCLUDE_LIMITS_H

/* The second thing that Unity does to guess your types is check `stdint.h`.
 * This file defines `UINTPTR_MAX`, since C99, that Unity can make use of to
 * learn about your system. It's possible you don't want it to do this or it's
 * possible that your system doesn't support `stdint.h`. If that's the case,
 * you're going to want to define this. That way, Unity will know to skip the
 * inclusion of this file and you won't be left with a compiler error.
 */
/* #define UNITY_EXCLUDE_STDINT_H */

/* ********************** MANUAL INTEGER TYPE DEFINITION ***********************
 * If you've disabled all of the automatic options above, you're going to have
 * to do the configuration yourself. There are just a handful of defines that
 * you are going to specify if you don't like the defaults.
 **************************************************************************** */

 /* Define this to be the number of bits an `int` takes up on your system. The
 * default, if not auto-detected, is 32 bits.
 *
 * Example:
 */
/* #define UNITY_INT_WIDTH 16 */

/* Define this to be the number of bits a `long` takes up on your system. The
 * default, if not autodetected, is 32 bits. This is used to figure out what
 * kind of 64-bit support your system can handle.  Does it need to specify a
 * `long` or a `long long` to get a 64-bit value. On 16-bit systems, this option
 * is going to be ignored.
 *
 * Example:
 */
/* #define UNITY_LONG_WIDTH 16 */

/* Define this to be the number of bits a pointer takes up on your system. The
 * default, if not autodetected, is 32-bits. If you're getting ugly compiler
 * warnings about casting from pointers, this is the one to look at.
 *
 * Example:
 */
 #define UNITY_POINTER_WIDTH 64

/* Unity will automatically include 64-bit support if it auto-detects it, or if
 * your `int`, `long`, or pointer widths are greater than 32-bits. Define this
 * to enable 64-bit support if none of the other options already did it for you.
 * There can be a significant size and speed impact to enabling 64-bit support
 * on small targets, so don't define it if you don't need it.
 */
/* #define UNITY_INCLUDE_64 */


/* *************************** FLOATING POINT TYPES ****************************
 * In the embedded world, it's not uncommon for targets to have no support for
 * floating point operations at all or to have support that is limited to only
 * single precision. We are able to guess integer sizes on the fly because
 * integers are always available in at least one size. Floating point, on the
 * other hand, is sometimes not available at all. Trying to include `float.h` on
 * these platforms would result in an error. This leaves manual configuration as
 * the only option.
 **************************************************************************** */

 /* By default, Unity guesses that you will want single precision floating point
  * support, but not double precision. It's easy to change either of these using
  * the include and exclude options here. You may include neither, just float,
  * or both, as suits your needs.
  */
#define UNITY_EXCLUDE_FLOAT
#define UNITY_INCLUDE_DOUBLE
/* #define UNITY_EXCLUDE_DOUBLE */

/* For features that are enabled, the following floating point options also
 * become available.
 */

/* Unity aims for as small of a footprint as possible and avoids most standard
 * library calls (some embedded platforms don't have a standard library!).
 * Because of this, its routines for printing integer values are minimalist and
 * hand-coded. To keep Unity universal, though, we eventually chose to develop
 * our own floating point print routines. Still, the display of floating point
 * values during a failure are optional. By default, Unity will print the
 * actual results of floating point assertion failures. So a failed assertion
 * will produce a message like "Expected 4.0 Was 4.25". If you would like less
 * verbose failure messages for floating point assertions, use this option to
 * give a failure message `"Values Not Within Delta"` and trim the binary size.
 */
/* #define UNITY_EXCLUDE_FLOAT_PRINT */

/* If enabled, Unity assumes you want your `FLOAT` asserts to compare standard C
 * floats. If your compiler supports a specialty floating point type, you can
 * always override this behavior by using this definition.
 *
 * Example:
 */
/* #define UNITY_FLOAT_TYPE float16_t */

/* If enabled, Unity assumes you want your `DOUBLE` asserts to compare standard
 * C doubles. If you would like to change this, you can specify something else
 * by using this option. For example, defining `UNITY_DOUBLE_TYPE` to `long
 * double` could enable gargantuan floating point types on your 64-bit processor
 * instead of the standard `double`.
 *
 * Example:
 */
/* #define UNITY_DOUBLE_TYPE long double */

/* If you look up `UNITY_ASSERT_EQUAL_FLOAT` and `UNITY_ASSERT_EQUAL_DOUBLE` as
 * documented in the Unity Assertion Guide, you will learn that they are not
 * really asserting that two values are equal but rather that two values are
 * "close enough" to equal. "Close enough" is controlled by these precision
 * configuration options. If you are working with 32-bit floats and/or 64-bit
 * doubles (the normal on most processors), you should have no need to change
 * these options. They are both set to give you approximately 1 significant bit
 * in either direction. The float precision is 0.00001 while the double is
 * 10^-12. For further details on how this works, see the appendix of the Unity
 * Assertion Guide.
 *
 * Example:
 */
/* #define UNITY_FLOAT_PRECISION 0.001f  */
/* #define UNITY_DOUBLE_PRECISION 0.001f */


/* *************************** MISCELLANEOUS ***********************************
 * Miscellaneous configuration options for Unity
 **************************************************************************** */

/* Unity uses the stddef.h header included in the C standard library for the
 * "NULL" macro. Define this in order to disable the include of stddef.h. If you
 * do this, you have to make sure to provide your own "NULL" definition.
 */
/* #define UNITY_EXCLUDE_STDDEF_H */

/* Define this to enable the unity formatted print macro:
 * "TEST_PRINTF"
 */
/* #define UNITY_INCLUDE_PRINT_FORMATTED */


/* *************************** TOOLSET CUSTOMIZATION ***************************
 * In addition to the options listed above, there are a number of other options
 * which will come in handy to customize Unity's behavior for your specific
 * toolchain. It is possible that you may not need to touch any of these but
 * certain platforms, particularly those running in simulators, may need to jump
 * through extra hoops to operate properly. These macros will help in those
 * situations.
 **************************************************************************** */

/* By default, Unity prints its results to `stdout` as it runs. This works
 * perfectly fine in most situations where you are using a native compiler for
 * testing. It works on some simulators as well so long as they have `stdout`
 * routed back to the command line. There are times, however, where the
 * simulator will lack support for dumping results or you will want to route
 * results elsewhere for other reasons. In these cases, you should define the
 * `UNITY_OUTPUT_CHAR` macro. This macro accepts a single character at a time
 * (as an `int`, since this is the parameter type of the standard C `putchar`
 * function most commonly used). You may replace this with whatever function
 * call you like.
 *
 * Example:
 * Say you are forced to run your test suite on an embedded processor with no
 * `stdout` option. You decide to route your test result output to a custom
 * serial `RS232_putc()` function you wrote like thus:
 */
/* #define UNITY_OUTPUT_CHAR(a)                    RS232_putc(a) */
/* #define UNITY_OUTPUT_CHAR_HEADER_DECLARATION    RS232_putc(int) */
/* #define UNITY_OUTPUT_FLUSH()                    RS232_flush() */
/* #define UNITY_OUTPUT_FLUSH_HEADER_DECLARATION   RS232_flush(void) */
/* #define UNITY_OUTPUT_START()                    RS232_config(115200,1,8,0) */
/* #define UNITY_OUTPUT_COMPLETE()                 RS232_close() */

/* Some compilers require a custom attribute to be assigned to pointers, like
 * `near` or `far`. In these cases, you can give Unity a safe default for these
 * by defining this option with the attribute you would like.
 *
 * Example:
 */
/* #define UNITY_PTR_ATTRIBUTE __attribute__((far)) */
/* #define UNITY_PTR_ATTRIBUTE near */

/* Print execution time of each test when executed in verbose mode
 *
 * Example:
 *
 * TEST - PASS (10 ms)
 */
/* #define UNITY_INCLUDE_EXEC_TIME */

#endif /* UNITY_CONFIG_H */
5、在测试函数中用到 TEST_ASSERT_TRUE和 TEST_ASSERT_FALSE, 是 Unity 实现的两个断言, 用于判断 布尔型表达式的值为真或为假。关于断言的笔记可查阅:【C语言笔记】assert怎么用?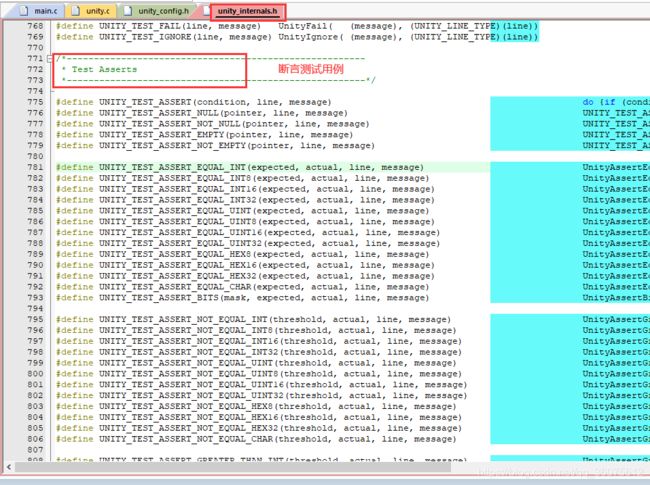
6、test_unity_code.c文件
#include "unity.h"
#include "unity_internals.h"

void setUp(void)
{
}

void tearDown(void)
{
}

/*
	闰年判断函数
  闰年:能被4整除同时不能被100整除,或者能被400整除。
*/
int IsLeapYear(int year)
{
	uint8_t flag = 0;
	if(((year % 100!=0) && (year % 4==0)) || ( year % 400==0) )
	{
		flag = 1;
	}
	return flag;
}

void leapYear(void)
{
	TEST_ASSERT_TRUE(IsLeapYear(2020));
	TEST_ASSERT_TRUE(IsLeapYear(2000));
}

void commonYear(void)
{
	TEST_ASSERT_FALSE(IsLeapYear(1999));
	TEST_ASSERT_FALSE(IsLeapYear(2100));
}


void test_unity(void)
{
//	UnityPrint("heihei\r\n");
//	UnityPrint("\r\n************\r\n");
	RUN_TEST(leapYear);
	RUN_TEST(commonYear);
	UNITY_END();
}
7、main.c文件
/* USER CODE BEGIN Header */
/**
  ******************************************************************************
  * @file           : main.c
  * @brief          : Main program body
  ******************************************************************************
  * @attention
  *
  * © Copyright (c) 2021 STMicroelectronics.
  * All rights reserved.
  *
  * This software component is licensed by ST under BSD 3-Clause license,
  * the "License"; You may not use this file except in compliance with the
  * License. You may obtain a copy of the License at:
  *                        opensource.org/licenses/BSD-3-Clause
  *
  ******************************************************************************
  */
/* USER CODE END Header */
/* Includes ------------------------------------------------------------------*/
#include "main.h"
#include "usart.h"
#include "gpio.h"

/* Private includes ----------------------------------------------------------*/
/* USER CODE BEGIN Includes */
#include "stdio.h"
#include "unity_internals.h"
/* USER CODE END Includes */

/* Private typedef -----------------------------------------------------------*/
/* USER CODE BEGIN PTD */

/* USER CODE END PTD */

/* Private define ------------------------------------------------------------*/
/* USER CODE BEGIN PD */
/* USER CODE END PD */

/* Private macro -------------------------------------------------------------*/
/* USER CODE BEGIN PM */

/* USER CODE END PM */

/* Private variables ---------------------------------------------------------*/

/* USER CODE BEGIN PV */

/* USER CODE END PV */

/* Private function prototypes -----------------------------------------------*/
void SystemClock_Config(void);
/* USER CODE BEGIN PFP */

/* USER CODE END PFP */

/* Private user code ---------------------------------------------------------*/
/* USER CODE BEGIN 0 */

/* USER CODE END 0 */

/**
  * @brief  The application entry point.
  * @retval int
  */
int main(void)
{
  /* USER CODE BEGIN 1 */

  /* USER CODE END 1 */

  /* MCU Configuration--------------------------------------------------------*/

  /* Reset of all peripherals, Initializes the Flash interface and the Systick. */
  HAL_Init();

  /* USER CODE BEGIN Init */

  /* USER CODE END Init */

  /* Configure the system clock */
  SystemClock_Config();

  /* USER CODE BEGIN SysInit */

  /* USER CODE END SysInit */

  /* Initialize all configured peripherals */
  MX_GPIO_Init();
  MX_USART1_UART_Init();
  /* USER CODE BEGIN 2 */
  extern void test_unity(void);
	test_unity();
  /* USER CODE END 2 */

  /* Infinite loop */
  /* USER CODE BEGIN WHILE */
  while (1)
  {


		HAL_Delay(1000);
		HAL_GPIO_TogglePin(LED_GPIO_Port, LED_Pin);
    /* USER CODE END WHILE */

    /* USER CODE BEGIN 3 */
  }
  /* USER CODE END 3 */
}

/**
  * @brief System Clock Configuration
  * @retval None
  */
void SystemClock_Config(void)
{
  RCC_OscInitTypeDef RCC_OscInitStruct = {0};
  RCC_ClkInitTypeDef RCC_ClkInitStruct = {0};

  /** Initializes the RCC Oscillators according to the specified parameters
  * in the RCC_OscInitTypeDef structure.
  */
  RCC_OscInitStruct.OscillatorType = RCC_OSCILLATORTYPE_HSE;
  RCC_OscInitStruct.HSEState = RCC_HSE_ON;
  RCC_OscInitStruct.HSEPredivValue = RCC_HSE_PREDIV_DIV1;
  RCC_OscInitStruct.HSIState = RCC_HSI_ON;
  RCC_OscInitStruct.PLL.PLLState = RCC_PLL_ON;
  RCC_OscInitStruct.PLL.PLLSource = RCC_PLLSOURCE_HSE;
  RCC_OscInitStruct.PLL.PLLMUL = RCC_PLL_MUL9;
  if (HAL_RCC_OscConfig(&RCC_OscInitStruct) != HAL_OK)
  {
    Error_Handler();
  }
  /** Initializes the CPU, AHB and APB buses clocks
  */
  RCC_ClkInitStruct.ClockType = RCC_CLOCKTYPE_HCLK|RCC_CLOCKTYPE_SYSCLK
                              |RCC_CLOCKTYPE_PCLK1|RCC_CLOCKTYPE_PCLK2;
  RCC_ClkInitStruct.SYSCLKSource = RCC_SYSCLKSOURCE_PLLCLK;
  RCC_ClkInitStruct.AHBCLKDivider = RCC_SYSCLK_DIV1;
  RCC_ClkInitStruct.APB1CLKDivider = RCC_HCLK_DIV2;
  RCC_ClkInitStruct.APB2CLKDivider = RCC_HCLK_DIV1;

  if (HAL_RCC_ClockConfig(&RCC_ClkInitStruct, FLASH_LATENCY_2) != HAL_OK)
  {
    Error_Handler();
  }
}

/* USER CODE BEGIN 4 */
#ifdef __GNUC__
  /* With GCC/RAISONANCE, small printf (option LD Linker->Libraries->Small printf
     set to 'Yes') calls __io_putchar() */
  #define PUTCHAR_PROTOTYPE int __io_putchar(int ch)
#else
  #define PUTCHAR_PROTOTYPE int fputc(int ch, FILE *f)
#endif /* __GNUC__ */
/**
  * @brief  Retargets the C library printf function to the USART.
  * @param  None
  * @retval None
  */
PUTCHAR_PROTOTYPE
{
  /* Place your implementation of fputc here */
  /* e.g. write a character to the EVAL_COM1 and Loop until the end of transmission */
  HAL_UART_Transmit(&huart1, (uint8_t *)&ch, 1, 0xFFFF);
  return ch;
}

int fgetc(FILE * f)
{
  uint8_t ch = 0;
  HAL_UART_Receive(&huart1, (uint8_t *)&ch, 1, 0xffff);
  return ch;
}
/* USER CODE END 4 */

/**
  * @brief  This function is executed in case of error occurrence.
  * @retval None
  */
void Error_Handler(void)
{
  /* USER CODE BEGIN Error_Handler_Debug */
  /* User can add his own implementation to report the HAL error return state */
  __disable_irq();
  while (1)
  {
  }
  /* USER CODE END Error_Handler_Debug */
}

#ifdef  USE_FULL_ASSERT
/**
  * @brief  Reports the name of the source file and the source line number
  *         where the assert_param error has occurred.
  * @param  file: pointer to the source file name
  * @param  line: assert_param error line source number
  * @retval None
  */
void assert_failed(uint8_t *file, uint32_t line)
{
  /* USER CODE BEGIN 6 */
  /* User can add his own implementation to report the file name and line number,
     ex: printf("Wrong parameters value: file %s on line %d\r\n", file, line) */
  /* USER CODE END 6 */
}
#endif /* USE_FULL_ASSERT */

/************************ (C) COPYRIGHT STMicroelectronics *****END OF FILE****/
四、运行结果

修改test_unity_code.c文件
#include "unity.h"
#include "unity_internals.h"

void setUp(void)
{
}

void tearDown(void)
{
}

/*
	闰年判断函数
  闰年:能被4整除同时不能被100整除,或者能被400整除。
*/
int IsLeapYear(int year)
{
	uint8_t flag = 0;
	if(((year % 100!=0) && (year % 4==0)) || ( year % 400==0) )
	{
		flag = 1;
	}
	return flag;
}

void leapYear(void)
{
	TEST_ASSERT_TRUE(IsLeapYear(2020));
	TEST_ASSERT_TRUE(IsLeapYear(2000));
}

void commonYear(void)
{
	TEST_ASSERT_FALSE(IsLeapYear(1888));
	TEST_ASSERT_FALSE(IsLeapYear(2100));
}


void test_unity(void)
{
//	UnityPrint("heihei\r\n");
//	UnityPrint("\r\n************\r\n");
	RUN_TEST(leapYear);
	RUN_TEST(commonYear);
	UNITY_END();
}
运行结果:
传送门->代码
参考文章:
1、https://www.sohu.com/a/367952273_505803
2、https://blog.csdn.net/qq845699/article/details/104168615
五、总结
好了,就介绍到此。