学习天机项目的笔记
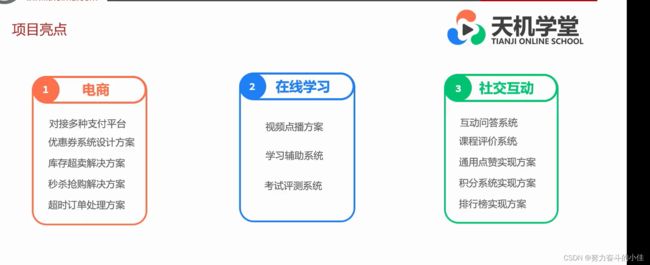
1.项目亮点
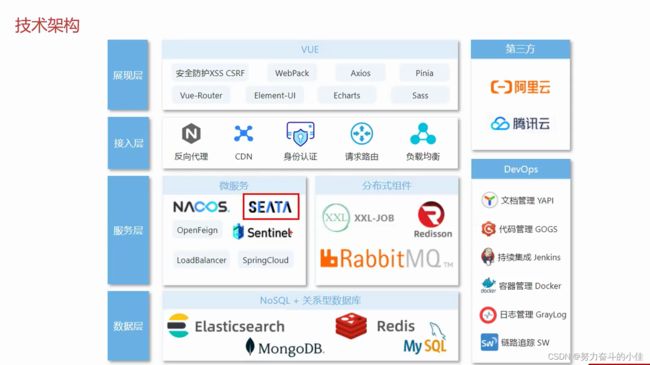
2.技术架构
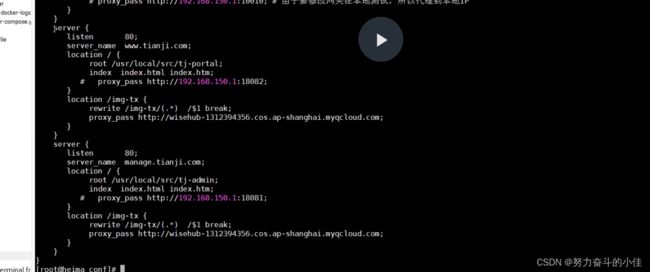
3.在本地配置虚假域名映射
修改本地的的host文件(配置小工具)

如果直接输入域名就能访问,就是不用输入端口号的话,就需要配置nginx

80是naginx的默认端口号监听即可(配置nginx.conf),一个server代表一个虚拟主机

4.持续集成自动化部署(Jenkins)


5.nginx部署前端

6.关于maven的小知识
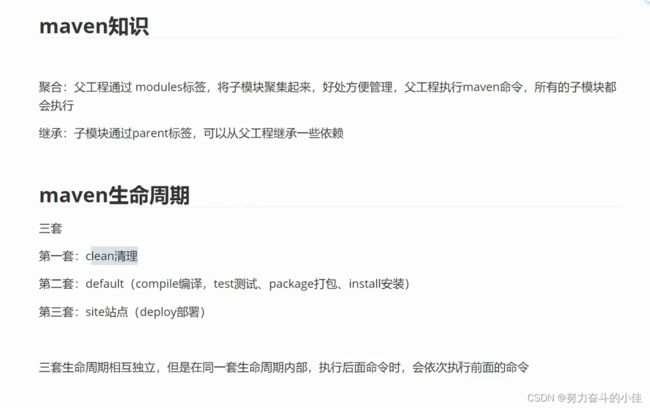
maven模块的聚合,在父工程聚合

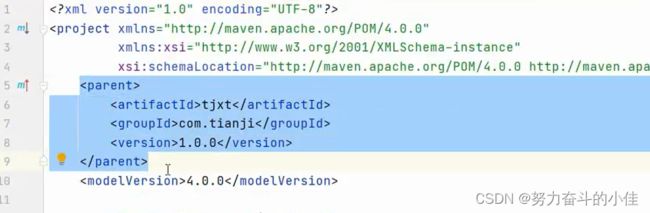
maven的继承,子模块继承父工程
关于maven依赖冲突问题的解决,以及版本的不兼容


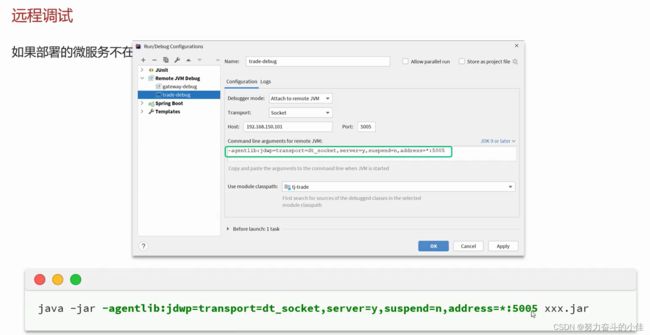
7.idea远程调试微服务


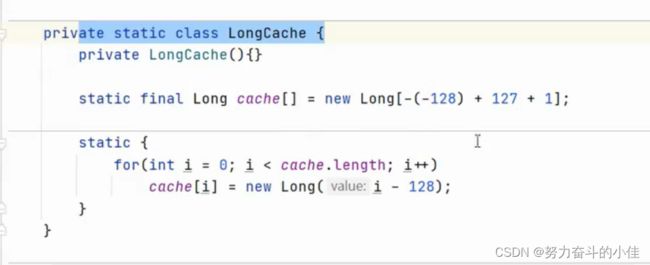
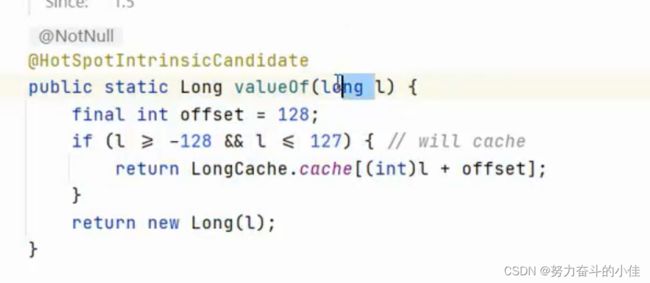
记录一个判断bug
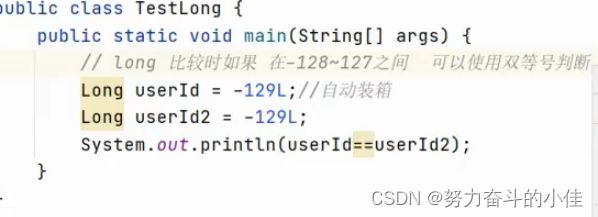
原因:
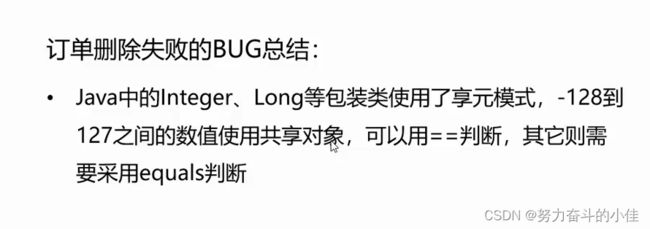
底层源码
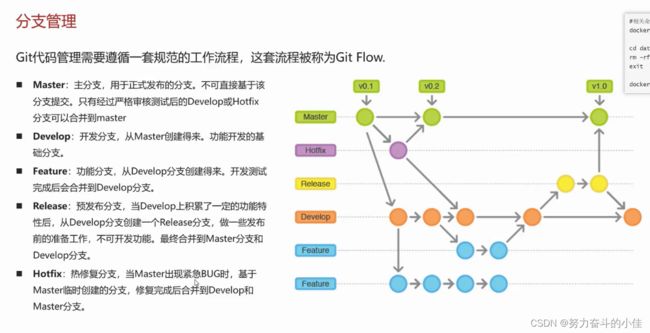
8.Git的分支管理规范
9.项目的介绍

10.项目各个模块的业务流程
1.我的课程模块
 、
、
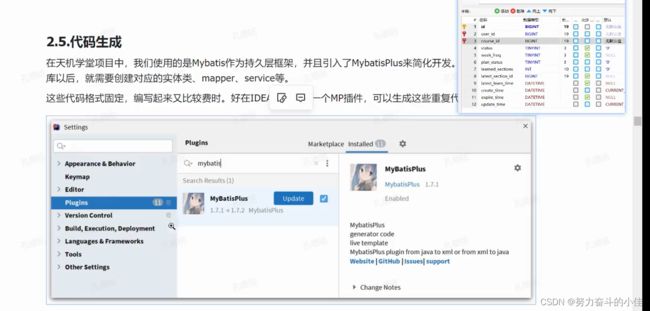
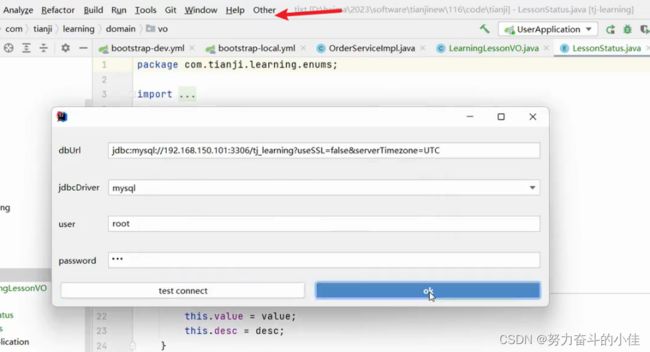
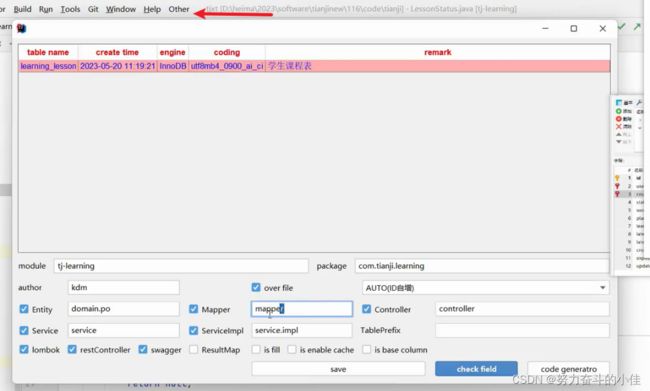
11.MP代码生成器
先下载插件
配置数据源
配置相关包信息,还能设置swagger注解
12.枚举类的使用讲解
枚举类的好处就是不用在写业务代码的时候定义过多的常量,让代码更加的简洁
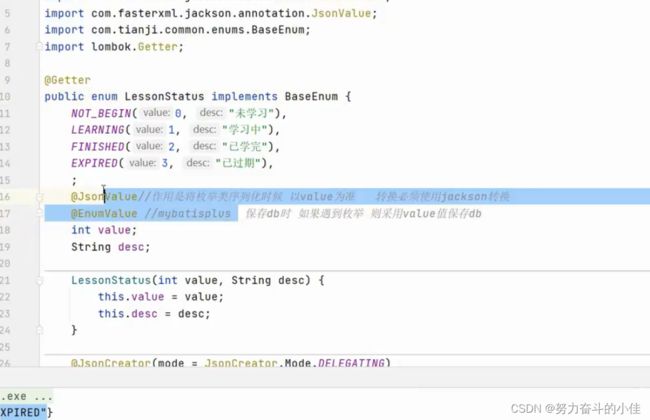
使用枚举的时候必须要明确两个区别,jackson返回前端的是value值1,2,3,fastjson是返回desc比如学习中,以及他们对Null值得处理


13.使用Mq进行消息通知
消息的幂等性处理就是在课程表中添加两个唯一约束,比如说课程id和用户id设置成唯一键。也能防止消息发送消息的重复。整体的流程是:生产者->交换机->队列->消费者
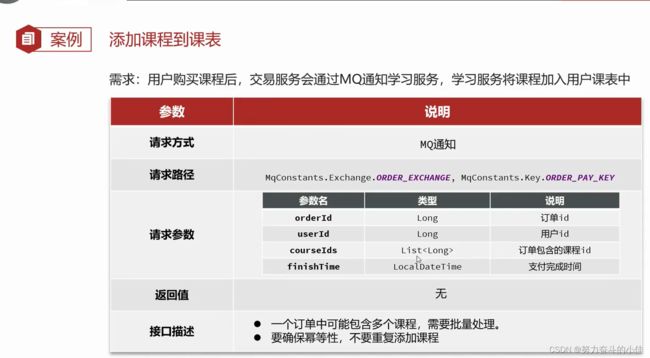
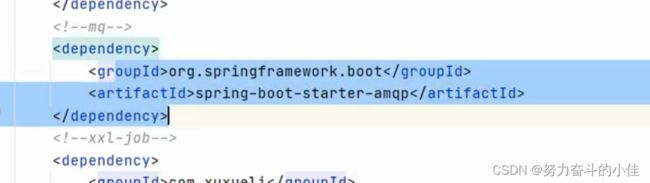
1.添加依赖
在生产模块和消费模块都要添加
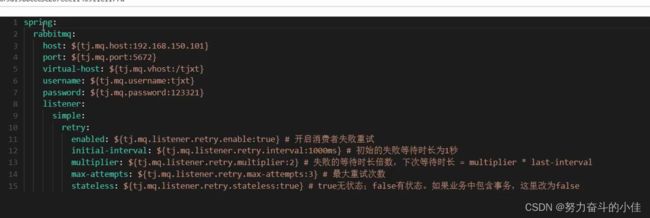
2.配置yml
3.在生产者
配置类:生命交换机以及队列并对其持久化操作,绑定以及发送消息失败之后的回调
@Slf4j
    @Configuration
    public class PayNotifyConfig implements ApplicationContextAware {

        //交换机
        public static final String PAYNOTIFY_EXCHANGE_FANOUT = "paynotify_exchange_fanout";
        //支付结果通知消息类型
        public static final String MESSAGE_TYPE = "payresult_notify";
        //支付通知队列
        public static final String PAYNOTIFY_QUEUE = "paynotify_queue";

        //声明交换机,且持久化
        @Bean(PAYNOTIFY_EXCHANGE_FANOUT)
        public FanoutExchange paynotify_exchange_fanout() {
            // 三个参数:交换机名称、是否持久化、当没有queue与其绑定时是否自动删除
            return new FanoutExchange(PAYNOTIFY_EXCHANGE_FANOUT, true, false);
        }

        //支付通知队列,且持久化
        @Bean(PAYNOTIFY_QUEUE)
        public Queue course_publish_queue() {
            return QueueBuilder.durable(PAYNOTIFY_QUEUE).build();
        }

        //交换机和支付通知队列绑定
        @Bean
        public Binding binding_course_publish_queue(@Qualifier(PAYNOTIFY_QUEUE) Queue queue, @Qualifier(PAYNOTIFY_EXCHANGE_FANOUT) FanoutExchange exchange) {
            return BindingBuilder.bind(queue).to(exchange);
        }

        @Override
        public void setApplicationContext(ApplicationContext applicationContext) throws BeansException {
            // 获取RabbitTemplate
            RabbitTemplate rabbitTemplate = applicationContext.getBean(RabbitTemplate.class);
            //消息处理service
            MqMessageService mqMessageService = applicationContext.getBean(MqMessageService.class);
            // 设置ReturnCallback
            rabbitTemplate.setReturnCallback((message, replyCode, replyText, exchange, routingKey) -> {
                // 投递失败,记录日志
                log.info("消息发送失败,应答码{},原因{},交换机{},路由键{},消息{}",
                        replyCode, replyText, exchange, routingKey, message.toString());
                MqMessage mqMessage = JSON.parseObject(message.toString(), MqMessage.class);
                //将消息再添加到消息表
                mqMessageService.addMessage(mqMessage.getMessageType(), mqMessage.getBusinessKey1(), mqMessage.getBusinessKey2(), mqMessage.getBusinessKey3());

            });
        }

    }
发送消息的方法
    //发送通知消息
    @Override
    public void notifyPayResult(MqMessage message) {
        //1.0构造一个消息
        String msg = JSON.toJSONString(message);//消息体转为json
        //设置消息持久化
        Message msgObj = MessageBuilder.withBody(msg.getBytes(StandardCharsets.UTF_8)).setDeliveryMode(MessageDeliveryMode.PERSISTENT).build();
        //2.0全局唯一的消息ID,需要封装到CorrelationData中,就是一个回调方法
        CorrelationData correlationData = new CorrelationData(message.getId().toString());
        correlationData.getFuture().addCallback(
                result -> {
                    if(result.isAck()){
                        // 3.1.ack,消息成功
                        log.debug("通知支付结果消息发送成功, ID:{}", correlationData.getId());
                        //删除消息表中的记录
                        mqMessageService.completed(message.getId());
                    }else{
                        // 3.2.nack,消息失败
                        log.error("通知支付结果消息发送失败, ID:{}, 原因{}",correlationData.getId(), result.getReason());
                    }
                },
                ex -> log.error("消息发送异常, ID:{}, 原因{}",correlationData.getId(),ex.getMessage())
        );
        //3.0发送消息,广播模式
        rabbitTemplate.convertAndSend(PayNotifyConfig.PAYNOTIFY_EXCHANGE_FANOUT,"",msgObj,correlationData);

    }
4.在消费者
最好也声明交换机这些,无论生产者先启动还是消费先启动都能保证先声明交换机和队列
@Slf4j
    @Configuration
    public class PayNotifyConfig implements ApplicationContextAware {

        //交换机
        public static final String PAYNOTIFY_EXCHANGE_FANOUT = "paynotify_exchange_fanout";
        //支付结果通知消息类型
        public static final String MESSAGE_TYPE = "payresult_notify";
        //支付通知队列
        public static final String PAYNOTIFY_QUEUE = "paynotify_queue";

        //声明交换机,且持久化
        @Bean(PAYNOTIFY_EXCHANGE_FANOUT)
        public FanoutExchange paynotify_exchange_fanout() {
            // 三个参数:交换机名称、是否持久化、当没有queue与其绑定时是否自动删除
            return new FanoutExchange(PAYNOTIFY_EXCHANGE_FANOUT, true, false);
        }

        //支付通知队列,且持久化
        @Bean(PAYNOTIFY_QUEUE)
        public Queue course_publish_queue() {
            return QueueBuilder.durable(PAYNOTIFY_QUEUE).build();
        }

        //交换机和支付通知队列绑定
        @Bean
        public Binding binding_course_publish_queue(@Qualifier(PAYNOTIFY_QUEUE) Queue queue, @Qualifier(PAYNOTIFY_EXCHANGE_FANOUT) FanoutExchange exchange) {
            return BindingBuilder.bind(queue).to(exchange);
        }


    }
消费者接受消息
@Slf4j
@Service
public class ReceivePayNotifyService {
    @Autowired
    MyCourseTableService myCourseTableService;

    //监听消息队列接收支付结果通知
    @RabbitListener(queues = PayNotifyConfig.PAYNOTIFY_QUEUE)
    public void receive(Message message, Channel channel){
        //要是抛出异常别让代码执行的这么迅速
        try{
            Thread.sleep(5000);
        }catch (InterruptedException ex){
            ex.printStackTrace();
        }

        //解析消息
        byte[] body = message.getBody();
        String JsonString = new String(body);
        //转成java对象
        MqMessage mqMessage = JSON.parseObject(JsonString, MqMessage.class);
        log.debug("学习中心服务接收支付的结果:{}",mqMessage);

        //消息的类型
        String messageType = mqMessage.getMessageType();
        //订单类型
        String businessKey2 = mqMessage.getBusinessKey2();
        //这里只处理支付结果通知
        if(PayNotifyConfig.MESSAGE_TYPE.equals(messageType)&& "60201".equals(businessKey2)){
            //根据消息的内容,更新选课记录,向我的课程表中插入数据
            //选课记录id
            String chooseCourseId = mqMessage.getBusinessKey1();
            boolean b = myCourseTableService.saveChooseCourseSuccess(chooseCourseId);
            if(!b){
                //添加选课失败,抛出异常,消息重回队列
                XueChengPlusException.cast("收到支付结果,添加选课失败");

            }

        }

    }
}
这个是有意思的一个接口常量类
package com.tianji.common.constants;

public interface MqConstants {
    interface Exchange{
        /*课程有关的交换机*/
        String COURSE_EXCHANGE = "course.topic";

        /*订单有关的交换机*/
        String ORDER_EXCHANGE = "order.topic";

        /*学习有关的交换机*/
        String LEARNING_EXCHANGE = "learning.topic";

        /*信息中心短信相关的交换机*/
        String SMS_EXCHANGE = "sms.direct";

        /*异常信息的交换机*/
        String ERROR_EXCHANGE = "error.topic";

        /*支付有关的交换机*/
        String PAY_EXCHANGE = "pay.topic";
        /*交易服务延迟任务交换机*/
        String TRADE_DELAY_EXCHANGE = "trade.delay.topic";

         /*点赞记录有关的交换机*/
        String LIKE_RECORD_EXCHANGE = "like.record.topic";

        /*优惠促销有关的交换机*/
        String PROMOTION_EXCHANGE = "promotion.topic";
    }
    interface Queue {
        String ERROR_QUEUE_TEMPLATE = "error.{}.queue";
    }
    interface Key{
        /*课程有关的 RoutingKey*/
        String COURSE_NEW_KEY = "course.new";
        String COURSE_UP_KEY = "course.up";
        String COURSE_DOWN_KEY = "course.down";
        String COURSE_EXPIRE_KEY = "course.expire";
        String COURSE_DELETE_KEY = "course.delete";

        /*订单有关的RoutingKey*/
        String ORDER_PAY_KEY = "order.pay";
        String ORDER_REFUND_KEY = "order.refund";

        /*积分相关RoutingKey*/
        /* 写回答 */
        String WRITE_REPLY = "reply.new";
        /* 签到 */
        String SIGN_IN = "sign.in";
        /* 学习视频 */
        String LEARN_SECTION = "section.learned";
        /* 写笔记 */
        String WRITE_NOTE = "note.new";
        /* 笔记被采集 */
        String NOTE_GATHERED = "note.gathered";

        /*点赞的RoutingKey*/
        String LIKED_TIMES_KEY_TEMPLATE = "{}.times.changed";
        /*问答*/
        String QA_LIKED_TIMES_KEY = "QA.times.changed";
        /*笔记*/
        String NOTE_LIKED_TIMES_KEY = "NOTE.times.changed";

        /*短信系统发送短信*/
        String SMS_MESSAGE = "sms.message";

        /*异常RoutingKey的前缀*/
        String ERROR_KEY_PREFIX = "error.";
        String DEFAULT_ERROR_KEY = "error.#";

        /*支付有关的key*/
        String PAY_SUCCESS = "pay.success";
        String REFUND_CHANGE = "refund.status.change";

        String ORDER_DELAY_KEY = "delay.order.query";

        /*领取优惠券的key*/
        String COUPON_RECEIVE = "coupon.receive";
    }
}
14远程调用其他模块Feign
在公用模块创建一个client
@FeignClient(contextId = "course", value = "course-service")
public interface CourseClient {

    /**
     * 根据老师id列表获取老师出题数据和讲课数据
     * @param teacherIds 老师id列表
     * @return 老师id和老师对应的出题数和教课数
     */
    @GetMapping("/course/infoByTeacherIds")
    List infoByTeacherIds(@RequestParam("teacherIds") Iterable teacherIds);

    /**
     * 根据小节id获取小节对应的mediaId和课程id
     *
     * @param sectionId 小节id
     * @return 小节对应的mediaId和课程id
     */
    @GetMapping("/course/section/{id}")
    SectionInfoDTO sectionInfo(@PathVariable("id") Long sectionId);

    /**
     * 根据媒资Id列表查询媒资被引用的次数
     *
     * @param mediaIds 媒资id列表
     * @return 媒资id和媒资被引用的次数的列表
     */
    @GetMapping("/course/media/useInfo")
    List mediaUserInfo(@RequestParam("mediaIds") Iterable mediaIds);

    /**
     * 根据课程id查询索引库需要的数据
     *
     * @param id 课程id
     * @return 索引库需要的数据
     */
    @GetMapping("/course/{id}/searchInfo")
    CourseSearchDTO getSearchInfo(@PathVariable("id") Long id);

    /**
     * 根据课程id集合查询课程简单信息
     * @param ids id集合
     * @return 课程简单信息的列表
     */
    @GetMapping("/courses/simpleInfo/list")
    List getSimpleInfoList(@RequestParam("ids") Iterable ids);

    /**
     * 根据课程id,获取课程、目录、教师信息
     * @param id 课程id
     * @return 课程信息、目录信息、教师信息
     */
    @GetMapping("/course/{id}")
    CourseFullInfoDTO getCourseInfoById(
            @PathVariable("id") Long id,
            @RequestParam(value = "withCatalogue", required = false) boolean withCatalogue,
            @RequestParam(value = "withTeachers", required = false) boolean withTeachers
    );
}
15.SpringBoot集成Spring Security做认证授权功能
1.添加依赖(注意所有的模块都添加才生效)
添加依赖之后就是自动的需要认证了

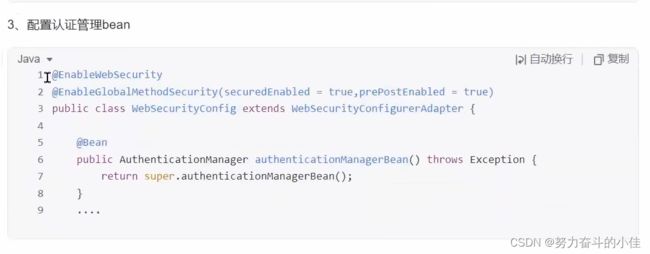
2.添加配置类
配置权限和用户身份(这个需要重新定义),配置加密的方式,配置拦截的路径,有点不明白就是怎么配置白名单
@EnableWebSecurity
@EnableGlobalMethodSecurity(securedEnabled = true,prePostEnabled = true)
public class WebSecurityConfig extends WebSecurityConfigurerAdapter {

    @Autowired
    DaoAuthenticationProviderCustom daoAuthenticationProviderCustom;


    //配置用户信息服务:注释掉是因为要自定义
//    @Bean
//    public UserDetailsService userDetailsService() {
//        //这里配置用户信息,这里暂时使用这种方式将用户存储在内存中
//        InMemoryUserDetailsManager manager = new InMemoryUserDetailsManager();
//        manager.createUser(User.withUsername("zhangsan").password("123").authorities("p1").build());
//        manager.createUser(User.withUsername("lisi").password("456").authorities("p2").build());
//        return manager;
//    }

    @Bean
    public PasswordEncoder passwordEncoder() {
//        //密码为明文方式
//        return NoOpPasswordEncoder.getInstance();
        //将用户输入的密码编码为BCrypt格式与数据库中的密码进行比对。
        return new BCryptPasswordEncoder();
    }

    @Override
    protected void configure(AuthenticationManagerBuilder auth) throws Exception {
        auth.authenticationProvider(daoAuthenticationProviderCustom);
    }


    //配置安全拦截机制
    @Override
    protected void configure(HttpSecurity http) throws Exception {
        http
                .authorizeRequests()
                .antMatchers("/r/**").authenticated()//访问/r开始的请求需要认证通过
                .anyRequest().permitAll()//其它请求全部放行
                .and()
                .formLogin().successForwardUrl("/login-success");//登录成功跳转到/login-success
       http.logout().logoutUrl("/logout");//退出地址
    }

    @Bean
    @Override
    public AuthenticationManager authenticationManagerBean() throws Exception {
        return super.authenticationManagerBean();
    }

    //测试代码
    public static void main(String[] args) {
        String password ="111111";
        //拿到算法BCryptPasswordEncoder
        PasswordEncoder  passwordEncoder = new BCryptPasswordEncoder();
        for(int i=0;i<10;i++){
            //每个计算出的Hash值都不一样
            String hashPass = passwordEncoder.encode(password);
            System.out.println(hashPass);
            //虽然每次计算的密码Hash值不一样,但是校验是通过的
            boolean matches = passwordEncoder.matches(password, hashPass);
            System.out.println(matches);
        }
    }


}
3.底层的过滤器过程
用户提交账号密码->账号密码过滤器->认证管理器->数据库认证管理器(将查询出来的用户信息)

4.在每个微服务中都需要的配置
首先是添加依赖这是已经知道的
配置tokenconfig
@Configuration
public class TokenConfig {

    String SIGNING_KEY = "mq123";


//    @Bean
//    public TokenStore tokenStore() {
//        //使用内存存储令牌(普通令牌)
//        return new InMemoryTokenStore();
//    }

    @Autowired
    private JwtAccessTokenConverter accessTokenConverter;

    @Bean
    public TokenStore tokenStore() {
        return new JwtTokenStore(accessTokenConverter());
    }

    @Bean
    public JwtAccessTokenConverter accessTokenConverter() {
        JwtAccessTokenConverter converter = new JwtAccessTokenConverter();
        converter.setSigningKey(SIGNING_KEY);
        return converter;
    }


}
现在就是配置ResourceConfig(添加拦截的路径的,当然可以配置在网关中),注意这个 服务标识要和认证模块的配置类中的需要包含此标识,可以看18
@Configuration
 @EnableResourceServer
 @EnableGlobalMethodSecurity(securedEnabled = true,prePostEnabled = true)
 public class ResouceServerConfig extends ResourceServerConfigurerAdapter {


  //资源服务标识
  public static final String RESOURCE_ID = "xuecheng-plus";

  @Autowired
  TokenStore tokenStore;

  @Override
  public void configure(ResourceServerSecurityConfigurer resources) {
   resources.resourceId(RESOURCE_ID)//资源 id
           .tokenStore(tokenStore)
           .stateless(true);
  }

 @Override
 public void configure(HttpSecurity http) throws Exception {
  http.csrf().disable()
          .authorizeRequests()
// (网关做了认证)               .antMatchers("/r/**","/course/**").authenticated()//所有/r/**的请求必须认证通过
          .anyRequest().permitAll()
  ;
 }

 }
5.测试访问资源模块的时候就需要携带令牌

整体过程:拿code->拿令牌->获取用户信息

16.基于OAuth2协议将服务器作为第三方颁发令牌(授权码模式和密码模式)
配置两个配置类,生成JWT令牌(注意资源的拦截标识每个模块都有唯一的)
@Configuration
 @EnableAuthorizationServer
 public class AuthorizationServer extends AuthorizationServerConfigurerAdapter {

  @Resource(name="authorizationServerTokenServicesCustom")
  private AuthorizationServerTokenServices authorizationServerTokenServices;

 @Autowired
 private AuthenticationManager authenticationManager;

  //客户端详情服务
  @Override
  public void configure(ClientDetailsServiceConfigurer clients)
          throws Exception {
        clients.inMemory()// 使用in-memory存储
                .withClient("XcWebApp")// client_id
//                .secret("XcWebApp")//客户端密钥
                //修改密码编码方式还需要将客户端的密钥更改为Bcrypt格式.
                .secret(new BCryptPasswordEncoder().encode("XcWebApp"))//客户端密钥
                .resourceIds("xuecheng-plus", "another-resource")//资源列表
                .authorizedGrantTypes("authorization_code", "password","client_credentials","implicit","refresh_token")// 该client允许的授权类型authorization_code,password,refresh_token,implicit,client_credentials
                .scopes("all")// 允许的授权范围
                .autoApprove(false)//false跳转到授权页面
                //客户端接收授权码的重定向地址
                .redirectUris("http://www.51xuecheng.cn")
   ;
  }


  //令牌端点的访问配置
  @Override
  public void configure(AuthorizationServerEndpointsConfigurer endpoints) {
   endpoints
           .authenticationManager(authenticationManager)//认证管理器
           .tokenServices(authorizationServerTokenServices)//令牌管理服务
           .allowedTokenEndpointRequestMethods(HttpMethod.POST);
  }

  //令牌端点的安全配置
  @Override
  public void configure(AuthorizationServerSecurityConfigurer security){
   security
           .tokenKeyAccess("permitAll()")                    //oauth/token_key是公开
           .checkTokenAccess("permitAll()")                  //oauth/check_token公开
           .allowFormAuthenticationForClients()				//表单认证(申请令牌)
   ;
  }


 }
token配置类(注意这里替换成了JWT令牌而不是普通令牌)
@Configuration
public class TokenConfig {

    private String SIGNING_KEY = "mq123";

    @Autowired
    TokenStore tokenStore;

//    @Bean
//    public TokenStore tokenStore() {
//        //使用内存存储令牌(普通令牌)
//        return new InMemoryTokenStore();
//    }

    @Autowired
    private JwtAccessTokenConverter accessTokenConverter;

    @Bean
    public TokenStore tokenStore() {
        return new JwtTokenStore(accessTokenConverter());
    }

    @Bean
    public JwtAccessTokenConverter accessTokenConverter() {
        JwtAccessTokenConverter converter = new JwtAccessTokenConverter();
        converter.setSigningKey(SIGNING_KEY);
        return converter;
    }

    //令牌管理服务
    @Bean(name="authorizationServerTokenServicesCustom")
    public AuthorizationServerTokenServices tokenService() {
        DefaultTokenServices service=new DefaultTokenServices();
        service.setSupportRefreshToken(true);//支持刷新令牌
        service.setTokenStore(tokenStore);//令牌存储策略

        TokenEnhancerChain tokenEnhancerChain = new TokenEnhancerChain();
        tokenEnhancerChain.setTokenEnhancers(Arrays.asList(accessTokenConverter));
        service.setTokenEnhancer(tokenEnhancerChain);

        service.setAccessTokenValiditySeconds(7200); // 令牌默认有效期2小时
        service.setRefreshTokenValiditySeconds(259200); // 刷新令牌默认有效期3天
        return service;
    }


}
在webConfig的配置Bean
前端的请求(注意以下的接口是Security配置好的直接请求就好):
### 授权码模式
### 第一步申请授权码(浏览器请求)/oauth/authorize?client_id=c1&response_type=code&scope=all&redirect_uri=http://www.51xuecheng.cn
###  JWT密码模式
POST {{auth_host}}/auth/oauth/token?client_id=XcWebApp&client_secret=XcWebApp&grant_type=password&username=zhangsan&password=123
JWT我们还可以还原数据:
###校验jwt令牌
POST {{auth_host}}/auth/oauth/check_token?token=eyJhbGciOiJIUzI1NiIsInR5cCI6IkpXVCJ9.eyJhdWQiOlsieHVlY2hlbmctcGx1cyJdLCJ1c2VyX25hbWUiOiJ7XCJjb21wYW55SWRcIjpcIjEyMzIxNDE0MjVcIixcImNyZWF0ZVRpbWVcIjpcIjIwMjItMDktMjhUMDg6MzI6MDNcIixcImlkXCI6XCI1MlwiLFwibmFtZVwiOlwiTeiAgeW4iFwiLFwic2V4XCI6XCIxXCIsXCJzdGF0dXNcIjpcIlwiLFwidXNlcm5hbWVcIjpcInQxXCIsXCJ1dHlwZVwiOlwiMTAxMDAyXCJ9Iiwic2NvcGUiOlsiYWxsIl0sImV4cCI6MTY4NTUzMDQ0MiwiYXV0aG9yaXRpZXMiOlsidGVzdCJdLCJqdGkiOiI4NGJmMGJhMi1kNDBiLTQ3YTQtOTdkNC1iOTU0Yjk0N2U4YmMiLCJjbGllbnRfaWQiOiJYY1dlYkFwcCJ9.IhsE7SsksEQXKjBZO5JCFS8CpzCug2i62mgGJJ9t50A
17.利用网关做一个权限认证
1.网关的三大作用
1.请求的路由转发
2.白名单的维护
3.校验JWT令牌的合法性
2.添加依赖

3.添加配置类
1.网关过滤器
@Component
@Slf4j
public class GatewayAuthFilter implements GlobalFilter, Ordered {


    //白名单
    private static List whitelist = null;

    static {
        //加载白名单
        try (
                InputStream resourceAsStream = GatewayAuthFilter.class.getResourceAsStream("/security-whitelist.properties");
        ) {
            Properties properties = new Properties();
            properties.load(resourceAsStream);
            Set strings = properties.stringPropertyNames();
            whitelist= new ArrayList<>(strings);

        } catch (Exception e) {
            log.error("加载/security-whitelist.properties出错:{}",e.getMessage());
            e.printStackTrace();
        }


    }

    @Autowired
    private TokenStore tokenStore;


    @Override
    public Mono filter(ServerWebExchange exchange, GatewayFilterChain chain) {
        //请求的url
        String requestUrl = exchange.getRequest().getPath().value();
        AntPathMatcher pathMatcher = new AntPathMatcher();
        //白名单放行
        for (String url : whitelist) {
            if (pathMatcher.match(url, requestUrl)) {
                return chain.filter(exchange);
            }
        }

        //检查token是否存在
        String token = getToken(exchange);
        if (StringUtils.isBlank(token)) {
            return buildReturnMono("没有认证",exchange);
        }
        //判断是否是有效的token
        OAuth2AccessToken oAuth2AccessToken;
        try {
            oAuth2AccessToken = tokenStore.readAccessToken(token);

            boolean expired = oAuth2AccessToken.isExpired();
            if (expired) {
                return buildReturnMono("认证令牌已过期",exchange);
            }
            return chain.filter(exchange);
        } catch (InvalidTokenException e) {
            log.info("认证令牌无效: {}", token);
            return buildReturnMono("认证令牌无效",exchange);
        }

    }

    /**
     * 获取token
     */
    private String getToken(ServerWebExchange exchange) {
        String tokenStr = exchange.getRequest().getHeaders().getFirst("Authorization");
        if (StringUtils.isBlank(tokenStr)) {
            return null;
        }
        String token = tokenStr.split(" ")[1];
        if (StringUtils.isBlank(token)) {
            return null;
        }
        return token;
    }


    private Mono buildReturnMono(String error, ServerWebExchange exchange) {
        ServerHttpResponse response = exchange.getResponse();
        String jsonString = JSON.toJSONString(new RestErrorResponse(error));
        byte[] bits = jsonString.getBytes(StandardCharsets.UTF_8);
        DataBuffer buffer = response.bufferFactory().wrap(bits);
        response.setStatusCode(HttpStatus.UNAUTHORIZED);
        response.getHeaders().add("Content-Type", "application/json;charset=UTF-8");
        return response.writeWith(Mono.just(buffer));
    }


    @Override
    public int getOrder() {
        return 0;
    }
}
2.白名单配置文件security-whitelist.properties
/**=??????
/auth/**=????
/content/open/**=??????????
/media/open/**=??????????
3.配置拦截器
 @EnableWebFluxSecurity
 @Configuration
 public class SecurityConfig {


  //安全拦截配置
  @Bean
  public SecurityWebFilterChain webFluxSecurityFilterChain(ServerHttpSecurity http) {

   return http.authorizeExchange()
           .pathMatchers("/**").permitAll()
           .anyExchange().authenticated()
           .and().csrf().disable().build();
  }


 }
4.配置tokenConfig
@Configuration
public class TokenConfig {

    String SIGNING_KEY = "mq123";


//    @Bean
//    public TokenStore tokenStore() {
//        //使用内存存储令牌(普通令牌)
//        return new InMemoryTokenStore();
//    }

    @Autowired
    private JwtAccessTokenConverter accessTokenConverter;

    @Bean
    public TokenStore tokenStore() {
        return new JwtTokenStore(accessTokenConverter());
    }

    @Bean
    public JwtAccessTokenConverter accessTokenConverter() {
        JwtAccessTokenConverter converter = new JwtAccessTokenConverter();
        converter.setSigningKey(SIGNING_KEY);
        return converter;
    }


}
5.配置错误信息返回类
/**
 * 错误响应参数包装
 */
public class RestErrorResponse implements Serializable {

    private String errMessage;

    public RestErrorResponse(String errMessage){
        this.errMessage= errMessage;
    }

    public String getErrMessage() {
        return errMessage;
    }

    public void setErrMessage(String errMessage) {
        this.errMessage = errMessage;
    }
}
6.将资源服务的拦截器注释,放行
 @Configuration
 @EnableResourceServer
 @EnableGlobalMethodSecurity(securedEnabled = true,prePostEnabled = true)
 public class ResouceServerConfig extends ResourceServerConfigurerAdapter {


  //资源服务标识
  public static final String RESOURCE_ID = "xuecheng-plus";

  @Autowired
  TokenStore tokenStore;

  @Override
  public void configure(ResourceServerSecurityConfigurer resources) {
   resources.resourceId(RESOURCE_ID)//资源 id
           .tokenStore(tokenStore)
           .stateless(true);
  }

 @Override
 public void configure(HttpSecurity http) throws Exception {
  http.csrf().disable()
          .authorizeRequests()
// (网关做了认证)               .antMatchers("/r/**","/course/**").authenticated()//所有/r/**的请求必须认证通过
          .anyRequest().permitAll()
  ;
 }

 }
18.用户认证(账号密码,微信扫码)认证模块操作
1.先屏蔽认证模块的WebSecurityConfig的一个Bean
    //配置用户信息服务:注释掉是因为要自定义
//    @Bean
//    public UserDetailsService userDetailsService() {
//        //这里配置用户信息,这里暂时使用这种方式将用户存储在内存中
//        InMemoryUserDetailsManager manager = new InMemoryUserDetailsManager();
//        manager.createUser(User.withUsername("zhangsan").password("123").authorities("p1").build());
//        manager.createUser(User.withUsername("lisi").password("456").authorities("p2").build());
//        return manager;
//    }
2.重写UserDetailsService中的loadUserByUsername方法
@Component
@Slf4j
public class UserDetailsServiceImpl implements UserDetailsService {

    @Autowired
    private ApplicationContext applicationContext;

    @Autowired
    private XcMenuMapper xcMenuMapper;

    /*
     * @Author 陈佳
     * @Description 根据账号查询用户信息,就是生成jwt令牌
     * @Date 15:50 2023/5/31
     * @Param [s:账号]
     * @return org.springframework.security.core.userdetails.UserDetails
     */
    @Override
    public UserDetails loadUserByUsername(String s) throws UsernameNotFoundException {
        AuthParamsDto authParamsDto = null;

        try {
            authParamsDto = JSON.parseObject(s,AuthParamsDto.class);
        }catch (Exception ex){
            log.info("认证请求不符合项目要求:{}",s);
            throw new RuntimeException("认证请求数据格式不对");
        }

        //调用方法执行校验用户和密码操作
        String authType = authParamsDto.getAuthType();
        AuthService authService = applicationContext.getBean(authType + "_authservice", AuthService.class);
        XcUserExt execute = authService.execute(authParamsDto);

        //返回的时候加上权限,userDetails
        return getUserPrincipal(execute);
    }


    /**
     * @description 查询用户信息
     * @param user  用户id,主键
     * @return com.xuecheng.ucenter.model.po.XcUser 用户信息
     * @author Mr.M
     * @date 2022/9/29 12:19
     */

    public UserDetails getUserPrincipal(XcUserExt user){
        //取出数据库的存储密码
        String password = user.getPassword();

        //从数据库中查询权限并且放入权限
        List xcMenus = xcMenuMapper.selectPermissionByUserId(user.getId());
        //只需要添加code
        List permissions = new ArrayList<>();
        if(xcMenus.size()<=0){
            //用户权限,如果不加则报Cannot pass a null GrantedAuthority collection
            permissions.add("p1");
        }else{
            xcMenus.forEach(menu->{
                permissions.add(menu.getCode());
            });
        }
        //转换成数组
        String[] authorities = permissions.toArray(new String[0]);
        //权限也放入jwt令牌中
        user.setPermissions(permissions);

        //======扩展用户身份信息======
        //为了安全在令牌中不放密码
        user.setPassword(null);
        //将user对象转为json
        String userJson = JSON.toJSONString(user);
        //创建UserDetails对象,权限信息待实现授权功能时再向UserDetail中加入
        UserDetails userDetails = User.withUsername(userJson).password(password).authorities(authorities).build();
        return userDetails;
    }
}
3.将入参比如密码进行算法加密
在WebSecurityConfig中将密码加密
    @Bean
    public PasswordEncoder passwordEncoder() {
//        //密码为明文方式
//        return NoOpPasswordEncoder.getInstance();
        //将用户输入的密码编码为BCrypt格式与数据库中的密码进行比对。
        return new BCryptPasswordEncoder();
    }
在AuthorizationServer中将客户端密钥进行加密
   //修改密码编码方式还需要将客户端的密钥更改为Bcrypt格式.
                .secret(new BCryptPasswordEncoder().encode("XcWebApp"))//客户端密钥
4.测试的链接
################扩展认证请求参数后######################
###密码模式
POST {{auth_host}}/auth/oauth/token?client_id=XcWebApp&client_secret=XcWebApp&grant_type=password&username={"username":"stu1","authType":"password","password":"111111"}
5.扩展用户信息(统一认证入口)
将loadUserByUsername的入参入手,将对象转成字符串使用
1.统一认证参数
@Data
public class AuthParamsDto {

    private String username; //用户名
    private String password; //域  用于扩展
    private String cellphone;//手机号
    private String checkcode;//验证码
    private String checkcodekey;//验证码key
    private String authType; // 认证的类型   password:用户名密码模式类型    sms:短信模式类型
    private Map payload = new HashMap<>();//附加数据,作为扩展,不同认证类型可拥有不同的附加数据。如认证类型为短信时包含smsKey : sms:3d21042d054548b08477142bbca95cfa; 所有情况下都包含clientId


}
2.重写框架的校验密码的方法,让我们自己校验
注意这个userDetailsService也是用我们自定义的
@Slf4j
@Component
public class DaoAuthenticationProviderCustom extends DaoAuthenticationProvider {
    @Autowired
    public void setUserDetailsService(UserDetailsService userDetailsService) {
        super.setUserDetailsService(userDetailsService);
    }

    @Override
    protected void additionalAuthenticationChecks(UserDetails userDetails, UsernamePasswordAuthenticationToken authentication) throws AuthenticationException {

    }
}
6.获取当前用户的工具类
@Slf4j
public class SecurityUtil {
    public static XcUser getUser() {
        try {
            //获取jwt中的用户信息
            Object principalObj = SecurityContextHolder.getContext().getAuthentication().getPrincipal();
            if (principalObj instanceof String) {
                //取出用户身份信息
                String principal = principalObj.toString();
                //将json转成对象
                XcUser user = JSON.parseObject(principal, XcUser.class);
                return user;
            }
        } catch (Exception e) {
            log.error("获取当前登录用户身份出错:{}", e.getMessage());
            e.printStackTrace();
        }

        return null;
    }


    @Data
    public static class XcUser implements Serializable {

        private static final long serialVersionUID = 1L;

        private String id;

        private String username;

        private String password;

        private String salt;

        private String name;
        private String nickname;
        private String wxUnionid;
        private String companyId;
        /**
         * 头像
         */
        private String userpic;

        private String utype;

        private LocalDateTime birthday;

        private String sex;

        private String email;

        private String cellphone;

        private String qq;

        /**
         * 用户状态
         */
        private String status;

        private LocalDateTime createTime;

        private LocalDateTime updateTime;


    }

}
7.统一认证接口
public interface AuthService {

    /**
     * @description 认证方法
     * @param authParamsDto 认证参数
     * @return com.xuecheng.ucenter.model.po.XcUser 用户信息
     * @author Mr.M
     * @date 2022/9/29 12:11
     */
    XcUserExt execute(AuthParamsDto authParamsDto);

}
8.不同认证放方式的实现类
1.账号密码验证码
@Slf4j
@Service("password_authservice")
public class PasswordAuthServiceImpl implements AuthService {

    @Autowired
    private PasswordEncoder passwordEncoder;

    @Autowired
    private XcUserMapper xcUserMapper;

    @Autowired
    private CheckCodeClient checkCodeClient;
    @Override
    public XcUserExt execute(AuthParamsDto authParamsDto) {
        //校验验证码
        String checkcode = authParamsDto.getCheckcode();//用户输入放入验证码
        String checkcodekey = authParamsDto.getCheckcodekey();//验证码的key
        if(StringUtils.isBlank(checkcodekey) || StringUtils.isBlank(checkcode)){
            throw new RuntimeException("请输入验证码");
        }

        //远程调用验证码服务接口
        Boolean verify = checkCodeClient.verify(checkcodekey, checkcode);
        if(!verify){
            throw new RuntimeException("验证码输入错误");
        }


        //账号
        String username = authParamsDto.getUsername();
        //从数据库中取出信息
        XcUser xcUser = xcUserMapper.selectOne(new LambdaQueryWrapper()
                .eq(XcUser::getUsername, username));
        if(xcUser == null){
            throw new RuntimeException("用户不存在");
        }

        //检验密码
        String passwordDb = xcUser.getPassword();
        String passwordFrom = authParamsDto.getPassword();
        boolean matches = passwordEncoder.matches(passwordFrom, passwordDb);
        if(!matches){
            throw new RuntimeException("密码输入不正确");
        }

        //返回用户信息包装成jwt返回给客户端
        XcUserExt xcUserExt = new XcUserExt();
        BeanUtils.copyProperties(xcUser,xcUserExt);

        //远程调用接口验证
        return xcUserExt;
    }
}
2.微信扫码认证
1.远程调用就使用restTemplate
在认证服务启动类上注入Bean
@SpringBootApplication
@EnableFeignClients("com.xuecheng.*.feignclient")
public class AuthApplication {

    public static void main(String[] args) {
        SpringApplication.run(AuthApplication.class, args);
    }

    //调用第三方接口时所需要的配置
    @Bean
    RestTemplate restTemplate(){
        RestTemplate restTemplate = new RestTemplate(new OkHttp3ClientHttpRequestFactory());
        return  restTemplate;
    }


}
2.二维码直接叫前端写
3.用户扫码得到code调用请求令牌
认证模块中
@Slf4j
@Controller
@Api(value = "微信登录接口实现",tags = "微信登录接口实现")
public class WxLoginController {

    @Autowired
    private WxAuthService wxAuthService;

    @ApiOperation(value = "申请令牌,存入数据库,认证令牌")
    @RequestMapping("/xuecheng/wxLogin")
    public String wxLogin(String code,String state){
        log.debug("微信回调下发授权码: code:{},state:{}",code,state);

        //利用授权码去微信认证接口申请jwt令牌
        XcUser xcUser = wxAuthService.wxAuth(code);


        if(xcUser == null){
            return "redirect:http://www.51xuecheng.cn/error.html";
        }
        //新用户注册完成后就直接走我们得认证路口execut

        String username = xcUser.getUsername();
        return "redirect:http://www.51xuecheng.cn/sign.html?username="+username+"&authType=wx";
    }
}
实现类
@Slf4j
@Service("wx_authservice")
public class WxAuthServiceImpl implements AuthService, WxAuthService {

    @Value("")
    private String appid;

    @Value("")
    private String secret;

    @Autowired
    private RestTemplate restTemplate;

    @Autowired
    private XcUserMapper xcUserMapper;

    @Autowired
    private XcUserRoleMapper xcUserRoleMapper;

    @Autowired
    WxAuthServiceImpl currentPorxy;

    @Override
    public XcUserExt execute(AuthParamsDto authParamsDto) {
        String username = authParamsDto.getUsername();
        LambdaQueryWrapper wrapper = new LambdaQueryWrapper().eq(XcUser::getUsername, username);
        XcUser xcUser = xcUserMapper.selectOne(wrapper);
        if(xcUser == null){
            throw new RuntimeException("该用户不存在");
        }

        XcUserExt xcUserExt = new XcUserExt();
        BeanUtils.copyProperties(xcUser,xcUserExt);

        return xcUserExt;
    }


    /*
        * @Author 陈佳
        * @Description 微信登录认证
        * @Date 21:12 2023/6/4
        * @Param [code:微信下发的授权码]
        * @return com.xuecheng.ucenter.model.po.XcUser
     */
    @Override
    public XcUser wxAuth(String code) {
        //收到code调用微信接口申请access_token
        Map access_token_map = getAccess_token(code);
        if (access_token_map == null){
            return null;
        }
        System.out.println(access_token_map);
        String access_token = access_token_map.get("access_token");
        String openid = access_token_map.get("openid");

        //利用令牌去请求用户信息
        Map userinfo = getUserinfo(access_token, openid);
        //将用户信息存入到用户表
        XcUser xcUser = currentPorxy.addWxUser(userinfo);


        return xcUser;
    }


    /**
     * 申请访问令牌,响应示例
     {
     "access_token":"ACCESS_TOKEN",
     "expires_in":7200,
     "refresh_token":"REFRESH_TOKEN",
     "openid":"OPENID",
     "scope":"SCOPE",
     "unionid": "o6_bmasdasdsad6_2sgVt7hMZOPfL"
     }
     */
    private Map getAccess_token(String code){
        //定义发起请求的模板
        String WxUrl_template = "https://api.weixin.qq.com/sns/oauth2/access_token?appid=%s&secret=%s&code=%s&grant_type=authorization_code";
        //真实的请求
        String url = String.format(WxUrl_template, appid, secret, code);
        //发送请求
        ResponseEntity response = restTemplate.exchange(url, HttpMethod.POST, null, String.class);
        //转成对象
        String body = response.getBody();
        log.debug("请求微信的回调令牌token,body:{}",body);
        Map result = JSON.parseObject(body, Map.class);

        return result;
    }

    /**获取用户信息,示例如下:
     {
     "openid":"OPENID",
     "nickname":"NICKNAME",
     "sex":1,
     "province":"PROVINCE",
     "city":"CITY",
     "country":"COUNTRY",
     "headimgurl": "https://thirdwx.qlogo.cn/mmopen/g3MonUZtNHkdmzicIlibx6iaFqAc56vxLSUfpb6n5WKSYVY0ChQKkiaJSgQ1dZuTOgvLLrhJbERQQ4eMsv84eavHiaiceqxibJxCfHe/0",
     "privilege":[
     "PRIVILEGE1",
     "PRIVILEGE2"
     ],
     "unionid": " o6_bmasdasdsad6_2sgVt7hMZOPfL"
     }
     */
    private Map getUserinfo(String access_token,String openid){
        String url_template="https://api.weixin.qq.com/sns/userinfo?access_token=%s&openid=%s";
        String url = String.format(url_template, access_token, openid);

        ResponseEntity exchange = restTemplate.exchange(url, HttpMethod.GET, null, String.class);
        //获取响应结果
        String result = new String(exchange.getBody().getBytes(StandardCharsets.ISO_8859_1), StandardCharsets.UTF_8);
        //将result转成map
        Map map = JSON.parseObject(result, Map.class);
        return map;
    }

    @Transactional
    public XcUser addWxUser(Map userInfo_map){
        String unionid = userInfo_map.get("unionid");
        String nickname = userInfo_map.get("nickname");
        //根据unionid查询用户信息
        XcUser xcUser = xcUserMapper.selectOne(new LambdaQueryWrapper().eq(XcUser::getWxUnionid, unionid));
        if(xcUser !=null){
            return xcUser;
        }
        //向数据库新增记录
        xcUser = new XcUser();
        String userId= UUID.randomUUID().toString();
        xcUser.setId(userId);//主键
        xcUser.setUsername(unionid);
        xcUser.setPassword(unionid);
        xcUser.setWxUnionid(unionid);
        xcUser.setNickname(nickname);
        xcUser.setName(nickname);
        xcUser.setUtype("101001");//学生类型
        xcUser.setStatus("1");//用户状态
        xcUser.setCreateTime(LocalDateTime.now());
        //插入
        int insert = xcUserMapper.insert(xcUser);

        //向用户角色关系表新增记录
        XcUserRole xcUserRole = new XcUserRole();
        xcUserRole.setId(UUID.randomUUID().toString());
        xcUserRole.setUserId(userId);
        xcUserRole.setRoleId("17");//学生角色
        xcUserRole.setCreateTime(LocalDateTime.now());
        xcUserRoleMapper.insert(xcUserRole);
        return xcUser;

    }


    public static void main(String[] args) {


    }


}
9.用户授权
根据资源标识就是第二种

1.在资源服务添加授权资源标识
其实这个注解就是框架加密令牌得到的
@RequestMapping("/r/r1")
@PreAuthorize("hasAuthority('p1')")//拥有p1权限方可访问
public String r1() {
return "访问r1资源";
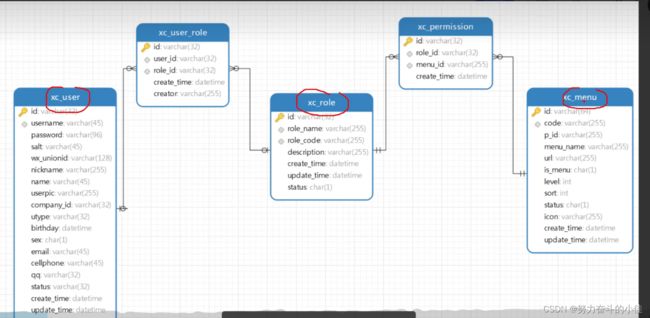
}2.维护用户权限的五张表
3.将数据库中的用户权限放进令牌中
public UserDetails getUserPrincipal(XcUserExt user){
        //取出数据库的存储密码
        String password = user.getPassword();

        //从数据库中查询权限并且放入权限
        List xcMenus = xcMenuMapper.selectPermissionByUserId(user.getId());
        //只需要添加code
        List permissions = new ArrayList<>();
        if(xcMenus.size()<=0){
            //用户权限,如果不加则报Cannot pass a null GrantedAuthority collection
            permissions.add("p1");
        }else{
            xcMenus.forEach(menu->{
                permissions.add(menu.getCode());
            });
        }
        //转换成数组
        String[] authorities = permissions.toArray(new String[0]);
        //权限也放入jwt令牌中
        user.setPermissions(permissions);

        //======扩展用户身份信息======
        //为了安全在令牌中不放密码
        user.setPassword(null);
        //将user对象转为json
        String userJson = JSON.toJSONString(user);
        //创建UserDetails对象,权限信息待实现授权功能时再向UserDetail中加入
        UserDetails userDetails = User.withUsername(userJson).password(password).authorities(authorities).build();
        return userDetails;
    }
4.细粒度授权
根据机构id去查询本机构的课程
19.使用JSR303校验
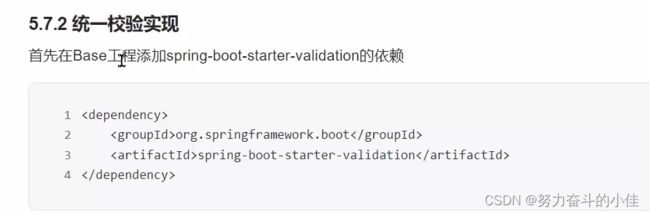
1.导入依赖
2.在请求参数类中添加注解@Validated

3.在实体类中按照自己的业务添加注解
4.在全局异常捕获器中添加校验JSR303的异常捕获(看下面讲解)
5.校验分组(同一个请求类可能会用于新增和修改同时使用)
1.添加分组
/**
 * @author Mr.M
 * @version 1.0
 * @description 用于分级校验,定义一些常用的组
 * @date 2023/2/14 9:37
 */
public class ValidationGroups {
 public interface Inster{};
 public interface Update{};
 public interface Delete{};
}
2.在请求类中分组

3.在控制层@Validated注解指定分组

20.全局异常处理
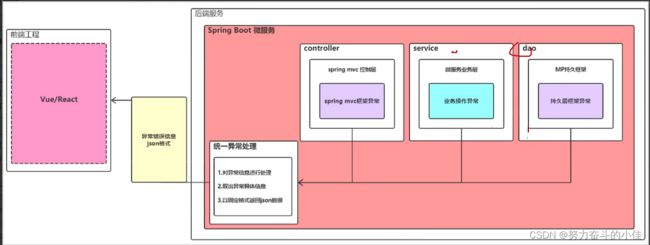
1.整体流程
2.了解Spring框架的一些注解

3.和前端约定统一异常返回类(String字符串报错)
public class RestErrorResponse implements Serializable {

    private String errMessage;

    public RestErrorResponse(String errMessage){
        this.errMessage= errMessage;
    }

    public String getErrMessage() {
        return errMessage;
    }

    public void setErrMessage(String errMessage) {
        this.errMessage = errMessage;
    }
}
4.自定义自己的逻辑业务异常类
public class XueChengPlusException extends RuntimeException {

    private String errMessage;

    public XueChengPlusException() {
    }

    public XueChengPlusException(String message) {
        super(message);
        this.errMessage = message;

    }

    public String getErrMessage() {
        return errMessage;
    }

    public void setErrMessage(String errMessage) {
        this.errMessage = errMessage;
    }

    public static void cast(String message){
        throw new XueChengPlusException(message);
    }
    public static void cast(CommonError error){
        throw new XueChengPlusException(error.getErrMessage());
    }

}
5.使用异常类

6.配置统一的枚举类型配合着自定义的异常类中的cast方法使用
public enum CommonError {

	UNKOWN_ERROR("执行过程异常,请重试。"),
	PARAMS_ERROR("非法参数"),
	OBJECT_NULL("对象为空"),
	QUERY_NULL("查询结果为空"),
	REQUEST_NULL("请求参数为空"),

	DELETE_ERROR("课程计划信息还有子级信息,无法操作");

	private String errMessage;

	public String getErrMessage() {
		return errMessage;
	}

	private CommonError( String errMessage) {
		this.errMessage = errMessage;
	}

}
7.定义全局异常捕获器(系统异常以及业务异常)
@Slf4j
@ControllerAdvice//在项目中来增强SpringMVC中的Controller,集中处理所有 Controller 中发生的异常
//@RestControllerAdvice
public class GlobalExceptionHandler {

 //对项目的自定义异常类型进行处理
   @ResponseBody//用于标记 Controller 方法的返回值类型,在返回 JSON、XML 或其他格式数据时更加方便.
   // 自动将方法的返回值序列化成指定格式,并将其作为响应体发送给客户端
   @ExceptionHandler(XueChengPlusException.class)// 表示捕获异常,并且只处理自定义类型的异常
   @ResponseStatus(HttpStatus.INTERNAL_SERVER_ERROR)//发生异常时返回对应的状态码
 public RestErrorResponse customException(XueChengPlusException e){

    //记录异常
    log.error("系统异常{}",e.getErrMessage(),e);
    //..

    //解析出异常信息
    String errMessage = e.getErrMessage();
    RestErrorResponse restErrorResponse = new RestErrorResponse(errMessage);
    return restErrorResponse;
   }


   @ResponseBody
   @ExceptionHandler(Exception.class)// 表示捕获异常,并且只处理所有类型的异常
   @ResponseStatus(HttpStatus.INTERNAL_SERVER_ERROR)
 public RestErrorResponse exception(Exception e){

    //记录异常
    log.error("系统异常{}",e.getMessage(),e);
    e.printStackTrace();
    if(e.getMessage().equals("不允许访问")){
        return new RestErrorResponse("没有操作权限");
    }

    //解析出异常信息
    RestErrorResponse restErrorResponse = new RestErrorResponse(CommonError.UNKOWN_ERROR.getErrMessage());
    return restErrorResponse;
   }


    //MethodArgumentNotValidException:捕获JSR303的合法参数校验的异常
    @ResponseBody
    @ExceptionHandler(MethodArgumentNotValidException.class)
    @ResponseStatus(HttpStatus.INTERNAL_SERVER_ERROR)
    public RestErrorResponse methodArgumentNotValidException(MethodArgumentNotValidException e){

        BindingResult bindingResult = e.getBindingResult();
        //存储错误信息
        List errors = new ArrayList<>();
        //获取到表单数据校验失败的详细信息
        bindingResult.getFieldErrors().stream().forEach(item->{
            errors.add(item.getDefaultMessage());
        });
        System.out.println("@@@@@@"+errors);

        //将list中的错误信息拼接起来
        String errMessage = StringUtils.join(errors, ",");
        System.out.println("#####"+errMessage);
        //记录异常
        log.error("系统异常{}",e.getMessage(),errMessage);

        //解析出异常信息
        RestErrorResponse restErrorResponse = new RestErrorResponse(errMessage);
        return restErrorResponse;
    }


}
21.搭建Nacos
1.基本的概念
服务注册中心,配置中心
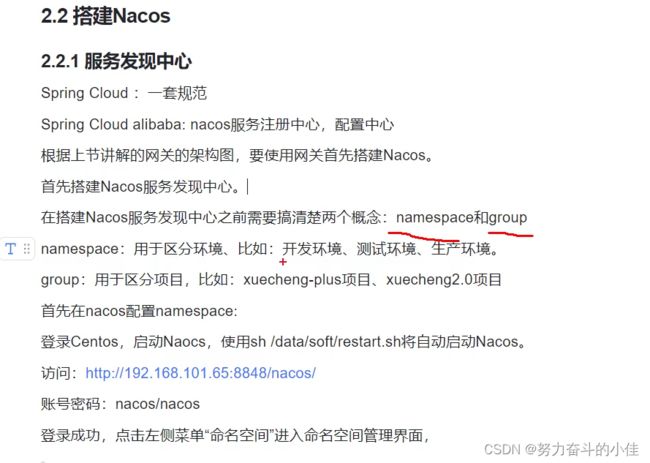
2.新建命名空间

3.导入依赖

4.在资源服务的yml配置
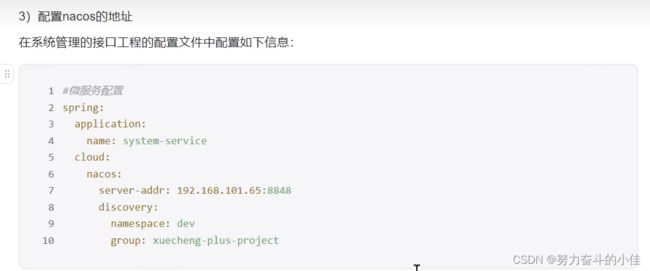
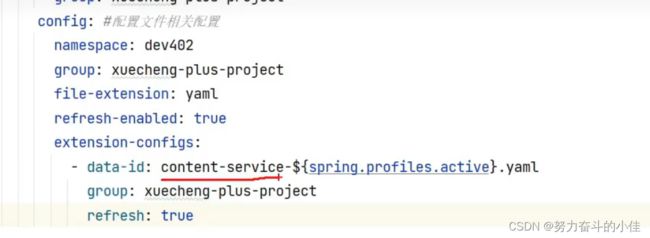
5.配置中心(特有配置和公用配置)
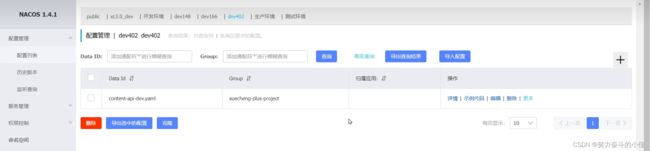
1.新增配置时dataid的填写
服务名+环境+配置文件后缀(content-service-dev.yaml)
grop就是项目名称
2.注册信息必须留在项目
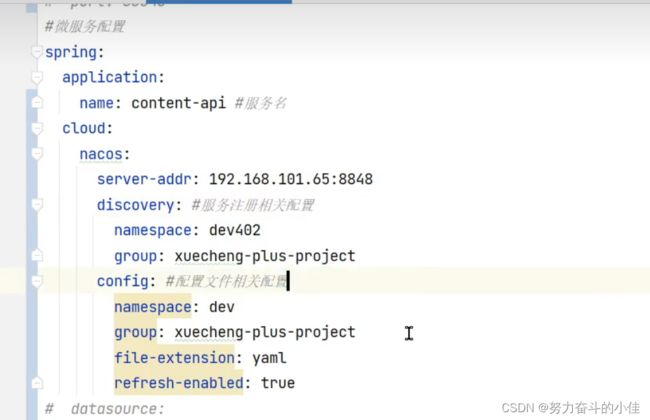

3.导入依赖

4.配置service这个就不用注册了,只需要被nacos发现即可,api才是启动实例(dev一定要指定而且不是命名空间)
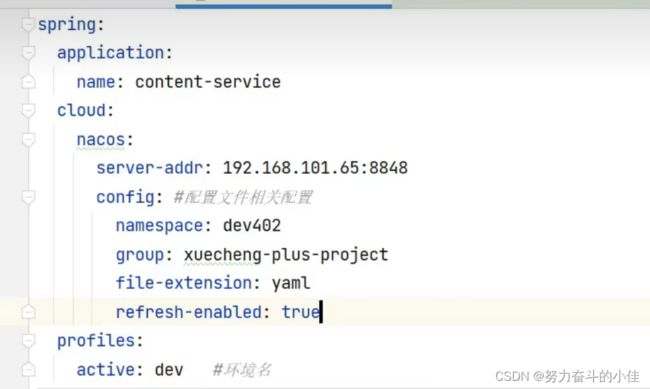
5.依赖配置(adpi引用service)
6.公用配置

7.引用配置

8.配置的优先级
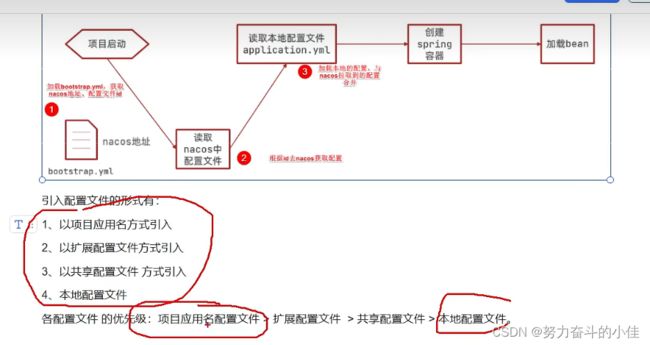
配置本地优先

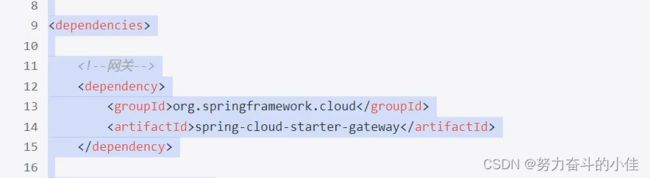
22.搭建网关
1.导入依赖
2.配置文件

3.配置路由

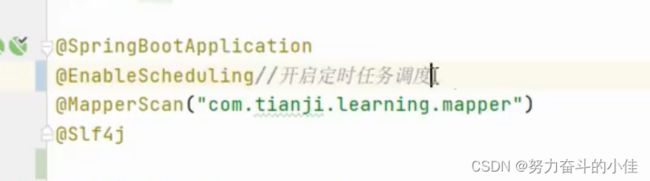
23.编写SpringTask定时任务
1.在启动类上添加注解
2.自定义一个bean容器
24.解决高并发问题的思路
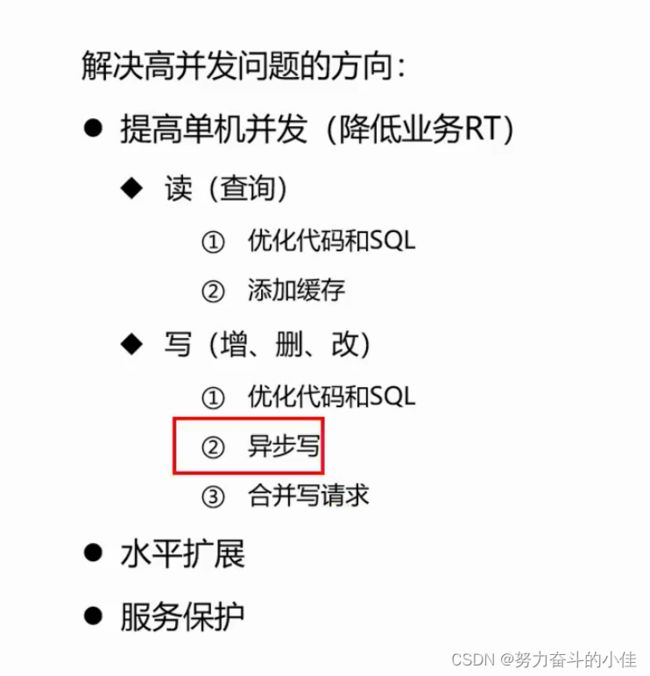
1.合并写请求

1.播放进度记录方案
对于请求量较大的接口需要做一个高并发的优化

2.使用redis做缓存,最终使用延迟任务将数据同步存储到db
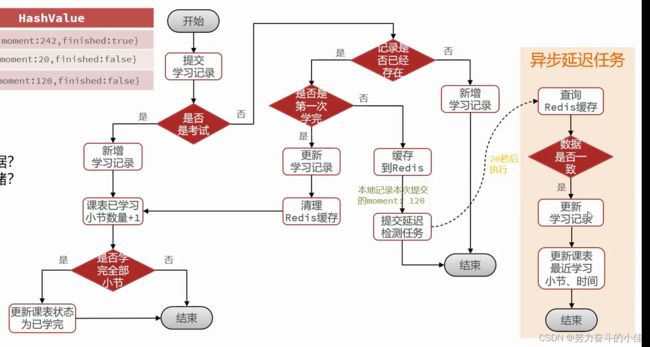

存储到redis中的数据结构

3.延迟任务使用DelayQueue队列的方式实现
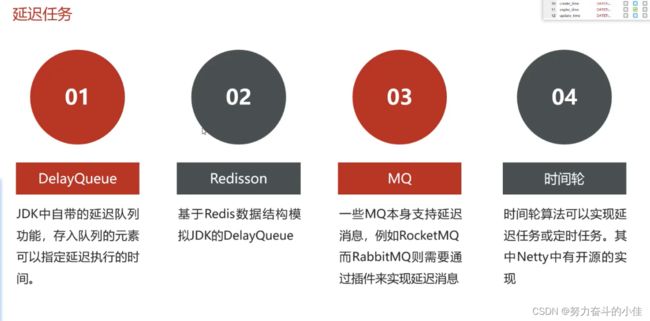
4.DelayQueue的用用法

5.代码实现
先写一个DelayTask,重写的方法看上面
@Data
public class DelayTask implements Delayed {
    private D data;
    private long deadlineNanos;

    public DelayTask(D data, Duration delayTime) {
        this.data = data;
        this.deadlineNanos = System.nanoTime() + delayTime.toNanos();
    }

    @Override
    public long getDelay(TimeUnit unit) {
        return unit.convert(Math.max(0, deadlineNanos - System.nanoTime()), TimeUnit.NANOSECONDS);
    }

    @Override
    public int compareTo(Delayed o) {
        long l = getDelay(TimeUnit.NANOSECONDS) - o.getDelay(TimeUnit.NANOSECONDS);
        if(l > 0){
            return 1;
        }else if(l < 0){
            return -1;
        }else {
            return 0;
        }
    }
}
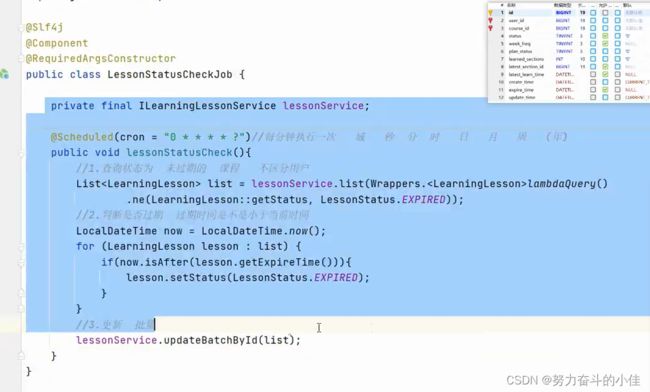
项目启动的时候就开启一个新的线程去执行异步延迟任务,此时只有这个课表中的所有课程的所有小节都学完了才会停止
@Slf4j
@Component
@RequiredArgsConstructor
public class LearningRecordDelayTaskHandler {
private final StringRedisTemplate redisTemplate;
private final LearningRecordMapper recordMapper;
private final ILearningLessonService lessonService;
private final DelayQueue> queue = new DelayQueue<>();
private final static String RECORD_KEY_TEMPLATE = "learning:record:{}";
private static volatile boolean begin = true;
@PostConstruct
public void init(){
CompletableFuture.runAsync(this::handleDelayTask);//初始化实例之后项目启动得时候开启一个新的线程去执行这个任务
}
@PreDestroy
public void destroy(){
begin = false;//实例初始化完成后停止执行任务
log.debug("延迟任务停止执行!");
}
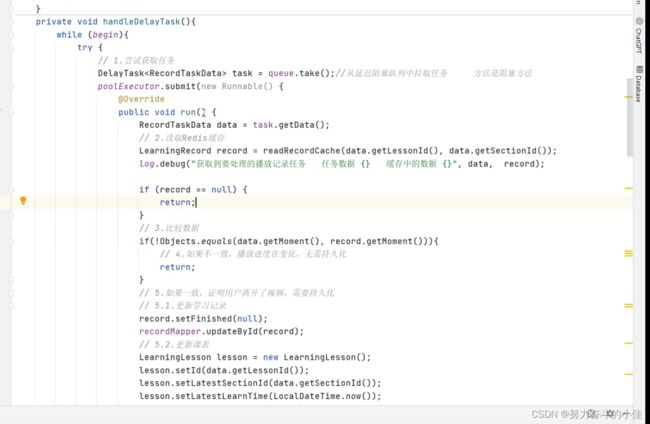
public void handleDelayTask(){
while (begin) {
try {
// 1.获取到期的延迟任务
DelayTask task = queue.take();
RecordTaskData data = task.getData();
// 2.查询Redis缓存
LearningRecord record = readRecordCache(data.getLessonId(), data.getSectionId());
if (record == null) {
continue;
}
// 3.比较数据,moment值
if(!Objects.equals(data.getMoment(), record.getMoment())) {
// 不一致,说明用户还在持续提交播放进度,放弃旧数据
continue;
}
// 4.一致,持久化播放进度数据到数据库
// 4.1.更新学习记录的moment
record.setFinished(null);
recordMapper.updateById(record);
// 4.2.更新课表最近学习信息
LearningLesson lesson = new LearningLesson();
lesson.setId(data.getLessonId());
lesson.setLatestSectionId(data.getSectionId());
lesson.setLatestLearnTime(LocalDateTime.now());
lessonService.updateById(lesson);
} catch (Exception e) {
log.error("处理延迟任务发生异常", e);
}
}
}
public void addLearningRecordTask(LearningRecord record){
// 1.添加数据到Redis缓存
writeRecordCache(record);
// 2.提交延迟任务到延迟队列 DelayQueue
queue.add(new DelayTask<>(new RecordTaskData(record), Duration.ofSeconds(20)));
}
public void writeRecordCache(LearningRecord record) {
log.debug("更新学习记录的缓存数据");
try {
// 1.数据转换
String json = JsonUtils.toJsonStr(new RecordCacheData(record));
// 2.写入Redis
String key = StringUtils.format(RECORD_KEY_TEMPLATE, record.getLessonId());
redisTemplate.opsForHash().put(key, record.getSectionId().toString(), json);
// 3.添加缓存过期时间
redisTemplate.expire(key, Duration.ofMinutes(1));
} catch (Exception e) {
log.error("更新学习记录缓存异常", e);
}
}
public LearningRecord readRecordCache(Long lessonId, Long sectionId){
try {
// 1.读取Redis数据
String key = StringUtils.format(RECORD_KEY_TEMPLATE, lessonId);
Object cacheData = redisTemplate.opsForHash().get(key, sectionId.toString());
if (cacheData == null) {
return null;
}
// 2.数据检查和转换
return JsonUtils.toBean(cacheData.toString(), LearningRecord.class);
} catch (Exception e) {
log.error("缓存读取异常", e);
return null;
}
}
public void cleanRecordCache(Long lessonId, Long sectionId){
// 删除数据
String key = StringUtils.format(RECORD_KEY_TEMPLATE, lessonId);
redisTemplate.opsForHash().delete(key, sectionId.toString());
}
@Data
@NoArgsConstructor
private static class RecordCacheData{
private Long id;
private Integer moment;
private Boolean finished;
public RecordCacheData(LearningRecord record) {
this.id = record.getId();
this.moment = record.getMoment();
this.finished = record.getFinished();
}
}
@Data
@NoArgsConstructor
private static class RecordTaskData{
private Long lessonId;
private Long sectionId;
private Integer moment;
public RecordTaskData(LearningRecord record) {
this.lessonId = record.getLessonId();
this.sectionId = record.getSectionId();
this.moment = record.getMoment();
}
}
}
提交学习记录
  @ApiOperation("提交学习记录")
    @PostMapping
    public void addLearningRecord(@RequestBody LearningRecordFormDTO formDTO){
        recordService.addLearningRecord(formDTO);
    }
}
@Override
@Transactional
public void addLearningRecord(LearningRecordFormDTO recordDTO) {
// 1.获取登录用户
Long userId = UserContext.getUser();
// 2.处理学习记录
boolean finished = false;
if (recordDTO.getSectionType() == SectionType.VIDEO) {
// 2.1.处理视频
finished = handleVideoRecord(userId, recordDTO);
}else{
// 2.2.处理考试
finished = handleExamRecord(userId, recordDTO);
}
if(!finished){
// 没有新学完的小节,无需更新课表中的学习进度
return;
}
// 3.处理课表数据
handleLearningLessonsChanges(recordDTO);
}
private boolean handleVideoRecord(Long userId, LearningRecordFormDTO recordDTO) {
// 1.查询旧的学习记录
LearningRecord old = queryOldRecord(recordDTO.getLessonId(), recordDTO.getSectionId());
// 2.判断是否存在
if (old == null) {
// 3.不存在,则新增
// 3.1.转换PO
LearningRecord record = BeanUtils.copyBean(recordDTO, LearningRecord.class);
// 3.2.填充数据
record.setUserId(userId);
// 3.3.写入数据库
boolean success = save(record);
if (!success) {
throw new DbException("新增学习记录失败!");
}
return false;
}
// 4.存在,则更新
// 4.1.判断是否是第一次完成
boolean finished = !old.getFinished() && recordDTO.getMoment() * 2 >= recordDTO.getDuration();
if(!finished){
LearningRecord record = new LearningRecord();
record.setLessonId(recordDTO.getLessonId());
record.setSectionId(recordDTO.getSectionId());
record.setMoment(recordDTO.getMoment());
record.setId(old.getId());
record.setFinished(old.getFinished());
taskHandler.addLearningRecordTask(record);
return false;
}
// 4.2.更新数据
boolean success = lambdaUpdate()
.set(LearningRecord::getMoment, recordDTO.getMoment())
.set(LearningRecord::getFinished, true)
.set(LearningRecord::getFinishTime, recordDTO.getCommitTime())
.eq(LearningRecord::getId, old.getId())
.update();
if(!success){
throw new DbException("更新学习记录失败!");
}
// 4.3.清理缓存
taskHandler.cleanRecordCache(recordDTO.getLessonId(), recordDTO.getSectionId());
return true;
}
private LearningRecord queryOldRecord(Long lessonId, Long sectionId) {
// 1.查询缓存
LearningRecord record = taskHandler.readRecordCache(lessonId, sectionId);
// 2.如果命中,直接返回
if (record != null) {
return record;
}
// 3.未命中,查询数据库
record = lambdaQuery()
.eq(LearningRecord::getLessonId, lessonId)
.eq(LearningRecord::getSectionId, sectionId)
.one();
// 4.写入缓存
taskHandler.writeRecordCache(record);
return record;
}
private void handleLearningLessonsChanges(LearningRecordFormDTO recordDTO) {
// 1.查询课表
LearningLesson lesson = lessonService.getById(recordDTO.getLessonId());
if (lesson == null) {
throw new BizIllegalException("课程不存在,无法更新数据!");
}
// 2.判断是否有新的完成小节
boolean allLearned = false;
// 3.如果有新完成的小节,则需要查询课程数据
CourseFullInfoDTO cInfo = courseClient.getCourseInfoById(lesson.getCourseId(), false, false);
if (cInfo == null) {
throw new BizIllegalException("课程不存在,无法更新数据!");
}
// 4.比较课程是否全部学完:已学习小节 >= 课程总小节
allLearned = lesson.getLearnedSections() + 1 >= cInfo.getSectionNum();
// 5.更新课表
lessonService.lambdaUpdate()
.set(lesson.getLearnedSections() == 0, LearningLesson::getStatus, LessonStatus.LEARNING.getValue())
.set(allLearned, LearningLesson::getStatus, LessonStatus.FINISHED.getValue())
.setSql("learned_sections = learned_sections + 1")
.eq(LearningLesson::getId, lesson.getId())
.update();
}6.将任务放进线程池中执行
创建线程池的四种方式以及怎么使用
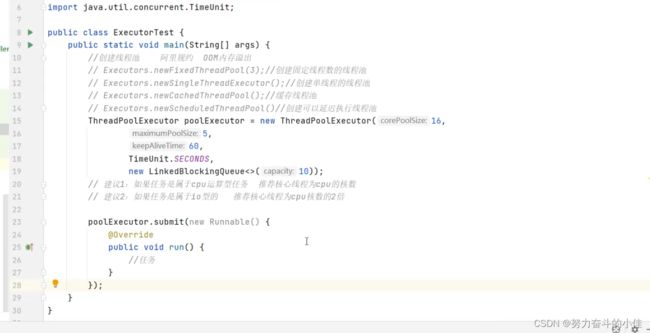
代码的改造

2.将同步变成异步

25.问题答疑评论功能的实现
1.表结构分析

回答评论表

问题表

2.新增和编辑接口的开发

  private final IInteractionQuestionService questionService;

    @ApiOperation("新增互动问题")
    @PostMapping
    public void saveQuestion(@Valid @RequestBody QuestionFormDTO questionDTO){
        questionService.saveQuestion(questionDTO);
    }

    @ApiOperation("修改提问")
    @PutMapping("/{id}")
    public void updateQuestion(
            @ApiParam("要修改的问题的id") @PathVariable("id") Long id,
            @RequestBody QuestionFormDTO questionDTO){
        questionService.updateQuestion(id, questionDTO);
    }


    @Override
    public void saveQuestion(QuestionFormDTO questionDTO) {
        // 1.获取当前登录的用户id
        Long userId = UserContext.getUser();
        // 2.数据封装
        InteractionQuestion question = BeanUtils.copyBean(questionDTO, InteractionQuestion.class);
        question.setUserId(userId);
        // 3.写入数据库
        save(question);
    }


   @Override
    public void updateQuestion(Long id, QuestionFormDTO questionDTO) {
        // 1.获取当前登录用户
        Long userId = UserContext.getUser();
        // 2.查询当前问题
        InteractionQuestion q = getById(id);
        if (q == null) {
            throw new BadRequestException("问题不存在");
        }
        // 3.判断是否是当前用户的问题
        if (!q.getUserId().equals(userId)) {
            // 不是,抛出异常
            throw new BadRequestException("无权修改他人的问题");
        }
        // 4.修改问题
        InteractionQuestion question = BeanUtils.toBean(questionDTO, InteractionQuestion.class);
        question.setId(id);
        updateById(question);
    }
3.查询问题的接口
入参

出参
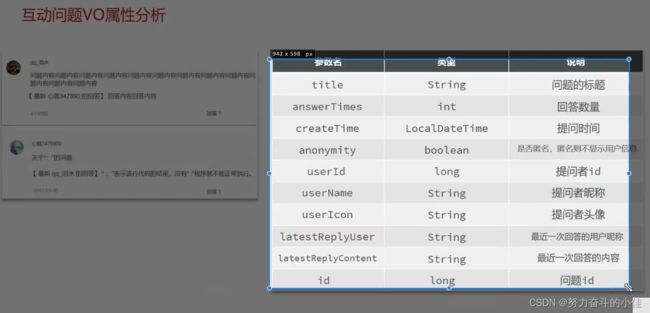
@ApiOperation("分页查询互动问题")
@GetMapping("page")
public PageDTO queryQuestionPage(QuestionPageQuery query){
return questionService.queryQuestionPage(query);
}
@Override
public PageDTO queryQuestionPage(QuestionPageQuery query) {
// 1.参数校验,课程id和小节id不能都为空
Long courseId = query.getCourseId();
Long sectionId = query.getSectionId();
if (courseId == null && sectionId == null) {
throw new BadRequestException("课程id和小节id不能都为空");
}
// 2.分页查询
Page page = lambdaQuery()
.select(InteractionQuestion.class, info -> !info.getProperty().equals("description"))
.eq(query.getOnlyMine(), InteractionQuestion::getUserId, UserContext.getUser())
.eq(courseId != null, InteractionQuestion::getCourseId, courseId)
.eq(sectionId != null, InteractionQuestion::getSectionId, sectionId)
.eq(InteractionQuestion::getHidden, false)
.page(query.toMpPageDefaultSortByCreateTimeDesc());
List records = page.getRecords();
if (CollUtils.isEmpty(records)) {
return PageDTO.empty(page);
}
// 3.根据id查询提问者和最近一次回答的信息
Set userIds = new HashSet<>();
Set answerIds = new HashSet<>();
// 3.1.得到问题当中的提问者id和最近一次回答的id
for (InteractionQuestion q : records) {
if(!q.getAnonymity()) { // 只查询非匿名的问题
userIds.add(q.getUserId());
}
answerIds.add(q.getLatestAnswerId());
}
// 3.2.根据id查询最近一次回答
answerIds.remove(null);
Map replyMap = new HashMap<>(answerIds.size());
if(CollUtils.isNotEmpty(answerIds)) {
List replies = replyMapper.selectBatchIds(answerIds);
for (InteractionReply reply : replies) {
replyMap.put(reply.getId(), reply);
if(!reply.getAnonymity()){
userIds.add(reply.getUserId());
}
}
}
// 3.3.根据id查询用户信息(提问者)
userIds.remove(null);
Map userMap = new HashMap<>(userIds.size());
if(CollUtils.isNotEmpty(userIds)) {
List users = userClient.queryUserByIds(userIds);
userMap = users.stream()
.collect(Collectors.toMap(UserDTO::getId, u -> u));
}
// 4.封装VO
List voList = new ArrayList<>(records.size());
for (InteractionQuestion r : records) {
// 4.1.将PO转为VO
QuestionVO vo = BeanUtils.copyBean(r, QuestionVO.class);
voList.add(vo);
// 4.2.封装提问者信息
if(!r.getAnonymity()){
UserDTO userDTO = userMap.get(r.getUserId());
if (userDTO != null) {
vo.setUserName(userDTO.getName());
vo.setUserIcon(userDTO.getIcon());
}
}
// 4.3.封装最近一次回答的信息
InteractionReply reply = replyMap.get(r.getLatestAnswerId());
if (reply != null) {
vo.setLatestReplyContent(reply.getContent());
if(!reply.getAnonymity()){
UserDTO user = userMap.get(reply.getUserId());
vo.setLatestReplyUser(user.getName());
}
}
}
return PageDTO.of(page, voList);
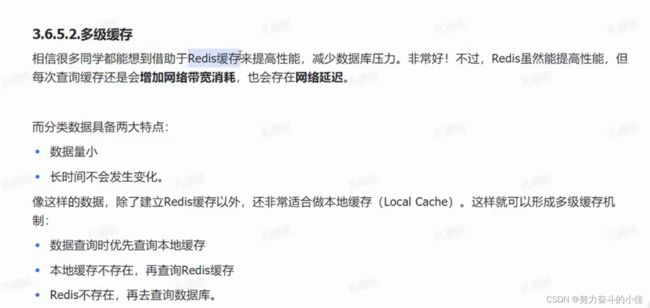
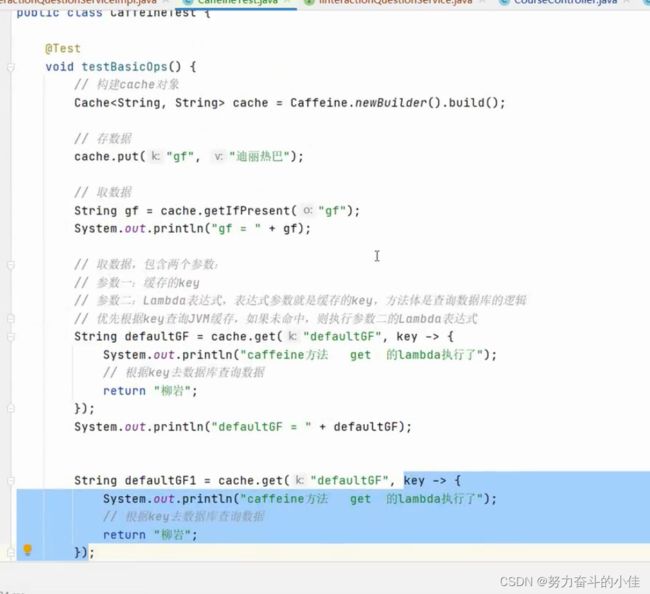
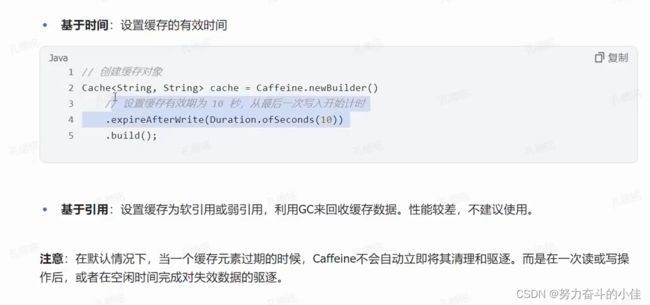
} 26.Caffieine做多级缓存(本地缓存+redis缓存)
当我们对于一些数据比较少去做修改的数据,比如说一些分类数据我们可以直接存储到缓存中,查询缓存
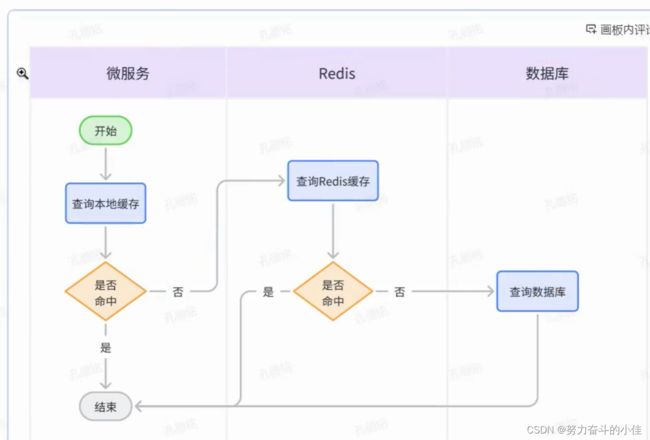

常用的API
三种清除策略

使用的方法
https://www.cnblogs.com/dw3306/p/15881537.html
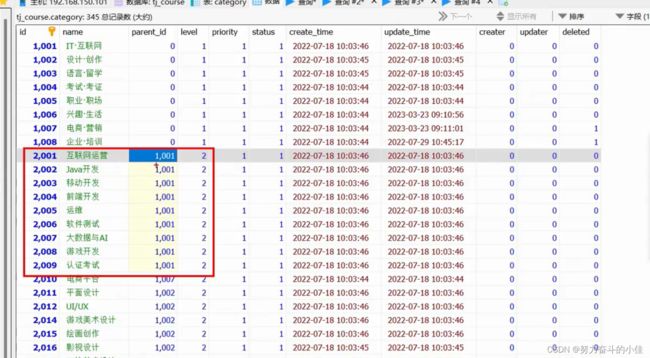
27.分类表的实现