Junit5基础教程
文章目录
-
- 一,导入依赖
- 二,基本功能
-
- 一、常用断言
- 二、执行顺序和常用注解
-
- 1、通过BeforeAll类的注解来保证顺序
- 2、通过order注解来保证执行顺序
- 三、依赖测试
- 四、参数化测试
- 五、测试套件
-
- SelectPackages、IncludePackages、SelectClasses、IncludeTags等注解的使用
- 六、软断言
- 七、并发测试
- 八、动态测试解决硬编码问题
- 九、Junit5启动类(适用于持续集成)
Junit5的构成:
- Junit Platform+Junit Jupiter+Junit Vintage
- Junit Platform:是Junit向测试平台演进,提供平台功能的模块,通过这个其他的自动化引擎可以接入Junit,实现对接和执行
- Junit Jupiter:核心,承载Juint4原有功能+丰富的新特性
- Junit Vintage:主要功能是对Juint旧版本进行兼容
一,导入依赖
 <properties>
        <maven.compiler.source>8</maven.compiler.source>
        <maven.compiler.target>8</maven.compiler.target>
        <project.build.sourceEncoding>UTF-8</project.build.sourceEncoding>
        <junit-platform.version>1.8.1</junit-platform.version>
        <junit-jupiter.version>5.8.1</junit-jupiter.version>
    </properties>
    <build>
        <pluginManagement>
            <plugins>
                <plugin>
                    <groupId>org.apache.maven.plugins</groupId>
                    <artifactId>maven-surefire-plugin</artifactId>
                    <version>3.0.0-M5</version>
                    <dependencies>
                        <dependency>
                            <groupId>org.junit.jupiter</groupId>
                            <artifactId>junit-jupiter-engine</artifactId>
                            <version>5.8.1</version>
                        </dependency>
                    </dependencies>
                    <configuration>
                        <includes>
                            <include>**/*Test.java</include>
                        </includes>
                    </configuration>
                </plugin>

                <plugin>
                    <groupId>org.apache.maven.plugins</groupId>
                    <artifactId>maven-compiler-plugin</artifactId>
                    <version>3.8.1</version>
                    <configuration>
                        <source>1.8</source>
                        <target>1.8</target>
                    </configuration>
                </plugin>
            </plugins>
        </pluginManagement>
    </build>
  <!--核心依赖-->
        <dependency>
            <groupId>org.junit.jupiter</groupId>
            <artifactId>junit-jupiter-engine</artifactId>
            <version>5.8.1</version>
        </dependency>
        <!--套件测试使用-->
        <dependency>
            <groupId>org.junit.platform</groupId>
            <artifactId>junit-platform-runner</artifactId>
            <version>1.8.1</version>
        </dependency>
        <dependency>
            <groupId>org.junit.platform</groupId>
            <artifactId>junit-platform-runner</artifactId>
            <version>1.8.1</version>
        </dependency>
二,基本功能
一、常用断言

二、执行顺序和常用注解
1、通过BeforeAll类的注解来保证顺序
// 执行顺序:beforeAll-beforeEach-afterEach-afterAll
@DisplayName("常用注解测试")
public class TestCase {
    /**
     * @BeforeAll和@AfterAll 必须静态修饰,在所有方法执行前后只执行一次
     * @Test 一个方法
     * @AfterEach和@BeforeEach 每次方法执行前都会执行一次
     * @DisplayName() 类似注解的功能
     * @RepeatedTest(5) 重复5次
     * @Disabled 不执行该方法
     * @Tags 打标签
     */
    @BeforeAll
    public static void beforeAll() {
        System.out.println("BeforeAll再每个类中只执行一次,且是在开头执行");
    }

    @BeforeEach
    public void beforeEach() {
        System.out.println("BeforeEach在每个方法执行前都会执行一次");
    }

    // junit5不需要访问修饰符
    //  @Disabled表示不执行
    @Test
    @Disabled
    @DisplayName("方法1")
    void fun1() {
        System.out.println("---fun1---");
    }

    @Test
    @DisplayName("方法2")
    @RepeatedTest(5)
    void fun2() {
        System.out.println("---fun2---");
    }

    @Test
    @Tag("tag1")
    void tagTest(){
        System.out.println("tag1");
    }
    @AfterEach
    public void afterEach() {
        System.out.println("AfterEach在每个方法执行前都会执行一次");
    }

    @AfterAll
    public static void afterAll() {
        System.out.println("afterAll再每个类中只执行一次,且是在结尾执行");
    }
}
2、通过order注解来保证执行顺序
import org.junit.jupiter.api.MethodOrderer.OrderAnnotation;
import org.junit.jupiter.api.Order;
import org.junit.jupiter.api.Test;
import org.junit.jupiter.api.TestMethodOrder;

@TestMethodOrder(OrderAnnotation.class)
class OrderedTestsDemo {

  @Test
  @Order(1)
  void nullValues() {
      // perform assertions against null values
  }

  @Test
  @Order(2)
  void emptyValues() {
      // perform assertions against empty values
  }

  @Test
  @Order(3)
  void validValues() {
      // perform assertions against valid values
  }
}
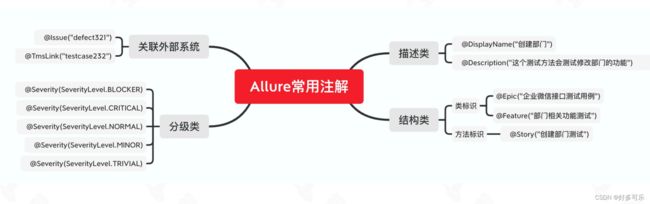
- allure注解
三、依赖测试
/**
 * @Nested:
 * 功能类似于suite测试套件
 * 从下往上执行
 */

public class NestedTest {
    private static HashMap<String, Object> dataMap = new HashMap<String, Object>();

    @Test
    void login() {
        dataMap.put("login", "登录成功");
    }

    @Nested
    class Shopping{
        @Test
        void shopping(){
            if (null!=dataMap.get("buy")){
                System.out.println("购买成功啦!");
            }else {
                System.out.println("购买失败");
            }
        }
    }

    @Nested
    class Buy {
        @Test
        void buyTest() {
            if (dataMap.get("login").equals("登录成功")) {
                System.out.println("登录成功");
                dataMap.put("buy", "登录成功,快去购物吧!");
            } else {
                System.out.println("登录失败");
            }
        }
    }
}
四、参数化测试
写过一篇,点这里!!
五、测试套件
SelectPackages、IncludePackages、SelectClasses、IncludeTags等注解的使用
/**
 * SelectPackages 选择需要执行的包
 */
@RunWith(JUnitPlatform.class)
@SelectPackages({"com.testCase2"})
public class SelectPackagesTest {

}
/**
 * @IncludePackages需要和@SelectPackages搭配使用
 * @IncludePackages是在@SelectPackages的基础上再做一层筛选
 * ps:一定要注意,包下的类名一定要Test开头或者结尾,否则就不执行了!!!
 */
@RunWith(JUnitPlatform.class)
@SelectPackages({"com.testCase2"})
// 只执行com.testCase2.demo1
@IncludePackages({"com.testCase2.demo1"})
public class IncludePackagesTest {
}
/**
 * @SelectClasses和@IncludeTags组合使用,在方法里选出对应的标签
 * 还有@ExcludeTag
 */
@RunWith(JUnitPlatform.class)
@SelectClasses({TestCase.class})
//@IncludeTags("tag1")
@ExcludeTags("tag1")
public class SelectClassesTest {
}
六、软断言
- assertAll断言方法,会在执行完所有断言后统⼀输出结果,⼀次性暴露所有问题,提高了测试脚本的健壮性。
import org.junit.jupiter.api.Assertions;
import org.junit.jupiter.api.Test;
import org.junit.jupiter.api.function.Executable;

import java.util.ArrayList;
import java.util.List;

import static org.junit.jupiter.api.Assertions.assertAll;

public class AssertAllDemo {
    // 普通方法,第一个执行失败以后后面都不执行
    @Test
    void assertTest1() {
        Assertions.assertTrue(2 == 1);
    }

    void assertTest2() {
        Assertions.assertTrue(3 == 1);
    }

    void assertTest3() {
        Assertions.assertTrue(1 == 1);
    }

    // 用了assertAll之后,所有方法都执行
    @Test
    void assertAllTest() {
        assertAll(
                "多次结果校验",
                () -> {
                    Assertions.assertTrue(2 == 1);
                },
                () -> {
                    Assertions.assertTrue(3 == 1);
                }
        );
    }

    @Test
    void assertAllTtest02() {
        List<Executable> assertList = new ArrayList<>();
        for (int i = 0; i < 10; i++) {
            int result = i;
            System.out.println(result);
            assertList.add(() -> {
                Assertions.assertEquals(10, result);
            });
        }
        assertAll("多次结果校验", assertList.stream());
    }

}
七、并发测试
- 测试环境基本上都是单线程操作,而线上存在分布式的并发场景,所以并不能暴露所有问题,这里就需要用到并发
- junit测试是在⼀个线程中串行执行的,从5.3开始⽀持并行测试。⾸先需要在配置⽂件junit-platform.properties 中配置。
#是否允许并行执行true/false
junit.jupiter.execution.parallel.enabled = true
#是否支持方法级别多线程same_thread/concurrent
junit.jupiter.execution.parallel.mode.default = concurrent
#是否支持类级别多线程same_thread/concurrent
junit.jupiter.execution.parallel.mode.classes.default = concurrent
# the maximum pool size can be configured using a ParallelExecutionConfigurationStrategy
junit.jupiter.execution.parallel.config.strategy=fixed
junit.jupiter.execution.parallel.config.fixed.parallelism=4
import org.junit.jupiter.api.RepeatedTest;
import org.junit.jupiter.api.Test;

/**
 * 并发测试
 */
public class ParallelTest {
  static   int result = 0;

    // 加synchronized可以保证其原子性,但是如果是分布式系统是不适合的,需要用如redis分布式锁
    public static  int cal(int x) throws InterruptedException {
        int i = result;
        Thread.sleep(1000);
        result = i + x;
        return result;
    }
    public static int add(int x,int y) throws InterruptedException {
        Thread.sleep(1000);
        result = y + x;
        return result;
    }
    @RepeatedTest(10)
    public void testCal() throws InterruptedException {
        long id = Thread.currentThread().getId();
        System.out.println("线程" + id + "为你服务:" + cal(1));
    }
    @RepeatedTest(10)
    public void testAdd() throws InterruptedException {
        long id = Thread.currentThread().getId();
        System.out.println("加法计算:线程" + id + "为你服务:" + add(1,2));
    }
}
八、动态测试解决硬编码问题
- 传统自动化测试思路中,我们的测试逻辑是在以硬编码的形式组织到代码里的,当遇到用例迁移或结果整合时,会产生大量的逻辑重写
- JUnit5提供了动态测试方案,让测试人员可以在脚本Runtime时动态的批量生成用例
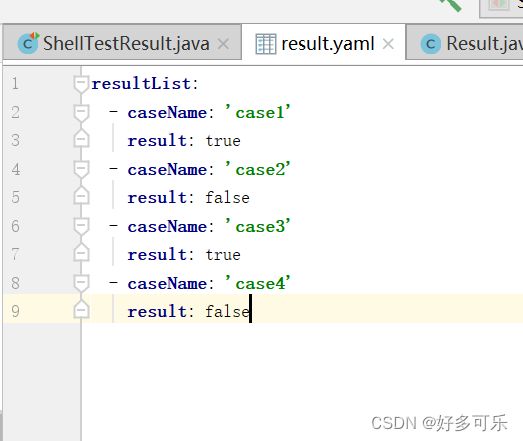
- 现在我们有一个需求,要把yaml文件内容转为测试用例,解决思路如下:
import com.fasterxml.jackson.databind.ObjectMapper;
import com.fasterxml.jackson.dataformat.yaml.YAMLFactory;
import org.junit.jupiter.api.Assertions;
import org.junit.jupiter.api.DynamicTest;
import org.junit.jupiter.api.Test;
import org.junit.jupiter.api.TestFactory;

import java.io.File;
import java.io.IOException;
import java.util.ArrayList;
import java.util.Collection;
import java.util.List;

/**
 * 动态测试demo
 * 需求:把result.yaml脚本变成测试用例
 * 首先把它通过反序列化变成对象
 * 然后把它添加到dynamicTestList
 */
public class ShellTestResult {
        @TestFactory
    Collection<DynamicTest> shellTestResult() throws IOException {
        // 新建一个列表来存储数据(不是结果)
        List<DynamicTest> dynamicTestList = new ArrayList<>();
        ObjectMapper mapper = new ObjectMapper(new YAMLFactory());
        // 反序列化方式把yaml文件转换为对象列表
        ResultList resultList = mapper.readValue(new File("D:\\interface_auto\\src\\main\\resources\\result.yaml"), ResultList.class);
        System.out.println("done");
        // 动态遍历生成测试方法
        for (Result result : resultList.getResultList()) {
            // 把数据收集起来
            dynamicTestList.add(
                    // 动态生成测试方法
                    DynamicTest.dynamicTest(result.getCaseName(), () -> {
                        Assertions.assertTrue(result.isResult());
                    })
            );
        }
        return dynamicTestList;
    }
}
import lombok.Data;

@Data
public class Result {
    private String caseName;
    private boolean result;

    public boolean isResult() {
        return result;
    }

    public void setResult(boolean result) {
        this.result = result;
    }
}
@Data
public class ResultList {
    private List<Result> resultList;
}
九、Junit5启动类(适用于持续集成)
import org.junit.platform.launcher.Launcher;
import org.junit.platform.launcher.LauncherDiscoveryRequest;
import org.junit.platform.launcher.TestExecutionListener;
import org.junit.platform.launcher.core.LauncherDiscoveryRequestBuilder;
import org.junit.platform.launcher.core.LauncherFactory;
import org.junit.platform.launcher.listeners.SummaryGeneratingListener;

import static org.junit.platform.engine.discovery.ClassNameFilter.includeClassNamePatterns;
import static org.junit.platform.engine.discovery.DiscoverySelectors.selectClass;
import static org.junit.platform.engine.discovery.DiscoverySelectors.selectPackage;

/**
 * junit5启动类(适用于持续集成这种点不了执行的)
 */
public class LauncherDemo {
    public static void main(String[] args) {
        LauncherDiscoveryRequest request = LauncherDiscoveryRequestBuilder.request().selectors(
                // 2个过滤条件是or不是and:
                selectPackage("com.learn.junit5"),
                selectClass(TestExecutionOrder.class)
        ).filters(
//                includeClassNamePatterns("Test.*")
        )
                .build();
        Launcher launcher = LauncherFactory.create();
        TestExecutionListener listener = new SummaryGeneratingListener();
        launcher.registerTestExecutionListeners(listener);
        launcher.execute(request);
    }
}