elasticsearch实战摘录
目录
elasticSearch语法摘录
准备相关:
docker启动es
索引新数据
选择合适的查询类型:使用term
使用过滤器:
应用聚合:
通过ID获取文档:
配置es集群
索引更新和删除数据
查看所有索引
使用mapping来定义各种文档
获取目前的映射
索引一篇新的文档
查看上面的新mapping
定义新的mapping
用于定义文档字段的核心类型
常用字段类型的查询
数组和多字段
使用预定义字段
更新现有的文档
使用 /_update
使用与doc同级的upsert参数来创建不存在的修改
通过脚本来更新文档
通过版本来实现并发控制
删除数据
删除文档
搜索数据
介绍查询和过滤器DSL
常用的基础查询和过滤器:
组合查询或复合查询
bool查询
bool过滤器
range查询和过滤器
prefix查询和过滤器
wildcard通配符查询
exists过滤器
分析数据
N元语法(ngram)和edge-ngram和滑动窗口
使用相关性进行搜索
使用boosting来影响文档的得分
解释一篇文档不匹配的原因
使用查询再打分来减少评分操作的性能影响(7.x似乎缺少相关属性??)
使用function_score来定制得分(7.x引入了script_score)
合并得分
1)field_value_factor
2)script_score
3)random_score
4)衰减函数
elasticSearch语法摘录
2020-06-21: notepad++中删除空格换行回车等方式,ctrl+f ==> 勾选循环查找和正则表达式 ==>替换栏输入\s 即可.
准备相关:
删除docker镜像 docker rmi id或标签
![]()
使用tag为镜像添加标签: docker tag 旧repostery:tag 新repostery:tag
![]()
当repostery不同,tag相同,imageID也相同的时候,使用docker rmi respostery:tag 删除不想要的image.
查看正在运行的容器: docker ps
启动已经停止的容器实例: docker start id
启动未启动过的容器实例: docker run. 有三个参数 1) -it,以交互方式启动;2) -p 映射内外部端口; 3) -d 以附加进程启动
进入docker容器:docker exec -it id前3位(可以模糊查询) /bin/bash ; 退出可以直接输入exit
停止一个正在运行的容器: docker stop 容器ID或容器名 有一个参数 -t,给容器时间(秒)去保存自己的状态:dcoker stop -t=20
直接立即关闭容器:docker kill 容器名ID
重启一个容器: docker restart ID或名称 对于正在运行的容器进行重启就可以加-t给一个保存状态的时间.
查看容器: docker inspect 容器名
删除容器: docker rm -v:直接删除容器,并解除与之关联的卷. -l db是移除容器甲对容器乙的连接db;-f db01 db02是删除容器db01和db02
清理临时的没有被使用的镜像文件:docker image prune(慎用!)
查看层级历史:docker history ID
docker启动es
9200端口用于外部通信,9300用于集群内部通信.
docker run -p 9200:9200 elasticsearch ,然后浏览器中调es所在ip:9200查看是否启动成功

索引是由一个或多个被称为分片的数据块组成.易于扩展
索引有分片,分片有副本,分片和副本可存在于不同的节点.当有3个节点5个分片和5个副本时:深色为分片,浅色为副本
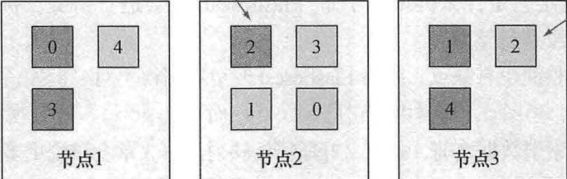
一个es服务是一个节点,或者一个es进程也是一个节点.多个节点可以加入同一个集群.默认情况下可以连接集群中任意一个节点并访问完整的数据集(完整的数据集不限于单个节点).
当索引一篇文档时,系统首先根据文档ID的散列值选择一个主分片将该文档发送过去,这个主分片可能位于别的节点(机器,线程).然后主分片开始同步该文档至所有副分片.搜索该文档时,es需要在该索引的完整分片集合中进行查找,这些分片可能是主分片也可能是副分片.
一份分片是Lucene的索引:一个包含倒排索引的文件目录.一个es索引由多个Lucene索引组成.副分片可以在运行的时候进行添加和移除,主分片不可以.过多的分片会影响性能.
分布式索引和搜索.索引时一旦确定文档所在分片,接受请求的节点将文档发送到分片所在节点.然后同步至所有副本.搜索时接受请求的节点将请求转发到一组包含所有数据的分片(可以是不同的节点上).es使用round-robin的轮训机制选择可用的分片(主分片或副分片).并将搜索请求转发过去.然后es从这些分片收集结果,将其聚集到单一的回复返回给客户端.
索引新数据
cURL的使用: -X此处不带空格[GET默认可以不带-X PUT PIST]; 单引号'ip:9200/索引/ID?pretty'
添加一个文档的命令:
curl -XPOST -H "Content-Type:application/json" '192.168.1.103:9200/get-together/1?pretty' -d '{"name":"Elasticsearch","organizer":"chow"}'

//返回
{
  "_index" : "get-together",
  "_type" : "1",
  "_id" : "ol8p0XIBV6yKmAPNJs-g",
  "_version" : 1,
  "result" : "created",
  "_shards" : {
    "total" : 2,
    "successful" : 1,
    "failed" : 0
  },
  "_seq_no" : 0,
  "_primary_term" : 1
}
[root@localhost ~]# curl -XPUT '192.168.1.103:9200/new-index'
{"acknowledged":true,"shards_acknowledged":true,"index":"new-index"}
查看mapping的命令:
[root@localhost ~]# curl '192.168.1.103:9200/get-together/_mapping?pretty'全文查找的 例子:这里加不了&fields=name,location\
[root@localhost ~]# curl "192.168.1.103:9200/get-together/_search?\
q=elasticsearch\
&size=1\
&pretty"

//es7.x已经移除type
可以写成&q=name,location:elasticsearch
[root@localhost ~]# curl "192.168.1.103:9200/get-together/_search?\
q=name:elasticsearch\
&size=1\
&pretty"
索引处可以加多个索引,用逗号隔开.也可以省略索引直接在所有索引间搜索.将不同范围的数据构建到不同的索引里,而不是一个大索引?
请求参数可以加"timeout=3s",设定请求在超过3秒后超时.此时只能获得这期间查到的内容.
返回结果中的"_shards"一栏会返回成功命中的分片以及失败的分片.即便有分片宕机,依然可以返回剩余分片的查询结果.
es默认限制结果数量为10.使用size参数修改返回的数量.
使用json格式制定搜索条件:
[root@localhost ~]# curl -H "Content-Type:application/json" '192.168.1.103:9200/get-together/_search?pretty' -d '{"query":{"query_string":{"query":"Denver"}}}'单query里指定多条件字段的AND查询可以这样写:注意query里面的AND一定要大写
[root@localhost ~]# curl -H "Content-Type:application/json" '192.168.1.103:9200/get-together/_search?pretty' -d '{"query":{"query_string":{"query":"name:Denver AND location_group:Denver"}}}'选择合适的查询类型:使用term
curl -H "Content-Type:application/json" '192.168.1.103:9200/get-together/_search?pretty' -d '{"query":{"term":{"name":"elasticsearch"}}}'使用过滤器:
如果对打分不感兴趣,使用过滤器更快更适合缓存.使用filter要配合bool查询.max_score项为0.0.不会根据得分排序.
curl -H "Content-Type:application/json" '192.168.1.103:9200/get-together/_search?pretty' -d '{"query":{"bool":{"filter":{"term":{"name":"elasticsearch"}}}}}'应用聚合:
对没有优化或加索引的字段聚合会报错.
[root@localhost ~]# curl -H "Content-Type:application/json" '192.168.1.103:9200/get-together/_search?pretty' -d '{"aggregations":{"organizers":{"terms":{"field":"organizer"}}}}'

      "caused_by" : {
        "type" : "illegal_argument_exception",
        "reason" : "Text fields are not optimised for operations that require per-document field data like aggregations and sorting, so these operations are disabled by default. Please use a keyword field instead. Alternatively, set fielddata=true on [organizer] in order to load field data by uninverting the inverted index. Note that this can use significant memory."
优化方式就是set fielddata=true .注意这里是_mapping相关操作
[root@localhost ~]# curl -H "Content-Type:application/json" '192.168.1.103:9200/get-together/_mapping?pretty' -d '{"properties":{"organizer":{"type":"text","fielddata":true}}}'
{
  "acknowledged" : true
}
在此聚合,就可以了.
"aggregations" : {
    "organizers" : {
      "doc_count_error_upper_bound" : 0,
      "sum_other_doc_count" : 0,
      "buckets" : [
        {
          "key" : "lee",
          "doc_count" : 2
        },
        {
          "key" : "andy",
          "doc_count" : 1
        },
        {
          "key" : "daniel",
          "doc_count" : 1
        },
        {
          "key" : "mik",
          "doc_count" : 1
        },
        {
          "key" : "tyler",
          "doc_count" : 1
        }
      ]
    }
  }
通过ID获取文档:
/_doc不能少
curl '192.168.1.103:9200/get-together/_doc/1?pretty'配置es集群
1.elasticsearch.yml中指定集群的名称 cluster.name 改名称后原有数据将不可见,不是丢失.
2.logging.yml中编辑日志选项 cluster-name.log;超过半秒的慢搜索日志:cluster-name_index_search_slowlog.log;超过半秒的慢索引(索引相关操作)日志:cluster-name_index_indexing_slowlog.log.
3.在环境变量或elasticsearch.in.sh中调整内存设置.这是配置java虚拟机 在文件开始部分加ES_HEAP_SIZE=500m.默认是256MB 实际生产中如果机器只运行es,可以将heap_size设置为最多一半的机器内存.
索引更新和删除数据
有3种类型的字段:基本字段,数组和多元字段,预定义字段.可以用预定义字段_ttl设置过期文档自动删除.
查看所有索引
[root@localhost ~]# curl "192.168.1.103:9200/_cat/indices?v"
health status index                  uuid                   pri rep docs.count docs.deleted store.size pri.store.size
yellow open   indexforputandmapping  gi0ZFKysRD6g1cO7ieTefA   1   1          1            0        4kb            4kb
yellow open   get-together           bM_WypSDQBma_mL4cHMdKA   2   1         20            0     45.2kb         45.2kb
yellow open   myindex                Fqk1gJbrTL6vyZ9eKXD0rg   1   1          0            0       208b           208b
yellow open   november_2014_invoices QEbTWlFMQJWPPWwXfss45A   1   1          0            0       208b           208b
yellow open   december_2014_invoices eMBBAX8WRKCAEAeUmZEixg   1   1          0            0       208b           208b
yellow open   new-index              iN-g0oqpQt6Qza6CmKqVtQ   1   1          0            0       208b           208b
green  open   .kibana_1              oRggM7WgRA-sN218C_WEkg   1   0          1            0      3.8kb          3.8kb
使用mapping来定义各种文档
获取目前的映射
curl '192.168.1.103:9200/get-together/_mapping?pretty'索引一篇新的文档
[root@localhost ~]# curl -XPOST -H 'Content-Type:application/json' '192.168.1.103:9200/indexforputandmapping/1?pretty' -d '{"name":"Late Night with Elasticsearch","date":"2013-10-25T19:00"}'
{
  "_index" : "indexforputandmapping",
  "_type" : "1",
  "_id" : "yV-d1nIBV6yKmAPNM89t",
  "_version" : 1,
  "result" : "created",
  "_shards" : {
    "total" : 2,
    "successful" : 1,
    "failed" : 0
  },
  "_seq_no" : 0,
  "_primary_term" : 1
}
查看上面的新mapping
[root@localhost ~]# curl '192.168.1.103:9200/indexforputandmapping/_mapping?pretty'
{
  "indexforputandmapping" : {
    "mappings" : {
      "properties" : {
        "date" : {
          "type" : "date"
        },
        "name" : {
          "type" : "text",
          "fields" : {
            "keyword" : {
              "type" : "keyword",
              "ignore_above" : 256
            }
          }
        }
      }
    }
  }
}
定义新的mapping
定义新的字段host,类型为text.es7.x移除了string,8之后会彻底移除.
[root@localhost ~]# curl -XPUT -H 'Content-Type:application/json' '192.168.1.103:9200/indexforputandmapping/_mapping?pretty' -d '{"properties":{"host":{"type":"text"}}}'
{
  "acknowledged" : true
}
可以每次只添加新字段,mapping会自动合并.再次查看该索引:
[root@localhost ~]# curl -XGET -H 'Content-Type:application/json' '192.168.1.103:9200/indexforputandmapping/_mapping?pretty'
{
  "indexforputandmapping" : {
    "mappings" : {
      "properties" : {
        "date" : {
          "type" : "date"
        },
        "host" : {
          "type" : "text"
        },
        "name" : {
          "type" : "text",
          "fields" : {
            "keyword" : {
              "type" : "keyword",
              "ignore_above" : 256
            }
          }
        }
      }
    }
  }
}
用于定义文档字段的核心类型
请参考这篇文章: https://blog.csdn.net/Mikowoo007/article/details/106585422
7.x 有字符串类:text,keyword;
数值型:long,integer,short,byte,double,float,half_float,scaled_float;布尔型:boolean;二进制型:binary默认不存储不搜索;
范围类型:integer_range,float_range,date_range等,譬如 age 的类型是 integer_range, 那么值可以是 {“gte”:20, “lte”: 40}:搜索 “term” {“age”:21} 可以搜索该值;
日期型:date 通过格式来判断是否属于date类型;
复杂数据类型:array 直接用[]定义,数组中的类型必须一致,可以是object对象数组;
对象类型:Object 查询时使用点操作符指定字段名;
专用数据类型: IP,经纬度geo_point等
常用字段类型的查询
先插一条数据
[root@localhost ~]# curl "192.168.1.103:9200/new-index/_mapping?pretty"
{
  "new-index" : {
    "mappings" : { }
  }
}

[root@localhost ~]# curl -XPOST -H 'Content-Type:application/json' '192.168.1.103:9200/new-index/1?pretty' -d '{"name":"Late Night with Elasticsearch","date":"2013-10-25T19:00"}'
{
  "_index" : "new-index",
  "_type" : "1",
  "_id" : "yl8A13IBV6yKmAPNIc-T",
  "_version" : 1,
  "result" : "created",
  "_shards" : {
    "total" : 2,
    "successful" : 1,
    "failed" : 0
  },
  "_seq_no" : 0,
  "_primary_term" : 1
}
查询.默认分词器将所有字符转化为小写,query_string的效果:会对搜索词进行分词,然后在text类型(也会分词)中去匹配,词词之间可以不连续词序也可以调换.match_phrase则要求(所分的词)必须连续且顺序.请参考:https://www.cnblogs.com/chenmz1995/p/10199147.html
[root@localhost ~]# curl -XGET -H 'Content-Type:application/json' '192.168.1.103:9200/new-index/_search?pretty' -d '{"query":{"query_string":{"query":"late"}}}'
{
  "took" : 3,
  "timed_out" : false,
  "_shards" : {
    "total" : 1,
    "successful" : 1,
    "skipped" : 0,
    "failed" : 0
  },
  "hits" : {
    "total" : {
      "value" : 1,
      "relation" : "eq"
    },
    "max_score" : 0.2876821,
    "hits" : [
      {
        "_index" : "new-index",
        "_type" : "1",
        "_id" : "yl8A13IBV6yKmAPNIc-T",
        "_score" : 0.2876821,
        "_source" : {
          "name" : "Late Night with Elasticsearch",
          "date" : "2013-10-25T19:00"
        }
      }
    ]
  }
}
对于不需要搜索的字段可以设置index为no,以节省空间,加快索引及搜索过程.
数组和多字段
数组 :如果要索引拥有多个值的字段,将这些值放在方括号中.数组在mapping中的type是里面数据的基本类型.
多字段:使用多字段可以对同一个字段设置不同的type及index属性.这里演示给tag字段加上一个不索引的配置的字段.注意配置"index":false
[root@localhost ~]# curl -XPUT -H 'Content-Type:application/json' '192.168.1.103:9200/new-index/_mapping?pretty' -d '{"properties":{"date":{"type":"date"},"name":{"type":"text","fields":{"keyword":{"type":"keyword","ignore_above":256}}},"tags":{"type":"text","fields":{"keyword":{"type":"keyword","ignore_above":256},"verbatim":{"type":"text","index":false}}}}}'    {
  "acknowledged" : true
}
再查看该索引的mapping就会发现tag字段的mapping变了
[root@localhost ~]# curl -XGET -H 'Content-Type:application/json' '192.168.1.103:9200/new-index/_mapping?pretty'          {
  "new-index" : {
    "mappings" : {
      "properties" : {
        "date" : {
          "type" : "date"
        },
        "name" : {
          "type" : "text",
          "fields" : {
            "keyword" : {
              "type" : "keyword",
              "ignore_above" : 256
            }
          }
        },
        "tags" : {
          "type" : "text",
          "fields" : {
            "keyword" : {
              "type" : "keyword",
              "ignore_above" : 256
            },
            "verbatim" : {
              "type" : "text",
              "index" : false
            }
          }
        }
      }
    }
  }
}
使用预定义字段
/_cat/indices:查看所有索引
C:\Users\admin>curl localhost:9200/_cat/indices?pretty_source:返回所有数据,如果只要返回某些字段,可以加上&_source=字段名
[root@localhost ~]# curl -XGET -H 'Content-Type:application/json' '192.168.1.103:9200/new-index/_search?pretty&_source=name'
{
  "took" : 13,
  "timed_out" : false,
  "_shards" : {
    "total" : 1,
    "successful" : 1,
    "skipped" : 0,
    "failed" : 0
  },
  "hits" : {
    "total" : {
      "value" : 2,
      "relation" : "eq"
    },
    "max_score" : 1.0,
    "hits" : [
      {
        "_index" : "new-index",
        "_type" : "1",
        "_id" : "yl8A13IBV6yKmAPNIc-T",
        "_score" : 1.0,
        "_source" : {
          "name" : "Late Night with Elasticsearch"
        }
      },
      {
        "_index" : "new-index",
        "_type" : "1",
        "_id" : "zV9E13IBV6yKmAPNVs-r",
        "_score" : 1.0,
        "_source" : { }
      }
    ]
  }
}还可以使用filter_path将took,timeout,_shards等过滤掉(不选即不显示):这里只显示了?pretty&filter_path=hits.hits._source&_source=name
[root@localhost ~]# curl -XGET -H 'Content-Type:application/json' '192.168.1.103:9200/new-index/_search?pretty&filter_path=hits.hits._source&_source=name'
{
  "hits" : {
    "hits" : [
      {
        "_source" : {
          "name" : "Late Night with Elasticsearch"
        }
      },
      {
        "_source" : { }
      }
    ]
  }
}
更新现有的文档
文档的更新包括检索文档,处理文档,并重新索引文档,直至先前的文档被覆盖.
使用 /_update
更新前:
[root@localhost ~]# curl -XGET -H 'Content-Type:application/json' '192.168.1.103:9200/get-together/_doc/2?pretty'
{
  "_index" : "get-together",
  "_type" : "_doc",
  "_id" : "2",
  "_version" : 1,
  "_seq_no" : 1,
  "_primary_term" : 1,
  "found" : true,
  "_source" : {
    "relationship_type" : "group",
    "name" : "Elasticsearch Denver",
    "organizer" : "Lee",
    "description" : "Get together to learn more about using Elasticsearch, the applications and neat things you can do with ES!",
    "created_on" : "2013-03-15",
    "tags" : [
      "denver",
      "elasticsearch",
      "big data",
      "lucene",
      "solr"
    ],
    "members" : [
      "Lee",
      "Mike"
    ],
    "location_group" : "Denver, Colorado, USA"
  }
}
更新时:
[root@localhost ~]# curl -XPOST -H 'Content-Type:application/json' '192.168.1.103:9200/get-together/_doc/2/_update?pretty' -d '{"doc":{"organizer":"Roy"}}'
{
  "_index" : "get-together",
  "_type" : "_doc",
  "_id" : "2",
  "_version" : 2,
  "result" : "updated",
  "_shards" : {
    "total" : 2,
    "successful" : 1,
    "failed" : 0
  },
  "_seq_no" : 16,
  "_primary_term" : 1
}
更新后:organizer改变,_version改变
[root@localhost ~]# curl -XGET -H 'Content-Type:application/json' '192.168.1.103:9200/get-together/_doc/2?pretty'         {
  "_index" : "get-together",
  "_type" : "_doc",
  "_id" : "2",
  "_version" : 2,
  "_seq_no" : 16,
  "_primary_term" : 1,
  "found" : true,
  "_source" : {
    "relationship_type" : "group",
    "name" : "Elasticsearch Denver",
    "organizer" : "Roy",
    "description" : "Get together to learn more about using Elasticsearch, the applications and neat things you can do with ES!",
    "created_on" : "2013-03-15",
    "tags" : [
      "denver",
      "elasticsearch",
      "big data",
      "lucene",
      "solr"
    ],
    "members" : [
      "Lee",
      "Mike"
    ],
    "location_group" : "Denver, Colorado, USA"
  }
}
如果之前文档不存在,那么这里会操作失败并提示文档缺失.同时也应该使用版本去避免并发修改.
使用与doc同级的upsert参数来创建不存在的修改
id为20的文档先前不存在,先upsert
[root@localhost ~]# curl -XPOST -H 'Content-Type:application/json' '192.168.1.103:9200/get-together/_doc/20/_update?pretty' -d '{"doc":{"organizer":"chow"},"upsert":{"name":"Elasticsearch Denver","organizer":"chow"}}'
{
  "_index" : "get-together",
  "_type" : "_doc",
  "_id" : "20",
  "_version" : 1,
  "result" : "created",
  "_shards" : {
    "total" : 2,
    "successful" : 1,
    "failed" : 0
  },
  "_seq_no" : 5,
  "_primary_term" : 1
}
再查看,已有
[root@localhost ~]# curl -XGET -H 'Content-Type:application/json' '192.168.1.103:9200/get-together/_doc/20?pretty'        {
  "_index" : "get-together",
  "_type" : "_doc",
  "_id" : "20",
  "_version" : 1,
  "_seq_no" : 5,
  "_primary_term" : 1,
  "found" : true,
  "_source" : {
    "name" : "Elasticsearch Denver",
    "organizer" : "chow"
  }
}
通过脚本来更新文档
可以实现:1)改值 2)删字段 等
默认的脚本语言是Grovvy;
脚本涉及到修改并重新索引文档,所以使用ctx._source来引用_source, 使用ctx_source.字段名 来引用某个指定的字段;
如果涉及到变量,建议在params下作为参数单独定义.参数与脚本分离,这样脚本只需要编译一次.
修改前:
[root@localhost ~]# curl -XGET -H 'Content-Type:application/json' '192.168.1.103:9200/online-shop/shirts/1?pretty'
{
  "_index" : "online-shop",
  "_type" : "shirts",
  "_id" : "1",
  "_version" : 1,
  "_seq_no" : 0,
  "_primary_term" : 1,
  "found" : true,
  "_source" : {
    "price" : 15
  }
}
修改中:这里的+=后面一定要用params引出参数名
[root@localhost ~]# curl -XPOST -H 'Content-Type:application/json' '192.168.1.103:9200/online-shop/shirts/1/_update?pretty' -d '{"script":{"inline":"ctx._source.price += params.price_diff","params":{"price_diff":10}}}'
{
  "_index" : "online-shop",
  "_type" : "shirts",
  "_id" : "1",
  "_version" : 2,
  "result" : "updated",
  "_shards" : {
    "total" : 2,
    "successful" : 1,
    "failed" : 0
  },
  "_seq_no" : 1,
  "_primary_term" : 1
}
修改后:
[root@localhost ~]# curl -XGET -H 'Content-Type:application/json' '192.168.1.103:9200/online-shop/shirts/1?pretty'        {
  "_index" : "online-shop",
  "_type" : "shirts",
  "_id" : "1",
  "_version" : 2,
  "_seq_no" : 1,
  "_primary_term" : 1,
  "found" : true,
  "_source" : {
    "price" : 25
  }
}
遇到一些语法报错问题,参考了这篇文章: https://blog.csdn.net/sanbingyutuoniao123/article/details/79687195
向数组中添加还需要在脚本中使用add()方法.
通过版本来实现并发控制
模拟并发修改.此处改成在Kibana中调用es
POST /online-shop/shirts/1/_update
{
  "script":"Thread.sleep(5000);ctx._source.price = 2"
}
POST /online-shop/shirts/1/_update
{
  "script":"ctx._source.caption = \"Knowing Elasticsearch\""
}
乐观锁,假设很少出现冲突.真的出现冲突的时候就报错.悲观锁则通过锁住可能引起冲突的操作预防冲突.
此处可以设置/_update?retry_on_conflict=3让es自动在冲突时重试.
可以设置使用外部版本:?version_type=external
删除数据
删除单个或部分文档,先标记后异步删除;删除整个索引几乎瞬间就能完成;还可以关闭索引
删除文档
根据id删除单个文档:也可以有版本控制
DELETE /online-shop/shirts/1删除查询匹配的文档:
Kibana的搜索
直接删除索引:
DELETE /online-shop关闭索引: 索引名/_close 打开索引:索引名/_open
搜索数据
关键词:query,size,from,_source,sort
GET /get-together/_search
{
  "from":0,
  "size": 10,
  "sort":[{"date":"desc"}],
  "_source":{
    "includes": ["date","title"]  //可以不加includes或excludes,直接跟在_source后面
  }
}
介绍查询和过滤器DSL
GET /get-together/_search
{
  "query":{
    "match": {
      "title": "hadoop"
    }
  }
}
term属于过滤器.
常用的基础查询和过滤器:
1) query_string的用法
GET /get-together/_search
{
  "query":{
    "query_string": {
      "default_field": "description",
      "query": "nosql"
    }
  }
}
query中可以带上Lucene的表达式,可以使用 AND OR TO 以及使用减号"-"进行结果剔除.
GET /get-together/_search
{
  "query":{
    "query_string": {
      "default_field": "description",
      "query": "(tags:search OR tags:lucene) AND created_on:[1999-01-01 TO 2001-01-01] AND -description:mongodb"
    }
  }
}
2) term查询和term过滤器
GET /get-together/_search
{
  "query":{
    "term":{
      "tags": "elasticsearch"
    }
  }
}
term过滤:filter要配合bool使用.max_score不再评分
GET /get-together/_search
{
  "query": {
    "bool": {
      "filter": {
        "term": {
          "tags": "elasticsearch"
        }
      }
    }
  }
}
3)terms查询
GET /get-together/_search
{
  "query": {
    "terms": {
      "tags": [
        "elasticsearch",
        "jvm"
      ]
    }
  }
}
4) match查询和term过滤器
match查询是一个散列映射,包含了希望搜索的字段和字符串.match查询 可以有多重方式,最常见的是boolean和词组phrase.
1.布尔查询方式: match会分词,这里查询的是Elasticsearch 和 Denver
GET /get-together/_search
{
  "query": {
    "match": {
      "name": {
        "query": "Elasticsearch Denver",
        "operator": "and"  //默认是or
      }
    }
  }
}
2.词组查询方式 允许词与词之间可以有别的词
GET /get-together/_search
{
  "query": {
    "match": {
      "name": {
        //7.x没有type
        "query": "enterprise london"
        //7.x没有slop
      }
    }
  }
}
还可以用词的开头去匹配
GET /get-together/_search
{
  "query": {
    "match": {
      "name": {
        "query": "Elasticsearch Den",
        "max_expansions": 1
      }
    }
  }
}
3.使用multi_match来匹配多个字段,注意fields数组里的字段类型和query的类型
GET /online-shop/shirts/_search
{
  "query":{
    "multi_match": {
      "query": "haha",
      "fields": ["caption","name"]
    }
  }
}
组合查询或复合查询
bool查询
GET /online-shop/shirts/_search
{
  "query": {
    "bool": {
      "must": [
        {
          "term": {
            "name": "hadoop"
          }
        }
      ],
      "should": [
        {
          "term": {
            "name": "hadoop"
          }
        },
        {
          "term": {
            "name": "1"
          }
        }
      ],
      "must_not": [
        {
          "range": {
            "price": {
              "gte": 10,
              "lte": 20
            }
          }
        }
      ]
    }
  }
}
bool过滤器
query不能直接跟filter,需要用bool包一层.must和should包在同一层真的没问题吗?
GET /online-shop/shirts/_search
{
  "query": {
    "bool": {
      "filter": {
        "bool": {
          "must": [
            {
              "term": {
                "name": "hadoop"
              }
            }
          ],
          "should": [
            {
              "term": {
                "name": "hadoop"
              }
            },
            {
              "term": {
                "name": "1"
              }
            }
          ],
          "must_not": [
            {
              "range": {
                "price": {
                  "gte": 10,
                  "lte": 20
                }
              }
            }
          ]
        }
      }
    }
  }
}
range查询和过滤器
GET /online-shop/shirts/_search
{
  "query":{
    "range": {
      "FIELD": {
        "gte": 10,
        "lte": 20
      }
    }
  }
}
过滤器形式:
GET /online-shop/shirts/_search
{
  "query": {
    "bool": {
      "filter": [
        {
          "range": {
            "FIELD": {
              "gte": 10,
              "lte": 20
            }
          }
        }
      ]
    }
  }
}
prefix查询和过滤器
GET /online-shop/shirts/_search
{
  "query": {
    "prefix": {
      "caption": {
        "value": "e"
      }
    }
  }
}
可用于根据输入实时查询,如果要带有一定的模糊性,可以使用match_phrase_prefix
wildcard通配符查询
*匹配任意数量字符,?匹配一个字符.?无法匹配空格.通配符出现的越早,查询性能越低.类似的有regexp查询.
GET /online-shop/shirts/_search
{
  "query": {
    "wildcard": {
      "caption": {
        "value": "l*n"
      }
    }
  }
}
exists过滤器
只查询特定字段有值的文档.
GET /get-together/_search
{
  "query": {
    "bool":{
      "filter": [
        {
          "exists": {
            "field": "tags"
          }
        }
      ]
    }
  }
}
高版本es filter的写法改为在bool中指定filter,并移除了missing的api(7.x已移除),可以在 bool must not 中指定exists代表不存在
分析数据
字符过滤->分词->分词过滤->索引数据
match,match_phrase会对查词进行分词分析.term和terms不会.
如果要对字段进行分析,在mapping的该字段下设置analyzer参数;如果不想分析,可以设置该字段的index属性为not_analyzed.
还可以通过fields属性设置不同的分词分析方式.
分析器包括:字符过滤器,一个单个分词器,0或多个分词过滤器.
关于keyword analyzer,最好是在映射中将涉及的字段设为not_analyzed.
N元语法(ngram)和edge-ngram和滑动窗口
ngram是将一个词进行一个字符间距的分割或多个指定字符间距的分割.可以设置min_gram和max_gram.会以min到max之间的间距分别分割字符串.可用于具有一定相似度的模糊查询.
edge-ngram的分词方式是始终从一侧开始包含词头,分词数量相对较少.可以通过设置side属性来指定从词尾开始分词.
滑动窗口类似上面的分词,但它是分词级别的N元语法,而不像上面的那样是字符串级别的.滑动窗口适用于查询英语中连续的短语.
使用相关性进行搜索
词频和逆文档频率.Lucene评分公式TF-IDF基于此.
更换字段的打分方案是在mapping中字段属性下设置similarity属性.也可以在setting中设置更高级的配置.
使用boosting来影响文档的得分
GET /online-shop/shirts/_search
{
  "query": {
    "boosting": {
      "positive": {
        "match": {
          "caption": "Elasticsearch"
        }
      },
      "negative": {
        "multi_match": {
          "fields": [
            "acption",
            "name"
          ],
          "query": "hadoop"
        }
      },
      "negative_boost": 0.2
    }
  }
}
boost大致是加权的作用.将所有字段的boost设置相同的值等于都没设置.
基本所有的查询都能设置boost,除此以外还可以通过function_score更精细的来控制boosting.
可以使用explain来解释分值的形成.举例如下:
GET /online-shop/shirts/_search
{
  "query": {
    "match": {
      "caption": "hadoop"
    }
  },
  "explain": true
}
解释一篇文档不匹配的原因
需要先知道文档的id,然后使用/_explain进行分析.
GET /online-shop/shirts/1/_explain
{
  "query": {
    "match": {
      "caption": "java"
    }
  }
}
//返回结果
{
  "_index" : "online-shop",
  "_type" : "shirts",
  "_id" : "1",
  "matched" : false,
  "explanation" : {
    "value" : 0.0,
    "description" : "no matching term",
    "details" : [ ]
  }
使用查询再打分来减少评分操作的性能影响(7.x似乎缺少相关属性??)
在下列情况下打分可能会变成资源密集型的操作:
1.使用脚本来计算每篇
2.进行phrase词组查询.
使用function_score来定制得分(7.x引入了script_score)
GET /online-shop/shirts/_search
{
  "query": {
    "function_score": {
      "query": {
        "match": {
          "caption": "hadoop"
        }
      },
      "functions": [
        {
          "weight": 2,  //相当于原boost * 2
          "filter": {    //在上述查询结果中过滤出caption字段含"elasticSearch"的
            "term": {
              "caption": "elasticsearch"
            }
          }
        }
      ]
    }
  }
}
function_score查询有一组不同的函数,每个函数可以使用另一个过滤器函数.
合并得分
上面的functions数组中可以放多个weight,每个weight的分值可以不一样.那么可以通过score_mode参数(multiply,sum,avg,fitst,max,min.如果没有说明默认是multiply)来合并不同函数的得分.
还有一种是boost_mode.它控制了原始查询的得分和函数得分是如何合并的.
1)field_value_factor
2)script_score
3)random_score
如果不想第一页永远展示那几个文档,可以设不同的seed
GET /get-together/_search
{
  "query": {
    "function_score": {
      "query": {
        "match": {
          "description": "elasticsearch"
        }
      },
      "functions": [
        {
          "random_score": {
            "seed": 31415926535
          }
        }
      ]
    }
  },
  "size": 2
}
4)衰减函数
如果想要最近的文档优先展示,老的文档靠后.或者在地理位置上靠近某个点的结果增加得分,远离的结果减少得分.可以使用这个函数.根据热度,时间,距离进行打分.