FastDFS安装并整合Openresty
FastDFS安装并整合Openresty
- 一、安装环境准备【CentOS7.9】
- 二、FastDFS--tracker安装
-
- 2.1.下载fastdfs
- 2.2.FastDFS安装环境
- 2.3.安装FastDFS依赖libevent库
- 2.4.安装libfastcommon
- 2.5.安装 libserverframe 网络框架
- 2.6.tracker编译安装
- 2.7.安装之后文件目录介绍
- 2.8.错误处理
- 2.9.配置FastDFS跟踪器(Tracker)
-
- 2.9.1.FastDFS 配置文件详解
- 2.9.2.备份tracker配置文件并修改
- 2.9.3.创建tracker基础数据目录
- 2.9.4.防火墙放行端口
- 2.9.5.初次成功启动
- 2.10.启动
- 三、FastDFS--storage安装
-
- 3.1.安装libevent
- 3.2.安装libfastcommon
- 3.3.storage编译安装
- 3.4.配置 FastDFS 存储 (Storage)
-
- 3.4.1.备份storage配置文件并修改
- 3.4.2.创建Storage基础数据目录,对应base_path目录
- 3.4.3.防火墙放行端口
- 3.4.4.初次启动
- 3.5.启动
- 3.6.查看Storage和Tracker是否在通信
- 3.7.Storage 目录
- 四、FastDFS 服务启动、停止、重启设置
-
- 4.1.创建文件夹管理脚本
- 4.2.编辑启动脚本文件 startFastDFS.sh
- 4.3.编辑停止脚本文件 stopFastDFS.sh
- 4.4.编辑重启脚本文件 restartFastDFS.sh
- 4.5.FastDFS安装成系统服务
- 4.6.fastdfs常用命令
- 五、上传图片测试:通过fdfs_test程序
-
- 5.1.FastDFS安装成功可通过`/usr/bin/fdfs_test`测试上传、下载等操作
- 5.2.修改/etc/fdfs/client.conf
- 5.3.上传文件使用格式
- 5.4.打印如下日志
- 5.5.下载路径
- 六、FastDFS 和nginx整合
-
- 6.1.nginx代理
- 6.2.在Storage上安装openresty
-
- 6.2.1.下载fastdfs-nginx-module模块
- 6.2.2.修改config文件将/usr/local/路径改为/usr/
- 6.2.3.将fastdfs-nginx-module/src下的mod_fastdfs.conf拷贝至/etc/fdfs/下
- 6.2.4.修改`mod_fastdfs.conf`的内容
- 6.2.5.openresty安装【添加fastdfs-nginx-module模块】
- 6.2.6.编辑nginx配置文件nginx.conf
- 6.3.访问测试
-
- 6.3.1.访问storage:
- 6.3.2.访问tracker:
- 6.3.3.使用域名访问 (推荐):
- 6.4.测试上传图片
- 6.5.访问图片预览效果【success】
- endl
一、安装环境准备【CentOS7.9】
[root@localhost ~]# cat /etc/redhat-release
CentOS Linux release 7.9.2009 (Core)
libfastcommon-1.0.72.tar.gz
libserverframe-1.2.2.tar.gz
fastdfs-6.11.0.tar.gz
openresty/1.25.3.1
fastdfs-nginx-module-1.24.tar.gz
二、FastDFS–tracker安装
分别在192.168.229.141和192.168.229.142上安装tracker
注:初次安装可只安装一台tracker方便调试
2.1.下载fastdfs
tracker和storage使用相同的安装包,下载地址:https://github.com/happyfish100/FastDFS
2.2.FastDFS安装环境
FastDFS是C语言开发,建议在linux上运行,本教程使用Centos7.9作为安装环境。
安装FastDFS需要先将官网下载的源码进行编译,编译依赖gcc环境,如果没有gcc环境,需要安装gcc
yum install gcc-c++
2.3.安装FastDFS依赖libevent库
yum -y install libevent
2.4.安装libfastcommon
libfastcommon是FastDFS官方提供的,libfastcommon包含了FastDFS运行所需要的一些基础库。
下载地址:https://github.com/happyfish100/libfastcommon
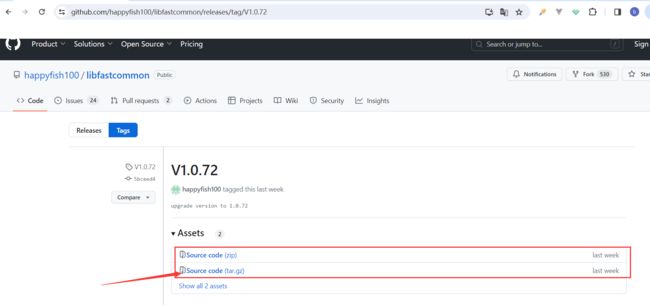
将libfastcommon-1.0.72.tar.gz拷贝至/usr/local/下
cd /usr/local

tar -zxvf libfastcommon-1.0.72.tar.gz

cd libfastcommon-1.0.72

./make.sh

./make.sh install

cd /usr/lib
安装完成之后查看相关文件,默认情况下:
头文件安装在/usr/include/fastcommon目录下
动态库安装在/usr/lib64/和/usr/lib/目录下
2.5.安装 libserverframe 网络框架
安装包下载地址:https://github.com/happyfish100/libserverframe
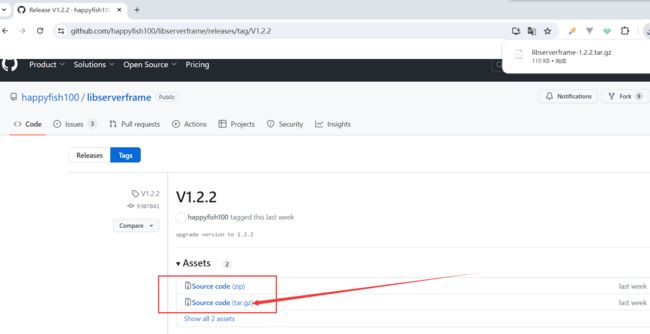
cd /usr/local

tar -zxvf libserverframe-1.2.2.tar.gz

cd libserverframe-1.2.2

./make.sh

./make.sh install
2.6.tracker编译安装
将fastdfs-6.11.0.tar.gz拷贝至/usr/local/下
cd /usr/local

tar -zxvf fastdfs-6.11.0.tar.gz

cd fastdfs-6.11.0

./make.sh

./make.sh install
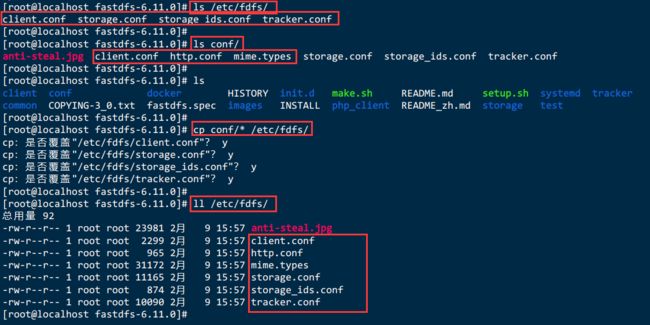
安装成功将安装目录下的conf下的文件拷贝到/etc/fdfs/下
cp /usr/local/fastdfs-6.11.0/conf/* /etc/fdfs/
2.7.安装之后文件目录介绍
安装之后,工具安装在/usr/bin/目录下:

fdfs_delete_file:删除文件
fdfs_download_file:下载文件
fdfs_upload_file:上传文件
fdfs_trackerd:启动tracker服务
fdfs_storaged:启动storage服务
fdfs_file_info:用来检查一个文件的信息,参数传递一个FastDFS文件
[root@localhost fastdfs-6.11.0]# ls /usr/bin/fdfs_*
/usr/bin/fdfs_appender_test  	 /usr/bin/fdfs_crc32          /usr/bin/fdfs_file_info
/usr/bin/fdfs_storaged  		/usr/bin/fdfs_trackerd
/usr/bin/fdfs_appender_test1  	/usr/bin/fdfs_delete_file    /usr/bin/fdfs_monitor
/usr/bin/fdfs_test      		/usr/bin/fdfs_upload_appender
/usr/bin/fdfs_append_file     	/usr/bin/fdfs_download_file  /usr/bin/fdfs_regenerate_filename
/usr/bin/fdfs_test1     		/usr/bin/fdfs_upload_file
配置文件默认安装在/etc/fdfs/目录下:
client.conf.sample:客户端默认配置文件
storage.conf.sample:storage服务默认配置文件
storage_ids.conf.sample:
tracker.conf.sample:tracker服务默认配置文件
[root@localhost fastdfs-6.11.0]# ls /etc/fdfs
anti-steal.jpg  client.conf  http.conf  mime.types  storage.conf  storage_ids.conf  tracker.conf
动态库文件分别安装在/usr/lib/目录和/usr/lib64/目录下
2.8.错误处理
[root@localhost fastdfs-6.11.0]# ./make.sh
gcc -Wall -D_FILE_OFFSET_BITS=64 -D_GNU_SOURCE -g -O1 -DDEBUG_FLAG -c -o ../common/fdfs_global.o ../common/fdfs_global.c  -I../common -I/usr/local/include
In file included from ../common/fdfs_global.c:21:0:
../common/fdfs_global.h:17:26: 致命错误:sf/sf_global.h:没有那个文件或目录
 #include "sf/sf_global.h"
                          ^
编译中断。
make: *** [../common/fdfs_global.o] 错误 1
gcc -Wall -D_FILE_OFFSET_BITS=64 -D_GNU_SOURCE -g -O1 -DDEBUG_FLAG -c -o ../common/fdfs_global.o ../common/fdfs_global.c  -I. -Itrunk_mgr -I../common -I../tracker -I../client -Ifdht_client -I/usr/include/fastcommon
In file included from ../common/fdfs_global.c:21:0:
../common/fdfs_global.h:17:26: 致命错误:sf/sf_global.h:没有那个文件或目录
 #include "sf/sf_global.h"
                          ^
编译中断。
make: *** [../common/fdfs_global.o] 错误 1
gcc -Wall -D_FILE_OFFSET_BITS=64 -D_GNU_SOURCE -g -O1 -DDEBUG_FLAG -c -o ../common/fdfs_global.o ../common/fdfs_global.c  -I../common -I../tracker -I/usr/include/fastcommon
In file included from ../common/fdfs_global.c:21:0:
../common/fdfs_global.h:17:26: 致命错误:sf/sf_global.h:没有那个文件或目录
 #include "sf/sf_global.h"
                          ^
编译中断。
make: *** [../common/fdfs_global.o] 错误 1
原因:在安装较新版得 fastdfs 时,从github 下载得安装包缺少文件,缺少了 libserverframe 网络框架
解决方法:`安装 libserverframe 网络框架``
安装包下载地址:https://github.com/happyfish100/libserverframe

cd /usr/local

tar -zxvf libserverframe-1.2.2.tar.gz

cd libserverframe-1.2.2

./make.sh

./make.sh install
安装完成后重新编译 fastdfs
2.9.配置FastDFS跟踪器(Tracker)
2.9.1.FastDFS 配置文件详解
FastDFS 配置文件详解:http://bbs.chinaunix.net/forum.php?mod=viewthread&tid=1941456&extra=page%3D1%26filter%3Ddigest%26digest%3D1
2.9.2.备份tracker配置文件并修改
cd /etc/fdfs

# 备份tracker配置文件
cp tracker.conf tracker.conf.bak

# 修改文件
vi tracker.conf
# 配置文件是否不生效,false 为生效
disabled=false

# 提供服务的端口
port=22122

# Tracker 数据和日志目录地址(根目录必须存在,子目录会自动创建)
#base_path = /opt/fastdfs
#base_path=/home/fastdfs/Tracker
base_path = /home/fastdfs

# HTTP 服务端口 默认8080 ,建议修改 防止冲突
#http.server_port = 8080
http.server_port = 80
2.9.3.创建tracker基础数据目录
# 创建tracker基础数据目录,即base_path对应的目录
mkdir -p /home/fastdfs
2.9.4.防火墙放行端口
# 检查端口号是否被占用
netstat -apn | grep 22122

# 防火墙放行端口(默认的22122)
firewall-cmd --zone=public --add-port=22122/tcp --permanent

# 配置立即生效
firewall-cmd --reload

# 查询开放端口
firewall-cmd --list-ports
2.9.5.初次成功启动
初次成功启动,会在 /home/fastdfs/ (配置的base_path)下创建 data、logs 两个目录
[root@localhost fdfs]# ls /home/fastdfs/
data  logs
${base_path}
|__data
| |__storage_groups.dat:存储分组信息
| |__storage_servers.dat:存储服务器列表
|__logs
| |__trackerd.log: tracker server 日志文件
2.10.启动
/usr/bin/fdfs_trackerd /etc/fdfs/tracker.conf restart

/usr/bin/fdfs_trackerd /etc/fdfs/tracker.conf stop

# 检查是否启动
ps aux | grep fdfs*
三、FastDFS–storage安装
分别在192.168.229.143、192.168.229.144、192.168.229.145、192.168.229.146上安装storage
注:初次安装可只安装一台storage方便调试。
3.1.安装libevent
同上
3.2.安装libfastcommon
同上
3.3.storage编译安装
同tracker编译安装
3.4.配置 FastDFS 存储 (Storage)
3.4.1.备份storage配置文件并修改
cd /etc/fdfs

# 备份storage配置文件
cp storage.conf storage.conf.bak

vi storage.conf
# 配置文件是否不生效,false 为生效
disabled=false

# 指定此 storage server 所在 组(卷)
group_name = group1

# storage server 服务端口
port=23000

# 心跳间隔时间,单位为秒 (这里是指主动向 tracker server 发送心跳)
heart_beat_interval=30

# Storage 数据和日志目录地址(根目录必须存在,子目录会自动生成)
#base_path = /opt/fastdfs
#base_path=/home/fastdfs/Storage
base_path = /home/fastdfs

# 存放文件时 storage server 支持多个路径。这里配置存放文件的基路径数目,通常只配一个目录。
store_path_count=1

# 逐一配置 store_path_count 个路径,索引号基于 0。
#store_path0 = /opt/fastdfs
store_path0 = /home/fastdfs/fdfs_storage
#store_path1 = /opt/fastdfs2
#如果有多个挂载磁盘则定义多个store_path,如下
#store_path1=.....
#store_path2=......

# FastDFS 存储文件时,采用了两级目录。这里配置存放文件的目录个数。
# 如果本参数只为 N(如: 256),那么 storage server 在初次运行时,会在 store_path 下自动创建 N * N 个存放文件的子目录。
subdir_count_per_path=256

#tracker_server = 192.168.209.121:22122
#tracker_server = 192.168.209.122:22122
#配置tracker服务器:IP
tracker_server = 192.168.229.141:22122
#如果有多个则配置多个tracker
#tracker_server = 192.168.229.142:22122

# 允许系统同步的时间段 (默认是全天) 。一般用于避免高峰同步产生一些问题而设定。
sync_start_time=00:00
sync_end_time=23:59

# 访问端口 默认80 建议修改 防止冲突
#http.server_port = 8888
#配置http端口
http.server_port = 80
3.4.2.创建Storage基础数据目录,对应base_path目录
# 对应base_path
mkdir -p /home/fastdfs

# 这是配置的store_path0路径,有多个要创建多个
mkdir -p /home/fastdfs/fdfs_storage
3.4.3.防火墙放行端口
# 检查端口号是否被占用
netstat -apn | grep 23000

# 防火墙放行端口(默认的 23000)
firewall-cmd --zone=public --add-port=23000/tcp --permanent

# 配置立即生效
firewall-cmd --reload

# 查询开放端口
firewall-cmd --list-ports
3.4.4.初次启动
启动Storage前确保Tracker是启动的
初次启动成功,会在 /home/fastdfs/fdfs_storage/base(base_path) 目录下创建 data、 logs 两个目录
3.5.启动
/usr/bin/fdfs_storaged /etc/fdfs/storage.conf restart

/usr/bin/fdfs_storaged /etc/fdfs/storage.conf stop
# 检查是否启动
ps aux | grep fdfs*
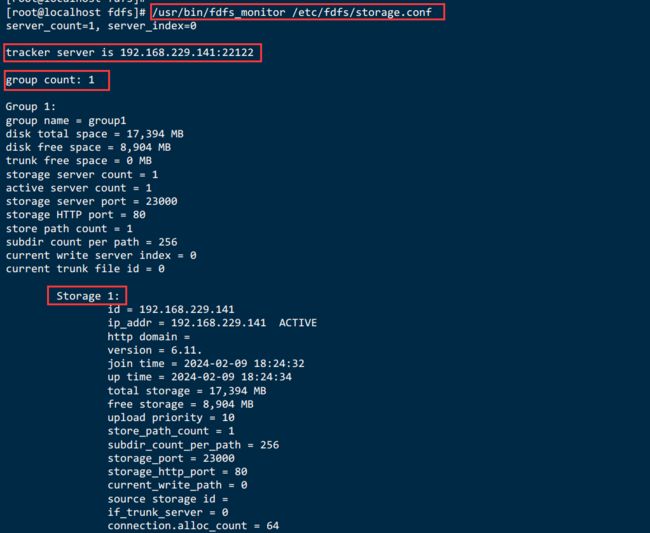
3.6.查看Storage和Tracker是否在通信
/usr/bin/fdfs_monitor /etc/fdfs/storage.conf
3.7.Storage 目录
同Tracker一样,Storage 启动成功后,在base_path 下创建了data、logs目录,记录着 Storage Server 的信息
在 store_path0/data 目录下,创建了N*N个子目录:
[root@localhost fdfs]# ls /home/fastdfs/fdfs_storage/data/
00  07  0E  15  1C  23  2A  31  38  3F  46  4D  54  5B  62  69  70  77  7E  85  8C  93  9A  A1  A8  AF
B6  BD  C4  CB  D2  D9  E0  E7  EE  F5  FC  01  08  0F  16  1D  24  2B  32  39  40  47  4E  55  5C  63
6A  71  78  7F  86  8D  94  9B  A2  A9  B0  B7  BE  C5  CC  D3  DA  E1  E8  EF  F6  FD  02  09  10  17
1E  25  2C  33  3A  41  48  4F  56  5D  64  6B  72  79  80  87  8E  95  9C  A3  AA  B1  B8  BF  C6  CD
D4  DB  E2  E9  F0  F7  FE  03  0A  11  18  1F  26  2D  34  3B  42  49  50  57  5E  65  6C  73  7A  81
88  8F  96  9D  A4  AB  B2  B9  C0  C7  CE  D5  DC  E3  EA  F1  F8  FF  04  0B  12  19  20  27  2E  35
3C  43  4A  51  58  5F  66  6D  74  7B  82  89  90  97  9E  A5  AC  B3  BA  C1  C8  CF  D6  DD  E4  EB
F2  F9  05  0C  13  1A  21  28  2F  36  3D  44  4B  52  59  60  67  6E  75  7C  83  8A  91  98  9F  A6
AD  B4  BB  C2  C9  D0  D7  DE  E5  EC  F3  FA  06  0D  14  1B  22  29  30  37  3E  45  4C  53  5A  61
68  6F  76  7D  84  8B  92  99  A0  A7  AE  B5  BC  C3  CA  D1  D8  DF  E6  ED  F4  FB
四、FastDFS 服务启动、停止、重启设置
4.1.创建文件夹管理脚本
mkdir -p /usr/fdfs

cd /usr/fdfs
4.2.编辑启动脚本文件 startFastDFS.sh
# 编辑脚本
vi startFastDFS.sh

# 给所有人添加执行权限
chmod a+x startFastDFS.sh

# 启动脚本
./startFastDFS.sh

# 查看是否启动成功
ps aux | grep fdfs*
脚本内容:
#!/bin/bash
# 启动tracker服务
/usr/bin/fdfs_trackerd /etc/fdfs/tracker.conf start

# 启动storage服务
/usr/bin/fdfs_storaged /etc/fdfs/storage.conf start

echo 'FastDFS start success'
4.3.编辑停止脚本文件 stopFastDFS.sh
# 编辑脚本
vi stopFastDFS.sh

# 给所有人添加执行权限
chmod a+x stopFastDFS.sh

# 停止脚本
./stopFastDFS.sh

# 查看是否停止成功
ps aux | grep fdfs*
脚本内容:
#!/bin/bash
# 停止tracker服务
/usr/bin/fdfs_trackerd /etc/fdfs/tracker.conf stop

# 停止storage服务
/usr/bin/fdfs_storaged /etc/fdfs/storage.conf stop

echo 'FastDFS stop success'
4.4.编辑重启脚本文件 restartFastDFS.sh
# 编辑脚本
vi restartFastDFS.sh

# 给所有人添加执行权限
chmod a+x restartFastDFS.sh

# 重启脚本
./restartFastDFS.sh

# 查看是否停止成功
ps aux | grep fdfs*
脚本内容:
#!/bin/bash
# 重启tracker服务
/usr/bin/fdfs_trackerd /etc/fdfs/tracker.conf restart

# 重启storage服务
/usr/bin/fdfs_storaged /etc/fdfs/storage.conf restart

echo 'FastDFS restart success'
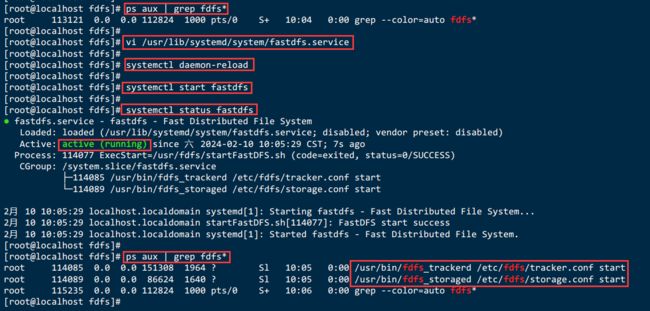
4.5.FastDFS安装成系统服务
# 创建脚本
vi /usr/lib/systemd/system/fastdfs.service

# 重新加载系统服务
systemctl daemon-reload
服务脚本内容
[Unit]
Description=fastdfs - Fast Distributed File System
After=network.target

[Service]
Type=forking
ExecStart=/usr/fdfs/startFastDFS.sh
ExecReload=/usr/fdfs/stopFastDFS.sh
ExecStop=/usr/fdfs/stopFastDFS.sh
PrivateTmp=true

[Install]
WantedBy=default.target
[Unit]:服务的说明
Description:描述服务
After:描述服务类别
[Service]服务运行参数的设置
Type=forking是后台运行的形式ExecStartpre是检查配置文件
ExecStart为服务的具体运行命令
ExecReload为重启命令
ExecStop为停止命令
PrivateTmp=True表示给服务分配独立的临时空间
注意:[Service]的启动、重启、停止命令全部要求使用绝对路径
[Install]运行级别下服务安装的相关设置,可设置为多用户,即系统运行级别为3
4.6.fastdfs常用命令
# 启动服务
systemctl start fastdfs

#停止
systemctl stop fastdfs

#重启
systemctl restart fastdfs

# 查看fastdfs状态
systemctl status fastdfs

# 开机启动
systemctl enable fastdfs

# 查看fdfs
ps aux | grep fdfs*
五、上传图片测试:通过fdfs_test程序
5.1.FastDFS安装成功可通过/usr/bin/fdfs_test测试上传、下载等操作
5.2.修改/etc/fdfs/client.conf
vi /etc/fdfs/client.conf
tracker_server根据自己部署虚拟机的情况配置
#Client 的数据和日志目录
#base_path=/home/fastdfs/client
base_path=/home/fastdfs
tracker_server=192.168.229.141:22122
#tracker_server=192.168.229.142:22122
5.3.上传文件使用格式
/usr/bin/fdfs_test 客户端配置文件地址 upload 上传文件
比如将/etc/fdfs/anti-steal.jpg下的图片上传到FastDFS中:
/usr/bin/fdfs_test /etc/fdfs/client.conf upload /etc/fdfs/anti-steal.jpg
5.4.打印如下日志
[root@localhost fdfs]# vi client.conf
[root@localhost fdfs]#
[root@localhost fdfs]# /usr/bin/fdfs_test /etc/fdfs/client.conf upload /etc/fdfs/anti-steal.jpg
This is FastDFS client test program v6.11.0

Copyright (C) 2008, Happy Fish / YuQing

FastDFS may be copied only under the terms of the GNU General
Public License V3, which may be found in the FastDFS source kit.
Please visit the FastDFS Home Page http://www.fastken.com/
for more detail.

[2024-02-09 18:33:56] DEBUG - base_path=/home/fastdfs, connect_timeout=5, network_timeout=60, tracker_server_count=1,
anti_steal_token=0, anti_steal_secret_key length=0, use_connection_pool=0, g_connection_pool_max_idle_time=3600s,
use_storage_id=0, connect_first_by=tracker, storage server id count: 0, multi storage ips: 0

tracker_query_storage_store_list_without_group:
        server 1. group_name=, ip_addr=192.168.229.141, port=23000

group_name=group1, ip_addr=192.168.229.141, port=23000
storage_upload_by_filename
group_name=group1, remote_filename=M00/00/00/wKjljWXF_5WALK3dAABdreSfEnY041.jpg
source ip address: 192.168.229.141
file timestamp=2024-02-09 18:33:57
file size=23981
file crc32=3835630198
example file url: http://192.168.229.141/group1/M00/00/00/wKjljWXF_5WALK3dAABdreSfEnY041.jpg
storage_upload_slave_by_filename
group_name=group1, remote_filename=M00/00/00/wKjljWXF_5WALK3dAABdreSfEnY041_big.jpg
source ip address: 192.168.229.141
file timestamp=2024-02-09 18:33:57
file size=23981
file crc32=3835630198
example file url: http://192.168.229.141/group1/M00/00/00/wKjljWXF_5WALK3dAABdreSfEnY041_big.jpg
5.5.下载路径
http://192.168.229.141/group1/M00/00/00/wKjljWXF_5WALK3dAABdreSfEnY041_big.jpg就是文件的下载路径
对应storage服务器上的
/home/fastdfs/fdfs_storage/data/00/00/wKjljWXF_5WALK3dAABdreSfEnY041_big.jpg文件
由于现在还没有和nginx整合无法使用http下载
六、FastDFS 和nginx整合
6.1.nginx代理
nginx代理storage上的nginx,并进行负载均衡
nginx的安装细节参考nginx文档,这里使用单机nginx,也可以使用两台nginx组成高可用或者采用lvs+nginx访问Storage上的nginx
创建nginx-fdfs.conf配置文件:
#storage群group1组
upstream storage_server_group1{
    	server 192.168.229.143:80 weight=10;
		server 192.168.229.144:80 weight=10;
    }
#storage群group2组
upstream storage_server_group2{
    	server 192.168.229.145:80 weight=10;
		server 192.168.229.146:80 weight=10;
    }

server {
	listen 80;
	server_name location;

	location /group1{
		proxy_redirect off;
		proxy_set_header Host $host;
		proxy_set_header X-Real-IP $remote_addr;
		proxy_set_header X-Forwarded-For $proxy_add_x_forwarded_for;
		proxy_pass http://storage_server_group1;
	}
	location /group2{
		proxy_redirect off;
		proxy_set_header Host $host;
		proxy_set_header X-Real-IP $remote_addr;
		proxy_set_header X-Forwarded-For $proxy_add_x_forwarded_for;
		proxy_pass http://storage_server_group2;
	}
}
6.2.在Storage上安装openresty
6.2.1.下载fastdfs-nginx-module模块
下载地址:https://github.com/happyfish100/fastdfs-nginx-module
将fastdfs-nginx-module-1.24.tar.gz传至/openresty/core/moudle/下
cd /openresty/core/moudle

tar -zxvf fastdfs-nginx-module-1.24.tar.gz

mv fastdfs-nginx-module-1.24 fastdfs-nginx-module

cd fastdfs-nginx-module/src
6.2.2.修改config文件将/usr/local/路径改为/usr/
#修改config文件将/usr/local/路径改为/usr/
cd fastdfs-nginx-module/src

vi config
6.2.3.将fastdfs-nginx-module/src下的mod_fastdfs.conf拷贝至/etc/fdfs/下
#将fastdfs-nginx-module/src下的mod_fastdfs.conf拷贝至/etc/fdfs/下
cp mod_fastdfs.conf /etc/fdfs/
6.2.4.修改mod_fastdfs.conf的内容
vi /etc/fdfs/mod_fastdfs.conf
# 连接超时时间
connect_timeout=10

base_path=/home/fastdfs

tracker_server=192.168.229.141:22122
#tracker_server=192.168.229.142:22122

# StorageServer 默认端口
storage_server_port=23000

# 如果文件ID的uri中包含/group**,则要设置为true
url_have_group_name=true

#指定文件存储路径,Storage配置的store_path0路径,必须和storage.conf中的一致
store_path0=/home/fastdfs/fdfs_storage
find / -name libfdfsclient.so

#将libfdfsclient.so拷贝至/usr/lib下
cp /usr/lib64/libfdfsclient.so /usr/lib/
6.2.5.openresty安装【添加fastdfs-nginx-module模块】
openresty安装:https://blog.csdn.net/qq_45740503/article/details/135887895
./configure --add-module=/openresty/core/moudle/fastdfs-nginx-module/src

make && make install

nginx -V
6.2.6.编辑nginx配置文件nginx.conf
新建nginx配置文件nginx-fdfs.conf
直接编辑nginx.conf
vi /usr/local/openresty/nginx/conf/nginx.conf
server {
        listen       80;
        server_name  192.168.229.141;

        #在80端口下添加fastdfs-nginx-module模块
		location ~/group([0-9])/M00 {
			root /home/fastdfs/fdfs_storage/data;
    		ngx_fastdfs_module;
		}
}
说明:
server_name指定本机ip

location /group1/M00/:

group1为nginx 服务fastdfs的分组名称,
M00是fastdfs自动生成编号,对应store_path0=/home/fastdfs/fdfs_storage,
如果fastdfs定义store_path1,这里就是M01
listen 80端口值是要与 /etc/fdfs/storage.conf 中的 http.server_port=80相对应。
如果改成其它端口,则需要统一,同时在防火墙中打开该端口。
6.3.访问测试
通过java客户端上传文件,使用浏览器http访问文件,这里访问上传图片测试的文件:
6.3.1.访问storage:
http://192.168.229.143/group1/M00/00/00/wKjljWXF_5WALK3dAABdreSfEnY041_big.jpg
如果配置了多个ip地址改为192.168.229.144也行,因为同一个分组的storage文件互相同步。
6.3.2.访问tracker:
http://192.168.229.141/group1/M00/00/00/wKjljWXF_5WALK3dAABdreSfEnY041.jpg
如果配置了多个ip地址改为192.168.229.142也行
6.3.3.使用域名访问 (推荐):
nginx对外由vip提供服务,使用域名访问如下:
比如vip对应的域名为img.test.com:
http://img.test.com/group1/M00/00/00/wKjljWXF_5WALK3dAABdreSfEnY041_big.jpg
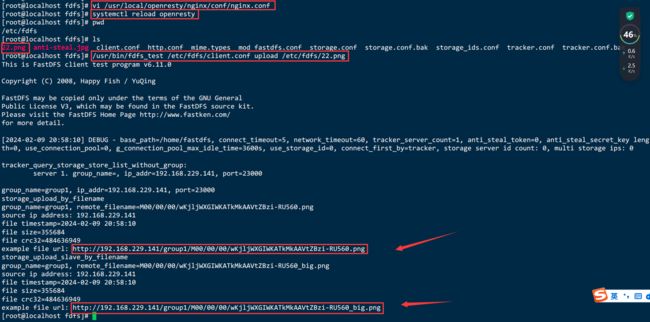
6.4.测试上传图片
/usr/bin/fdfs_test 客户端配置文件地址 upload 上传文件
/usr/bin/fdfs_test /etc/fdfs/client.conf upload /etc/fdfs/22.png
6.5.访问图片预览效果【success】
http://192.168.229.141/group1/M00/00/00/wKjljWXGIWKATkMkAAVtZBzi-RU560.png
http://192.168.229.141/group1/M00/00/00/wKjljWXGIWKATkMkAAVtZBzi-RU560_big.png


