云计算运维1
1、企业服务器LNMP环境搭建
集群:多台服务器在一起作同样的事 。分布式 :多台服务器在一起作不同的事 。
环境准备:
1、设置静态ip(NAT模式网关为.2)
# cat /etc/sysconfig/network-scripts/ifcfg-ens33
TYPE="Ethernet"
BOOTPROTO="none"
IPADDR="10.1.1.10"
NETMASK="255.255.255.0"
GATEWAY="10.1.1.2"
DNS1="8.8.8.8"
NAME="ens33"
DEVICE="ens33"
ONBOOT="yes"
2、关闭防火墙和selinux
systemctl stop firewalld   systemctl disable firewalld   centos7版本
service iptables stop      chkconfig iptables off   centos6版本
setenforce 0
sed -i "s/SELINUX=enforcing/SELINUX=disabled/" /etc/selinux/config
3、设置主机名和域名解析(FQDN完整域名如linux.lnmp.com,简短域名linux)
hostnamectl set-hostname linux
# cat /etc/hosts
127.0.0.1   localhost localhost.localdomain localhost4 localhost4.localdomain4
::1         localhost localhost.localdomain localhost6 localhost6.localdomain6
10.1.1.10   linux.lnmp.com linux
4、宿主机不通外网,配置本地yum源(可选)
挂载本地光驱/dev/sr0到/mnt,mount /dev/sr0 /mnt
开机自动挂载光盘,echo "mount /dev/sr0 /mnt" >> /etc/rc.local  chmod +x /etc/rc.local
开机启动文件/etc/rc.local是os开机最后读取的一个文件,os启动后会自动执行文件/etc/rc.local
先备份默认源,cd /etc/yum.repos.d    mkdir bak   mv ./* ./bak
centos7版本本地yum源配置,# vim test.repo
[os]
name = os
baseurl = file:///mnt
gpgcheck = 0
yum clean all 清缓存,yum makecache 重新建立缓存,yum repolist all 列出所有repo
7版本在挂载点/mnt就有repodata和Packages目录(repodata引用Packages里面软件包)
8版本要进去挂载点/mnt的AppStream和BaseOS目录里面才有相应的repodata和Packages目录
centos8版本本地yum源配置:/dev/cdrom是/dev/sr0软链接,# mount /dev/cdrom /mnt
# vim test.repo
[os]
name = os
baseurl = file:///mnt/BaseOS
gpgcheck = 0

[app]
name = app
baseurl = file:///mnt/AppStream
gpgcheck = 0
yum clean all 清缓存,yum makecache 重新建立缓存,yum repolist all 列出所有repo
5、网络校时
服务器校时的原因:1因为计划任务要执行,提供准确的时间 2服务器间进行通信时,需要统一的一致时间
centos7版本,yum -y install ntp   systemctl start ntpd   systemctl enable ntpd
centos6版本,开启ntpd服务 service ntpd start 开机自启ntpd chkconfig ntpd on
ntpdate -u  ntp1.aliyun.com    -u 参数来强制 ntpdate 命令使用 UDP 协议与 NTP 服务器进行通信
echo "* */1 * * * root ntpdate -u time.server.com" >> /etc/crontab    每小时同步一次
LNMP架构生产业务环境需要使用源码编译的方式进行安装。
MySQL编译参数的说明

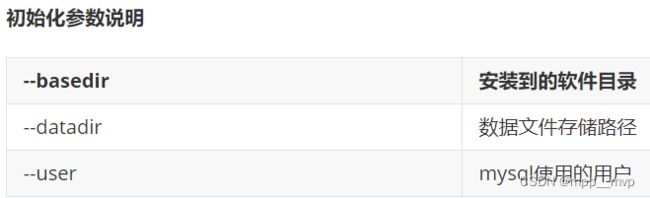
MySQL初始化参数说明
脚本实现MySQL安装及其初始化,vi mysql_install.sh
#!/bin/bash
#源码编译安装MySQL,将MySQL安装过程封装成了mysql_install(){}函数
mysql_install() {
#1、创建用户,没有mysql用户就创建mysql用户
`id mysql` &>/dev/null
[ $? -ne 0 ] && useradd -s /sbin/nologin -M mysql
#2、解决依赖
yum install -y cmake
yum install -y ncurses-devel
#3、编译安装
cd /root/soft
tar zxvf mysql-5.6.33.tar.gz
cd mysql-5.6.33
cmake \
-DCMAKE_INSTALL_PREFIX=/usr/local/mysql \
-DMYSQL_DATADIR=/usr/local/mysql/data \
-DSYSCONFDIR=/etc \
-DENABLED_LOCAL_INFILE=1 \
-DWITH_PARTITION_STORAGE_ENGINE=1 \
-DEXTRA_CHARSETS=all \
-DDEFAULT_CHARSET=utf8mb4 \
-DDEFAULT_COLLATION=utf8mb4_general_ci \
-DWITH_SSL=bundled
make && make install
#配置文件
rm -rf /etc/my.cnf
cp /usr/local/mysql/support-files/my-default.cnf /etc/my.cnf
#授权并初始化数据库
chown -R mysql:mysql /usr/local/mysql
/usr/local/mysql/scripts/mysql_install_db --basedir=/usr/local/mysql --datadir=/usr/local/mysql/data --user=mysql
#配置服务、自启动和环境变量
cp /usr/local/mysql/support-files/mysql.server /etc/init.d/mysqld
systemctl  start mysqld
systemctl  enable mysqld
# centos6版本,chkconfig --add mysqld   chkconfig mysqld on  service start mysqld
echo 'PATH=/usr/local/mysql/bin:$PATH' >> /etc/profile
source  /etc/profile
#删除匿名用户
#设置root域名的密码
rpm -qa|grep expect
if [ $? -ne 0 ];then
   yum -y install expect
fi
#导入环境变量PATH
export PATH=/usr/local/mysql/bin:$PATH
#初始化root密码 删除匿名用户
echo '#!/usr/bin/expect
set timeout 60
spawn mysql_secure_installation
expect {
"enter for none" { send "\r"; exp_continue}
"Y/n" { send "Y\r" ; exp_continue}
"password" { send "123456\r"; exp_continue}
"Cleaning up" { send "\r"}
}
interact ' > mysql_secure_installation.exp
chmod +x mysql_secure_installation.exp
./mysql_secure_installation.exp
}

#脚本开始时间
start_time=`date +%s`
#执行的脚本代码,调mysql_install(){}函数
mysql_install
#脚本结束时间
end_time=`date +%s`
#脚本执行花费时间
const_time=$((end_time-start_time))
echo 'Take time is: '$const_time's'

[root@linux ~]# mysql -uroot -p
Enter password:
mysql> show databases;
+--------------------+
| Database           |
+--------------------+
| information_schema |
| mysql              |
| performance_schema |
+--------------------+
3 rows in set (0.01 sec)
nginx官网:http://nginx.org/,nginx常见安装方式:
①yum安装配置,需使用Nginx官方源或者EPEL源
②源码编译,编译过程中出现的依赖问题,依赖解决yum -y install pcre-devel zlib-devel openssl-devel

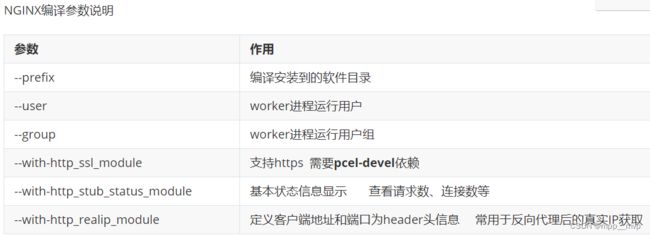
Nginx编译参数说明
脚本实现Nginx安装及其初始化,vi nginx_install.sh
#!/bin/bash
#源码编译安装Nginx,将Nginx安装过程封装成了nginx_install(){}函数
nginx_install(){
#创建软件运行用户,没有www用户就创建www用户
`id www` &>>/dev/null
if [ $? -ne 0 ];then
   useradd -s/sbin/nologin -M www
fi
#安装依赖
yum -y install pcre-devel zlib-devel openssl-devel
#编译安装
cd /root/soft
tar zxvf nginx-1.14.2.tar.gz
cd nginx-1.14.2
./configure --prefix=/usr/local/nginx --user=www --group=www --with-http_ssl_module --with-http_stub_status_module --with-http_realip_module && make && make install
}

#脚本开始时间
start_time=`date +%s`
#执行的脚本代码,调nginx_install(){}函数
nginx_install
#脚本结束时间
end_time=`date +%s`
#脚本执行花费时间
const_time=$((end_time-start_time))
echo 'Take time is: '$const_time's'
编译安装nginx
cd  /opt
wget http://nginx.org/download/nginx-1.18.0.tar.gz
tar xf   nginx-1.18.0.tar.gz
cd  nginx-1.18.0
yum -y install gcc pcre-devel openssl-devel zlib-devel openssl  openssl-devel
mkdir /apps/nginx -p
./configure   --prefix=/apps/nginx
make
make  install

ln -s /apps/nginx/sbin/nginx   /usr/sbin/nginx
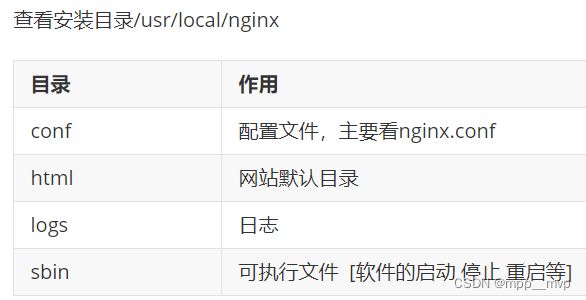
查看安装目录/usr/local/nginx
启动nginx,网页访问测试
[root@linux sbin]# pwd
/usr/local/nginx/sbin
[root@linux sbin]# ./nginx     启动nginx
[root@linux sbin]# ps -aux | grep nginx
root      12572  0.0  0.0  45948  1116 ?        Ss   16:45   0:00 nginx: master process ./nginx
www       12573  0.0  0.0  46396  1892 ?        S    16:45   0:00 nginx: worker process
root      12580  0.0  0.0 112708   972 pts/0    S+   16:46   0:00 grep --color=auto nginx

查看nginx的二进制可执行文件的相关参数
求帮助,[root@linux sbin]# ./nginx -h
nginx version: nginx/1.14.2
Usage: nginx [-?hvVtTq] [-s signal] [-c filename] [-p prefix] [-g directives]

Options:
#查看帮助
  -?,-h         : this help
#查看版本并退出
  -v            : show version and exit
#查看版本和配置选项并退出
  -V            : show version and configure options then exit
#检测配置文件语法并退出
  -t            : test configuration and exit
#检测配置文件语法打印它并退出
  -T            : test configuration, dump it and exit
#在配置测试期间禁止显示非错误信息
  -q            : suppress non-error messages during configuration testing
#发送信号给主进程  stop强制退出  quit优雅的退出  reopen重开日志   reload重载配置
  -s signal     : send signal to a master process: stop, quit, reopen, reload
#设置nginx目录  $prefix路径
  -p prefix     : set prefix path (default: /usr/local/nginx/)
#指定启动使用的配置文件
  -c filename   : set configuration file (default: conf/nginx.conf)
#在配置文件之外设置全局指令
  -g directives : set global directives out of configuration file
一般主要使用:
-s参数控制管理nginx服务,停止nginx服务[root@linux sbin]# ./nginx -s stop
-V参数查看nginx开启的模块和编译参数
-t参数检测配置文件是否有错误
centos7版本,使用systemctl管理自搭建nginx,编译安装配置文件编写使得可以使用systemctl管理。
systemctl管理服务依靠的是/lib/systemd/system配置文件下有对应服务以.service结尾的文件,yum安装或者rpm安装服务时该文件已经写好了,但是编译安装没有此文件所以需要我们手写才可以通过systemctl来管理服务。
使用社区的服务配置文件,nginx编译包里默认没有服务启动脚本模板
https://www.nginx.com/resources/wiki/start/topics/examples/systemd/

vim /lib/systemd/system/nginx.service
[Unit]
Description=nginx
After=network.target

[Service]
Type=forking
ExecStart=/usr/local/nginx/sbin/nginx -c /usr/local/nginx/conf/nginx.conf
ExecStop=/usr/local/nginx/sbin/nginx -s stop
ExecReload=/usr/local/nginx/sbin/nginx -s reload
PrivateTmp=true

[Install]
WantedBy=multi-user.target
ExecStart:nginx的启动命令
ExecReload:nginx的重载命令
ExecStop:nginx的停止命令
WantedBy=multi-user.target:安装字符界面
重新加载systemctl配置文件,systemctl daemon-reload
systemctl start nginx
systemctl enable nginx
systemctl status nginx
centos6版本,使用service管理自搭建nginx
1、使用社区的服务配置文件,nginx编译包里默认没有服务启动脚本模板
vim /etc/init.d/nginx
https://www.nginx.com/resources/wiki/start/topics/examples/redhatnginxinit/
修改软件和配置路径,vim /etc/init.d/nginx
#执行文件路径  第22行
nginx="/usr/local/nginx/sbin/nginx"
#配置文件路径  第25行
NGINIX_CONF_FILE="/usr/local/nginx/conf/nginx.conf"
2、添加自启动
chmod +x /etc/init.d/nginx
chkconfig --add nginx  添加服务
chkconfig --del nginx  删除服务
chkconfig nginx on  添加服务开机自启动
service start nginx   启动nginx服务
chkconfig  查看服务开启模式(init0-6)的情况  chkconfig |grep nginx
chkconfig --level 35 nginx on  开启服务运行模式3字符5图形模式
3、注意在服务脚本中,有chkconfig配置开启模式、开启顺序、关闭顺序设置(系统中有些软件要依赖别的软件先启动才能启动的)
#!/bin/sh
# nginx - this script starts and stops the nginx daemon
# 下面chkconfig看似注释掉了,但其实不是注释掉的内容
# 下面横线这个位置即第一项为开启模式(init0-6)  85即第2项为开启顺序  15即第3项为关闭顺序
# chkconfig:   - 85 15      -是什么都不开启,要是想开启3字符5图形模式,chkconfig:  35 85 15
4、自定义服务脚本,vim /etc/init.d/nginx
#!/bin/bash
#Nginx管理文件位置
EXEC=/usr/local/nginx/sbin/nginx
start(){
   $EXEC
   if [ $? -eq 0 ];then
      echo -e "\033[32m nginx is running \033[0m"
   fi
}

stop(){
  $EXEC -s quit
   if [ $? -eq 0 ];then
      echo -e "\033[31m nginx is not run \033[0m"
   fi
}
status(){    #nginx启用了有/usr/local/nginx/logs/nginx.pid文件
  if [ -f '/usr/local/nginx/logs/nginx.pid' ];then
     echo -e "\033[32m nginx is running \033[0m"
  else
     echo -e "\033[31m nginx is not run \033[0m"
  fi
}
restart(){
  stop
  start
}

reload(){
  $EXEC -s reload
}

configtest(){
  $EXEC -t
}

#调用执行
case "$1" in
   start)
      start;;
   stop)
      stop;;
   restart)
      restart;;
   status)
      status;;
   reload)
      reload;;
   configtest)
      configtest;;
   *)
   echo '请输入这些内容{start|stop|restart|reload|configtest}'
   ;;
esac
源码安装php
1、解压进入目录
tar zxf php-7.2.12.tar.gz
cd php-7.2.12
2、编译参数配置
./configure --prefix=/usr/local/php --with-config-file-path=/usr/local/php/etc --enable-fpm --with-fpm-user=www --with-fpm-group=www --with-mysqli=mysqlnd --with-pdo-mysql=mysqlnd --with-iconv-dir --with-freetype-dir --with-jpeg-dir --with-png-dir --with-zlib --with-libxml-dir --enable-xml --disable-rpath --enable-bcmath --enable-shmop --enable-sysvsem --enable-inline-optimization --with-curl --enable-mbregex --enable-mbstring --enable-ftp --with-gd --with-openssl --with-mhash --enable-pcntl --enable-sockets --with-xmlrpc --with-libzip --enable-soap --without-pear --with-gettext --disable-fileinfo --enable-maintainer-zts
--with 代表需要手动开启  可能需要加载第三方模块  第三方模块没有,就会error
--enable 代表开启php的默认功能
--without  关闭默认加载的模块
3、解决软件依赖问题
yum -y install libxml2-devel libjpeg-devel libpng-devel freetype-devel curl-devel openssl-devel
解决完依赖问题再次执行编译参数配置
4、编译并安装到目录
make && make install

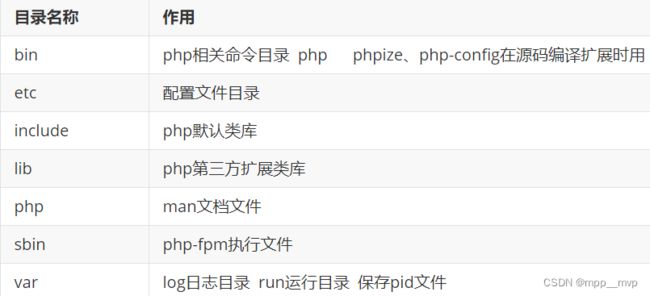
查看PHP的安装目录,cd /usr/local/php
使用php-fpm进行管理php服务,有两个配置文件:
php.ini           #默认php配置文件
php-fpm.conf      #php-fpm相关的配置
1、复制配置文件
cp /usr/local/php/etc/php-fpm.conf.default /usr/local/php/etc/php-fpm.conf
cp /usr/local/php/etc/php-fpm.d/www.conf.default /usr/local/php/etc/php-fpm.d/www.conf
cp /root/soft/php-7.2.12/php.ini-development /usr/local/php/etc/php.ini
2、添加启动服务
centos6版本的服务运行脚本init.d.php-fpm,复制到/etc/init.d/php-fpm
cp /root/soft/php-7.2.12/sapi/fpm/init.d.php-fpm /etc/init.d/php-fpm
chmod +x /etc/init.d/php-fpm
chkconfig --add php-fpm
chkconfig php-fpm on
service start php-fpm
centos7版本的服务运行脚本php-fpm.service,复制到/lib/systemd/system/php-fpm.service
cp /root/soft/php-7.2.12/sapi/fpm/php-fpm.service /lib/systemd/system/php-fpm.service
chmod +x /lib/systemd/system/php-fpm.service
systemctl start php-fpm
systemctl enable php-fpm
systemctl status php-fpm
3、添加环境变量(方便php、phpize、phpconfig查找使用)
echo 'PATH=/usr/local/php/bin:$PATH' >> /etc/profile
source /etc/profile
[root@linux ~]# php -v
PHP 7.2.12 (cli) (built: Feb  6 2024 15:00:06) ( ZTS )
Copyright (c) 1997-2018 The PHP Group
Zend Engine v3.2.0, Copyright (c) 1998-2018 Zend Technologies
脚本安装php及其初始化配置,vi php_install.sh
#!/bin/bash
php_install(){
#php编译安装
#和nginx使用相同的用户www,如果没有就创建
`id www` &> /dev/null
[ $? -ne 0 ] && useradd -s /sbin/nologin -M www
#解决依赖
yum -y install libxml2-devel libjpeg-devel libpng-devel freetype-devel curl-devel openssl-devel
#解压
tar xvf php-7.2.12.tar.gz
cd php-7.2.12
#编译安装php
./configure --prefix=/usr/local/php --with-config-file-path=/usr/local/php/etc --enable-fpm --with-fpm-user=www --with-fpm-group=www --with-mysqli=mysqlnd --with-pdo-mysql=mysqlnd --with-iconv-dir --with-freetype-dir --with-jpeg-dir --with-png-dir --with-zlib --with-libxml-dir --enable-xml --disable-rpath --enable-bcmath --enable-shmop --enable-sysvsem --enable-inline-optimization --with-curl --enable-mbregex --enable-mbstring --enable-ftp --with-gd --with-openssl --with-mhash --enable-pcntl --enable-sockets --with-xmlrpc --with-libzip --enable-soap --without-pear --with-gettext --disable-fileinfo --enable-maintainer-zts && make && make install
#配置文件初始化
cp php.ini-development /usr/local/php/etc/php.ini
#php-fpm服务配置文件
cp /usr/local/php/etc/php-fpm.conf.default /usr/local/php/etc/php-fpm.conf
#php-fpm服务子配置文件
cp /usr/local/php/etc/php-fpm.d/www.conf.default /usr/local/php/etc/php-fpm.d/www.conf
#配置服务及其环境变量
cp /root/soft/php-7.2.12/sapi/fpm/init.d.php-fpm /etc/init.d/php-fpm
chmod +x /etc/init.d/php-fpm
chkconfig --add php-fpm
chkconfig php-fpm on
service start php-fpm
echo 'PATH=/usr/local/php/bin:$PATH' >> /etc/profile
source /etc/profile
}

#脚本开始时间
start_time=`date +%s`
#执行的脚本代码
php_install
#脚本结束时间
end_time=`date +%s`
#脚本执行花费时间
const_time=$((end_time-start_time))
echo 'Take time is: '$const_time's'
Nginx+php-fpm配置
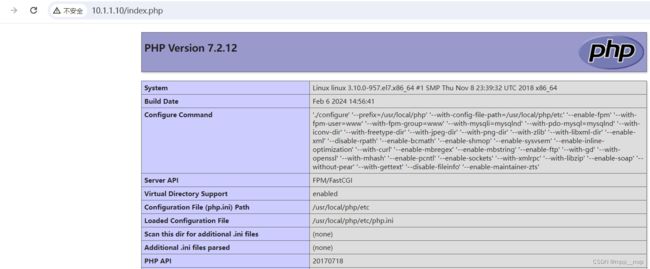
1、编写测试文件
vim /usr/local/nginx/html/index.php
<?php
	phpinfo();
2、在nginx.conf中配置
修改配置文件,告知nginx如果接收到.php结尾的请求,交由给php-fpm进行处理
vim /usr/local/nginx/conf/nginx.conf
打开location ~ .php$那段注释,并把/scripts修改为$document_root,$document_root加载的就是root目录

# pass the PHP scripts to FastCGI server listening on 127.0.0.1:9000
        #
        location ~ \.php$ {
            root           html;
            fastcgi_pass   127.0.0.1:9000;
            fastcgi_index  index.php;
            fastcgi_param  SCRIPT_FILENAME  $document_root$fastcgi_script_name;
            include        fastcgi_params;
        }
[root@linux conf]# netstat -lntp |grep nginx
tcp        0      0 0.0.0.0:80              0.0.0.0:*               LISTEN      35902/nginx: master
[root@linux conf]# netstat -lntp |grep php
tcp        0      0 127.0.0.1:9000          0.0.0.0:*               LISTEN      35394/php-fpm: mast