RBAC 权限控制模型
- 如果没有权限控制,系统的功能完全不设防,全部暴露在所有用户面前,用户登录以后可以使用系统中的所有功能,这是实际运行中不能接受的。
- 所以权限控制系统的目标就是:管理用户行为,保护系统功能。
- 那么如何进行权限控制呢?
- 定义资源
- 创建权限
- 创建角色
- 管理用户
- 建立关联关系
一、如何进行权限控制呢?
- 定义资源:资源就是系统中需要保护起来的功能。具体形式很多:URL 地址、handler方法、service 方法、页面元素等等都可以定义为资源使用权限控制系统保护起来。
- 创建权限:一个功能复杂的项目会包含很多具体资源,成千上万都有可能。这么多资源逐个进行操作太麻烦了。为了简化操作,可以将相关的几个资源封装到一起,打包成一个“权限”同时分配给有需要的人。
- 创建角色:对于一个庞大系统来说,一方面需要保护的资源非常多,另一方面操作系统的人也非常多。把资源打包为权限是对操作的简化,同样把用户划分为不同角色也是对操作的简化。否则直接针对一个个用户进行管理就会很繁琐。所以角色就是用户的分组、分类。先给角色分配权限,然后再把角色分配给用户,用户以这个角色的身份操作系统就享有角色对应的权限了。
- 管理用户:系统中的用户其实是人操作系统时用来登录系统的账号、密码。
- 建立关联关系:
- 权限→资源:单向多对多
- Java 类之间单向:从权限实体类可以获取到资源对象的集合,但是通过资源获取不到权限
- 数据库表之间多对多:一个权限可以包含多个资源,一个资源可以被分配给多个不同权限
- 角色→权限:单向多对多
- Java 类之间单向:从角色实体类可以获取到权限对象的集合,但是通过权限获取不到角色
- 数据库表之间多对多:一个角色可以包含多个权限,一个权限可以被分配给多个不同角色
- 用户→角色:双向多对多
- Java 类之间双向:可以通过用户获取它具备的角色,也可以看一个角色下包含哪些用户
- 数据库表之间多对多:一个角色可以包含多个用户,一个用户可以身兼数职
- 权限→资源:单向多对多
二、 多对多关联关系在数据库中的表示
2.1.没有中间表的情况

如果只能在一个外键列上存储关联关系数据,那么现在这情况无法使用 SQL 语句进行关联查询。
2.2. 有中间表
select t_studet.id,t_student.name from t_student left join t_inner on t_studen.id = t_inner.stuent_id left join t_subject on t_inner.subject_id=t_subject.id where t_subjct.id=1
2.3.中间表主键生成的方式
方式一:另外设置字段作为主键

方式二:使用联合主键(组合起来不能重复即可!)

三、RBAC 权限模型
鉴于权限控制的核心是用户通过角色与权限进行关联,所以前面描述的权限控制系统可以提炼为一个模型:RBAC(Role-Based Access Control ,基于角色的访问控制)。在 RBAC 模型中,一个用户可以对应多个角色,一个角色拥有多个权限,权限具体定义用户可以做哪些事情。
3.1 RBAC0~RBAC3:4种权限模型介绍
- RBAC0:最基本的RBAC模型,RBAC模型的核心部分,后面三种升级版 RBAC 模型也都是建立在 RBAC0的基础上。
- RBAC1:在 RBAC0 的基础上增加了角色之间的继承关系。角色 A 继承角色 B 之后将具备 B 的权限再增加自己独有的其他权限。比如:付费会员角色继承普通会员角色,那么付费会员除了普通会员的权限外还具备浏览付费内容的权限。
- RBAC2:在 RBAC0 的基础上进一步增加了角色责任分离关系。责任分离关系包含静态责任分离和动态责任分离两部分。
- 静态责任分离:给用户分配角色时生效
- 互斥角色:权限上相互制约的两个或多个角色就是互斥角色。用户只能被分配到一组互斥角色中的一个角色。例如:一个用户不能既有会计师角色又有审计师角色。
- 基数约束:
一个角色对应的访问权限数量应该是受限的;一个角色中用户的数量应该是受限的 ;一个用户拥有的角色数量应该是受限的 - 先决条件角色:用户想拥有A角色就必须先拥有B角色,从而保证用户拥有 X 权限的前提是拥有 Y 权限。例如:“金牌会员”角色只能授予拥有“银牌会员”角色的用户,不能直接授予普通用户
- 动态责任分离:用户 登录系统时生效
- 一个用户身兼数职,在特定场景下激活特定角色:马云在阿里巴巴内部激活创始人角色;马云在某企业级论坛上激活演讲嘉宾角色
- 静态责任分离:给用户分配角色时生效
- RBAC3:RBAC3 是在 RBAC0 的基础上同时添加 RBAC2 和 RBAC3 的约束,最全面、最复杂。
3.2 模型图解
3.2.1基本RBAC模型

3.2.2扩展RBAC模型

四、后台管理系统的角色分配
1.权限控制
2.给admin分配角色role
2.1目标:通过页面操作把 Admin 和 Role 之间的 关联关系保存到数据库。
2.2思路

2.3代码:前往分配页面
2.3.1创建保存 Admin-Role 关联关系的数据库表
CREATE TABLE `project_crowd`.`inner_admin_role` ( `id` INT NOT NULL AUTO_INCREMENT, `admin_id` INT, `role_id` INT, PRIMARY KEY (`id`) );这个表并不对应现实生活中或项目业务功能中的一个具体实体,所以没有对应的实体类,也不通过逆向工程做逆向生成
2.3.2修改 “ 分配 ”按钮
2.3.3创建 AssignHandler
@RequestMapping("/assign/to/assign/role/page/{adminId}")
public String toAssignRolePage(
        @PathVariable("adminId") Integer adminId,
        ModelMap modelMap) {
    // 1.查询本身已分配的角色
    List assignedRoleList = roleService.getAssignedRole(adminId);
    // 2.查询未分配角色
    List unAssignedRoleList = roleService.getUnAssignedRole(adminId);
    // 3.存入模型(本质上其实是:request.setAttribute("attrName",attrValue);
    modelMap.addAttribute("assignedRoleList", assignedRoleList);
    modelMap.addAttribute("unAssignedRoleList", unAssignedRoleList);
    modelMap.addAttribute("adminId",adminId);
    return "assign-role";
}
2.3.4 RoleServiceImpl中的方法
@Override
public List getAssignedRole(Integer adminId) {
    return roleMapper.selectAssignedRole(adminId);
}

@Override
public List getUnAssignedRole(Integer adminId) {
    return roleMapper.selectUnAssignedRole(adminId);
}
2.3.5 SQL 语句
2.3.6 在页面上显示角色数据
对 option 标签进行说明:
实际显示角色信息时:
举例:
assign-role.html关键代码:
2.3.7效果展示

2.3.8 调整表单让表单能够提交数据

jquery代码:
2.4 代码:执行分配
2.4.1handler方法
@RequestMapping("/assign/do/role/assign")
public String saveAdminRoleRelationShip(
        @RequestParam("adminId") Integer adminId,
        @RequestParam("pageNum") Integer pageNum,
        @RequestParam("keyword") String keyword,
        // 我们允许用户在页面上取消所有已分配角色再提交表单,所以可以不提供roleIdList 请求参数
        // 设置 required=false 表示这个请求参数不是必须的
        @RequestParam(value="roleIdList", required=false) List roleIdList){
    adminService.saveAdminRoleRelationShip(adminId,roleIdList);
    return "redirect:/admin/getPage?pageNum="+pageNum+"&keyword="+keyword;
}
2.4.2Service 方法
@Override
public void saveAdminRoleRelationShip(Integer adminId, List roleIdList) {
    // 旧数据如下:
    // adminId roleId
    // 1        1(要删除)
    // 1        2(要删除)
    // 1        3
    // 1        4
    // 1        5
    // 新数据如下:
    // adminId roleId
    // 1        3(本来就有)
    // 1        4(本来就有)
    // 1        5(本来就有)
    // 1        6(新)
    // 1        7(新)
    // 为了简化操作:先根据 adminId 删除旧的数据,再根据 roleIdList 保存全部新的数据

    // 1.根据 adminId 删除旧的关联关系数据
    adminMapper.deleteOLdRelationship(adminId);

    // 2.根据roleIdList 和 adminId 保存新的关联关系
    if(roleIdList != null && roleIdList.size() > 0){
        adminMapper.insertNewRelationship(adminId, roleIdList);
    }
}
2.4.3 SQL 语句
void deleteOLdRelationship(@Param("adminId") Integer adminId);

    delete
    from inner_admin_role
    where admin_id = #{adminId}


void insertNewRelationship(@Param("adminId") Integer adminId,@Param("roleIdList") List roleIdList);

    insert into inner_admin_role(admin_id,role_id)
    values (#{adminId},#{roleId})
2.4.4 修正 Bug
$("#submitBtn").click(function(){
    // 在提交表单前把“已分配”部分的 option 全部选中
    $("select:eq(1)>option").prop("selected","selected");
    // 为了看到上面代码的效果,暂时不让表单提交
    // return false;
});
3.给role分配权限(auth)
3.1目标:把角色和权限的关联关系保存到数据库
3.2思路:
3.3代码:前往分配权限页面
3.3.1创建权限表:t_auth表,填充假数据
CREATE TABLE `t_auth` (
`id` int(11) NOT NULL AUTO_INCREMENT,
`name` varchar(200) DEFAULT NULL,
`title` varchar(200) DEFAULT NULL,
`category_id` int(11) DEFAULT NULL,
PRIMARY KEY (`id`)
);
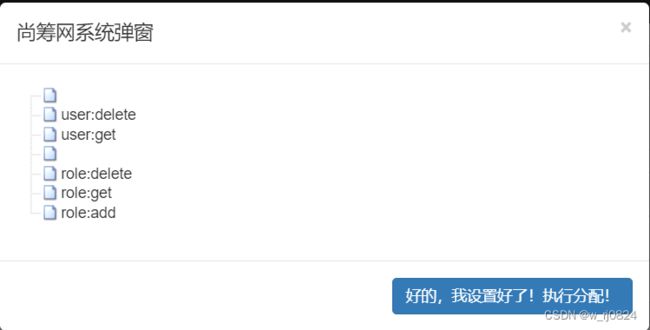
INSERT INTO t_auth(id,`name`,title,category_id) VALUES(1,'','用户模块',NULL);
INSERT INTO t_auth(id,`name`,title,category_id) VALUES(2,'user:delete','删除',1);
INSERT INTO t_auth(id,`name`,title,category_id) VALUES(3,'user:get','查询',1);
INSERT INTO t_auth(id,`name`,title,category_id) VALUES(4,'','角色模块',NULL);
INSERT INTO t_auth(id,`name`,title,category_id) VALUES(5,'role:delete','删除',4);
INSERT INTO t_auth(id,`name`,title,category_id) VALUES(6,'role:get','查询',4);
INSERT INTO t_auth(id,`name`,title,category_id) VALUES(7,'role:add','新增',4);
name 字段:给资源分配权限或给角色分配权限时使用的具体值,将来做权限验证也是使用 name 字段的值来进行比对。建议使用英文。
title 字段:在页面上显示,让用户便于查看的值。建议使用中文。
category_id 字段:关联到当前权限所属的分类。这个关联不是到其他表关联,而是就在当前表内部进行关联,关联其他记录。所以说,t_auth 表中是依靠 category_id 字段建立了“节点”之间的父子关系。
name 字段中值的格式:中间的“:”没有任何特殊含义。不论是我们自己写的代码
还是将来使用的框架都不会解析“:”。如果不用“:”,用“%、@、&、*、-”等等这样
的符号也都是可以的。 模块:操作名:user:delete
3.3.2 逆向工程生成资源:Auth、AuthExample、AuthMapper、AuthMapper.xml
3.3.3 创建角色到权限之间关联关系的中间表
CREATE TABLE `project_crowd`.`inner_role_auth` ( `id` INT NOT NULL AUTO_INCREMENT,`role_id` INT, `auth_id` INT, PRIMARY KEY (`id`) );3.3.4 创建分配权限模态框文件并引入
3.3.5 给 "☑" 绑定单击响应函数,用以打开分配权限模态框
// 通过button标签的id属性把roleId值传递到按钮的单击响应函数中,在单击响应函数中使用this.id拿到其值。
var checkBtn = "";

给分配权限按钮绑定单击响应函数
$("#rolePageBody").on("click",".checkBtn",function () {
    // 把当前角色的id存入全局变量
    window.roleId = this.id;
    // 打开模态框
    $("#roleAssignAuthModal").modal("show");
    // 在模态框中装载权限的树形结构数据
    fillAuthTree();
});
3.3.6 在role-page.html中加入zTree的环境
3.3.7 在my-role.js中编写函数: fillAuthTree()
// 声明专门的函数用来在分配Auth的模态框中显示Auth的树形结构数据
function fillAuthTree() {
    // 1.发送Ajax请求查询Auth数据
    var ajaxReturn = $.ajax({
        "url":"/assign/get/all/auth",
        "type":"post",
        "dataType":"json",
        "async":false
    });
    console.log(ajaxReturn);
    // 判断当前响应状态码是否为200
    var statusCode = ajaxReturn.status;
    // 如果当前响应状态码不是200,说明发生错误或其他意外情况,显示提示信息,让当前函数停止执行
    if(statusCode != 200){
        layer.msg("请求处理出错!响应状态码="+statusCode+" 说明信息="+ajaxReturn.statusText);
        return;
    }
    // 2.如果当前响应状态码是200,说明请求成功,从响应结果中获取 Auth 的 JSON 数据
    var resultEntity = ajaxReturn.responseJSON;
    // 从resultEntity中获取result属性
    var result = resultEntity.operationResult;
    //判断result是否成功
    if(result != "SUCCESS"){
        layer.msg(resultEntity.operationMessage);
        return;
    }
    // 确认result为成功后获取auth
    var authList = resultEntity.queryData;
    // 3.准备对 zTree 进行设置的 JSON 对象
    // zTree的另一种使用方法:从服务器端查询到的list不需要组装成树形结构,这里我们交给zTree去组装
    var setting = {
        "data":{
            "simpleData":{
                "enable":true
            }
        }
    };
    // 4.生成树形结构
    $.fn.zTree.init($("#authTreeDemo"), setting, authList);
}
3.3.8 后端代码:获取所有的权限信息
@ResponseBody
@RequestMapping("/assign/get/all/auth")
public ResultEntity> getAllAuth(){
    List authList = authService.getAllAuth();
    return ResultEntity.successWithData(authList);
}

@Override
public List getAllAuth() {
    return authMapper.selectByExample(new AuthExample());
}
3.3.9 效果展示
3.3.10 效果修正

    var setting = {
        "data": {
            "simpleData": {
                // 开启把查询到的list组装成树形结构的功能
                "enable": true,
                // 使用categoryId属性关联父节点,不用默认的 pId 了
                "pIdKey": "categoryId"
            },
            "key": {
                // 使用 title 属性显示节点名称,不用默认的 name 作为属性名了
                "name": "title"
            }
        }
    };
3.3.11 把已经分配的权限进行回显(完整的fillAuthTree()代码)
// 声明专门的函数用来在分配Auth的模态框中显示Auth的树形结构数据
function fillAuthTree() {
    // 1.发送Ajax请求查询Auth数据
    var ajaxReturn = $.ajax({
        "url":"/assign/get/all/auth",
        "type":"post",
        "dataType":"json",
        "async":false
    });
    console.log(ajaxReturn);
    // 判断当前响应状态码是否为200
    var statusCode = ajaxReturn.status;
    // 如果当前响应状态码不是200,说明发生错误或其他意外情况,显示提示信息,让当前函数停止执行
    if(statusCode != 200){
        layer.msg("请求处理出错!响应状态码="+statusCode+" 说明信息="+ajaxReturn.statusText);
        return;
    }
    // 2.如果当前响应状态码是200,说明请求成功,从响应结果中获取 Auth 的 JSON 数据
    var resultEntity = ajaxReturn.responseJSON;
    // 从resultEntity中获取result属性
    var result = resultEntity.operationResult;
    //判断result是否成功
    if(result != "SUCCESS"){
        layer.msg(resultEntity.operationMessage);
        return;
    }
    // 确认result为成功后获取auth
    var authList = resultEntity.queryData;
    // 3.准备对 zTree 进行设置的 JSON 对象
    // zTree的另一种使用方法:从服务器端查询到的list不需要组装成树形结构,这里我们交给zTree去组装
    var setting = {
        "data": {
            "simpleData": {
                // 开启把查询到的list组装成树形结构的功能
                "enable": true,
                // 使用categoryId属性关联父节点,不用默认的 pId 了
                "pIdKey": "categoryId"
            },
            "key": {
                // 使用 title 属性显示节点名称,不用默认的 name 作为属性名了
                "name": "title"
            }
        },
        "check": {
            // 设置zTree的节点上是否显示checkBox或radio
            "enable":true
        }
    };
    // 4.生成树形结构
    $.fn.zTree.init($("#authTreeDemo"), setting, authList);
    // 获取zTreeObj对象
    var zTreeObj = $.fn.zTree.getZTreeObj("authTreeDemo");
    // 调用zTreeObj对象的方法,把节点展开
    zTreeObj.expandAll(true);

    // 5.查询已分配的Auth的id组成的List
    ajaxReturn = $.ajax({
        "url":"/assign/get/assigned/auth/by/roleId",
        "type":"post",
        "data":{
            "roleId":window.roleId
        },
        "dataType":"json",
        "async":false
    });
    // 判断当前响应状态码是否为200
    statusCode = ajaxReturn.status;
    // 如果当前响应状态码不是200,说明发生错误或其他意外情况,显示提示信息,让当前函数停止执行
    if(statusCode != 200){
        layer.msg("请求处理出错!响应状态码="+statusCode+" 说明信息="+ajaxReturn.statusText);
        return;
    }
    // 如果当前响应状态码是200,说明请求成功,从响应结果中获取 Auth 的 JSON 数据
    var authIdArray = ajaxReturn.responseJSON.queryData;
    // 6.根据authIdArray把树形结构中对应的节点勾选上
    // ①遍历authIdArray
    for(var i = 0;i < authIdArray.length; i++){
        var authId = authIdArray[i];
        // ②根据authId去查询树形结构中对应的节点
        var treeNode  = zTreeObj.getNodeByParam("id",authId)
        // ③将treeNode设置为被勾选
        // checked设置为true表示节点勾选
        var checked = true;
        // checkTypeFlag设置为false,表示父子节点之间不联动,避免把不该勾选的给勾选上
        var checkTypeFlag = false;
        zTreeObj.checkNode(treeNode,checked,checkTypeFlag)
    }
}
3.3.12 后端代码
@ResponseBody
@RequestMapping("/assign/get/assigned/auth/by/roleId")
public ResultEntity> getAssignedAuthByRoleId(
@RequestParam("roleId") Integer roleId){
List authIdList = authService.getAssignedAuthByRoleId(roleId);
return ResultEntity.successWithData(authIdList);
}
@Override
public List getAssignedAuthByRoleId(Integer roleId) {
return authMapper.selectAssignedAuthByRoleId(roleId);
}
List selectAssignedAuthByRoleId(@Param("roleId") Integer roleId);
3.4 勾选权限,执行分配
3.4.1给“执行分配”按钮绑定单击响应函数
// 14.给分配权限模态框中的"执行分配"按钮绑定单击响应函数
$("#roleAssignAuthBtn").click(function () {
    // ①.收集树形结构中被勾选的节点的id
    // 1>声明一个专门的数组存放被勾选id
    var authIdArray = [];
    // 2>获取zTreeObj对象
    var zTreeObj = $.fn.zTree.getZTreeObj("authTreeDemo");
    // 3>获取全部被勾选的节点
    var checkedNodes = zTreeObj.getCheckedNodes(true);
    // 4>遍历checkedNodes得到authIdArray
    for(var i = 0; i < checkedNodes.length; i++){
        var checkedNode = checkedNodes[i];
        var authId = checkedNode.id;
        authIdArray.push(authId);
    }
    // ②.发送请求执行分配
    var requestBody = {
        "authIdArray":authIdArray,
        // 为了服务器端handler方法能够统一使用List方式接收数据,roleId也存入数组
        "roleId":[window.roleId]
    };
    requestBody = JSON.stringify(requestBody);
    $.ajax({
        "url":"/assign/do/role/assign/auth",
        "type":"post",
        "data":requestBody,
        "contentType":"application/json;charset=UTF-8",
        "dataType":"json",
        "success":function (response) {
            var result = response.operationResult;
            if(result == "SUCCESS") {
                layer.msg("操作成功!");
            }
            if(result == "FAILED") {
                layer.msg("操作失败!"+response.message);
            }
        },
        "error":function (response) {
            layer.msg(response.status+" "+response.statusText);
        }
    });
    // 关闭模态框
    $("#roleAssignAuthModal").modal("hide");
});
3.4.2后端代码:执行分配权限
@ResponseBody
@RequestMapping("/assign/do/role/assign/auth")
public ResultEntity saveRoleAuthRelationShip(
        @RequestBody Map> map){
    authService.saveRoleAuthRelationShip(map);
    return ResultEntity.successWithoutData();
}

@Override
public void saveRoleAuthRelationShip(Map> map) {
    // 1.获取roleId的值
    List roleIdList = map.get("roleId");
    Integer roleId = roleIdList.get(0);
    // 2.删除旧的关联关系
    authMapper.deleteOldRelationShip(roleId);
    // 3.获取authIdList
    List authIdList = map.get("authIdArray");
    if(authIdList != null && authIdList.size() > 0){
        // 4.添加新的关联关系
        authMapper.insertNewRelationship(roleId,authIdList);
    }
}

void deleteOldRelationShip(@Param("roleId") Integer roleId);

void insertNewRelationship(@Param("roleId") Integer roleId,@Param("authIdList") List authIdList);


    delete from inner_role_auth where role_id = #{roleId}


    insert into inner_role_auth(auth_id, role_id) values
    (#{authId},#{roleId})
4.给menu分配权限(auth)(同role分配权限,略)
五、项目实战
1.众筹项目加入 SpringSecurity 环境
1.1加入依赖
    org.springframework.security
    spring-security-web
    5.4.2


    org.springframework.security
    spring-security-config
    5.4.2


    org.springframework.security
    spring-security-taglibs
    5.4.2
1.2在web.xml中加入Filter
    springSecurityFilterChain
    org.springframework.web.filter.DelegatingFilterProxy


    springSecurityFilterChain
    /*
1.3配置类CrowdfundingSecurityConfig
//注意:这个类一定要放在自动扫描的包下,否则所有配置都不会生效
//将当前类标记为配置类
@Configuration
//启用 Web安全功能
@EnableWebSecurity
//注解表示启用全局方法权限管理功能。
@EnableGlobalMethodSecurity(prePostEnabled=true)
public class CrowdfundingSecurityConfig extends WebSecurityConfigurerAdapter {
    // 用以指定正确的账号和正确的密码
    @Override
    protected void configure(AuthenticationManagerBuilder builder) throws Exception {

    }

    @Override
    protected void configure(HttpSecurity security) throws Exception {

    }
}
1.4自动扫描的包(谁来把 CrowdfundingSecurityConfig 扫描到 IOC 里?)
考虑到权限控制系统更多的需要控制 Web 请求,而且有些请求没有经过 Service 方法,所以在SpringMVC的IOC容器中扫描CrowdfundingSecurityConfig。但是,SpringSecurity是有管理 Service、Dao 方法的能力的。
1.5 多个 IOC 容器之间的关系
①.问题描述:项目启动时控制台抛异常说找不到“springSecurityFilterChain”的 bean。
org.springframework.beans.factory.NoSuchBeanDefinitionException: No bean named 'springSecurityFilterChain' available②.问题分析:
Web 组件加载顺序:Listener→Filter→Servlet
Spring IOC 容器:ContextLoaderListener 创建
SpringSecurityFilterChain:从 IOC 容器中找到对应的 bean
SpringMVC IOC 容器:DispatcherServlet 创建
DelegatingFilterProxy 查找 IOC 容器然后查找 bean 的工作机制:

ContextLoaderListener 初始化后,springSecurityFilterChain就在 ContextLoaderListener创建的 IOC 容器中查找所需要的 bean,但是我们没有在 ContextLoaderListener 的 IOC 容器中扫描 SpringSecurity 的配置类,所以 springSecurityFilterChain 对应的 bean 找不到。

③.问题解决:把两个 IOC 容器合二为一
将 ContextLoaderListener 取消,原本由 ContextLoaderListener 读取的 Spring 配置文件交给 DispatcherServlet 负责读取。
- DelegatingFilterProxy 在初始化时查找 IOC 容器,找不到,放弃。
- 第一次请求时再次查找。
- 找到 SpringMVC 的 IOC 容器。
- 从这个 IOC 容器中找到所需要的 bean。
    DispatcherServlet
    org.springframework.web.servlet.DispatcherServlet

        contextConfigLocation
        classpath:spring-web-mvc.xml,classpath:spring-persist-*.xml


    1
遗憾的是:会破坏现有程序的结构。原本是 ContextLoaderListener 和 DispatcherServlet
两个组件创建两个 IOC 容器,现在改成只有一个。还有一种解决方案是:改源码。
修改 DelegatingFilterProxy 的源码,修改两处:
①.初始化时直接跳过查找 IOC 容器的环节
@Override
protected void initFilterBean() throws ServletException {
    synchronized (this.delegateMonitor) {
        if (this.delegate == null) {
            // If no target bean name specified, use filter name.
            if (this.targetBeanName == null) {
                this.targetBeanName = getFilterName();
            }
            // Fetch Spring root application context and initialize the delegate early,
            // if possible. If the root application context will be started after this
            // filter proxy, we'll have to resort to lazy initialization.

            /*WebApplicationContext wac = findWebApplicationContext();
            if (wac != null) {
                this.delegate = initDelegate(wac);
            }*/
        }
    }
}
②.第一次请求的时候直接找 SpringMVC 的 的 IOC 容器
@Override
public void doFilter(ServletRequest request, ServletResponse response,
    FilterChain filterChain) throws ServletException, IOException {
    // Lazily initialize the delegate if necessary.
    Filter delegateToUse = this.delegate;
    if (delegateToUse == null) {
        synchronized (this.delegateMonitor) {
            delegateToUse = this.delegate;
            if (delegateToUse == null) {
                // 把原来的查找 IOC 容器的代码注释掉
                // WebApplicationContext wac = findWebApplicationContext();
                // 按我们自己的需要重新编写
                // 1. 获取 ServletContext 对象
                ServletContext sc = this.getServletContext();
                // 2.拼 拼接 接 SpringMVC 将 将 IOC 容器存入 入 ServletContext 域的时候使用的属性名
                String servletName = "springDispatcherServlet";
                String attrName = FrameworkServlet.SERVLET_CONTEXT_PREFIX + servletName;
                // 3. 根据 attrName 从 从 ServletContext 域中获取 IOC 容器对象
                WebApplicationContext wac = (WebApplicationContext)
                sc.getAttribute(attrName);
                if (wac == null) {
                    throw new IllegalStateException("No WebApplicationContext found: " + "no ContextLoaderListener or DispatcherServlet registered?");
                }
                delegateToUse = initDelegate(wac);
            }
            this.delegate = delegateToUse;
        }
    }
    // Let the delegate perform the actual doFilter operation.
    invokeDelegate(delegateToUse, request, response, filterChain);
}
1.6 SpringSecurity 初始设置
@Override
protected void configure(HttpSecurity security) throws Exception {
    security.authorizeRequests()
            .antMatchers("/","/bootstrap/**","/css/**","/fonts/**","/img/**"
        ,"/jquery/**","/layer/**","/script/**","/ztree/**","/crowd/**")
            .permitAll()
            .and()
            .authorizeRequests()
            .anyRequest()
            .authenticated();
}
2.登录
2.1 SpringSecurity 开启表单登录功能并前往登录表单页面
①.登录表单
②.security设置
@Override
protected void configure(HttpSecurity security) throws Exception {
    security.authorizeRequests()    //对请求进行授权
            .antMatchers("/","/bootstrap/**","/css/**"
                    ,"/fonts/**","/img/**","/jquery/**","/layer/**","/script/**","/ztree/**","/crowd/**") //针对登录页以及静态资源进行设置,可以无条件访问
            .permitAll()            //设置成无条件访问
            .anyRequest()           //表示任意请求
            .authenticated()        //均需要授权才能登陆
            .and()
            .formLogin()                    //开启表单登录的功能
            .loginPage("/admin/to/loginPage")//指定前往登陆页面的地址
            .loginProcessingUrl("/security/do/login")//指定处理登录请求的地址
            .permitAll()
            .usernameParameter("loginAcct") //定制登录账号的请求参数名
            .passwordParameter("userPswd") //定制登录密码的请求参数名
            .defaultSuccessUrl("/admin/to/main/page") //指定登陆成功后前往的地址
            .and()
            .logout()                      //开启退出登录的功能
            .logoutUrl("/security/do/logout") //指定退出登录的地址
            .logoutSuccessUrl("/admin/to/loginPage")//指定退出成功以后前往的地址
            .and()
            .csrf()     //防跨站请求伪造功能
            .disable(); // 禁用 CSRF 功能;
}
③.指定正确的账号和正确的密码(假数据)
@Override
protected void configure(AuthenticationManagerBuilder builder) throws Exception {
    //builder.userDetailsService(userDetailsService).passwordEncoder(passwordEncoder);
    builder.inMemoryAuthentication()
            .passwordEncoder(passwordEncoder)
            .withUser("tom")
            .password("4297F44B13955235245B2497399D7A93")
            .roles("admin");
}
④. 取消以前的自定义登录拦截器
2.2退出登录
.and()
.logout()                      //开启退出登录的功能
.logoutUrl("/security/do/logout") //指定退出登录的地址
.logoutSuccessUrl("/admin/to/loginPage")//指定退出成功以后前往的地址
2.3把内存登录(假数据)改成数据库登录
①.思路

②.代码体现
操作1:根据账号查询 Admin对象
// 1.根据用户名从数据库查询 Admin 对象
// ①创建 AdminExample 对象
AdminExample adminExample = new AdminExample();
// ②创建 Criteria 对象
AdminExample.Criteria criteria = adminExample.createCriteria();
// ③在 Criteria 对象中封装查询条件
criteria.andLoginAcctEqualTo(username);
// ④调用 AdminMapper 的方法执行查询
List adminList = adminMapper.selectByExample(adminExample);
// ⑤得到Admin对象
if(adminList == null || adminList.size() != 1) {
return null;
}
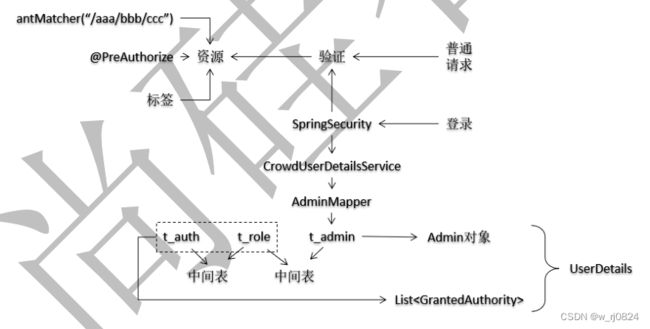
Admin admin = adminList.get(0); 操作2:根据 adminId 查询已分配的角色
Integer adminId = admin.getId();
List roleList = roleMapper.selectAssignedRole(adminId);
操作3:根据 adminId 查询已分配权限
List authNameList = authMapper.selectAssignedAuthNameByAdminId(adminId);
//查询权限的方法:
List selectAssignedAuthNameByAdminId(Integer adminId);
//查询adminId对应的权限的SQL语句:
操作4 :创建 SecurityAdmin 类
// 考虑到 User 对象中仅仅包含账号和密码,为了能够获取到原始的 Admin 对象,专门创建这个类对 User 类进行扩展
public class SecurityAdmin extends User {
    private static final long serialVersionUID = 1L;
    // 原始的 Admin 对象,包含 Admin 对象的全部属性
    private Admin originalAdmin;
    public SecurityAdmin(
        // 传入原始的 Admin 对象
        Admin originalAdmin,
        // 创建角色、权限信息的集合
        List authorities) {

        // 调用父类构造器
        super(originalAdmin.getLoginAcct(), originalAdmin.getUserPswd(), authorities);
        // 给本类的 this.originalAdmin 赋值
        this.originalAdmin = originalAdmin;
    }
    // 对外提供的获取原始 Admin 对象的 getXxx()方法
    public Admin getOriginalAdmin() {
        return originalAdmin;
    }
}
操作5:MyUserDetailsService的完整代码
@Component
public class MyUserDetailsService implements UserDetailsService {
    @Autowired
    private AdminMapper adminMapper;
    @Autowired
    private RoleMapper roleMapper;
    @Autowired
    private AuthMapper authMapper;

    // 总目标:根据表单提交的用户查询User对象,并装配角色、权限等信息
    @Override
    public UserDetails loadUserByUsername(
            // 表单提交的用户名
            String username

        ) throws UsernameNotFoundException {
        // 1.根据用户名从数据库查询 Admin 对象
        // ①创建 AdminExample 对象
        AdminExample adminExample = new AdminExample();
        // ②创建 Criteria 对象
        AdminExample.Criteria criteria = adminExample.createCriteria();
        // ③在 Criteria 对象中封装查询条件
        criteria.andLoginAcctEqualTo(username);
        // ④调用 AdminMapper 的方法执行查询
        List adminList = adminMapper.selectByExample(adminExample);
        // ⑤得到Admin对象
        if(adminList == null || adminList.size() != 1) {
            return null;
        }
        Admin admin = adminList.get(0);
        // ⑥.获取数据库中密码
        String userPswd = admin.getUserPswd();
        // 2.根据adminId查询admin对应的权限信息(包括角色、权限)
        Integer adminId = admin.getId();
        List roleList = roleMapper.selectAssignedRole(adminId);
        // 3.根据adminId查询admin对应的权限信息(包括角色、权限)
        List authNameList = authMapper.selectAssignedAuthNameByAdminId(adminId);
        // 4.给admin设置角色权限信息
        // ①创建集合用来存放权限信息
        ArrayList authorities = new ArrayList<>();
        // ②遍历 roleList 存入角色信息
        for (Role role : roleList) {
            String roleName = role.getName();
            // 注意:一定要加 "ROLE_"
            authorities.add(new SimpleGrantedAuthority("ROLE_" + roleName));
        }
        // ③.遍历 authNameList 存入权限信息
        for (String authName : authNameList) {
            authorities.add(new SimpleGrantedAuthority(authName));
        }
        // 5.把admin对象和authorities封装到SecurityAdmin中
        SecurityAdmin securityAdmin = new SecurityAdmin(admin, authorities);
        return securityAdmin;
    }
}
操作6:配置类CrowdfundingSecurityConfig中引入 UserDetailsService
@Override
protected void configure(AuthenticationManagerBuilder builder) throws Exception {
    // 正式功能中使用基于数据库的认证
    builder.userDetailsService(userDetailsService).passwordEncoder(passwordEncoder);
    //        临时使用内存版登录的模式测试代码
    //        builder.inMemoryAuthentication()
    //                .passwordEncoder(passwordEncoder)
    //                .withUser("tom")
    //                .password("4297F44B13955235245B2497399D7A93")
    //                .roles("admin");
}
操作7:密码加密
①MD5加密
// 用以解决"java.lang.IllegalArgumentException: There is no PasswordEncoder mapped for the id "null""报错问题
@Component
public class MyPasswordEncoder implements PasswordEncoder {
    //encode()方法对明文进行加密。
    @Override
    public String encode(CharSequence rawPassword) {
        return privateEncode(rawPassword);
    }
    //matches()方法对明文加密后和密文进行比较。
    @Override
    public boolean matches(CharSequence rawPassword, String encodedPassword) {
        // 1.对明文密码进行加密
        String formPassword = privateEncode(rawPassword);
        // 2.声明数据库查询出来的密码
        String databasePassword = encodedPassword;
        // 3.比较
        return Objects.equals(formPassword,databasePassword);
    }

    private String privateEncode(CharSequence rawPassword){
        try {
            // 1.创建MessageDigest对象
            String algorithm = "MD5";
            MessageDigest messageDigest = MessageDigest.getInstance(algorithm);

            // 2.获取rawPassword的字节数组
            byte[] input = ((String) rawPassword).getBytes();

            // 3.加密
            byte[] output = messageDigest.digest(input);

            // 4.创建 BigInteger 对象
            int signum = 1;//控制bigInteger是正数
            BigInteger bigInteger = new BigInteger(signum, output);

            // 5.按照 16 进制将 bigInteger 的值转换为字符串
            int radix = 16;
            String encoded = bigInteger.toString(radix).toUpperCase();

            return encoded;
        } catch (NoSuchAlgorithmException e) {
            e.printStackTrace();
            return null;
        }
    }
}
②带盐值的加密
I.准备BCryptPasswordEncoder对象,放到IOC容器里面
// 装配
@Autowired
private BCryptPasswordEncoder passwordEncoder;
// 保存到IOC容器
@Bean
public BCryptPasswordEncoder getPasswordEncoder(){
    return new BCryptPasswordEncoder();
}
// 使用
builder.userDetailsService(userDetailsService).passwordEncoder(passwordEncoder);
操作8:使用BCryptPasswordEncoder在保存admin时加密
在AdminServiceImpl中进行修改

//对密码进行md5加密
//String userPswd = admin.getUserPswd();
//String md5UserPswd = CrowdUtil.md5(userPswd);

//对密码进行盐值加密
String userPswd = admin.getUserPswd();
String bCryptUserPswd = passwordEncoder.encode(userPswd);

admin.setUserPswd(bCryptUserPswd);
操作9:在页面上显示用户昵称
SpringSecurity处理完登录操作之后把登陆成功的User对象以principal属性名存入了UsernamePasswordAuthenticationToken对象。
2.4权限控制
操作1:设置测试数据(更改数据库)
运行时计算权限需要的数据:
    用户:adminOperator
        角色:经理
        权限:无
        角色:经理操作者
        权限:user:save
        最终组装后:ROLE_经理,ROLE_经理操作者,user:save
    用户:roleOperator
        角色:部长
        权限:无
        角色:部长操作者
        权限:role:delete
        最终组装后:ROLE_部长,ROLE_部长操作者,role:delete,user:get
测试时进行操作的数据:
        admin01
        admin02
        ……
        role01
        role02
        ……
操作2:给资源上锁
①.访问 Admin 分页功能时具备“经理”角色
.antMatchers("/admin/getPage") //针对分页显示Admin数据设定访问控制
.hasRole("经理") //要求具备经历角色
效果:adminOperator可以访问,roleOperator不可以访问
②.访问 Role 分页功能时具备部长的角色
另一种方法:使用注解@PreAuthorize("hasRole('部长')")
@PreAuthorize("hasRole('部长')")
@ResponseBody
@RequestMapping("/ajax/role/get/page")
public ResultEntity> getRoleForAjax(
        @RequestParam(value = "keyword",defaultValue = "") String keyword,
        @RequestParam(value = "pageNum",defaultValue = "1") Integer pageNum,
        @RequestParam(value = "pageSize",defaultValue = "5") Integer pageSize){
    // 调用 Service 方法获取分页数据
    PageInfo rolePageInfo = roleService.getRolePageInfo(keyword, pageNum, pageSize);
    // 封装到 ResultEntity 对象中返回(如果上面的操作抛出异常,交给异常映射机制处理)
    return ResultEntity.successWithData(rolePageInfo);
}
注解生效的前提条件: 需要在配置类上加注解@EnableGlobalMethodSecurity(prePostEnabled = true),该注解表示启用全局方法权限控制功能,并且设置 prePostEnabled = true。保证@PreAuthority、@PostAuthority、@PreFilter、@PostFilter 生效
③.访问拒绝后的处理
这个结果为什么没有经过异常映射机制?
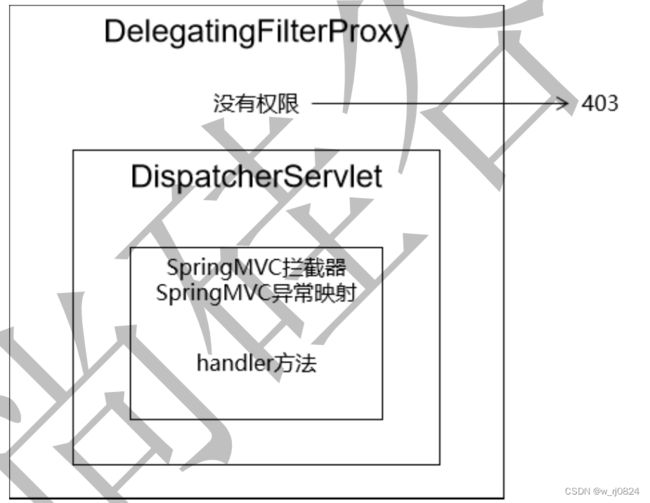
所以要在 SpringSecurity 的配置类中进行配置
.exceptionHandling()
.accessDeniedHandler(new AccessDeniedHandler() {
    @Override
    public void handle(HttpServletRequest request, HttpServletResponse response, AccessDeniedException e) throws IOException, ServletException {
        request.setAttribute("exception","抱歉!您无法访问这个资源!");
        request.getRequestDispatcher("/to/no/auth/page").forward(request,response);
    }
});
④.访问 Admin 保存功能时具备 user:save 权限
@PreAuthorize("hasAuthority('user:save')")
@RequestMapping("/admin/addPage")
public String insertAdmin(Admin admin){
    adminService.saveAdmin(admin);
    return "redirect:/admin/getPage?pageNum="+Integer.MAX_VALUE;
}
⑤.访问 Admin 分页功能时具备“经理”角色或“user:get”权限二者之一
security
.antMatchers("/admin/getPage")// 针对分页显示 Admin 数据设定访问控制
.access("hasRole('经理') OR hasAuthority('user:get')") //要求具备"经理"角色和"user:get"权限二者之一
其他注解(了解)
@PostAuthorize:先执行方法然后根据方法返回值判断是否具备权限。
例如:查询一个 Admin 对象,在@PostAuthorize 注解中和当前登录的 Admin 对象进行比较,如果不一致,则判断为不能访问。实现“只能查自己”效果。@PostAuthorize("returnObject.data.loginAcct == principal.username")使用 returnObject 获取到方法返回值,使用 principal 获取到当前登录用户的主体对象
@PreFilter:在方法执行前对传入的参数进行过滤。只能对集合类型的数据进行过滤。
@PostFilter:在方法执行后对方法返回值进行过滤。只能对集合类型的数据进行过滤。
⑥. 页面元素的权限控制
// access 属性可以传入权限控制相关的表达式


……