透过 Spring 源码解析注解 @Autowired、@Resource 的区别
目录
一. 前言
二. 源码解析
2.1. 概述
2.2. 代码块1:AbstractAutowireCapableBeanFactory#populateBean 方法
2.3. 代码块2:AbstractBeanFactory#getBeanPostProcessors 方法
2.4. 代码块3:AutowiredAnnotationBeanPostProcessor#postProcessProperties 方法
2.5. 代码块4:AutowiredAnnotationBeanPostProcessor#findAutowiringMetadata 方法
2.6. 代码块5:AutowiredAnnotationBeanPostProcessor#buildAutowiringMetadata 方法
2.7. 代码块6:InjectionMetadata#inject 方法
2.8. 代码块7:AutowiredFieldElement#inject 方法
2.9. 代码块8:CommonAnnotationBeanPostProcessor#postProcessProperties 方法
2.10. 代码块9:CommonAnnotationBeanPostProcessor#findResourceMetadata 方法
2.11. 代码块10:CommonAnnotationBeanPostProcessor#buildResourceMetadata 方法
2.12. 代码块11:CommonAnnotationBeanPostProcessor 类的内部类 ResourceElement
2.13. 代码块12:@Resource 注解
2.14. 代码块13:InjectionMetadata#inject 方法
2.15. 代码块14:InjectionMetadata 类的内部类 InjectedElement#inject 方法
2.16. 代码块15:CommonAnnotationBeanPostProcessor 类的内部类ResourceElement#getResourceToInject 方法
2.17. 代码块16:CommonAnnotationBeanPostProcessor#getResource 方法
2.18. 代码块17:CommonAnnotationBeanPostProcessor#autowireResource 方法
三. 总结
一. 前言
在 Spring 中依赖注入可以使用 @Autowired、@Resource 和 @Inject 来完成,并且在一般的使用中是可以相互替换的(注意是一般),不过三者还是有区别。我们知道,Spring 对于@Autowired、@Resource 注解使用不同的后置处理器进行处理,@Autowired、@Resource 之间的处理方式不同,@Autowired 是根据类型,@Resource 是根据名称。
二. 源码解析
2.1. 概述
在进行源码分析之前,你需要了解一下 Bean 的生命周期,可参见《Spring 面试必考:Spring Bean 的生命周期和作用域》,其中在第五次调用 Bean 的后置处理器时,完成属性的依赖注入。第五次调用 Bean 的后置处理器的步骤:拿到 Spring 容器中所有的实现了 BeanPostProcessor 接口的类,然后判断其是否为 InstantiationAwareBeanPostProcessor 接口的实现类,如果是调用 postProcessProperties 方法,完成属性赋值。
在 Spring 中,使用 AutowiredAnnotationBeanPostProcessor 和CommonAnnotationBeanPostProcessor 类分别处理 @Autowired 注解和 @Resource 注解,他们都实现了 InstantiationAwareBeanPostProcessor 类,所以标注了 @Autowired、@Resource会在第六次调用 Bean 的后置处理器的时候完成属性注入。
 @Autowired 注解
 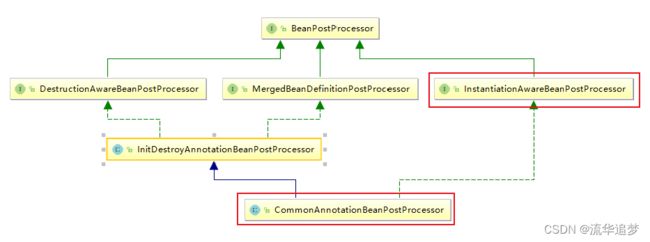 @Resource 注解
从上面两张类的关系图可以看到其都间接实现了 InstantiationAwareBeanPostProcessor 类,下面我们就一起分析一下源码:
2.2. 代码块1:AbstractAutowireCapableBeanFactory#populateBean 方法
protected void populateBean(String beanName, RootBeanDefinition mbd, @Nullable BeanWrapper bw) {
// Give any InstantiationAwareBeanPostProcessors the opportunity to modify the
// state of the bean before properties are set. This can be used, for example,
// to support styles of field injection.
boolean continueWithPropertyPopulation = true;
// 1.第五次后置处理器,对应着我之前博客里面写的bean生命周期,首先判断这个bean是否是合成的,这个绝大多数是不是合成的,然后判断是否有InstantiationAwareBeanPostProcessors的接口
if (!mbd.isSynthetic() && hasInstantiationAwareBeanPostProcessors()) {
// 2.拿到所有的BeanPostProcessors处置处理器
for (BeanPostProcessor bp : getBeanPostProcessors()) {
// 3.逐一判断这个后置处理器是否是InstantiationAwareBeanPostProcessor类型的,因为BeanPostProcessor接口是为了统一进行管理bean后置处理器的
// BeanPostProcessor还有子接口,用于实现不同的作用,可以参考bean后置处理器那篇博客
if (bp instanceof InstantiationAwareBeanPostProcessor) {
InstantiationAwareBeanPostProcessor ibp = (InstantiationAwareBeanPostProcessor) bp;
if (!ibp.postProcessAfterInstantiation(bw.getWrappedInstance(), beanName)) {
continueWithPropertyPopulation = false;
break;
}
}
}
}
// 4.如果为true,则说明在第五次调用后置处理的时候返回为false,这样就不会进行属性注入了
// 所以当你想bean中不进行属性注入,可以实现InstantiationAwareBeanPostProcessor的postProcessAfterInstantiation方法
if (!continueWithPropertyPopulation) {
return;
}
PropertyValues pvs = (mbd.hasPropertyValues() ? mbd.getPropertyValues() : null);
// 5.解析自动装配模式为AUTOWIRE_BY_NAME和AUTOWIRE_BY_TYPE(现在几乎不用,现在默认是AUTOWIRE_NO)
/**
*
*
* id值跟Fruit里的属性名一致
* AbstractAutowireCapableBeanFactory#populateBean 方法是在 Spring 启动时,完成非懒加载单实例 Bean 注册到容器时会执行的方法,可以对着《Spring 面试必考:Spring Bean 的生命周期和作用域》来进行分析,populateBean 方法会执行Bean 生命周期的第五、第六次后置处理器,第五次就不做分析了,关键进行分析第六次完成属性注入的生命周期,在 populateBean 方法中的第7步,会拿到所有的 BeanPostProcessors 方法,然后判断是否是 InstantiationAwareBeanPostProcessor 类型的,如果是则执行postProcessPropertyValues 方法完成属性注入,因为 AutowiredAnnotationBeanPostProcessor 和 CommonAnnotationBeanPostProcessor 类都实现了 InstantiationAwareBeanPostProcessor 接口,所以会在第7步进行调用各自的方法。
我们先看一下 getBeanPostProcessors 方法,看代码块2。然后看一下AutowiredAnnotationBeanPostProcessor 的 postProcessProperties 方法,看代码块3。CommonAnnotationBeanPostProcessor 的 postProcessProperties 方法,看代码块8。
2.3. 代码块2:AbstractBeanFactory#getBeanPostProcessors 方法
/**
 * Return the list of BeanPostProcessors that will get applied
 * to beans created with this factory.
 */
 //就是简单的返回容器中所有的beanPostProcessors
public List getBeanPostProcessors() {
    return this.beanPostProcessors;
}
2.4. 代码块3:AutowiredAnnotationBeanPostProcessor#postProcessProperties 方法
@Override
public PropertyValues postProcessProperties(PropertyValues pvs, Object bean, String beanName) {
    // 1.获取这个类中所有标注了@Autowired的属性和方法,并把它们封装在InjectionMetadata对象中
	InjectionMetadata metadata = findAutowiringMetadata(beanName, bean.getClass(), pvs);
	try {
	    // 2.完成bean的属性注入
		metadata.inject(bean, beanName, pvs);
	} catch (BeanCreationException ex) {
		throw ex;
	}
	return pvs;
}
第1步,解析出这个类中所有的标注了 @Autowired 的属性和方法,看代码块4;第2步,完成对Bean 属性的注入,看代码块6。
2.5. 代码块4:AutowiredAnnotationBeanPostProcessor#findAutowiringMetadata 方法
private InjectionMetadata findAutowiringMetadata(String beanName, Class clazz, @Nullable PropertyValues pvs) {
	// Fall back to class name as cache key, for backwards compatibility with custom callers.
	// 1.得到bean的名称
	String cacheKey = (StringUtils.hasLength(beanName) ? beanName : clazz.getName());
	// Quick check on the concurrent map first, with minimal locking.
	// 2.先从缓存中获取已经解析过的类,在完成对一个类的解析之后,会进行缓存,第二次就不用在去解析了
	InjectionMetadata metadata = this.injectionMetadataCache.get(cacheKey);
	// 3.判断是否刷新
	if (InjectionMetadata.needsRefresh(metadata, clazz)) {
	    // 4.加锁
		synchronized (this.injectionMetadataCache) {
		    // 6.再次从缓存中获取解析之后的类
			metadata = this.injectionMetadataCache.get(cacheKey);
			if (InjectionMetadata.needsRefresh(metadata, clazz)) {
				if (metadata != null) {
					metadata.clear(pvs);
				}
				// 7.完成对类的解析,获取所有的标注了@Autowired的属性和方法
				metadata = buildAutowiringMetadata(clazz);
				// 8.放入到缓存中
				this.injectionMetadataCache.put(cacheKey, metadata);
			}
		}
	}
	return metadata;
}
在第7步中会完成对类的解析,解析出所有标注了 @Autowired 的属性和方法,看代码块5。
2.6. 代码块5:AutowiredAnnotationBeanPostProcessor#buildAutowiringMetadata 方法
private InjectionMetadata buildAutowiringMetadata(final Class clazz) {
	List elements = new ArrayList<>();
	Class targetClass = clazz;

	do {
		final List currElements = new ArrayList<>();

        // 1.解析类中属性标注@Autowired注解的情况
		ReflectionUtils.doWithLocalFields(targetClass, field -> {
			AnnotationAttributes ann = findAutowiredAnnotation(field);
			if (ann != null) {
			    // 2.如果这个属性是static修饰的,即使被@Autowired标注也不会进行属性的自动注入,直接返回
				// 这里使用的是lamda表达式,虽然有返回,但是不是退出buildAutowiringMetadata方法,不懂的自行百度
				if (Modifier.isStatic(field.getModifiers())) {
					return;
				}
				// 3.判断@Autowired注解里面的required字段
				boolean required = determineRequiredStatus(ann);
				// 4.封装成AutowiredFieldElement对象,添加到currElements集合中
				currElements.add(new AutowiredFieldElement(field, required));
			}
		});

		ReflectionUtils.doWithLocalMethods(targetClass, method -> {
			Method bridgedMethod = BridgeMethodResolver.findBridgedMethod(method);
			if (!BridgeMethodResolver.isVisibilityBridgeMethodPair(method, bridgedMethod)) {
				return;
			}
			AnnotationAttributes ann = findAutowiredAnnotation(bridgedMethod);
			if (ann != null && method.equals(ClassUtils.getMostSpecificMethod(method, clazz))) {
				if (Modifier.isStatic(method.getModifiers())) {
				    // 5.如果这个方法是static修饰的,即使被@Autowired标注也不会进行属性的自动注入,直接返回
					return;
				}
				boolean required = determineRequiredStatus(ann);
				// 6.判断@Autowired注解里面的required字段
				PropertyDescriptor pd = BeanUtils.findPropertyForMethod(bridgedMethod, clazz);
				currElements.add(new AutowiredMethodElement(method, required, pd));
			}
		});

		elements.addAll(0, currElements);
		// 7.解析父类,这个可以看出Spring想的真周到
		targetClass = targetClass.getSuperclass();
	}
	while (targetClass != null && targetClass != Object.class);

	return new InjectionMetadata(clazz, elements);
} 可以看到如果属性和方法被 static 修饰的话,是不会完成属性的自动注入的。在第7步中,还会递归解析当前类的父类,这一点我感觉 Spring 做的真周到,你想到的没想到的,Spring 都会帮你做。
2.7. 代码块6:InjectionMetadata#inject 方法
public void inject(Object target, @Nullable String beanName, @Nullable PropertyValues pvs) throws Throwable {
	Collection checkedElements = this.checkedElements;
	Collection elementsToIterate =
			(checkedElements != null ? checkedElements : this.injectedElements);
	// 1.拿到类中(包括父类)标注了@Autowired注解的属性和方法
	if (!elementsToIterate.isEmpty()) {
		for (InjectedElement element : elementsToIterate) {
			// 2.遍历,然后对每一个完成属性注入,这个是分属性和方法的,他们都实现了InjectedElement类,重写了inject方法
			// 这里已属性注入为例
			element.inject(target, beanName, pvs);
		}
	}
}
第2步遍历类中所有的标注了@Autowired属性和方法,具体看代码块7。
2.8. 代码块7:AutowiredFieldElement#inject 方法
@Override
protected void inject(Object bean, @Nullable String beanName, @Nullable PropertyValues pvs) throws Throwable {
    // 1.记住这里是调用InjectedElement的方法,标注了@Autowired注解的属性和方法都会被封装成InjectedElement类,
	// 所以这里使用this.member就是获取封装在InjectedElement的属性
	Field field = (Field) this.member;
	Object value;
	// 2.是否已有解析之后的缓存,如果有,则直接从缓存里面取
	if (this.cached) {
		value = resolvedCachedArgument(beanName, this.cachedFieldValue);
	}
	else {
        // 3.将属性和@Autowired注解里面的@Autowired字段封装成DependencyDescriptor对象
		DependencyDescriptor desc = new DependencyDescriptor(field, this.required);
		desc.setContainingClass(bean.getClass());

		Set autowiredBeanNames = new LinkedHashSet<>(1);
		TypeConverter typeConverter = beanFactory.getTypeConverter();
		try {
            // 4.从容器中获取所依赖的bean,由于该方法过于复杂,大致说一下过程
			// 首先会判断需要注入属性的类型是否是Array、Collection、Map类型的,如果是,则查找所有属性的泛型类型进行注入
			// 例如Map map,然后Spring判断是Map类型,将就回去查找Value所对应的类型是Student,
			// 然后就会查找所有的Student类型,以bean的id为key,以Student的实例为Value注入到这个map中
			// 如果不是Array、Collection、Map类型的,就是去查找所有的需要注入属性的类型,如果只有一个,则直接注入,
			// 如发现多个就会查找一个最优,会先通过@Primary注解查找最优,如果找不到会通过@Priority注解查找最优,如果该找不到
			// 就是用基本策略,使用属性的名称进行逐个匹配查找到的bean的id,如果属性的名称和bean的id相同即为最优,如果还找打不到
			// 那么就不要意思了,直接报错了
			value = beanFactory.resolveDependency(desc, beanName, autowiredBeanNames, typeConverter);
		}
		catch (BeansException ex) {
			throw new UnsatisfiedDependencyException(null, beanName, new InjectionPoint(field), ex);
		}
		// 5.放到缓存中,下次不用进行解析了
		synchronized (this) {
			if (!this.cached) {
				if (value != null || this.required) {
					this.cachedFieldValue = desc;
					registerDependentBeans(beanName, autowiredBeanNames);
					// 步骤如果autowiredBeanNames大于1,说明是Array、Collection、Map类型
					if (autowiredBeanNames.size() == 1) {
						String autowiredBeanName = autowiredBeanNames.iterator().next();
						// 6.如果是1个,也需要判断是不是Array、Collection、Map类型
						if (beanFactory.containsBean(autowiredBeanName) &&
								beanFactory.isTypeMatch(autowiredBeanName, field.getType())) {
							this.cachedFieldValue = new ShortcutDependencyDescriptor(
									desc, autowiredBeanName, field.getType());
						}
					}
				}
				else {
					this.cachedFieldValue = null;
				}
				this.cached = true;
			}
		}
	}
	if (value != null) {
		ReflectionUtils.makeAccessible(field);
		field.set(bean, value);
	}
}
其中第4步是最重点,也是最难得看懂的,有兴趣的同学可以结合源码和注释仔细阅读,到这里关于 @Autowired 源码就介绍完了。
下面我们来看一下 CommonAnnotationBeanPostProcessor 的 postProcessProperties 方法。
2.9. 代码块8:CommonAnnotationBeanPostProcessor#postProcessProperties 方法
@Override
public PropertyValues postProcessProperties(PropertyValues pvs, Object bean, String beanName) {
    // 1.获取这个类中所有标注了@Resource的属性和方法,并把它们封装在InjectionMetadata对象中
	InjectionMetadata metadata = findResourceMetadata(beanName, bean.getClass(), pvs);
	try {
	    // 2.完成bean的属性注入
		metadata.inject(bean, beanName, pvs);
	}
	catch (Throwable ex) {
		throw new BeanCreationException(beanName, "Injection of resource dependencies failed", ex);
	}
	return pvs;
}
CommonAnnotationBeanPostProcessor 和 AutowiredAnnotationBeanPostProcessor 的postProcessProperties 方法基本一样。
第1步,解析出所有标注了 @Resource 的属性和方法,并把它们封装在 InjectionMetadata 对象中,具体看代码块9。
第2步,完成 Bean 的属性注入,具体看代码块13。
2.10. 代码块9:CommonAnnotationBeanPostProcessor#findResourceMetadata 方法
private InjectionMetadata findResourceMetadata(String beanName, final Class clazz, @Nullable PropertyValues pvs) {
	// Fall back to class name as cache key, for backwards compatibility with custom callers.
    // 1.得到bean的名称
	String cacheKey = (StringUtils.hasLength(beanName) ? beanName : clazz.getName());
	// Quick check on the concurrent map first, with minimal locking.
    // 2.先从缓存中获取已经解析过的类,在完成对一个类的解析之后,会进行缓存,第二次就不用在去解析了
	InjectionMetadata metadata = this.injectionMetadataCache.get(cacheKey);
    // 3.判断是否刷新
	if (InjectionMetadata.needsRefresh(metadata, clazz)) {
        // 4.加锁
		synchronized (this.injectionMetadataCache) {
            // 5.再次从缓存中获取解析之后的类
			metadata = this.injectionMetadataCache.get(cacheKey);
			if (InjectionMetadata.needsRefresh(metadata, clazz)) {
				if (metadata != null) {
					metadata.clear(pvs);
				}
			    // 6.完成对类的解析,获取所有的标注了@Resource的属性和方法
				metadata = buildResourceMetadata(clazz);
			    // 7.放入到缓存中
				this.injectionMetadataCache.put(cacheKey, metadata);
			}
		}
	}
	return metadata;
}
这个方法和 AutowiredAnnotationBeanPostProcessor 的一样就不多介绍,关键看一下第6步,进行解析 @Resource 注解,解析的时候就不一样了,具体看代码块10。
2.11. 代码块10:CommonAnnotationBeanPostProcessor#buildResourceMetadata 方法
private InjectionMetadata buildResourceMetadata(final Class clazz) {
	List elements = new ArrayList<>();
	Class targetClass = clazz;

	do {
		final List currElements = new ArrayList<>();
		// 1.解析标注了@Resource注解的属性,
		ReflectionUtils.doWithLocalFields(targetClass, field -> {
		    // 2.判断是否标注了@WebServiceRef注解,这个没看
			if (webServiceRefClass != null && field.isAnnotationPresent(webServiceRefClass)) {
				if (Modifier.isStatic(field.getModifiers())) {
					throw new IllegalStateException("@WebServiceRef annotation is not supported on static fields");
				}
				currElements.add(new WebServiceRefElement(field, field, null));
			}
			// 3.判断是否标注了@EJB注解,这个没看
			else if (ejbRefClass != null && field.isAnnotationPresent(ejbRefClass)) {
				if (Modifier.isStatic(field.getModifiers())) {
					throw new IllegalStateException("@EJB annotation is not supported on static fields");
				}
				currElements.add(new EjbRefElement(field, field, null));
			}
			// 4.判断是否标注了@Resource注解,
			else if (field.isAnnotationPresent(Resource.class)) {
			    // 5.@Resource注解如果标注在static修饰的属性上,直接报错,不知道上面你是否记得@Autowired是怎么处理static修饰的属性的
				// 忘记的翻看上文代码
				if (Modifier.isStatic(field.getModifiers())) {
					throw new IllegalStateException("@Resource annotation is not supported on static fields");
				}
				// 6.判断是否是需要被忽略的类型
				if (!this.ignoredResourceTypes.contains(field.getType().getName())) {
					currElements.add(new ResourceElement(field, field, null));
				}
			}
		});
        // 7.解析标注了@Resource注解的方法
		ReflectionUtils.doWithLocalMethods(targetClass, method -> {
			Method bridgedMethod = BridgeMethodResolver.findBridgedMethod(method);
			if (!BridgeMethodResolver.isVisibilityBridgeMethodPair(method, bridgedMethod)) {
				return;
			}
			if (method.equals(ClassUtils.getMostSpecificMethod(method, clazz))) {
				if (webServiceRefClass != null && bridgedMethod.isAnnotationPresent(webServiceRefClass)) {
					if (Modifier.isStatic(method.getModifiers())) {
						throw new IllegalStateException("@WebServiceRef annotation is not supported on static methods");
					}
					if (method.getParameterCount() != 1) {
						throw new IllegalStateException("@WebServiceRef annotation requires a single-arg method: " + method);
					}
					PropertyDescriptor pd = BeanUtils.findPropertyForMethod(bridgedMethod, clazz);
					currElements.add(new WebServiceRefElement(method, bridgedMethod, pd));
				}
				else if (ejbRefClass != null && bridgedMethod.isAnnotationPresent(ejbRefClass)) {
					if (Modifier.isStatic(method.getModifiers())) {
						throw new IllegalStateException("@EJB annotation is not supported on static methods");
					}
					if (method.getParameterCount() != 1) {
						throw new IllegalStateException("@EJB annotation requires a single-arg method: " + method);
					}
					PropertyDescriptor pd = BeanUtils.findPropertyForMethod(bridgedMethod, clazz);
					currElements.add(new EjbRefElement(method, bridgedMethod, pd));
				}
				// 8.判断方法上是否标注了@Resource注解
				else if (bridgedMethod.isAnnotationPresent(Resource.class)) {
				    // 9.@Resource注解如果标注在static修饰的方法上,直接报错,
					if (Modifier.isStatic(method.getModifiers())) {
						throw new IllegalStateException("@Resource annotation is not supported on static methods");
					}
					// 10.获取其@Resource标注方法的形参列表
					Class[] paramTypes = method.getParameterTypes();
					// 11.如果不是1个就报错,这Spring对于@Resource要求的真实苛刻啊
					if (paramTypes.length != 1) {
						throw new IllegalStateException("@Resource annotation requires a single-arg method: " + method);
					}
					if (!this.ignoredResourceTypes.contains(paramTypes[0].getName())) {
						PropertyDescriptor pd = BeanUtils.findPropertyForMethod(bridgedMethod, clazz);
						currElements.add(new ResourceElement(method, bridgedMethod, pd));
					}
				}
			}
		});

		elements.addAll(0, currElements);
		// 12.递归解析父类的@Resource注解
		targetClass = targetClass.getSuperclass();
	}
	while (targetClass != null && targetClass != Object.class);

	return new InjectionMetadata(clazz, elements);
}
到这里我们已经知道了:
- 使用 @Resource 时,如果是 static 则直接报错,使用 @Autowired 则不会。
- 使用 @Resource 标注在方法上面时,方法的参数只能有一个,没有或多个参数则直接报错,使用 @Autowired 则没有限制。
在第6步,会判断是否是被忽略的类型,如果不是,则添加到集合中,我们看一下ResourceElement 类是如何实现的,看代码块11。
2.12. 代码块11:CommonAnnotationBeanPostProcessor 类的内部类 ResourceElement
/**
 * Class representing injection information about an annotated field
 * or setter method, supporting the @Resource annotation.
 */
private class ResourceElement extends LookupElement {

	private final boolean lazyLookup;

	public ResourceElement(Member member, AnnotatedElement ae, @Nullable PropertyDescriptor pd) {
		super(member, pd);
		// 1.从属性中面获取@Resource注解
		Resource resource = ae.getAnnotation(Resource.class);
		// 2.获取@Resource注解上面name属性的值
		String resourceName = resource.name();
		// 3.获取@Resource注解上面type属性的值
		Class resourceType = resource.type();
		// 4.如果@Resource注解name属性值为空,则isDefaultName为ture,就会使用默认的名称
		this.isDefaultName = !StringUtils.hasLength(resourceName);
		if (this.isDefaultName) {
		    // 5.如果使用了默认名称的话,就会使用标注了@Resource注解属性的名称
			resourceName = this.member.getName();
			// 6.如果标注了@Resource注解的是方法,那么就是判断是否是以set开头的
			if (this.member instanceof Method && resourceName.startsWith("set") && resourceName.length() > 3) {
			    // 7.如果是以set开头长度大于3则将set去除,并把首字母变成小写
				resourceName = Introspector.decapitalize(resourceName.substring(3));
			}
		}
		else if (embeddedValueResolver != null) {
			resourceName = embeddedValueResolver.resolveStringValue(resourceName);
		}
		// 8.检查在@Resource注解中设置的属性和和标注了@Resource注解的属性类型是否是一致的
		if (Object.class != resourceType) {
			checkResourceType(resourceType);
		}
		else {
			// No resource type specified... check field/method.
			// 9.没用设置的的话,使用@Resource注解的属性类型
			resourceType = getResourceType();
		}
		this.name = (resourceName != null ? resourceName : "");
		this.lookupType = resourceType;
		String lookupValue = resource.lookup();
		this.mappedName = (StringUtils.hasLength(lookupValue) ? lookupValue : resource.mappedName());
		// 10.判断是否为懒加载的
		Lazy lazy = ae.getAnnotation(Lazy.class);
		this.lazyLookup = (lazy != null && lazy.value());
	}

	@Override
	protected Object getResourceToInject(Object target, @Nullable String requestingBeanName) {
		return (this.lazyLookup ? buildLazyResourceProxy(this, requestingBeanName) :
				getResource(this, requestingBeanName));
	}
}
这个类主要是用来解析 @Resource 注解的,因为 @Resource 注解有很多属性,具体看代码块12。
2.13. 代码块12:@Resource 注解
@Target({TYPE, FIELD, METHOD})
@Retention(RUNTIME)
public @interface Resource {

    String name() default "";

    String lookup() default "";

    Class type() default java.lang.Object.class;

    enum AuthenticationType {
            CONTAINER,
            APPLICATION
    }

    AuthenticationType authenticationType() default AuthenticationType.CONTAINER;

    boolean shareable() default true;

    String mappedName() default "";

    String description() default "";
}
代码块12 是为了让你更好的理解代码块11,这两个要结合着看。
2.14. 代码块13:InjectionMetadata#inject 方法
public void inject(Object target, @Nullable String beanName, @Nullable PropertyValues pvs) throws Throwable {
	Collection checkedElements = this.checkedElements;
	Collection elementsToIterate =
			(checkedElements != null ? checkedElements : this.injectedElements);
	// 1.判断类中标注了@Resource注解的集合是否为空
	if (!elementsToIterate.isEmpty()) {
		for (InjectedElement element : elementsToIterate) {
		    // 2.不为空,则进行处理
			element.inject(target, beanName, pvs);
		}
	}
}
第2步会遍历类中所有加了 @Resource 注解的属性和方法,然后对每个完成依赖注入,具体看代码14。
2.15. 代码块14:InjectionMetadata 类的内部类 InjectedElement#inject 方法
/**
 * Either this or {@link #getResourceToInject} needs to be overridden.
 */
protected void inject(Object target, @Nullable String requestingBeanName, @Nullable PropertyValues pvs)
		throws Throwable {
	// 1.判断是属性还是方法
	if (this.isField) {
		Field field = (Field) this.member;
		ReflectionUtils.makeAccessible(field);
		// 2.getResourceToInject方法会依赖项的查找
		field.set(target, getResourceToInject(target, requestingBeanName));
	}
	else {
		if (checkPropertySkipping(pvs)) {
			return;
		}
		try {
			Method method = (Method) this.member;
			ReflectionUtils.makeAccessible(method);
			method.invoke(target, getResourceToInject(target, requestingBeanName));
		}
		catch (InvocationTargetException ex) {
			throw ex.getTargetException();
		}
	}
}
重点关注属性的依赖注入,对于方法的和属性的差不多,这里不做过多介绍,在第2步会查找并注入依赖项,具体看代码块15。
2.16. 代码块15:CommonAnnotationBeanPostProcessor 类的内部类ResourceElement#getResourceToInject 方法
@Override
protected Object getResourceToInject(Object target, @Nullable String requestingBeanName) {
	return (this.lazyLookup ? buildLazyResourceProxy(this, requestingBeanName) :
			getResource(this, requestingBeanName));
}
判断是否为懒加载,如果是则进行懒加载,懒加载会返回一个代理的类用来替代,只有在使用到这个属性的时候才会去加载,如果不是懒加载,则调用 getResource 方法获取依赖项,具体看代码块16。
2.17. 代码块16:CommonAnnotationBeanPostProcessor#getResource 方法
protected Object getResource(LookupElement element, @Nullable String requestingBeanName)
		throws NoSuchBeanDefinitionException {
	if (StringUtils.hasLength(element.mappedName)) {
		return this.jndiFactory.getBean(element.mappedName, element.lookupType);
	}
	if (this.alwaysUseJndiLookup) {
		return this.jndiFactory.getBean(element.name, element.lookupType);
	}
	// 1.完成依赖注入
	return autowireResource(this.resourceFactory, element, requestingBeanName);
}
在第1步中会完成依赖注入,看代码块17。
2.18. 代码块17:CommonAnnotationBeanPostProcessor#autowireResource 方法
protected Object autowireResource(BeanFactory factory, LookupElement element, @Nullable String requestingBeanName)
			throws NoSuchBeanDefinitionException {

	Object resource;
	Set autowiredBeanNames;
	// 1.获取名称,如果在注解内部指定了name属性,则name就为执行的name
	// 如果没有指定,则会获取标注了@Resource注解中属性的名称
	String name = element.name;

	if (factory instanceof AutowireCapableBeanFactory) {
		AutowireCapableBeanFactory beanFactory = (AutowireCapableBeanFactory) factory;
		DependencyDescriptor descriptor = element.getDependencyDescriptor();
		// 2.fallbackToDefaultTypeMatch:判断是否回退到默认类型匹配
		// isDefaultName:代码块11中进行了说明,如果@Resource注解name属性有值,则isDefaultName为false,如果@Resource注解name属性没有值,则为true,
		//isDefaultName为true,element.name是标注了@Resource注解中属性的名称
		// 查看工厂中是否包含该名称的bean
		if (this.fallbackToDefaultTypeMatch && element.isDefaultName && !factory.containsBean(name)) {
			autowiredBeanNames = new LinkedHashSet<>();
			// 3.resolveDependency方法在代码块7中介绍了,如果走这个,是和@Autowired注解一样
			resource = beanFactory.resolveDependency(descriptor, requestingBeanName, autowiredBeanNames, null);
			if (resource == null) {
				throw new NoSuchBeanDefinitionException(element.getLookupType(), "No resolvable resource object");
			}
		}
		else {
		    // 4.根据名称去查找bean
			resource = beanFactory.resolveBeanByName(name, descriptor);
			autowiredBeanNames = Collections.singleton(name);
		}
	}
	else {
		resource = factory.getBean(name, element.lookupType);
		autowiredBeanNames = Collections.singleton(name);
	}

	if (factory instanceof ConfigurableBeanFactory) {
		ConfigurableBeanFactory beanFactory = (ConfigurableBeanFactory) factory;
		for (String autowiredBeanName : autowiredBeanNames) {
			if (requestingBeanName != null && beanFactory.containsBean(autowiredBeanName)) {
				beanFactory.registerDependentBean(autowiredBeanName, requestingBeanName);
			}
		}
	}

	return resource;
}
在第2步中,比较绕,我们举例说明:
@Resource
private String student;
// 因为此时@Resource注解中name属性为空,
// 所以:element.isDefaultName = true
// element.name = student

@Resource(name = "student1")
private String student2;
// 因为此时@Resource注解中name属性有值,
// 所以:element.isDefaultName = false
// element.name = student1,即@Resource内部指定的
根据第2步我们知道,如果 @Resource 想要像 @Autowired 一样,使用类型进行匹配,需要满足以下条件(必须全部满足):
1. @Resource 注解中 name 属性没有进行设置;
2. 第1条满足之后,会查看标注了 @Resource 属性的名称在容器在容器中不存在。什么意思?比如:
@Resource
private String student2;
id 为 student2 的 Bean 在容器中不存在。只有上面两条同时存在,才会和 @Autowired 走一样的逻辑。
三. 总结
这里再总结一下 @Autowired、@Resource 注解的区别:
@Autowired 注解:
- Spring 本身替换的注解(org.springframework.beans.factory.annotation.Autowired),需要导入 Spring 相应的 jar 包才能使用。
- 可以标注的位置:构造器、方法、方法参数、变量域和注解上面。
- 在 Spring 容器解析 @Autowired 注解时,使用的后置处理器为AutowiredAnnotationBeanPostProcessor。
- @Autowired 注解有一个 required 属性,当指定 required 属性为 false 时,意味着在容器中找相应类型的 Bean,如果找不到则忽略,而不报错(这一条是两个注解所没有的功能)。
- 默认优先按照类型去容器中找对应的组件,找到就赋值,如果找到多个相同类型的组件,再将属性的名称作为组件的 id 去容器中查找,如果组件 id 对象的 Bean 不存在,而且 required属性为 true,就报错。
- 如果标注了 @Autowired 的是 static 静态的属性或方法,那么 Spring 会直接忽略,但不会报错。
@Resource 注解:
- JSR250 规范提供的注解(javax.annotation.Resource),不需要导入格外的包,这个注解在 JDK 的 rt.jar 包中。
- 可以标注的位置:TYPE(表示可以标注在接口、类、枚举),FIELD(变量域)和METHOD(方法)上面。
- 在 Spring 容器解析 @Resource 注解时,使用的后置处理器为CommonAnnotationBeanPostProcessor。
- 默认是按照组件名称进行装配的,根据 @Resource 注解 name 属性的名称去容器中查找,如果 name 没有指定,则根据标注了 @Resource 的属性名称去判断容器中是否存在该名称的 Bean,如果不存在,则会走和 @Autowired 一样的逻辑,这个时候就会支持 @Primary 注解。
- 如果标注了 @Resource 的是 static 静态的属性或方法,那么会直接报错。
- 标注了 @Resource 的是方法只能有一个参数,如果是没有或者是多个,那么 Spring 会直接报错,而 @Autowired 则没有限制。