新手小白的SpringBoot学习笔记(学习中...)
(有哪里说的不对的地方请轻喷呜呜)
视频学习参考了
【1天搞定SpringBoot+Vue全栈开发】 https://www.bilibili.com/video/BV1nV4y1s7ZN/?p=2&share_source=copy_web&vd_source=66e36597c9fcfdfe265d00aa7af40ff9
文件可参考文章最顶部(是我自己的,目前运行最没问题的一个)
一、准备工作
在创建springboot前需要添加的东西(视情况而定)
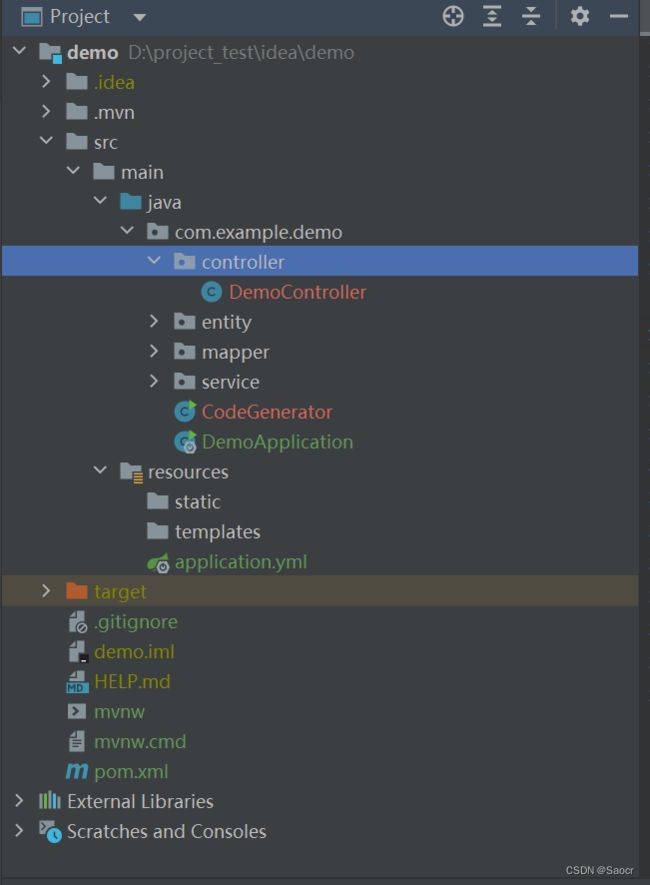
需添加一个与XXXApplication同级的类,命名为CodeGenerator
package com.example.demo;

import com.baomidou.mybatisplus.annotation.DbType;
import com.baomidou.mybatisplus.generator.AutoGenerator;
import com.baomidou.mybatisplus.generator.config.DataSourceConfig;
import com.baomidou.mybatisplus.generator.config.GlobalConfig;
import com.baomidou.mybatisplus.generator.config.PackageConfig;
import com.baomidou.mybatisplus.generator.config.StrategyConfig;
import com.baomidou.mybatisplus.generator.config.rules.NamingStrategy;
import com.baomidou.mybatisplus.generator.engine.FreemarkerTemplateEngine;

import java.util.ResourceBundle;

public class CodeGenerator {

    public static void main(String[] args) {
        AutoGenerator autoGenerator = new AutoGenerator();
        //全局配置
        GlobalConfig gc = new GlobalConfig();
        String oPath = System.getProperty("user.dir");//得到当前项目的路径
        gc.setOutputDir(oPath + "/src/main/java");   //生成文件输出根目录
        gc.setOpen(false);//生成完成后不弹出文件框
        gc.setFileOverride(false);  //文件覆盖//先TRUE后改为FALSE
        gc.setActiveRecord(false);// 不需要ActiveRecord特性的请改为false
        gc.setEnableCache(false);// XML 二级缓存
        gc.setBaseResultMap(true);// XML ResultMap
        gc.setBaseColumnList(false);// XML columList
        gc.setAuthor("xxx");// 作者

        // 自定义文件命名,注意 %s 会自动填充表实体属性!
        gc.setControllerName("%sController");
        gc.setServiceName("%sService");
        gc.setServiceImplName("%sServiceImpl");
        gc.setMapperName("%sMapper");
        gc.setXmlName("%sMapper");
        autoGenerator.setGlobalConfig(gc);

        // 数据源配置
        DataSourceConfig dsc = new DataSourceConfig();
        dsc.setDbType(DbType.MYSQL);   //设置数据库类型,我是postgresql
        dsc.setDriverName("com.mysql.cj.jdbc.Driver");
//用户名和密码要改
        dsc.setUsername("root");
        dsc.setPassword("030609wc");
//数据库的名称要记得改
        dsc.setUrl("jdbc:mysql://localhost:3306/demo?autoReconnect=true&useUnicode=true&characterEncoding=utf8&zeroDateTimeBehavior=CONVERT_TO_NULL&useSSL=false&serverTimezone=GMT%2B8");  //指定数据库@ToDo
        autoGenerator.setDataSource(dsc);

        // 策略配置
        StrategyConfig strategy = new StrategyConfig();
        strategy.setNaming(NamingStrategy.underline_to_camel);      // 表名生成策略
//需要将表内有哪些属性填进去
        strategy.setInclude("XXX");     // 需要生成的表
        strategy.setEntityLombokModel(true); //开启lombok生成
        strategy.setRestControllerStyle(true); //开启rest风格controller封装
        strategy.setEntityTableFieldAnnotationEnable(true); //开启entity 属性注解
        strategy.setControllerMappingHyphenStyle(true);
        autoGenerator.setStrategy(strategy);

        // 包配置
        PackageConfig pc = new PackageConfig();
        pc.setParent("com.example.demo");
        pc.setController("controller");
        pc.setService("service");
        pc.setServiceImpl("service.impl");
        pc.setMapper("mapper");
        pc.setEntity("entity");
        pc.setXml("mapper.xml");
        autoGenerator.setPackageInfo(pc);
//        TemplateConfig tc = new TemplateConfig();
//        tc.setController("/mybatis-plus-generator-template/controller.java.vm");
//        tc.setEntity("/mybatis-plus-generator-template/entity.java.vm");
//        tc.setMapper("/mybatis-plus-generator-template/mapper.java.vm");
//        tc.setXml("/mybatis-plus-generator-template/mapper.xml.vm");
//        tc.setService("/mybatis-plus-generator-template/service.java.vm");
//        tc.setServiceImpl("/mybatis-plus-generator-template/serviceImpl.java.vm");
//        autoGenerator.setTemplate(tc);
//        autoGenerator.setTemplateEngine(new FreemarkerTemplateEngine());
        autoGenerator.execute();
    }
}
将pom.xml改为
    4.0.0

        org.springframework.boot
        spring-boot-starter-parent
        2.7.3


    com.example
    demo
    0.0.1-SNAPSHOT
    demo
    demo

        1.8


            org.springframework.boot
            spring-boot-starter-web


            org.springframework.boot
            spring-boot-devtools
            runtime
            true


            org.projectlombok
            lombok
            true


            mysql
            mysql-connector-java
            8.0.27


            com.baomidou
            mybatis-plus-boot-starter
            3.4.1


            com.baomidou
            mybatis-plus-extension
            3.4.0


            com.github.yulichang
            mybatis-plus-join
            1.2.1


            org.apache.velocity
            velocity-engine-core
            2.3


            com.baomidou
            mybatis-plus-generator
            3.4.1


            io.springfox
            springfox-swagger2
            2.9.2


            io.springfox
            springfox-swagger-ui
            2.9.2


                org.springframework.boot
                spring-boot-maven-plugin


                            org.projectlombok
                            lombok
在application.yml中添加内容 (有的也可以不添加,看情况吧)
server:
  port: 8081
spring:
  datasource:
    driver-class-name: com.mysql.cj.jdbc.Driver
    password: 030609wc
    username: root
    url: jdbc:mysql://localhost:3306/demo?&useSSL=true&useUnicode=true&characterEncoding=utf-8&serverTimezone=UTC
  mvc:
    format:
      date-time: yyyy-MM-dd HH:mm

mybatis-plus:
  mapper-locations: classPath*:/mapper/*.xml
我的启动类(DemoApplication)似乎加了点东西,我也不太懂,把代码贴在这里方便日后作参考
package com.example.demo;

import org.mybatis.spring.annotation.MapperScan;
import org.springframework.boot.SpringApplication;
import org.springframework.boot.autoconfigure.SpringBootApplication;

@SpringBootApplication
@MapperScan("com.example.demo.mapper")
public class DemoApplication {

    public static void main(String[] args) {
        SpringApplication.run(DemoApplication.class, args);
    }

}
二、springboot快速上手
1.一些介绍(?)
代码位于src下面的java目录,在resources下放一些资源,其中图片、css等静态资源可放在static中,HTML的模板可放在templates中,但是由于前后端分离,前端资源放在vue中则用不到这俩,test下放java的测试程序;pom.xml中有个parent标签,可以认为是一个父级的项目,一些依赖基于此父级项目;
2.创建控制器
在main的java包下的公司包内再创建一个包,命名为control,创建一个java类可自由命名,一般命名为XXXController。
控制器需要做标记,在类名前加一个@RestController,可以用来接受客户端请求。
请求即在类中创建一个方法,方法名随便取。要在方法前加一个注解@GetMapping("链接地址"),代表浏览器要发一个get请求来访问这个方法。
这个连接地址是个路径,在本机上就是http://localhost:8081/demo/getAll(链接地址)
package com.example.demo.controller;


import com.example.demo.entity.Demo;
import com.example.demo.service.DemoService;
import org.springframework.beans.factory.annotation.Autowired;
import org.springframework.web.bind.annotation.GetMapping;
import org.springframework.web.bind.annotation.RequestMapping;

import org.springframework.web.bind.annotation.RestController;

import java.util.List;

/**
 *
 *  前端控制器
 *
 *
 * @author xxx
 * @since 2023-08-08
 */
@RestController
@RequestMapping("/demo")
public class DemoController {

    @Autowired
    DemoService demoService;


    @GetMapping("getAll")
    public List getAllData(){
        return demoService.getAll();
    }

}
注意:java程序的每次修改都需要重启程序,否则不在网页更新。
但springboot提供了spring-boot-devtools组件,可以不重启也能重新编译、启动项目,大大缩短编译启动的时间。devtools会监听classpath下的文件变动来触发Restart类加载器重新加载该类。可以设置哪些监听哪些不监听。
可通过添加依赖实现(我加完了)
但是热部署有一步我没找到在哪里,还是需要手动重启。
三、SpringBoot Controller
1.web入门
webmvc组件为web开发提供了注解,是web开发的基础框架;
json组件提供json数据的解析,可发送json相关数据也可返回相关数据,json为JSON数据解析组件;
tomcat是自带的容器依赖。
此启动器在创建项目时勾选即可
2.控制器
SprintBoot提供了两种注解,即@Controller和@RestController用来标识此类负责接收和处理HTTP请求。
如果请求的是页面和数据,则使用@Controller,通常要配合Thymeleaf模板引擎使用,用了的前后端就不分离了。(了解即可)
如果只请求数据,则使用@RestController。
3.@RestController 用法
@RestController注解会默认返回的对象数据转换为JSON格式。
(看起来是在类前注解一下)
4.URL映射
@RequestMapping注解主要负责URL的路由映射。可以添加在Controller类或具体的方法上。若添加在Controller类上,则这个Controller中的所有路由映射都将会加上此映射规则,若只加在方法上,则只对当前方法生效。
@RequestMapping注解包含很多属性参数来定义HTTP的请求映射规则。常用属性参数如下:
- value:请求URL的路径,支持URL模板、正则表达式
- method:HTTP请求方法(get还是post之类的)
- consumes:规定请求的媒体类型(Content-Type),如application/json
- produces:规定响应的媒体类型
- params,headers:规定请求的参数及请求头的值
5.路由映射
@RequestMapping的value属性用于匹配URL映射,value支持简单表达式@RequestMapping(“/user”)
@RequestMapping支持使用通配符匹配URL,支持"*" "?" "**"等通配符。
" * " 匹配任意字符;
" ** " 匹配任意路径;(可以有很多个路径,即可以有很多的/)
" ? " 匹配单个字符。
优先级
有通配符的优先级低于没有通配符的。如/user/add.json比/user/*.json优先匹配。
有" ** "通配符优先级低于有" * "通配符的。
6.Method匹配
HTTP请求Method有GET、POST、PUT、DELETE等方式。HTTP支持全部Method。
@RequestMapping注解提供了method参数指定请求的Method类型,包括RequestMethod.GET、RequestMethod.POST、RequestMethod.DELETE、RequestMethod.PUT等。
@RequestMapping(value = "aa",method = RequestMethod.GET)
//method = RequestMethod.GET时与@GetMapping("aa")等价
public String hello(){
    return "你好世界";
}
同样,method = RequestMethod.POST时可用@PostMapping等注解代替
7.参数传递
@RequestParam将请求参数绑定到控制器的方法参数上,接收的参数来自HTTP请求体或请求url的QueryString,当请求的参数名称与Controller的业务方法参数名称一致时,@RequestParam可以省略。
@RequestParam的使用详解
当请求的参数名称与控制器方法的参数名称一致时,@RequestParam可以省略。例如,如果一个请求的URL为
/example?name=John&age=25,控制器方法定义如下: @GetMapping("/example") public String exampleMethod(@RequestParam String name, @RequestParam int age) { // 方法体 } 在上述示例中,
@RequestParam可以省略,因为请求参数名称与方法参数名称一致。可以直接这样定义:@GetMapping("/example") public String exampleMethod(String name, int age) { // 方法体 }需要注意的是,默认情况下,@RequestParam注解的required属性为true,表示该参数为必需参数,如果请求中没有携带该参数,将会抛出异常。如果想使参数为可选,可以将required属性设置为false,或者给方法参数提供一个默认值。
@GetMapping("/example") public String exampleMethod(@RequestParam(required = false) String name, @RequestParam(defaultValue = "18") int age) { // 方法体 } 这样,在请求中如果没有传递name参数,则name的值为null;如果没有传递age参数,则age的值为18。
Getmapping请求可以直接通过地址栏发送;
 @RequestMapping(value = "getTest1",method = RequestMethod.GET)
    //地址栏:/getTest1
    public String getTest1(){
        return "GET请求1";
    }
    @GetMapping("getTest2")
    //地址栏:/getText2?nickname=XXXX&phone=XXX
    public String getTest2(String nickname,String phone){
        System.out.println("nickname:"+nickname);
        System.out.println("phone:"+phone);
        return "GET请求2";
    }
    @GetMapping("getTest3")
    //地址栏:/getTest3?nickname=xxx
    //加一个required=false代表这个nickname使不使用都可以,但是一旦有了@RequestParam,就不能写成/getTest3?name=xxx(不知道这么理解的对不对)
    public String getTest3(@RequestParam(value = "nickname",required = false) String name){
        System.out.println("nickname:"+name);
        return "GET请求3";
    }
@GetMapping("test/**")
    public String postTest5(){
        return "通配符请求";
    }
PostMapping请求只能通过前端程序或表单发送,可以通过postman查看,但请求参数要放在请求体里;
 @PostMapping("postTest1")
    public String postTest1(){
        return "POST请求1";
    }
    @PostMapping("postTest2")
    //在postman里选择body选项,点击x-www-form-urlencoded,传参数名和参数值。但也可以不选择这个
    //直接在地址栏:/postTest2?username=ccc&password=489
    public String postTest2(String username,String password){
        System.out.println("username:"+username);
        System.out.println("password:"+password);
        return "POST请求2";
    }
    @PostMapping("postTest3")
    //属性名称要保证和前台传来的名称一致
    //创建一个User类,能更好的面向对象
    public String postTest3(User user){
        System.out.println(user.toString());
        return "POST请求3";
    }
    @PostMapping("postTest4")
    //在处理非Content-Type类型(比如json,xml等),需要在参数类型前面加一个@RequestBody
    //注意类中的参数名和参数类型要一致
    public String postTest4(@RequestBody User user){
        System.out.println(user);
        return "POST请求4";
    }

四、SpringBoot文件上传+拦截器
1.静态资源访问
在application.properties中直接定义过滤规则和静态资源位置:
spring.mvc.static-path-pattern=/static/**
spring.web.resources.static-locations=classpath:/static/
过滤规则为/static/**
静态资源位置为classpath:/static/
2.文件上传原理
文件上传时需要有前端对应的表单。
表单的enctype属性规定在发送到服务器之前应该如何对表单数据进行编码。
当表单的enctype="application/x-www-form-urlencoded"(默认)时(最好改成multipart/form-data类型,要不然传不上来),form表单中的数据格式为:key=value&key=value
当表单的enctype="multipart/form-data"时,其传输数据形式如下:
最终放在请求体里传给后端。

3.SpringBoot实现文件上传功能
SpringBoot工程嵌入的tomcat限制了请求的文件大小,每个文件的配置最大为1Mb,单次请求的文件总数不能大于10Mb。
要更改此默认值需要在配置文件(如application.properties)中加入两个配置
spring.servlet.multipart.max-file-size=10MB
spring.servlet.multipart.max-request-size=10MB
当表单的enctype="multipart/form-data"时,可以使用MultipartFile获取上传的文件数据,再通过transferTo方法将其写入到磁盘中。
创建了一个FileUploadController类
package com.example.demo.controller;


import org.springframework.web.bind.annotation.PostMapping;
import org.springframework.web.bind.annotation.RestController;
import org.springframework.web.multipart.MultipartFile;

import javax.servlet.http.HttpServletRequest;
import java.io.File;
import java.io.IOException;

@RestController
public class FileUploadController {
    @PostMapping("upload")
//MultipartFile用于接文件的类型
    public String up(String nickname, MultipartFile photo, HttpServletRequest request)throws IOException{
        System.out.println(nickname);
        //获取图像原始名称
        System.out.println(photo.getOriginalFilename());
        //获取文件类型
        System.out.println(photo.getContentType());
        //这一句可以删除,留着也没事儿
        System.out.println(System.getProperty("user.dir"));
        String path= request.getServletContext().getRealPath("/upload/");
        //每点一次path都是动态变化的,在网页加载不出来时,可以试着在postman重新上传,然后在网页界面刷新
        System.out.println(path);
        saveFile(photo,path);
        return "上传成功";
    }

    private void saveFile(MultipartFile photo, String path) throws IOException{
        //判断存储的目录是否存在,如果不存在则创建
        File dir=new File(path);
        if(!dir.exists()){
            //创建目录
            dir.mkdir();
        }
        //往磁盘里存文件只有路径不行,还需要有文件名称
        File file=new File(path+photo.getOriginalFilename());
        //transferTo的方法来自MultipartFile类
        photo.transferTo(file);
    }
}
因为暂时还没跟前端连接,所以暂时需要postman上传数据,上传的图片会保存在服务器所在路径中,若此路径没有upload文件则新建一个
选择form-data上传参数名和图片
(图片改为file格式后点击上传就好啦)

因为之前在网页中打开图片是直接打开static文件里的内容了,想要更改网页打开图片的路径,需要在application.yml(有的也可能是application.properties)里输入
##第一个斜线代表服务器所在路径
spring.web.resources.static-locations: /upload/
在地址栏再次输入http://localhost:8081/图片名 打开的就是upload路径下的图片啦!
(暂时没搞明白怎么存到D盘且打开)
4.拦截器
拦截器在Web系统中非常常见,对于某些全局统一操作,可以把它提取到拦截器中实现。总结一下,拦截器大致有一下几种使用场景:
- 权限检查:如果登陆检测,进入处理程序检测是否登陆,如果没有,则直接返回登录界面。
- 性能监控:有时系统在某段时间莫名很慢,可通过拦截器在进入处理程序之前记录开始时间,在处理完后记录结束时间,从而得到请求的处理时间
- 通用行为:读取cookie得到用户信息并将用户对象放入请求,从而方便后续流程使用,还有提取Locale、Theme信息等,只要是多个处理程序都需要的,即可使用拦截器实现。
SpringBoot定义了HandlerInterceptor接口来实现自定义拦截器的功能
HandlerInterceptor接口定义了preHandle、postHandle、afterCompletion三种方法,通过重写这三种方法实现请求前、请求后等操作。
先定义一个拦截器类接口接HandlerInterceptor
package com.example.demo.interceptor;

import org.springframework.web.servlet.HandlerInterceptor;

import javax.servlet.http.HttpServletRequest;
import javax.servlet.http.HttpServletResponse;

public class LoginInterceptor implements HandlerInterceptor {
    @Override
    //HttpServletRequest request对应前端的请求; HttpServletResponse response利用前端返回对应信息
    public boolean preHandle(HttpServletRequest request, HttpServletResponse response, Object handler) throws Exception {
        System.out.println("LoginInterceptor");
        return true;
    }
}
再注册拦截器,接口接WebMvcConfigurer,但使用此类需要添加一个注释@Configuration
- addPathPatterns方法定义拦截的地址
- excludePathPatterns定义排除地址不被拦截
- 添加的一个拦截器没有addPathPatterns任何一个url则默认拦截所有请求
- 如果没有excludePathPatterns任何一个请求,则默认不放过任何一个请求。
package com.example.demo.config;

import com.example.demo.interceptor.LoginInterceptor;
import org.springframework.context.annotation.Configuration;
import org.springframework.web.servlet.config.annotation.InterceptorRegistry;
import org.springframework.web.servlet.config.annotation.WebMvcConfigurer;


//WebMvcConfigurer是一个专门用来做配置的类,为了让此类生效需要加一个注解@Configuration
@Configuration
public class WebConfigurer implements WebMvcConfigurer {
    @Override
    public void addInterceptors(InterceptorRegistry registry){
        //拦截所有user下面的请求
        registry.addInterceptor(new LoginInterceptor()).addPathPatterns("/user/**");
    }
}
五、构建RESTful服务+Swagger
1.RESTful介绍
RESTful是目前流行的互联网软件服务架构设计风格。
特点:
- 每个URI代表一种资源
- 客户端使用GET、POST、PUT、DELETE四种表示操作方式的动词对服务端资源进行操作:GET用于获取资源,POST用于新建资源(也可用于更新资源),PUT用于更新资源,DELETE用于删除资源
- 通过操作资源的表现形式来实现服务端请求操作
- 资源的表现形式是JSON或者HTML
- 客户端与服务端之间的交互在请求之间是无状态的,从客户端到服务端的每个请求都包含必须的信息。
2.构建RESTful应用接口
RESTful API
符合RESTful规范的Web API需要具备两个关键特性:
安全性:安全的方法被期望不会产生任何副作用,当我们使用GET操作获取资源时,不会引起资源本身的改变,也不会引起服务器状态的改变。
幂等性:幂等的方法保证了重复进行一个请求和一次请求的效果相同(并不是指相应总是相同的,而是指服务器上资源的状态从第一次请求后就不再改变了),在数学上幂等性是指N次变换和一次变换相同。

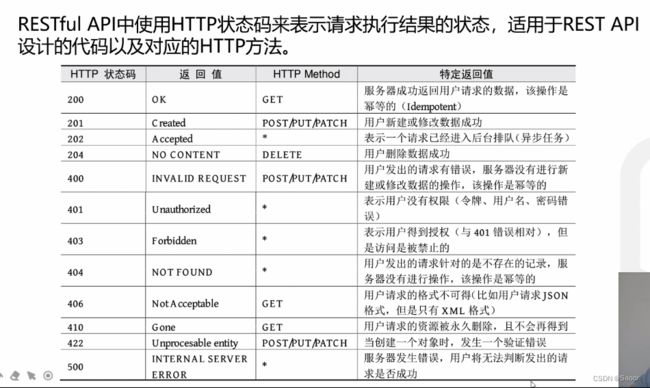
HTTP状态码是服务向用户返回的状态码和提示信息,客户端的每一次请求,服务都必须给出回应,回应包括HTTP状态码和数据两部分。

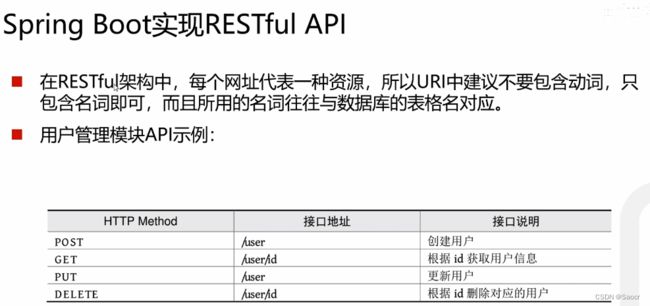
Spring Boot实现RESTful API
@GetMapping:处理GET请求,获取资源
@PostMapping:处理POST请求,新增资源
@PutMapping:处理PUT请求,更新资源
@DeleteMapping:处理DELETE,删除资源
@PatchMapping:处理PATCH请求,用于部分更新资源
package com.example.demo.controller;


import com.example.demo.entity.User;
import io.swagger.annotations.ApiOperation;
import org.springframework.web.bind.annotation.*;

@RestController
public class UserController {
    //如果想得到路径上的参数要在参数前加一个注解@PathVariable,否则拿不到id
    //希望id是通过动态路径传递,则需要加一个{},花括号代表是动态的
    @ApiOperation("获取用户")//添加注解
    @GetMapping("/user/{id}")
    //在地址栏做出了改变,地址栏输入http://localhost:8081/user/10,直接输入id的值即可,而不用带“?”了
    public String getUserById(@PathVariable int id){
        System.out.println(id);
        return "根据ID获取用户";
    }
    @PostMapping("user")
    public String save(User user){
        return "添加新用户";
    }
    @PutMapping("user")
    public String update(User user){
        return "更新用户";
    }
    @DeleteMapping("user/{id}")
    public String deleteById(@PathVariable int id){
        return "根据ID删除用户";
    }
}
3.使用Swagger生成Web API文档
Swagger是一个规范和完整的框架,用于生成、描述、调用和可视化RESTful风格的Web服务,是非常流行的API表达工具;Swagger能够自动化生成完善的RESTful API文档,同时并根据后台代码的修改同步更新,同时提供完整的测试页面来调试API。
在使用Swagger需要在pom中添加两个依赖(已经加好),需要版本的问题,尽量在2.6以下(改好了)
还要有一个基本的配置Swagger2Config
package com.example.demo.config;


import org.springframework.context.annotation.Bean;
import org.springframework.context.annotation.Configuration;
import org.springframework.web.bind.annotation.RestController;
import springfox.documentation.builders.ApiInfoBuilder;
import springfox.documentation.builders.PathSelectors;
import springfox.documentation.builders.RequestHandlerSelectors;
import springfox.documentation.service.ApiInfo;
import springfox.documentation.spi.DocumentationType;
import springfox.documentation.spring.web.plugins.Docket;
import springfox.documentation.swagger2.annotations.EnableSwagger2;

@Configuration//告诉spring容器,这类是一个配置类
@EnableSwagger2//启用Swagger2功能
public class Swagger2Config {
    @Bean
    public Docket createRestApi(){

        return new Docket(DocumentationType.SWAGGER_2)
                .apiInfo(apiInfo()).select()//做基本配置
                .apis(RequestHandlerSelectors.basePackage("com"))//这一步是告诉他要扫描哪个包,com包下所有API都交给Swagger2管理
                .paths(PathSelectors.any())
                .build();
    }
    private ApiInfo apiInfo(){
        return new ApiInfoBuilder().title("演示项目API").version("1.0").description("学习Swagger2的演示文稿").build();//标题、版本、描述都是基本的
    }
}
//http://localhost:8081/swagger-ui.html
启动项目访问 http://localhost:8081/swagger-ui.html,即可打开自动生成的可视化测试页面。可通过此api上传文件。

六、MybatisPlus多表查询及分页查询
1.多表查询(Mybatis)
实现复杂关系映射,可以使用@Results注解、@Result注解、@One注解、@Many注解组合完成复杂关系的配置。

UserController
package com.example.demo.controller; import com.baomidou.mybatisplus.core.conditions.query.QueryWrapper; import com.baomidou.mybatisplus.core.metadata.IPage; import com.baomidou.mybatisplus.extension.plugins.pagination.Page; import com.example.demo.entity.User; import com.example.demo.mapper.Usermapper; import org.springframework.beans.factory.annotation.Autowired; import org.springframework.web.bind.annotation.GetMapping; import org.springframework.web.bind.annotation.PostMapping; import org.springframework.web.bind.annotation.RestController; import java.util.List; @RestController public class UserController { @Autowired Usermapper userMapper; @GetMapping("/user/findAll") public Listfind(){return userMapper.selectAllUserAndOrders();} //条件查询 @GetMapping("/user/find") public List findByCond(){ QueryWrapper queryWrapper=new QueryWrapper(); queryWrapper.eq("username","zhangsan"); return userMapper.selectList(queryWrapper); } //分页查询 @GetMapping("/user/findByPage") public IPage findByPage(){ //设置起始值及每页条数 Page page=new Page<>(0,2);//分别代表从第几条开始取,取几条 IPage iPage=userMapper.selectPage(page,null);//还可以带一个条件 return iPage; } //查询所有用户 @GetMapping("findAll") public IPage findAll(){ //设置起始值及每页条数 Page page=new Page<>(0,2); return userMapper.selectPage(page,null); } //插入数据 @PostMapping("user") public String save(User user){ int r=userMapper.insert(user); if(r>0){ return "插入成功"; }else { return "插入失败"; } } }
OrderController
package com.example.demo.controller;


import com.example.demo.mapper.OrderMapper;
import org.springframework.beans.factory.annotation.Autowired;
import org.springframework.web.bind.annotation.GetMapping;
import org.springframework.web.bind.annotation.RestController;

import java.util.List;

@RestController
public class OrderController {
    @Autowired
    private OrderMapper orderMapper;
    @GetMapping("order/findAll")
    public List findAll(){
        List orders=orderMapper.selectAllOrderAndUser();
        return orders;
    }
}
User
package com.example.demo.entity; import com.baomidou.mybatisplus.annotation.IdType; import com.baomidou.mybatisplus.annotation.TableField; import com.baomidou.mybatisplus.annotation.TableId; import com.baomidou.mybatisplus.annotation.TableName; import java.util.List; @TableName("t_user")//表的名称和用户名称不对应,所以要加一个注解 public class User { @TableId(type = IdType.AUTO) private int id; private String username; private String password; private String birthday; //描述用户的所有订单 @TableField(exist = false)//告诉MybatisPlus此字段在数据库是不存在的,需要自己去映射 private Listorders;//用于描述用户有哪些订单,其中orders字段在表中时不存在的 //alt+insert public int getId() { return id; } public void setId(int id) { this.id = id; } public String getUsername(){ return username; } public void setUsername(String username){ this.username=username; } public String getPassword(){ return password; } public void setPassword(String password){ this.password=password; } public String getBirthday() { return birthday; } public void setBirthday(String birthday) { this.birthday = birthday; } public List getOrders() { return orders; } public void setOrders(List orders) { this.orders = orders; } @Override public String toString() { return "User{id:"+id+"username:"+username+" password:"+password+"birthday:"+birthday+"orders:"+orders+"}"; } }
Order
package com.example.demo.entity;


import com.baomidou.mybatisplus.annotation.TableField;
import com.baomidou.mybatisplus.annotation.TableName;

import java.util.List;

@TableName("t_order")
public class Order {
    private int id;
    private String ordertime;
    private double total;
    private int uid;

    @TableField(exist = false)
    private User user;

    public int getId() {
        return id;
    }

    public void setId(int id) {
        this.id = id;
    }

    public String getOrdertime() {
        return ordertime;
    }

    public void setOrdertime(String ordertime) {
        this.ordertime = ordertime;
    }

    public double getTotal() {
        return total;
    }

    public void setTotal(double total) {
        this.total = total;
    }

    public int getUid() {
        return uid;
    }

    public void setUid(int uid) {
        this.uid = uid;
    }

    @Override
    public String toString() {
        return "Order{id:"+id+"ordertime:"+ordertime+" total:"+total+"uid:"+user+"}";
    }
}
Usermapper
package com.example.demo.mapper; import com.baomidou.mybatisplus.core.mapper.BaseMapper; import com.example.demo.entity.User; import org.apache.ibatis.annotations.*; import java.util.List; @Mapper public interface Usermapper extends BaseMapper{ //查询用户,根据用户id查询信息 @Select("select * from t_user where id=#{id}") User selectById(int id); //查询用户及其所有订单 @Select("select * from t_user") @Results(//若少了这个results则查询是没有意义的.用于结果集的映射。在results内可发多个result,每个result都是参数,为每一个字段进行赋值 { @Result(column="id",property="id"),//column代表表中字段,property代表类里的字段 @Result(column="username",property="username"), @Result(column="password",property="password"), @Result(column = "birthday",property = "birthday"), @Result(column = "id",property = "orders",javaType = List.class,//类型是一个集合 many = @Many(select = "com.example.demo.mapper.OrderMapper.selectByUid") ) } ) List selectAllUserAndOrders(); }
OrderMapper
package com.example.demo.mapper; import com.baomidou.mybatisplus.core.mapper.BaseMapper; import com.example.demo.entity.Order; import com.example.demo.entity.User; import org.apache.ibatis.annotations.*; import java.util.List; @Mapper public interface OrderMapper extends BaseMapper{ @Select("select * from t_order where uid=#{uid}") List selectByUid(int uid); //查询所有的订单,同时查询订单的用户 @Select("select * from t_order") @Results({ @Result(column = "id",property = "id"), @Result(column ="ordertime" ,property ="ordertime" ), @Result(column = "total",property = "total"), @Result(column = "uid",property = "user",javaType = User.class,one = @One(select = "com.example.demo.mapper.Usermapper.selectById")) }) List selectAllOrderAndUser(); }
2.分页查询
需要编写配置文件
tips:如果是3.4.0以前的springboot写法是PaginationInterceptor而不是MybatisPlusInterceptor
MyBatisPlusConfig
package com.example.demo.config;

import com.baomidou.mybatisplus.annotation.DbType;
import com.baomidou.mybatisplus.extension.plugins.MybatisPlusInterceptor;
import com.baomidou.mybatisplus.extension.plugins.inner.PaginationInnerInterceptor;
import org.springframework.context.annotation.Bean;
import org.springframework.context.annotation.Configuration;

@Configuration
public class MyBatisPlusConfig {
    @Bean
    public MybatisPlusInterceptor mybatisPlusInterceptor() {
        MybatisPlusInterceptor interceptor = new MybatisPlusInterceptor();
        interceptor.addInnerInterceptor(new PaginationInnerInterceptor(DbType.MYSQL));
        return interceptor;
    }
}