由浅至深谈谈JUC
JUC并发工具
一、CountDownLatch应用&源码分析
1.1 CountDownLatch介绍
CountDownLatch就是JUC包下的一个工具,整个工具最核心的功能就是计数器。
如果有三个业务需要并行处理,并且需要知道三个业务全部都处理完毕了。
需要一个并发安全的计数器来操作。
CountDownLatch就可以实现。
给CountDownLatch设置一个数值。可以设置3。
每个业务处理完毕之后,执行一次countDown方法,指定的3每次在执行countDown方法时,对3进行-1。
主线程可以在业务处理时,执行await,主线程会阻塞等待任务处理完毕。
当设置的3基于countDown方法减为0之后,主线程就会被唤醒,继续处理后续业务。

当咱们的业务中,出现2个以上允许并行处理的任务,并且需要在任务都处理完毕后,再做其他处理时,可以采用CountDownLatch去实现这个功能。
1.2 CountDownLatch应用
模拟有三个任务需要并行处理,在三个任务全部处理完毕后,再执行后续操作
CountDownLatch中,执行countDown方法,代表一个任务结束,对计数器 - 1
执行await方法,代表等待计数器变为0时,再继续执行
执行await(time,unit)方法,代表等待time时长,如果计数器不为0,返回false,如果在等待期间,计数器为0,方法就返回true
一般CountDownLatch更多的是基于业务去构建,不采用成员变量。
static ThreadPoolExecutor executor = (ThreadPoolExecutor) Executors.newFixedThreadPool(3);

static CountDownLatch countDownLatch = new CountDownLatch(3);

public static void main(String[] args) throws InterruptedException {
    System.out.println("主业务开始执行");
    sleep(1000);
    executor.execute(CompanyTest::a);
    executor.execute(CompanyTest::b);
    executor.execute(CompanyTest::c);
    System.out.println("三个任务并行执行,主业务线程等待");
    // 死等任务结束
    // countDownLatch.await();
    // 如果在规定时间内,任务没有结束,返回false
    if (countDownLatch.await(10, TimeUnit.SECONDS)) {
        System.out.println("三个任务处理完毕,主业务线程继续执行");
    }else{
        System.out.println("三个任务没有全部处理完毕,执行其他的操作");
    }
}

private static void a() {
    System.out.println("A任务开始");
    sleep(1000);
    System.out.println("A任务结束");
    countDownLatch.countDown();
}
private static void b() {
    System.out.println("B任务开始");
    sleep(1500);
    System.out.println("B任务结束");
    countDownLatch.countDown();
}
private static void c() {
    System.out.println("C任务开始");
    sleep(2000);
    System.out.println("C任务结束");
    countDownLatch.countDown();
}

private static void sleep(long timeout){
    try {
        Thread.sleep(timeout);
    } catch (InterruptedException e) {
        e.printStackTrace();
    }
}
1.3 CountDownLatch源码分析
保证CountDownLatch就是一个计数器,没有什么特殊的功能,查看源码也只是查看计数器实现的方式
发现CountDownLatch的内部类Sync继承了AQS,CountDownLatch就是基于AQS实现的计数器。
AQS就是一个state属性,以及AQS双向链表
猜测计数器的数值实现就是基于state去玩的。
主线程阻塞的方式,也是阻塞在了AQS双向链表中。
1.3.1 有参构造
就是构建内部类Sync,并且给AQS中的state赋值
// CountDownLatch的有参构造
public CountDownLatch(int count) {
    // 健壮性校验
    if (count < 0) throw new IllegalArgumentException("count < 0");
    // 构建内部类,Sync传入count
    this.sync = new Sync(count);
}

// AQS子类,Sync的有参构造
Sync(int count) {
    // 就是给AQS中的state赋值
    setState(count);
}
1.3.2 await方法
await方法就时判断当前CountDownLatch中的state是否为0,如果为0,直接正常执行后续任务
如果不为0,以共享锁的方式,插入到AQS的双向链表,并且挂起线程
// 一般主线程await的方法,阻塞主线程,等待state为0
public void await() throws InterruptedException {
    sync.acquireSharedInterruptibly(1);
}

// 执行了AQS的acquireSharedInterruptibly方法
public final void acquireSharedInterruptibly(int arg) throws InterruptedException {
    // 判断线程是否中断,如果中断标记位是true,直接抛出异常
    if (Thread.interrupted())
        throw new InterruptedException();
    if (tryAcquireShared(arg) < 0)
        // 共享锁挂起的操作
        doAcquireSharedInterruptibly(arg);
}

// tryAcquireShared在CountDownLatch中的实现
protected int tryAcquireShared(int acquires) {
    // 查看state是否为0,如果为0,返回1,不为0,返回-1
    return (getState() == 0) ? 1 : -1;
}

private void doAcquireSharedInterruptibly(int arg) throws InterruptedException {
    // 封装当前先成为Node,属性为共享锁
    final Node node = addWaiter(Node.SHARED);
    boolean failed = true;
    try {
        for (;;) {
            final Node p = node.predecessor();
            if (p == head) {
                int r = tryAcquireShared(arg);
                if (r >= 0) {
                    setHeadAndPropagate(node, r);
                    p.next = null; // help GC
                    failed = false;
                    return;
                }
            }
            // 在这,就需要挂起当前线程。
            if (shouldParkAfterFailedAcquire(p, node) &&
                parkAndCheckInterrupt())
                throw new InterruptedException();
        }
    } finally {
        if (failed)
            cancelAcquire(node);
    }
}
1.3.3 countDown方法
countDown方法本质就是对state - 1,如果state - 1后变为0,需要去AQS的链表中唤醒挂起的节点
// countDown对计数器-1
public void countDown() {
    // 是-1。
    sync.releaseShared(1);
}

// AQS提供的功能
public final boolean releaseShared(int arg) {
    // 对state - 1
    if (tryReleaseShared(arg)) {
        // state - 1后,变为0,执行doReleaseShared
        doReleaseShared();
        return true;
    }
    return false;
}
// CountDownLatch的tryReleaseShared实现
protected boolean tryReleaseShared(int releases) {
    // 死循环是为了避免CAS并发问题
    for (;;) {
        // 获取state
        int c = getState();
        // state已经为0,直接返回false
        if (c == 0)
            return false;
        // 对获取到的state - 1
        int nextc = c-1;
        // 基于CAS的方式,将值赋值给state
        if (compareAndSetState(c, nextc))
            // 赋值完,发现state为0了。此时可能会有线程在await方法处挂起,那边挂起,需要这边唤醒
            return nextc == 0;
    }
}

// 如何唤醒在await方法处挂起的线程
private void doReleaseShared() {
    // 死循环
    for (;;) {
        // 拿到head
        Node h = head;
        // head不为null,有值,并且head != tail,代表至少2个节点
        // 一个虚拟的head,加上一个实质性的Node
        if (h != null && h != tail) {
            // 说明AQS队列中有节点
            int ws = h.waitStatus;
            // 如果head节点的状态为 -1.
            if (ws == Node.SIGNAL) {
                // 先对head节点将状态从-1,修改为0,避免重复唤醒的情况
                if (!compareAndSetWaitStatus(h, Node.SIGNAL, 0))
                    continue;
                // 正常唤醒节点即可,先看head.next,能唤醒就唤醒,如果head.next有问题,从后往前找有效节点
                unparkSuccessor(h);
            }
            // 会在Semaphore中谈到这个位置
            else if (ws == 0 &&
                     !compareAndSetWaitStatus(h, 0, Node.PROPAGATE))
                continue;
        }
        // 会在Semaphore中谈到这个位置
        if (h == head)
            break;
    }
}
二、CyclicBarrier应用&源码分析
2.1 CyclicBarrier介绍
从名字上来看CyclicBarrier,就是代表循环屏障
Barrier屏障:让一个或多个线程达到一个屏障点,会被阻塞。屏障点会有一个数值,当达到一个线程阻塞在屏障点时,就会对屏障点的数值进行-1操作,当屏障点数值减为0时,屏障就会打开,唤醒所有阻塞在屏障点的线程。在释放屏障点之后,可以先执行一个任务,再让所有阻塞被唤醒的线程继续之后后续任务。
Cyclic循环:所有线程被释放后,屏障点的数值可以再次被重置。
CyclicBarrier一般被称为栅栏。
CyclicBarrier是一种同步机制,允许一组线程互相等待。现成的达到屏障点其实是基于await方法在屏障点阻塞。
CyclicBarrier并没有基于AQS实现,他是基于ReentrantLock锁的机制去实现了对屏障点–,以及线程挂起的操作。(CountDownLatch本身是基于AQS,对state进行release操作后,可以-1)
CyclicBarrier没来一个线程执行await,都会对屏障数值进行-1操作,每次-1后,立即查看数值是否为0,如果为0,直接唤醒所有的互相等待线程。
CyclicBarrier对比CountDownLatch区别
- 底层实现不同。CyclicBarrier基于ReentrantLock做的。CountDownLatch直接基于AQS做的。
- 应用场景不同。CountDownLatch的计数器只能使用一次。而CyclicBarrier在计数器达到0之后,可以重置计数器。CyclicBarrier可以实现相比CountDownLatch更复杂的业务,执行业务时出现了错误,可以重置CyclicBarrier计数器,再次执行一次。
- CyclicBarrier还提供了很多其他的功能:
- 可以获取到阻塞的现成有多少
- 在线程互相等待时,如果有等待的线程中断,可以抛出异常,避免无限等待的问题。
- CountDownLatch一般是让主线程等待,让子线程对计数器–。CyclicBarrier更多的让子线程也一起计数和等待,等待的线程达到数值后,再统一唤醒
CyclicBarrier:多个线程互相等待,直到到达同一个同步点,再一次执行。
2.2 CyclicBarrier应用
出国旅游。
导游小姐姐需要等待所有乘客都到位后,发送护照,签证等等文件,再一起出发
比如Tom,Jack,Rose三个人组个团出门旅游
在构建CyclicBarrier可以指定barrierAction,可以选择性指定,如果指定了,那么会在barrier归0后,优先执行barrierAction任务,然后再去唤醒所有阻塞挂起的线程,并行去处理后续任务。
所有互相等待的线程,可以指定等待时间,并且在等待的过程中,如果有线程中断,所有互相的等待的线程都会被唤醒。
如果在等待期间,有线程中断了,唤醒所有线程后,CyclicBarrier无法继续使用。
如果线程中断后,需要继续使用当前的CyclicBarrier,需要调用reset方法,让CyclicBarrier重置。
如果CyclicBarrier的屏障数值到达0之后,他默认会重置屏障数值,CyclicBarrier在没有线程中断时,是可以重复使用的。
public static void main(String[] args) throws InterruptedException {
    CyclicBarrier barrier = new CyclicBarrier(3,() -> {
        System.out.println("等到各位大佬都到位之后,分发护照和签证等内容!");
    });

    new Thread(() -> {
        System.out.println("Tom到位!!!");
        try {
            barrier.await();
        } catch (Exception e) {
            System.out.println("悲剧,人没到齐!");
            return;
        }
        System.out.println("Tom出发!!!");
    }).start();
    Thread.sleep(100);
    new Thread(() -> {
        System.out.println("Jack到位!!!");
        try {
            barrier.await();
        } catch (Exception e) {
            System.out.println("悲剧,人没到齐!");
            return;
        }
        System.out.println("Jack出发!!!");
    }).start();
    Thread.sleep(100);
    new Thread(() -> {
        System.out.println("Rose到位!!!");
        try {
            barrier.await();
        } catch (Exception e) {
            System.out.println("悲剧,人没到齐!");
            return;
        }
        System.out.println("Rose出发!!!");
    }).start();
    /*
    tom到位,jack到位,rose到位
    导游发签证
    tom出发,jack出发,rose出发
     */

}
2.3 CyclicBarrier源码分析
分成两块内容去查看,首先查看CyclicBarrier的一些核心属性,然后再查看CyclicBarrier的核心方法
2.3.1 CyclicBarrier的核心属性
public class CyclicBarrier {
   // 这个静态内部类是用来标记是否中断的
    private static class Generation {
        boolean broken = false;
    }

    /** CyclicBarrier是基于ReentrantLock实现的互斥操作,以及计数原子性操作 */
    private final ReentrantLock lock = new ReentrantLock();
    /** 基于当前的Condition实现线程的挂起和唤醒 */
    private final Condition trip = lock.newCondition();
    /** 记录有参构造传入的屏障数值,不会对这个数值做操作 */
    private final int parties;
    /** 当屏障数值达到0之后,优先执行当前任务  */
    private final Runnable barrierCommand;
    /** 初始化默认的Generation,用来标记线程中断情况 */
    private Generation generation = new Generation();
    /** 每来一个线程等待,就对count进行-- */
    private int count;
}
2.3.2 CyclicBarrier的有参构造
掌握构建CyclicBarrier之后,内部属性的情况
// 这个是CyclicBarrier的有参构造
// 在内部传入了parties,屏障点的数值
// 还传入了barrierAction,屏障点的数值达到0,优先执行barrierAction任务
public CyclicBarrier(int parties, Runnable barrierAction) {
    // 健壮性判
    if (parties <= 0) throw new IllegalArgumentException();
    // 当前类中的属性parties是保存屏障点数值的
    this.parties = parties;
    // 将parties赋值给属性count,每来一个线程,继续count做-1操作。
    this.count = parties;
    // 优先执行的任务
    this.barrierCommand = barrierAction;
}
2.3.3 CyclicBarrier中的await方法
在CyclicBarrier中,提供了2个await方法
- 第一个是无参的方式,线程要死等,直屏障点数值为0,或者有线程中断
- 第二个是有参方式,传入等待的时间,要么时间到位了,要不就是直屏障点数值为0,或者有线程中断
无论是哪种await方法,核心都在于内部调用的dowait方法
dowait方法主要包含了线程互相等待的逻辑,以及屏障点数值到达0之后的操作
// 包含了线程互相等到的逻辑,以及屏障点数值到达0后的操作
private int dowait(boolean timed, long nanos)throws
            // 当前新编程中断,抛出这个异常
            InterruptedException,
            // 其他线程中断,当前线程抛出这个异常
            BrokenBarrierException,
            // await时间到位,抛出这个异常
            TimeoutException {
    // 加锁
    final ReentrantLock lock = this.lock;
    lock.lock();
    try {
        // 拿到Generation对象的引用
        final Generation g = generation;

        // 判断下线程中断了么?如果中断了,直接抛出异常
        if (g.broken)
            throw new BrokenBarrierException();

        // 当前线程中断了么?
        if (Thread.interrupted()) {
            // 做了三个实现,
            // 设置broken为true,将count重置,唤醒其他等待的线程
            breakBarrier();
            // 抛出异常
            throw new InterruptedException();
        }

        // 屏障点做--
        int index = --count;
        // 如果屏障点为0,打开屏障啦!!
        if (index == 0) {
            // 标记
            boolean ranAction = false;
            try {
                // 拿到有参构造中传递的任务
                final Runnable command = barrierCommand;
                // 任务不为null,优先执行当前任务
                if (command != null)
                    command.run();
                // 上述任务执行没问题,标记位设置为true
                ranAction = true;
                // 执行nextGeneration
                // 唤醒所有线程,重置count,重置generation
                nextGeneration();
                return 0;
            } finally {
                // 如果优先执行的任务出了问题i,就直接抛出异常
                if (!ranAction)
                    breakBarrier();
            }
        }

        // 死循环
        for (;;) {
            try {
                //  如果调用await方法,死等
                if (!timed)
                    trip.await();
                // 如果调用await(time,unit),基于设置的nans时长决定await的时长
                else if (nanos > 0L)
                    nanos = trip.awaitNanos(nanos);
            } catch (InterruptedException ie) {
                // 到这,说明线程被中断了
                // 查看generation有没有被重置。
                // 并且当前broken为false,需要做线程中断后的操作。
                if (g == generation && ! g.broken) {
                    breakBarrier();
                    throw ie;
                } else {
                    Thread.currentThread().interrupt();
                }
            }
            // 是否是中断唤醒,是就抛异常。
            if (g.broken)
                throw new BrokenBarrierException();
            // 说明被reset了,返回index的数值。或者任务完毕也会被重置
            if (g != generation)
                return index;
            // 指定了等待的时间内,没有等到所有线程都到位
            if (timed && nanos <= 0L) {
                // 中断任务
                breakBarrier();
                // 抛出异常
                throw new TimeoutException();
            }
        }
    } finally {
        lock.unlock();
    }
}
三、Semaphone应用&源码分析
3.1 Semaphore介绍
sync,ReentrantLock是互斥锁,保证一个资源同一时间只允许被一个线程访问
Semaphore(信号量)保证1个或多个资源可以被指定数量的线程同时访问
底层实现是基于AQS去做的。
Semaphore底层也是基于AQS的state属性做一个计数器的维护。state的值就代表当前共享资源的个数。如果一个线程需要获取的1或多个资源,直接查看state的标识的资源个数是否足够,如果足够的,直接对state - 1拿到当前资源。如果资源不够,当前线程就需要挂起等待。知道持有资源的线程释放资源后,会归还给Semaphore中的state属性,挂起的线程就可以被唤醒。
Semaphore也分为公平和非公平的概念。
使用场景:连接池对象就可以基础信号量去实现管理。在一些流量控制上,也可以采用信号量去实现。再比如去迪士尼或者是环球影城,每天接受的人流量是固定的,指定一个具体的人流量,可能接受10000人,每有一个人购票后,就对信号量进行–操作,如果信号量已经达到了0,或者是资源不足,此时就不能买票。
3.2 Semaphore应用
以上面环球影城每日人流量为例子去测试一下。
public static void main(String[] args) throws InterruptedException {
    // 今天环球影城还有人个人流量
    Semaphore semaphore = new Semaphore(10);

    new Thread(() -> {
        System.out.println("一家三口要去~~");
        try {
            semaphore.acquire(3);
            System.out.println("一家三口进去了~~~");
            Thread.sleep(10000);
        } catch (InterruptedException e) {
            e.printStackTrace();
        }finally {
            System.out.println("一家三口走了~~~");
            semaphore.release(3);
        }
    }).start();

    for (int i = 0; i < 7; i++) {
        int j = i;
        new Thread(() -> {
            System.out.println(j + "大哥来了。");
            try {
                semaphore.acquire();
                System.out.println(j + "大哥进去了~~~");
                Thread.sleep(10000);
            } catch (InterruptedException e) {
                e.printStackTrace();
            }finally {
                System.out.println(j + "大哥走了~~~");
                semaphore.release();
            }
        }).start();
    }

    Thread.sleep(10);

    System.out.println("main大哥来了。");
    if (semaphore.tryAcquire()) {
        System.out.println("main大哥进来了。");
    }else{
        System.out.println("资源不够,main大哥进来了。");
    }
    Thread.sleep(10000);

    System.out.println("main大哥又来了。");
    if (semaphore.tryAcquire()) {
        System.out.println("main大哥进来了。");
        semaphore.release();
    }else{
        System.out.println("资源不够,main大哥进来了。");
    }
}
其实Semaphore整体就是对构建Semaphore时,指定的资源数的获取和释放操作
获取资源方式:
- acquire():获取一个资源,没有资源就挂起等待,如果中断,直接抛异常
- acquire(int):获取指定个数资源,资源不够,或者没有资源就挂起等待,如果中断,直接抛异常
- tryAcquire():获取一个资源,没有资源返回false,有资源返回true
- tryAcquire(int):获取指定个数资源,没有资源返回false,有资源返回true
- tryAcquire(time,unit):获取一个资源,如果没有资源,等待time.unit,如果还没有,就返回false
- tryAcquire(int,time,unit):获取指定个数资源,如果没有资源,等待time.unit,如果还没有,就返回false
- acquireUninterruptibly():获取一个资源,没有资源就挂起等待,中断线程不结束,继续等
- acquireUninterruptibly(int):获取指定个数资源,没有资源就挂起等待,中断线程不结束,继续等
归还资源方式:
- release():归还一个资源
- release(int):归还指定个数资源
3.3 Semaphore源码分析
先查看Semaphore的整体结构,然后基于获取资源,以及归还资源的方式去查看源码
3.3.1 Semaphore的整体结构
Semaphore内部有3个静态内类。
首先是向上抽取的Sync
其次还有两个Sync的子类NonFairSync以及FairSync两个静态内部类
Sync内部主要提供了一些公共的方法,并且将有参构造传入的资源个数,直接基于AQS提供的setState方法设置了state属性。
NonFairSync以及FairSync区别就是tryAcquireShared方法的实现是不一样。
3.3.2 Semaphore的非公平的获取资源
在构建Semaphore的时候,如果只设置资源个数,默认情况下是非公平。
如果在构建Semaphore,传入了资源个数以及一个boolean时,可以选择非公平还是公平。
public Semaphore(int permits, boolean fair) {
        sync = fair ? new FairSync(permits) : new NonfairSync(permits);
    }
从非公平的acquire方法入手
首先确认默认获取资源数是1个,并且acquire是允许中断线程时,抛出异常的。获取资源的方式,就是直接用state - 需要的资源数,只要资源足够,就CAS的将state做修改。如果没有拿到锁资源,就基于共享锁的方式去将当前线程挂起在AQS双向链表中。如果基于doAcquireSharedInterruptibly拿锁成功,会做一个事情。会执行setHeadAndPropagate方法。一会说
// 信号量的获取资源方法(默认获取一个资源)
public void acquire() throws InterruptedException {
    // 跳转到了AQS中提供共享锁的方法
    sync.acquireSharedInterruptibly(1);
}

// AQS提供的
public final void acquireSharedInterruptibly(int arg) throws InterruptedException {
    // 判断线程的中断标记位,如果已经中断,直接抛出异常
    if (Thread.interrupted())
        throw new InterruptedException();
    // 先看非公平的tryAcquireShared实现。
    // tryAcquireShared:
    //     返回小于0,代表获取资源失败,需要排队。
    //     返回大于等于0,代表获取资源成功,直接执行业务代码
    if (tryAcquireShared(arg) < 0)
        doAcquireSharedInterruptibly(arg);
}

// 信号量的非公平获取资源方法
final int nonfairTryAcquireShared(int acquires) {
    // 死循环。
    for (;;) {
        // 获取state的数值,剩余的资源个数
        int available = getState();
        // 剩余的资源个数 - 需要的资源个数
        int remaining = available - acquires;
        // 如果-完后,资源个数小于0,直接返回这个负数
        if (remaining < 0 ||
            // 说明资源足够,基于CAS的方式,将state从原值,改为remaining
            compareAndSetState(available, remaining))
            return remaining;
    }
}
// 获取资源失败,资源不够,当前线程需要挂起等待
private void doAcquireSharedInterruptibly(int arg) throws InterruptedException {
    // 构建Node节点,线程和共享锁标记,并且到AQS双向链表中
    final Node node = addWaiter(Node.SHARED);
    boolean failed = true;
    try {
        for (;;) {
            // 拿到上一个节点
            final Node p = node.predecessor();
            // 如果是head.next,就抢一手
            if (p == head) {
                // 再次基于非公平的方式去获取一次资源
                int r = tryAcquireShared(arg);
                // 到这,说明拿到了锁资源
                if (r >= 0) {
                    setHeadAndPropagate(node, r);
                    p.next = null;
                    failed = false;
                    return;
                }
            }
            // 如果上面没拿到,或者不是head的next节点,将前继节点的状态改为-1,并挂起当前线程
            if (shouldParkAfterFailedAcquire(p, node) && parkAndCheckInterrupt())
                // 如果线程中断会抛出异常
                throw new InterruptedException();
        }
    } finally {
        if (failed)
            cancelAcquire(node);
    }
}
acquire()以及acquire(int)的方式,都是执行acquireSharedInterruptibly方法去尝试获取资源,区别只在于是否传入了需要获取的资源个数。
tryAcquire()以及tryAcquire(int因为这两种方法是直接执行tryAcquire,只使用非公平的实现,只有非公平的情况下,才有可能在有线程排队的时候获取到资源
但是tryAcquire(int,time,unit)这种方法是正常走的AQS提供的acquire。因为这个tryAcquire可以排队一会,即便是公平锁也有可能拿到资源。这里的挂起和acquire挂起的区别仅仅是挂起的时间问题。
- acquire是一直挂起直到线程中断,或者线程被唤醒。
- tryAcquire(int,time,unit)是挂起一段时间,直到线程中断,要么线程被唤醒,要么阻塞时间到了
还有acquireUninterruptibly()以及acquireUninterruptibly(int)只是在挂起线程后,不会因为线程的中断而去抛出异常
3.3.3 Semaphore公平实现
公平与非公平只是差了一个方法的实现tryAcquireShared实现
这个方法的实现中,如果是公平实现,需要先查看AQS中排队的情况
// 信号量公平实现
protected int tryAcquireShared(int acquires) {
    // 死循环。
    for (;;) {
        // 公平实现在走下述逻辑前,先判断队列中排队的情况
        // 如果没有排队的节点,直接不走if逻辑
        // 如果有排队的节点,发现当前节点处在head.next位置,直接不走if逻辑
        if (hasQueuedPredecessors())
            return -1;

        // 下面这套逻辑和公平实现是一模一样的。
        int available = getState();
        int remaining = available - acquires;
        if (remaining < 0 ||
            compareAndSetState(available, remaining))
            return remaining;
    }
}
3.3.4 Semaphore释放资源
因为信号量从头到尾都是共享锁的实现……
释放资源操作,不区分公平和非公平
// 信号量释放资源的方法入口
public void release() {
    sync.releaseShared(1);
}

// 释放资源不分公平和非公平,都走AQS的releaseShared
public final boolean releaseShared(int arg) {
    // 优先查看tryReleaseShared,这个方法是信号量自行实现的。
    if (tryReleaseShared(arg)) {
        // 只要释放资源成功,执行doReleaseShared,唤醒AQS中排队的线程,去竞争Semaphore的资源
        doReleaseShared();
        return true;
    }
    return false;
}

// 信号量实现的释放资源方法
protected final boolean tryReleaseShared(int releases) {
    // 死循环
    for (;;) {
        // 拿到当前的state
        int current = getState();
        // 将state + 归还的资源个数,新的state要被设置为next
        int next = current + releases;
        // 如果归还后的资源个数,小于之前的资源数。
        // 避免出现归还资源后,导致next为负数,需要做健壮性判断
        if (next < current)
            throw new Error("Maximum permit count exceeded");
        // CAS操作,保证原子性,只会有一个线程成功的就之前的state修改为next
        if (compareAndSetState(current, next))
            return true;
    }
}
3.4 AQS中PROPAGATE节点
为了更好的了解PROPAGATE节点状态的意义,优先从JDK1.5去分析一下释放资源以及排队后获取资源的后置操作
3.4.1 掌握JDK1.5-Semaphore执行流程图
首先查看4个线程获取信号量资源的情况

往下查看释放资源的过程会触发什么问题
首先t1释放资源,做了进一步处理
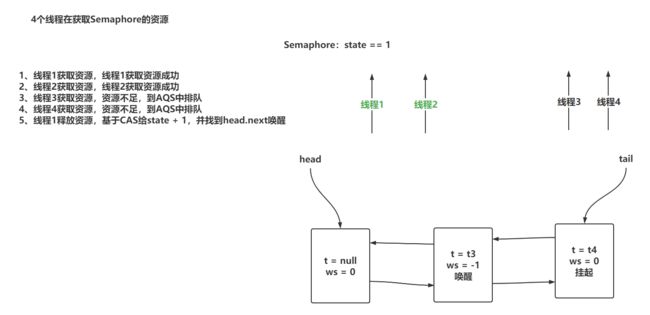
当线程3获取锁资源后,线程2再次释放资源,因为执行点问题,导致线程4无法被唤醒
3.4.2 分析JDK1.8的变化

====================================JDK1.5实现============================================.
public final boolean releaseShared(int arg) {
    if (tryReleaseShared(arg)) {
        Node h = head;
        if (h != null && h.waitStatus != 0)
            unparkSuccessor(h);
        return true;
    }
    return false;
}


private void setHeadAndPropagate(Node node, int propagate) {
    setHead(node);
    if (propagate > 0 && node.waitStatus != 0) {
        Node s = node.next;
        if (s == null || s.isShared())
            unparkSuccessor(node);
    }
}

====================================JDK1.8实现============================================.
public final boolean releaseShared(int arg) {
    if (tryReleaseShared(arg)) {
        doReleaseShared();
        return true;
    }
    return false;
}
private void doReleaseShared() {
    for (;;) {
        // 拿到head节点
        Node h = head;
        // 判断AQS中有排队的Node节点
        if (h != null && h != tail) {
            // 拿到head节点的状态
            int ws = h.waitStatus;
            // 状态为-1
            if (ws == Node.SIGNAL) {
                // 将head节点的状态从-1,改为0
                if (!compareAndSetWaitStatus(h, Node.SIGNAL, 0))
                    continue;
                // 唤醒后继节点
                unparkSuccessor(h);
            }
            // 发现head状态为0,将head状态从0改为-3,目的是为了往后面传播
            else if (ws == 0 &&
                     !compareAndSetWaitStatus(h, 0, Node.PROPAGATE))
                continue;                // loop on failed CAS
        }
        // 没有并发的时候。head节点没变化,正常完成释放排队的线程
        if (h == head)
            break;
    }
}

private void setHeadAndPropagate(Node node, int propagate) {
    // 拿到head
    Node h = head;
    // 将线程3的Node设置为新的head
    setHead(node);
    // 如果propagate 大于0,代表还有剩余资源,直接唤醒后续节点,如果不满足,也需要继续往后判断看下是否需要传播
    // h == null:看成健壮性判断即可
    // 之前的head节点状态为负数,说明并发情况下,可能还有资源,需要继续向后唤醒Node
    // 如果当前新head节点的状态为负数,继续释放后续节点
    if (propagate > 0 || h == null || h.waitStatus < 0 || (h = head) == null || h.waitStatus < 0) {
        // 唤醒当前节点的后继节点
        Node s = node.next;
        if (s == null || s.isShared())
            doReleaseShared();
    }
}
异步编程
一、FutureTask应用&源码分析
1.1 FutureTask介绍
FutureTask是一个可以取消异步任务的类。FutureTask对Future做的一个基本实现。可以调用方法区开始和取消一个任务。
一般是配合Callable去使用。
异步任务启动之后,可以获取一个绑定当前异步任务的FutureTask。
可以基于FutureTask的方法去取消任务,查看任务是否结果,以及获取任务的返回结果。
FutureTask内部的整体结构中,实现了RunnableFuture的接口,这个接口又继承了Runnable, Future这个两个接口。所以FutureTask也可以作为任务直接交给线程池去处理。
1.2 FutureTask应用
大方向是FutureTask对任务的控制:
- 任务执行过程中状态的控制
- 任务执行完毕后,返回结果的获取
FutureTask的任务在执行run方法后,是无法被再次运行,需要使用runAndReset方法才可以。
public static void main(String[] args) throws InterruptedException {
    // 构建FutureTask,基于泛型执行返回结果类型
    // 在有参构造中,声明Callable或者Runnable指定任务
    FutureTask<String> futureTask = new FutureTask<>(() -> {
        System.out.println("任务开始执行……");
        Thread.sleep(2000);
        System.out.println("任务执行完毕……");
        return "OK!";
    });

    // 构建线程池
    ExecutorService service = Executors.newFixedThreadPool(10);

    // 线程池执行任务
    service.execute(futureTask);

    // futureTask提供了run方法,一般不会自己去调用run方法,让线程池去执行任务,由线程池去执行run方法
    // run方法在执行时,是有任务状态的。任务已经执行了,再次调用run方法无效的。
    // 如果希望任务可以反复被执行,需要去调用runAndReset方法
//        futureTask.run();

    // 对返回结果的获取,类似阻塞队列的poll方法
    // 如果在指定时间内,没有拿到方法的返回结果,直接扔TimeoutException
//        try {
//            String s = futureTask.get(3000, TimeUnit.MILLISECONDS);
//            System.out.println("返回结果:" + s);
//        } catch (Exception e) {
//            System.out.println("异常返回:" + e.getMessage());
//            e.printStackTrace();
//        }

    // 对返回结果的获取,类似阻塞队列的take方法,死等结果
//        try {
//            String s = futureTask.get();
//            System.out.println("任务结果:" + s);
//        } catch (ExecutionException e) {
//            e.printStackTrace();
//        }

    // 对任务状态的控制
//        System.out.println("任务结束了么?:" + futureTask.isDone());
//        Thread.sleep(1000);
//        System.out.println("任务结束了么?:" + futureTask.isDone());
//        Thread.sleep(1000);
//        System.out.println("任务结束了么?:" + futureTask.isDone());
}
1.3 FutureTask源码分析
看FutureTask的源码,要从几个方向去看:
- 先查看FutureTask中提供的一些状态
- 在查看任务的执行过程
1.3.1 FutureTask中的核心属性
清楚任务的流转流转状态是怎样的,其次对于核心属性要追到是干嘛的。
/**
 FutureTask的核心属性
 FutureTask任务的状态流转
 * NEW -> COMPLETING -> NORMAL           任务正常执行,并且返回结果也正常返回
 * NEW -> COMPLETING -> EXCEPTIONAL      任务正常执行,但是结果是异常
 * NEW -> CANCELLED                      任务被取消
 * NEW -> INTERRUPTING -> INTERRUPTED    任务被中断
 */
// 记录任务的状态
private volatile int state;
// 任务被构建之后的初始状态
private static final int NEW          = 0;
private static final int COMPLETING   = 1;
private static final int NORMAL       = 2;
private static final int EXCEPTIONAL  = 3;
private static final int CANCELLED    = 4;
private static final int INTERRUPTING = 5;
private static final int INTERRUPTED  = 6;

/** 需要执行任务,会被赋值到这个属性 */
private Callable<V> callable;
/** 任务的任务结果要存储在这几个属性中 */
private Object outcome; // non-volatile, protected by state reads/writes
/** 执行任务的线程 */
private volatile Thread runner;
/** 等待返回结果的线程Node对象, */
private volatile WaitNode waiters;
static final class WaitNode {
    volatile Thread thread;
    volatile WaitNode next;
    WaitNode() { thread = Thread.currentThread(); }
}
1.3.2 FutureTask的run方法
任务执行前的一些判断,以及调用任务封装结果的方式,还有最后的一些后续处理
// 当线程池执行FutureTask任务时,会调用的方法
public void run() {
    // 如果当前任务状态不是NEW,直接return告辞
    if (state != NEW ||
        // 如果状态正确是NEW,这边需要基于CAS将runner属性设置为当前线程
        // 如果CAS失败,直接return告辞
        !UNSAFE.compareAndSwapObject(this, runnerOffset, null, Thread.currentThread()))
        return;

    try {
        // 将要执行的任务拿到
        Callable<V> c = callable;
        // 健壮性判断,保证任务不是null
        // 再次判断任务的状态是NEW(DCL)
        if (c != null && state == NEW) {
            // 执行任务
            // result:任务的返回结果
            // ran:如果为true,任务正常结束。 如果为false,任务异常结束。
            V result;
            boolean ran;
            try {
                // 执行任务
                result = c.call();
                // 正常结果,ran设置为true
                ran = true;
            } catch (Throwable ex) {
                // 如果任务执行期间出了异常
                // 返回结果置位null
                result = null;
                // ran设置为false
                ran = false;
                // 封装异常结果
                setException(ex);
            }
            if (ran)
                // 封装正常结果
                set(result);
        }
    } finally {
        // 将执行任务的线程置位null
        runner = null;
        // 拿到任务的状态
        int s = state;
        // 如果状态大于等于INTERRUPTING
        if (s >= INTERRUPTING)
            // 进来代表任务中断,做一些后续处理
            handlePossibleCancellationInterrupt(s);
    }
}
1.3.3 FutureTask的set&setException方法
任务执行完毕后,修改任务的状态以及封装任务的结果
// 没有异常的时候,正常返回结果
protected void set(V v) {
    // 因为任务执行完毕,需要将任务的状态从NEW,修改为COMPLETING
    if (UNSAFE.compareAndSwapInt(this, stateOffset, NEW, COMPLETING)) {
        // 将返回结果赋值给 outcome 属性
        outcome = v;
        // 将任务状态变为NORMAL,正常结束
        UNSAFE.putOrderedInt(this, stateOffset, NORMAL);
        // 一会再说……
        finishCompletion();
    }
}

// 任务执行期间出现了异常,这边要封装结果
protected void setException(Throwable t) {
    // 因为任务执行完毕,需要将任务的状态从NEW,修改为COMPLETING
    if (UNSAFE.compareAndSwapInt(this, stateOffset, NEW, COMPLETING)) {
        // 将异常信息封装到 outcome 属性
        outcome = t;
        // 将任务状态变为EXCEPTIONAL,异常结束
        UNSAFE.putOrderedInt(this, stateOffset, EXCEPTIONAL);
        // 一会再说……
        finishCompletion();
    }
}
1.3.4 FutureTask的cancel方法
任务取消的一个方式
- 任务直接从NEW状态转换为CANCEL
- 任务从NEW状态变成INTERRUPTING,然后再转换为INTERRUPTED
// 取消任务操作
public boolean cancel(boolean mayInterruptIfRunning) {
    // 查看任务的状态是否是NEW,如果NEW状态,就基于传入的参数mayInterruptIfRunning
    // 决定任务是直接从NEW转换为CANCEL,还是从NEW转换为INTERRUPTING
    if (!(state == NEW &&
        UNSAFE.compareAndSwapInt(this, stateOffset, NEW, mayInterruptIfRunning ? INTERRUPTING : CANCELLED)))
        return false;
    try {
        // 如果mayInterruptIfRunning为true
        // 就需要中断线程
        if (mayInterruptIfRunning) {
            try {
                // 拿到任务线程
                Thread t = runner;
                if (t != null)
                    // 如果线程不为null,直接interrupt
                    t.interrupt();
            } finally {
                // 将任务状态设置为INTERRUPTED
                UNSAFE.putOrderedInt(this, stateOffset, INTERRUPTED);
            }
        }
    } finally {
        // 任务结束后的一些处理~~ 一会看~~
        finishCompletion();
    }
    return true;
}
1.3.5 FutureTask的get方法
这个是线程获取FutureTask任务执行结果的方法
// 拿任务结果
public V get() throws InterruptedException, ExecutionException {
    // 获取任务的状态
    int s = state;
    // 要么是NEW,任务还没执行完
    // 要么COMPLETING,任务执行完了,结果还没封装好。
    if (s <= COMPLETING)
        // 让当前线程阻塞,等待结果
        s = awaitDone(false, 0L);
    // 最终想要获取结果,需要执行report方法
    return report(s);
}

// 线程等待FutureTask结果的过程
private int awaitDone(boolean timed, long nanos) throws InterruptedException {
    // 针对get方法传入了等待时长时,需要计算等到什么时间点
    final long deadline = timed ? System.nanoTime() + nanos : 0L;
    // 声明好需要的Node,queued:放到链表中了么?
    WaitNode q = null;
    boolean queued = false;
    for (;;) {
        // 查看线程是否中断,如果中断,从等待链表中移除,甩个异常
        if (Thread.interrupted()) {
            removeWaiter(q);
            throw new InterruptedException();
        }
        // 拿到状态
        int s = state;
        // 到这,说明任务结束了。
        if (s > COMPLETING) {
            if (q != null)
                // 如果之前封装了WaitNode,现在要清空
                q.thread = null;
            return s;
        }
        // 如果任务状态是COMPLETING,这就不需要去阻塞线程,让步一下,等待一小会,结果就有了
        else if (s == COMPLETING)
            Thread.yield();
        // 如果还没初始化WaitNode,初始化
        else if (q == null)
            q = new WaitNode();
        // 没放队列的话,直接放到waiters的前面
        else if (!queued)
            queued = UNSAFE.compareAndSwapObject(this, waitersOffset,
                                                 q.next = waiters, q);
        // 准备挂起线程,如果timed为true,挂起一段时间
        else if (timed) {
            // 计算出最多可以等待多久
            nanos = deadline - System.nanoTime();
            // 如果等待的时间没了
            if (nanos <= 0L) {
                // 移除当前的Node,返回任务状态
                removeWaiter(q);
                return state;
            }
            // 等一会
            LockSupport.parkNanos(this, nanos);
        }
        else
            // 死等
            LockSupport.park(this);
    }
}

// get的线程已经可以阻塞结束了,基于状态查看能否拿到返回结果
private V report(int s) throws ExecutionException {
    // 拿到outcome 返回结果
    Object x = outcome;
    // 如果任务状态是NORMAL,任务正常结束,返回结果
    if (s == NORMAL)
        return (V)x;
    // 如果任务状态大于等于取消
    if (s >= CANCELLED)
        // 直接抛出异常
        throw new CancellationException();
    // 到这就是异常结束
    throw new ExecutionException((Throwable)x);
}
1.3.6 FutureTask的finishCompletion方法
只要任务结束了,无论是正常返回,异常返回,还是任务被取消都会执行这个方法
而这个方法其实就是唤醒那些执行get方法等待任务结果的线程
// 任务结束后触发
private void finishCompletion() {
    // 在任务结束后,需要唤醒
    for (WaitNode q; (q = waiters) != null;) {
        // 第一步直接以CAS的方式将WaitNode置为null
        if (UNSAFE.compareAndSwapObject(this, waitersOffset, q, null)) {
            for (;;) {
                // 拿到了Node中的线程
                Thread t = q.thread;
                // 如果线程不为null
                if (t != null) {
                    // 第一步先置位null
                    q.thread = null;
                    // 直接唤醒这个线程
                    LockSupport.unpark(t);
                }
                // 拿到当前Node的next
                WaitNode next = q.next;
                // next为null,代表已经将全部节点唤醒了吗,跳出循环
                if (next == null)
                    break;
                // 将next置位null
                q.next = null;
                // q的引用指向next
                q = next;
            }
            break;
        }
    }

    // 任务结束后,可以基于这个扩展方法,记录一些信息
    done();

    // 任务执行完,把callable具体任务置位null
    callable = null;
}
二、CompletableFuture应用&源码分析
2.1 CompletableFuture介绍
平时多线程开发一般就是使用Runnable,Callable,Thread,FutureTask,ThreadPoolExecutor这些内容和并发编程息息相关。相对来对来说成本都不高,多多使用是可以熟悉这些内容。这些内容组合在一起去解决一些并发编程的问题时,很多时候没有办法很方便的去完成异步编程的操作。
Thread + Runnable:执行异步任务,但是没有返回结果
Thread + Callable + FutureTask:完整一个可以有返回结果的异步任务
- 获取返回结果,如果基于get方法获取,线程需要挂起在WaitNode里
- 获取返回结果,也可以基于isDone判断任务的状态,但是这里需要不断轮询
上述的方式都是有一定的局限性的。
比如说任务A,任务B,还有任务C。其中任务B还有任务C执行的前提是任务A先完成,再执行任务B和任务C。
如果任务的执行方式逻辑比较复杂,可能需要业务线程导出阻塞等待,或者是大量的任务线程去编一些任务执行的业务逻辑。对开发成本来说比较高。
CompletableFuture就是帮你处理这些任务之间的逻辑关系,编排好任务的执行方式后,任务会按照规划好的方式一步一步执行,不需要让业务线程去频繁的等待
2.2 CompletableFuture应用
CompletableFuture应用还是需要一内内的成本的。
首先对CompletableFuture提供的函数式编程中三个函数有一个掌握
Supplier<U>  // 生产者,没有入参,有返回结果
Consumer<T>  // 消费者,有入参,但是没有返回结果
Function<T,U>// 函数,有入参,又有返回结果
2.2.1 supplyAsync
CompletableFuture如果不提供线程池的话,默认使用的ForkJoinPool,而ForkJoinPool内部是守护线程,如果main线程结束了,守护线程会跟着一起结束。
public static void main(String[] args)  {
    // 生产者,可以指定返回结果
    CompletableFuture<String> firstTask = CompletableFuture.supplyAsync(() -> {
        System.out.println("异步任务开始执行");
        System.out.println("异步任务执行结束");
        return "返回结果";
    });

    String result1 = firstTask.join();
    String result2 = null;
    try {
        result2 = firstTask.get();
    } catch (InterruptedException e) {
        e.printStackTrace();
    } catch (ExecutionException e) {
        e.printStackTrace();
    }

    System.out.println(result1 + "," + result2);
}
2.2.2 runAsync
当前方式既不会接收参数,也不会返回任何结果,非常基础的任务编排方式
public static void main(String[] args) throws IOException {
    CompletableFuture.runAsync(() -> {
        System.out.println("任务go");
        System.out.println("任务done");
    });

    System.in.read();
}
2.2.3 thenApply,thenApplyAsync
有任务A,还有任务B。
任务B需要在任务A执行完毕后再执行。
而且任务B需要任务A的返回结果。
任务B自身也有返回结果。
thenApply可以拼接异步任务,前置任务处理完之后,将返回结果交给后置任务,然后后置任务再执行
thenApply提供了带有Async的方法,可以指定每个任务使用的具体线程池。
public static void main(String[] args) throws IOException {
    ExecutorService executor = Executors.newFixedThreadPool(10);

    /*CompletableFuture taskA = CompletableFuture.supplyAsync(() -> {
        String id = UUID.randomUUID().toString();
        System.out.println("执行任务A:" + id);
        return id;
    });
    CompletableFuture taskB = taskA.thenApply(result -> {
        System.out.println("任务B获取到任务A结果:" + result);
        result = result.replace("-", "");
        return result;
    });

    System.out.println("main线程拿到结果:" + taskB.join());*/

    CompletableFuture<String> taskB = CompletableFuture.supplyAsync(() -> {
        String id = UUID.randomUUID().toString();
        System.out.println("执行任务A:" + id + "," + Thread.currentThread().getName());
        return id;
    }).thenApplyAsync(result -> {
        System.out.println("任务B获取到任务A结果:" + result + "," + Thread.currentThread().getName());
        result = result.replace("-", "");
        return result;
    },executor);

    System.out.println("main线程拿到结果:" + taskB.join());
}
2.2.4 thenAccept,thenAcceptAsync
套路和thenApply一样,都是任务A和任务B的拼接
前置任务需要有返回结果,后置任务会接收前置任务的结果,返回后置任务没有返回值
public static void main(String[] args) throws IOException {
    CompletableFuture.supplyAsync(() -> {
        System.out.println("任务A");
        return "abcdefg";
    }).thenAccept(result -> {
        System.out.println("任务b,拿到结果处理:" + result);
    });

    System.in.read();
}
2.2.5 thenRun,thenRunAsync
套路和thenApply,thenAccept一样,都是任务A和任务B的拼接
前置任务没有返回结果,后置任务不接收前置任务结果,后置任务也会有返回结果
public static void main(String[] args) throws IOException {
    CompletableFuture.runAsync(() -> {
        System.out.println("任务A!!");
    }).thenRun(() -> {
        System.out.println("任务B!!");
    });

    System.in.read();
}
2.2.6 thenCombine,thenAcceptBoth,runAfterBoth
比如有任务A,任务B,任务C。任务A和任务B并行执行,等到任务A和任务B全部执行完毕后,再执行任务C。
A+B ------ C
基于前面thenApply,thenAccept,thenRun知道了一般情况三种任务的概念
thenCombine以及thenAcceptBoth还有runAfterBoth的区别是一样的。
public static void main(String[] args) throws IOException {
    CompletableFuture<Integer> taskC = CompletableFuture.supplyAsync(() -> {
        System.out.println("任务A");
        try {
            Thread.sleep(2000);
        } catch (InterruptedException e) {
            e.printStackTrace();
        }
        return 78;
    }).thenCombine(CompletableFuture.supplyAsync(() -> {
        System.out.println("任务B");
        try {
            Thread.sleep(2000);
        } catch (InterruptedException e) {
            e.printStackTrace();
        }
        return 66;
    }), (resultA, resultB) -> {
        System.out.println("任务C");
        int resultC = resultA + resultB;
        return resultC;
    });

    System.out.println(taskC.join());
    System.in.read();
}
2.2.7 applyToEither,acceptEither,runAfterEither
比如有任务A,任务B,任务C。任务A和任务B并行执行,只要任务A或者任务B执行完毕,开始执行任务C
A or B ----- C
applyToEither,acceptEither,runAfterEither三个方法拼接任务的方式都是一样的
区别依然是,可以接收结果并且返回结果,可以接收结果没有返回结果,不接收结果也没返回结果
public static void main(String[] args) throws IOException {
    CompletableFuture<Integer> taskC = CompletableFuture.supplyAsync(() -> {
        System.out.println("任务A");
        return 78;
    }).applyToEither(CompletableFuture.supplyAsync(() -> {
        System.out.println("任务B");
        return 66;
    }), resultFirst -> {
        System.out.println("任务C");
        return resultFirst;
    });

    System.out.println(taskC.join());
    System.in.read();
}
2.2.8 exceptionally,thenCompose,handle
exceptionally
这个也是拼接任务的方式,但是只有前面业务执行时出现异常了,才会执行当前方法来处理
只有异常出现时,CompletableFuture的编排任务没有处理完时,才会触发
thenCompose,handle
这两个也是异常处理的套路,可以根据方法描述发现,他的功能方向比exceptionally要更加丰富
thenCompose可以拿到返回结果同时也可以拿到出现的异常信息,但是thenCompose本身是Consumer不能返回结果。无法帮你捕获异常,但是可以拿到异常返回的结果。
handle可以拿到返回结果同时也可以拿到出现的异常信息,并且也可以指定返回托底数据。可以捕获异常的,异常不会抛出去。
public static void main(String[] args) throws IOException {
        CompletableFuture<Integer> taskC = CompletableFuture.supplyAsync(() -> {
            System.out.println("任务A");
//            int i = 1 / 0;
            return 78;
        }).applyToEither(CompletableFuture.supplyAsync(() -> {
            System.out.println("任务B");
            return 66;
        }), resultFirst -> {
            System.out.println("任务C");
            return resultFirst;
        }).handle((r,ex) -> {
            System.out.println("handle:" + r);
            System.out.println("handle:" + ex);
            return -1;
        });
        /*.exceptionally(ex -> {
            System.out.println("exceptionally:" + ex);
            return -1;
        });*/
        /*.whenComplete((r,ex) -> {
            System.out.println("whenComplete:" + r);
            System.out.println("whenComplete:" + ex);
        });*/


        System.out.println(taskC.join());
        System.in.read();
    }
2.2.9 allOf,anyOf
allOf的方式是让内部编写多个CompletableFuture的任务,多个任务都执行完后,才会继续执行你后续拼接的任务
allOf返回的CompletableFuture是Void,没有返回结果
public static void main(String[] args) throws IOException {
        CompletableFuture.allOf(
                CompletableFuture.runAsync(() -> {
                    try {
                        Thread.sleep(1000);
                    } catch (InterruptedException e) {
                        e.printStackTrace();
                    }
                    System.out.println("任务A");
                }),
                CompletableFuture.runAsync(() -> {
                    try {
                        Thread.sleep(2000);
                    } catch (InterruptedException e) {
                        e.printStackTrace();
                    }
                    System.out.println("任务B");
                }),
                CompletableFuture.runAsync(() -> {
                    try {
                        Thread.sleep(3000);
                    } catch (InterruptedException e) {
                        e.printStackTrace();
                    }
                    System.out.println("任务C");
                })
        ).thenRun(() -> {
            System.out.println("任务D");
        });

        System.in.read();
    }
anyOf是基于多个CompletableFuture的任务,只要有一个任务执行完毕就继续执行后续,最先执行完的任务做作为返回结果的入参
public static void main(String[] args) throws IOException {
    CompletableFuture.anyOf(
            CompletableFuture.supplyAsync(() -> {
                try {
                    Thread.sleep(1000);
                } catch (InterruptedException e) {
                    e.printStackTrace();
                }
                System.out.println("任务A");
                return "A";
            }),
            CompletableFuture.supplyAsync(() -> {
                try {
                    Thread.sleep(2000);
                } catch (InterruptedException e) {
                    e.printStackTrace();
                }
                System.out.println("任务B");
                return "B";
            }),
            CompletableFuture.supplyAsync(() -> {
                try {
                    Thread.sleep(3000);
                } catch (InterruptedException e) {
                    e.printStackTrace();
                }
                System.out.println("任务C");
                return "C";
            })
    ).thenAccept(r -> {
        System.out.println("任务D执行," + r + "先执行完毕的");
    });

    System.in.read();
}
2.3 CompletableFuture源码分析
CompletableFuture的源码内容特别多。不需要把所有源码都看了,更多的是要掌握整个CompletableFuture的源码执行流程,以及任务的执行时机。
从CompletableFuture中比较简单的方法作为分析的入口,从而掌握整体执行的流程。
2.3.1 当前任务执行方式
将任务和CompletableFuture封装到一起,再执行封住好的具体对象的run方法即可
// 提交任务到CompletableFuture
public static CompletableFuture<Void> runAsync(Runnable runnable) {
    // asyncPool:执行任务的线程池
    // runnable:具体任务。
    return asyncRunStage(asyncPool, runnable);
}

// 内部执行的方法
static CompletableFuture<Void> asyncRunStage(Executor e, Runnable f) {
    // 对任务做非空校验
    if (f == null) throw new NullPointerException();
    // 直接构建了CompletableFuture的对象,作为最后的返回结果
    CompletableFuture<Void> d = new CompletableFuture<Void>();
    // 将任务和CompletableFuture对象封装为了AsyncRun的对象
    // 将封装好的任务交给了线程池去执行
    e.execute(new AsyncRun(d, f));
    // 返回构建好的CompletableFuture
    return d;
}

// 封装任务的AsyncRun类信息
static final class AsyncRun extends ForkJoinTask<Void> implements Runnable, AsynchronousCompletionTask {
    // 声明存储CompletableFuture对象以及任务的成员变量
    CompletableFuture<Void> dep;
    Runnable fn;

    // 将传入的属性赋值给成员变量
    AsyncRun(CompletableFuture<Void> dep, Runnable fn) {
        this.dep = dep;
        this.fn = fn;
    }
    // 当前对象作为任务提交给线程池之后,必然会执行当前方法
    public void run() {
        // 声明局部变量
        CompletableFuture<Void> d; Runnable f;
        // 将成员变量赋值给局部变量,并且做非空判断
        if ((d = dep) != null && (f = fn) != null) {
            // help GC,将成员变量置位null,只要当前任务结束后,成员变量也拿不到引用。
            dep = null; fn = null;
            // 先确认任务没有执行。
            if (d.result == null) {
                try {
                    // 直接执行任务
                    f.run();
                    // 当前方法是针对Runnable任务的,不能将结果置位null
                    // 要给没有返回结果的Runnable做一个返回结果
                    d.completeNull();
                } catch (Throwable ex) {
                    // 异常结束!
                    d.completeThrowable(ex);
                }
            }
            d.postComplete();
        }
    }
}
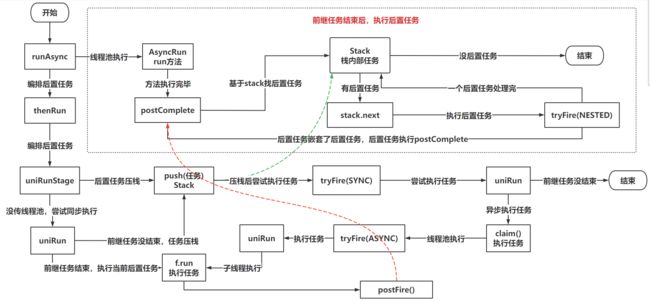
2.3.2 任务编排的存储&执行方式
首先如果要在前继任务处理后,执行后置任务的话。
有两种情况:
- 前继任务如果没有执行完毕,后置任务需要先放在stack栈结构中存储
- 前继任务已经执行完毕了,后置任务就应该直接执行,不需要在往stack中存储了。
如果单独采用thenRun在一个任务后面指定多个后继任务,CompletableFuture无法保证具体的执行顺序,而影响执行顺序的是前继任务的执行时间,以及后置任务编排的时机。
2.3.3 任务编排流程
// 编排任务,前继任务搞定,后继任务再执行
public CompletableFuture<Void> thenRun(Runnable action) {
    // 执行了内部的uniRunStage方法,
    // null:线程池,现在没给。
    // action:具体要执行的任务
    return uniRunStage(null, action);
}

// 内部编排任务方法
private CompletableFuture<Void> uniRunStage(Executor e, Runnable f) {
    // 后继任务不能为null,健壮性判断
    if (f == null) throw new NullPointerException();
    // 创建CompletableFuture对象d,与后继任务f绑定
    CompletableFuture<Void> d = new CompletableFuture<Void>();
    // 如果线程池不为null,代表异步执行,将任务压栈
    // 如果线程池是null,先基于uniRun尝试下,看任务能否执行
    if (e != null || !d.uniRun(this, f, null)) {
        // 如果传了线程池,这边需要走一下具体逻辑
        // e:线程池
        // d:后继任务的CompletableFuture
        // this:前继任务的CompletableFuture
        // f:后继任务
        UniRun<T> c = new UniRun<T>(e, d, this, f);
        // 将封装好的任务,push到stack栈结构
        // 只要前继任务没结束,这边就可以正常的将任务推到栈结构中
        // 放入栈中可能会失败
        push(c);
        // 无论压栈成功与否,都要尝试执行以下。
        c.tryFire(SYNC);
    }
    // 无论任务执行完毕与否,都要返回后继任务的CompletableFuture
    return d;
}
2.3.4 查看后置任务执行时机
任务在编排到前继任务时,因为前继任务已经结束了,这边后置任务会主动的执行
// 后置任务无论压栈成功与否,都需要执行tryFire方法
static final class UniRun<T> extends UniCompletion<T,Void> {

    Runnable fn;
    // executor:线程池
    // dep:后置任务的CompletableFuture
    // src:前继任务的CompletableFuture
    // fn:具体的任务
    UniRun(Executor executor, CompletableFuture<Void> dep,CompletableFuture<T> src, Runnable fn) {
        super(executor, dep, src); this.fn = fn;
    }

    final CompletableFuture<Void> tryFire(int mode) {
        // 声明局部变量
        CompletableFuture<Void> d; CompletableFuture<T> a;
        // 赋值局部变量
        // (d = dep) == null:赋值加健壮性校验
        if ((d = dep) == null ||
            // 调用uniRun。
            // a:前继任务的CompletableFuture
            // fn:后置任务
            // 第三个参数:传入的是this,是UniRun对象
            !d.uniRun(a = src, fn, mode > 0 ? null : this))
            // 进到这,说明前继任务没结束,等!
            return null;
        dep = null; src = null; fn = null;
        return d.postFire(a, mode);
    }
}

// 是否要主动执行任务
final boolean uniRun(CompletableFuture<?> a, Runnable f, UniRun<?> c) {
    // 方法要么正常结束,要么异常结束
    Object r; Throwable x;
    // a == null:健壮性校验
    // (r = a.result) == null:判断前继任务结束了么?
    // f == null:健壮性校验
    if (a == null || (r = a.result) == null || f == null)
        // 到这代表任务没结束。
        return false;
    // 后置任务执行了没? == null,代表没执行
    if (result == null) {
        // 如果前继任务的结果是异常结束。如果前继异常结束,直接告辞,封装异常结果
        if (r instanceof AltResult && (x = ((AltResult)r).ex) != null)
            completeThrowable(x, r);
        else
            // 到这,前继任务正常结束,后置任务正常执行
            try {
                // 如果基于tryFire(SYNC)进来,这里的C不为null,执行c.claim
                // 如果是因为没有传递executor,c就是null,不会执行c.claim
                if (c != null && !c.claim())
                    // 如果返回false,任务异步执行了,直接return false
                    return false;
                // 如果claim没有基于线程池运行任务,那这里就是同步执行
                // 直接f.run了。
                f.run();
                // 封装Null结果
                completeNull();
            } catch (Throwable ex) {
                // 封装异常结果
                completeThrowable(ex);
            }
    }
    return true;
}

// 异步的线程池处理任务
final boolean claim() {
    Executor e = executor;
    if (compareAndSetForkJoinTaskTag((short)0, (short)1)) {
        // 只要有线程池对象,不为null
        if (e == null)
            return true;
        executor = null; // disable
        // 基于线程池的execute去执行任务
        e.execute(this);
    }
    return false;
}
前继任务执行完毕后,基于嵌套的方式执行后置。
// A:嵌套了B+C,  B:嵌套了D+E
// 前继任务搞定,遍历stack执行后置任务
// A任务处理完,解决嵌套的B和C
final void postComplete() {
    // f:前继任务的CompletableFuture
    // h:存储后置任务的栈结构
    CompletableFuture<?> f = this; Completion h;
    // (h = f.stack) != null:赋值加健壮性判断,要确保栈中有数据
    while ((h = f.stack) != null ||
            // 循环一次后,对后续节点的赋值以及健壮性判断,要确保栈中有数据
           (f != this && (h = (f = this).stack) != null)) {
        // t:当前栈中任务的后续任务
        CompletableFuture<?> d; Completion t;
        // 拿到之前的栈顶h后,将栈顶换数据
        if (f.casStack(h, t = h.next)) {
            if (t != null) {
                if (f != this) {
                    pushStack(h);
                    continue;
                }
                h.next = null;    // detach
            }
            // 执行tryFire方法,
            f = (d = h.tryFire(NESTED)) == null ? this : d;
        }
    }
}

// 回来了  NESTED == -1
final CompletableFuture<Void> tryFire(int mode) {
    CompletableFuture<Void> d; CompletableFuture<T> a;
    if ((d = dep) == null ||
        !d.uniRun(a = src, fn, mode > 0 ? null : this))
        return null;
    dep = null; src = null; fn = null;
    // 内部会执行postComplete,运行B内部嵌套的D和E
    return d.postFire(a, mode);
}
2.4 CompletableFuture执行流程图