消息模型与生成pdf
今日内容
- 消息中间件
- RabbitMQ
- 五种消息模型
- SpringAMQP
- 生产pdf
- Jaspersoft Studio
第一章 消息中间件(面试)
消息队列中间件是分布式系统中重要的组件,主要解决异步消息,应用解耦,流量削峰等问题,实现高性能,高可用,可伸缩和最终一致性架构。
对于消息中间件,常见的角色大致也就有Producer(生产者)、Consumer(消费者)。
1. 应用场景
1.1 异步消息
场景说明:用户注册后,需要发注册邮件和注册短信。

1.2 应用解耦
上面的应用也体现了解耦合
1.3 流量削峰(削峰添谷)
流量削峰也是消息队列中的常用场景,一般在秒杀或团抢活动中使用广泛。
应用场景:秒杀活动,一般会因为流量过大,导致流量暴增,应用挂掉。为解决这个问题,一般需要在应用前端加入消息队列。

2. 常见的消息中间件(了解)
常见的消息中间件,有下面这些:
- ActiveMQ:是Apache出品基于JMS(Java Message Service)规范的一种消息中间件的实现。
- ZeroMQ:号称”史上最快的消息中间件”,基于C语言开发的。
- Kafka:Apache下的一个子项目 。特点:可以达到10W/s的吞吐速率;适合处理海量数据。
- RabbitMQ:是基于AMQP(Advanced Message Queuing Protocol)协议上完成的,基Erlang语言开发的。
- RocketMQ :阿里巴巴推出。
AMQP和JMS区别: JMS限定了必须使用Java语言;AMQP只是协议,不规定实现方式,因此是跨平台跨语言的
第二章 RabbitMQ安装
RabbitMQ是基于AMQP(Advanced Message Queuing Protocol)的一款消息中间件管理系统,官网地址: http://www.rabbitmq.com/
1. 安装和启动
1.1 Erlang
RabbitMQ是基于Erlang语言开发,所以我们需要先安装此环境
官网地址:https://www.erlang.org/
我们的课程中使用的是:22.0版本,资料提供了安装包
注意:安装Erlang语言,不要有中文路径
1.2 RabbitMQ
我们的课程中使用的是:3.7.16版本,资料提供了安装包
注意:安装RabbitMQ,不要有中文路径
安装启动命令 访问路径等
1. 双击rabbitmq-server-3.7.16.exe安装即可(这个目录要记住)

2. 进入到rabbitMq的安装目录中,进入sbin文件夹中,打开dos窗口
	2.1 启动
		rabbitmqctl start_app
	2.2 开启web控制台的访问
		rabbitmq-plugins enable rabbitmq_management

3. 浏览器访问管理控制台
	http://127.0.0.1:15672/
	用户名:guest
	密码:guest

* 控制台  15672
* 软件    5672
重置命令
* 重置mq数据
	rabbitmqctl stop_app
	rabbitmqctl reset
	rabbitmqctl start_app
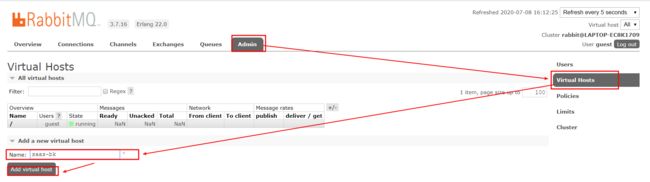
2. 空间和用户管理
要想使用RabbitMQ,必须创建出空间【类似于数据库服务器中的一个库一样】和用户
2.1 创建空间
2.2 创建用户
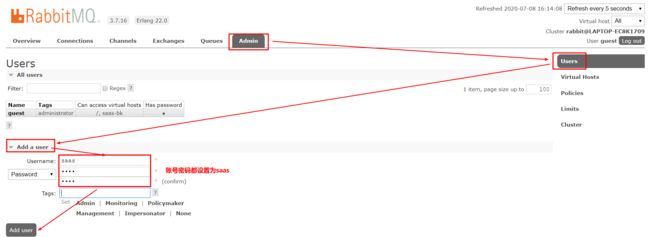
2.3 将空间交给用户管理

第三章 五种消息模型(理解)
1. 概述
消息中间件的消息分为两类传输模型:点对点模型、发布/订阅模型
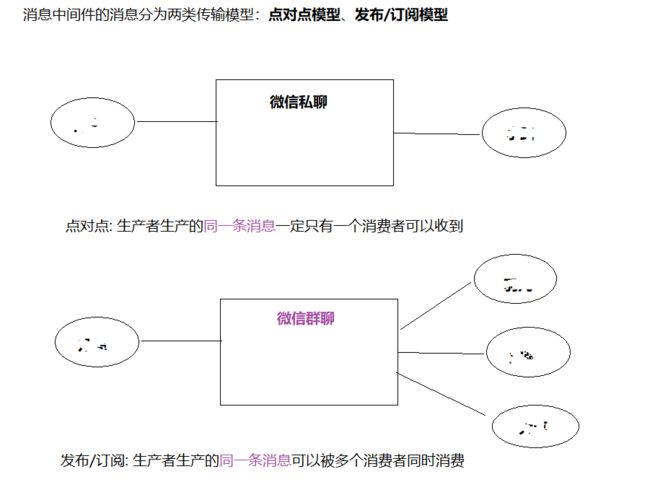
RabbitMQ在此基础上进行细化,提供了6种消息模型,但是第6种其实是RPC,并不是MQ,因此不予学习。那么也就剩下5种:
- 1、2(点对点模型)
- 3、4、5(发布/订阅模型)

2. 演示工程导入
将rabbit_mq_demo导入到IDEA中,rabbit_mq_demo是已经编辑好的演示五种消息关系的项目.
3. 消息模型
3.1 Simple消息模型
这是最简单的消息模型,典型的一个生产者对应一个消费者,生产者向队列生成消息,消费者从队列消费消息

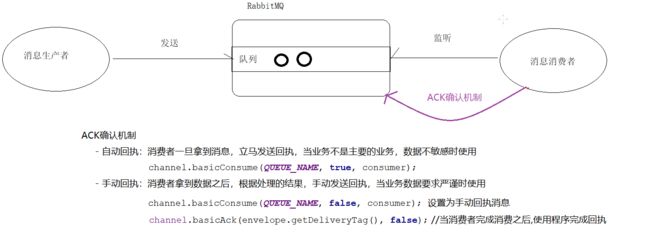
ACK确认机制
自动回执:消费者一旦拿到消息,立马发送回执,当业务不是主要的业务,数据不敏感时使用
channel.basicConsume(QUEUE_NAME,true, consumer);
3.2 Work消息模型
当消息处理比较耗时的时候,可能生产消息的速度会远远大于消息的消费速度。长此以往,消息就会堆积越来越多,无法及时处理。
此时就可以使用work 模型:让多个消费者绑定到一个队列,共同消费队列中的消息,注意同一条消息只能被其中一个消费者消费。

3.3 订阅消息模型-Fanout( 广播 )
Fanout类型的交换机与多个队列绑定,当消息发送到此类型的交换机时,所有与之绑定的队列都能收到消息。

3.4 订阅消息模型-Direct
当一个队列与Direct类型的交换机绑定的时候,需要声明出自己能够处理的请求标识(binding key)
当我们程序将消息发送给此类型的交换机时,也需要指定一个标识(routing key),只有routing和binding完全匹配时,绑定的队列才能收到消息。
消息广播给指定用户,通过routing(生产者)和binding(消费者)进行匹配

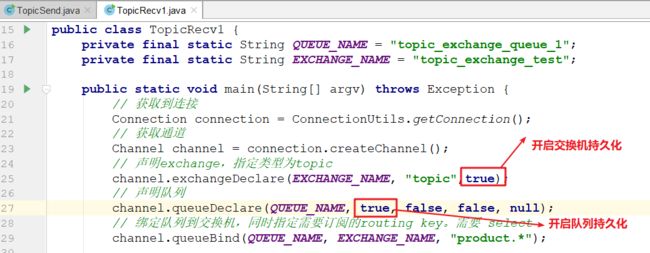
3.5 订阅消息模型-Topic
Topic类型的交换机与Direct类型的交换机基本功能是一样的,但是它支持使用通配符来书写binding key
常用的通配符有两个:
#:匹配一个或多个词
- 匹配到文件夹下所有
*:匹配不多不少恰好1个词
- 匹配到子文件夹

4. 消息持久化
为了保证在MQ宕机的时候,消息不丢失,对消息、队列、交换机添加持久化的设置
1)生产者开启交换机和消息的持久化

2)消费者开启交换机和队列的持久化
3)删除MQ中现有的交换机和队列, 然后再测试(略)

面试题:如何避免消息丢失?
1)消息的持久化机制,可以防止由于MQ宕机导致的消息丢失。
2)消费者的手动ACK机制,可以防止消费者丢失消息。
1. 点对点
	Simple   一个生产者---一个消费者
	Work     一个生产者---多个消费者
		平均消费
		竞争消费
2. 发布订阅
	Fanout(广播)   一个生产者---多个消费者
	Direct(路由)   一个生产者---多个消费者  (  bindingkey    routingkey  )
	Topic (主题)   一个生产者---多个消费者  (  bindingkey    routingkey      支持 routingkey的通配符 *  ## )

3. ACk确认机制
	自动回执: 消费者拿到消息之后自动回执消息
	手动回执: 消费成功之后使用代码手动回执消息
第五章 Spring AMQP(重点)
Spring有很多不同的子项目,其中就有对AMQP的支持,为我们提供了一个模板 bean(AMQPTemplate) 来发送和接收消息,来简化RabbitMQ操作。
官网地址:https://spring.io/projects/spring-amqp
Spring-amqp是对AMQP协议的抽象实现,而spring-rabbit是对协议的具体实现,也是目前的唯一实现。
1. 创建父工程
<dependencies>
    <dependency>
        <groupId>com.rabbitmqgroupId>
        <artifactId>amqp-clientartifactId>
        <version>5.5.3version>
    dependency>
    <dependency>
        <groupId>org.springframework.amqpgroupId>
        <artifactId>spring-rabbitartifactId>
        <version>2.1.3.RELEASEversion>
    dependency>
    <dependency>
        <groupId>junitgroupId>
        <artifactId>junitartifactId>
        <version>4.12version>
    dependency>
    <dependency>
        <groupId>org.springframeworkgroupId>
        <artifactId>spring-testartifactId>
        <version>5.1.4.RELEASEversion>
    dependency>
    <dependency>
        <groupId>com.fasterxml.jackson.coregroupId>
        <artifactId>jackson-databindartifactId>
        <version>2.9.6version>
    dependency>
dependencies>

<build>
    <plugins>

        <plugin>
            <groupId>org.apache.maven.pluginsgroupId>
            <artifactId>maven-compiler-pluginartifactId>
            <version>3.1version>
            <configuration>
                <source>1.8source>
                <target>1.8target>
                <encoding>UTF-8encoding>
            configuration>
        plugin>
    plugins>
build>
2. 创建消费者模块
2.1 创建模块
创建rabbit_consumer(消费者)模块
2.2 加入spring的配置文件
<beans xmlns="http://www.springframework.org/schema/beans"
       xmlns:xsi="http://www.w3.org/2001/XMLSchema-instance" xmlns:rabbit="http://www.springframework.org/schema/rabbit"
       xsi:schemaLocation="http://www.springframework.org/schema/rabbit
   http://www.springframework.org/schema/rabbit/spring-rabbit.xsd
   http://www.springframework.org/schema/beans
   http://www.springframework.org/schema/beans/spring-beans.xsd">


    <rabbit:connection-factory id="connectionFactory" virtual-host="saas-bk"
                               host="127.0.0.1" port="5672" username="saas" password="saas"/>

    <rabbit:admin connection-factory="connectionFactory"/>


    <rabbit:queue name="spring.test.queue" auto-declare="true" durable="true"/>


    <rabbit:topic-exchange  id="springTestExchange" name="spring.test.exchange">
        <rabbit:bindings>
            <rabbit:binding queue="spring.test.queue" pattern="user.#" />
        rabbit:bindings>
    rabbit:topic-exchange>


    <bean id="testMqListener" class="com.itheima.MqListener"/>


    <rabbit:listener-container connection-factory="connectionFactory">
        <rabbit:listener ref="testMqListener" queues="spring.test.queue"/>
    rabbit:listener-container>

beans>
2.3 实现一个监听器负责接收消息
/**
* @description: 定义消费者监听器实现消息监听接口,并重写其中的方法
* @author: mryhl
* @date: Created in 2020/10/23 17:41
* @version: 1.1
*/
public class MqListener implements MessageListener {
public void onMessage(Message message) {
System.out.println("已经监听到生产者发送的信息: " + new String(message.getBody()));
}
}
2.4 启动Spring环境
/**
 * @description: 启动spring环境
 * @author: mryhl
 * @date: Created in 2020/10/23 17:45
 * @version: 1.1
 */
public class ConsumerStart {
   public static void main(String[] args) throws IOException {
      ClassPathXmlApplicationContext act = new ClassPathXmlApplicationContext("applicationContext-mq-consumer.xml");
      act.start();
      System.in.read();
   }
}
3. 创建生产者模块
3.1 创建模块
创建rabbit_producer模块
3.2 加入Spring的配置文件
<beans xmlns="http://www.springframework.org/schema/beans"
       xmlns:xsi="http://www.w3.org/2001/XMLSchema-instance" xmlns:rabbit="http://www.springframework.org/schema/rabbit"
       xsi:schemaLocation="http://www.springframework.org/schema/rabbit
   http://www.springframework.org/schema/rabbit/spring-rabbit.xsd
   http://www.springframework.org/schema/beans
   http://www.springframework.org/schema/beans/spring-beans.xsd">


    <rabbit:connection-factory id="connectionFactory" virtual-host="saas-bk"
                               host="127.0.0.1" port="5672" username="saas" password="saas"/>

    <rabbit:admin connection-factory="connectionFactory"/>


    <rabbit:topic-exchange id="springTestExchange" name="spring.test.exchange">rabbit:topic-exchange>


    <bean id="jsonMessageConverter"
          class="org.springframework.amqp.support.converter.Jackson2JsonMessageConverter"/>


    <rabbit:template id="rabbitTemplate" connection-factory="connectionFactory"
                     exchange="spring.test.exchange"
                     message-converter="jsonMessageConverter"/>


beans>
3.3 加入一个发送消息的类,测试
/**
 * @description: 生产者发送消息测试
 * @author: mryhl
 * @date: Created in 2020/10/23 17:50
 * @version: 1.1
 */
public class ProducerTest {
   public static void main(String[] args) {
      // 启动spring环境
      ClassPathXmlApplicationContext act = new ClassPathXmlApplicationContext("applicationContext-mq-producer.xml");
      // 获取Template,使用它就可以完成消息发送
      AmqpTemplate amqpTemplate = act.getBean(AmqpTemplate.class);
      // 发送消息
      amqpTemplate.convertAndSend("user.save","Hi,I love you!");
   }
}
4. 手动ACK机制(扩展)
Spring整合rabbit之后,默认使用的依旧是自动消息回执,如果需要手动回执,需要处理下面两步骤:
- 在消费者的配置文件中配置消息回执为手动回执模式( acknowledge=”manual” )
<rabbit:listener-container connection-factory="connectionFactory" acknowledge="manual">
    <rabbit:listener ref="testMqListener" queues="spring.test.queue"/>
rabbit:listener-container>
- 当消息正常消费完毕之后,使用代码手动发送回执
public class MqListener implements ChannelAwareMessageListener {
public void onMessage(Message message, Channel channel) throws Exception {
System.out.println("接收到信息了,消息内容是:" + new String(message.getBody()));
channel.basicAck(message.getMessageProperties().getDeliveryTag(), false);
}
}
第六章 发送邮件改版(重点)
1. 需求说明
添加用户成功,向MQ中发送一个消息,然后由邮件发送模块监听这个MQ, 拿到消息之后,开始向用户的邮箱中发送一封邮件。

2. 改造生成者工程
2.1 加入Spring的配置文件
<beans xmlns="http://www.springframework.org/schema/beans"
       xmlns:xsi="http://www.w3.org/2001/XMLSchema-instance" xmlns:rabbit="http://www.springframework.org/schema/rabbit"
       xsi:schemaLocation="http://www.springframework.org/schema/rabbit
   http://www.springframework.org/schema/rabbit/spring-rabbit.xsd
   http://www.springframework.org/schema/beans
   http://www.springframework.org/schema/beans/spring-beans.xsd">


    <rabbit:connection-factory id="connectionFactory" virtual-host="saas-bk"
                               host="127.0.0.1" port="5672" username="saas" password="saas"/>

    <rabbit:admin connection-factory="connectionFactory"/>


    <rabbit:topic-exchange id="springMailExchange" name="spring.mail.exchange">rabbit:topic-exchange>


    <bean id="jsonMessageConverter"
          class="org.springframework.amqp.support.converter.Jackson2JsonMessageConverter"/>


    <rabbit:template id="rabbitTemplate" connection-factory="connectionFactory"
                     exchange="spring.mail.exchange"
                     message-converter="jsonMessageConverter"/>

beans>
2.2 加入发送消息的代码
/**
* 新增,修改功能
*/
(value = "/edit", name = "部门新增")
public String edit(User user) {
String oldPwd = user.getPassword();
if (StringUtils.isNotEmpty(oldPwd)){
String pwd = new Md5Hash(oldPwd,user.getEmail(),2).toString();
user.setPassword(pwd);
}
if (StringUtils.isEmpty(user.getId())) {
//1. 设置主键
user.setId(UUID.randomUUID().toString());
//2. 设置企业信息
user.setCompanyId(getCompanyId());
user.setCompanyName(getCompanyName());
userService.save(user);
// 这里发送邮件
String to = user.getEmail();
String title = "saas平台--用户新增成功";
String content = "恭喜您,您的账号已经在saas平台开通成功,请使用当前邮箱作用账号,使用" + oldPwd + "作为密码进行登录";
Map map = new HashMap<>();
map.put("to",to);
map.put("title",title);
map.put("content",content);
//MailUtil.sendMail(to, title, content);
template.convertAndSend("mail.send",map);
} else {
userService.update(user);
}
//重定向到list方法
return "redirect:/system/user/list.do";
}
3. 搭建消费者工程
3.1 创建发送邮件的模块
<project xmlns="http://maven.apache.org/POM/4.0.0"
         xmlns:xsi="http://www.w3.org/2001/XMLSchema-instance"
         xsi:schemaLocation="http://maven.apache.org/POM/4.0.0 http://maven.apache.org/xsd/maven-4.0.0.xsd">
    <parent>
        <artifactId>export_parentartifactId>
        <groupId>com.itheimagroupId>
        <version>1.0-SNAPSHOTversion>
    parent>
    <modelVersion>4.0.0modelVersion>

    <artifactId>export_mailartifactId>
<dependencies>
    <dependency>
        <groupId>com.itheimagroupId>
        <artifactId>export_commonsartifactId>
        <version>1.0-SNAPSHOTversion>
    dependency>
dependencies>

project>
3.2 加入配置文件
<beans xmlns="http://www.springframework.org/schema/beans"
       xmlns:xsi="http://www.w3.org/2001/XMLSchema-instance" xmlns:rabbit="http://www.springframework.org/schema/rabbit"
       xsi:schemaLocation="http://www.springframework.org/schema/rabbit
   http://www.springframework.org/schema/rabbit/spring-rabbit.xsd
   http://www.springframework.org/schema/beans
   http://www.springframework.org/schema/beans/spring-beans.xsd">


    <rabbit:connection-factory id="connectionFactory" virtual-host="saas-bk"
                               host="127.0.0.1" port="5672" username="saas" password="saas"/>

    <rabbit:admin connection-factory="connectionFactory"/>


    <rabbit:queue name="spring.mail.queue" auto-declare="true" durable="true"/>


    <rabbit:topic-exchange  id="springMailExchange" name="spring.mail.exchange">
        <rabbit:bindings>
            <rabbit:binding queue="spring.mail.queue" pattern="mail.#" />
        rabbit:bindings>
    rabbit:topic-exchange>


    <bean id="testMqListener" class="com.itheima.mail.listener.MailListener"/>


    <rabbit:listener-container connection-factory="connectionFactory" acknowledge="auto">
        <rabbit:listener ref="testMqListener" queues="spring.mail.queue"/>
    rabbit:listener-container>

beans>
3.3 加入监听的类
/**
 * @description:
 * @author: mryhl
 * @date: Created in 2020/10/13 20:47
 * @version: 1.1
 */
public class MailStart {
   public static void main(String[] args) throws IOException {
      ClassPathXmlApplicationContext act =
            new ClassPathXmlApplicationContext("classpath*:applicationContext-*.xml");

      act.start();

      System.in.read();
   }
}
3.4 启动Spring环境
/**
 * @description:
 * @author: mryhl
 * @date: Created in 2020/10/13 20:47
 * @version: 1.1
 */
public class MailStart {
   public static void main(String[] args) throws IOException {
      ClassPathXmlApplicationContext act =
            new ClassPathXmlApplicationContext("classpath*:applicationContext-*.xml");

      act.start();

      System.in.read();
   }
}
第七章 PDF报表
1. 报表技术概述
在企业级应用开发中,报表下载打印是很重要的一个功能。其实除了Excel报表之外,PDF报表也有广泛的应用场景,例如:货运详情,货运单等。
目前世面上比较流行的制作PDF报表的工具如下:
- iTextPDF:用于生成PDF文档的一个java类库,使用起来相对繁琐。
- OpenOffice:是一套跨平台的办公室软件套件,可以灵活的将word或者Excel转化为PDF文档。
- JasperReport:JasperReport是一个强大、灵活的报表生成工具,能够展示丰富的页面内容并生成PDF。
2. JasperReport介绍
JasperReport 步骤 阶段 生命周期
JasperReport是一个强大、灵活的报表生成工具,能够展示丰富的页面内容,并将之转换成PDF,HTML,或者XML格式。
官网地址:https://community.jaspersoft.com/
使用JasperReport做开发,一共分为三个步骤:
- 设计:指定PDF页面布局、复杂公式、数据源等,创建出PDF模板(xx.jrxml)
- 执行:将java查询的数据填充到PDF模板中(xx.jasper + data)
- 输出:生成PDF报表

第八章 Jaspersoft Studio安装和使用
1. 软件安装
Jaspersoft Studio是一款基于Eclipse的报表设计器,使用该软件可以方便地对报表进行可视化的模板设计。
官网下载地址:https://community.jaspersoft.com/community-download,
资料中已经提供了,可直接使用它进行安装
2. 软件布局介绍

3. 快速入门(重点)
3.1 创建一个新工程

3.2 创建一个新模板

3.3 模板基本布局介绍

3.4 在模板上添加一些元素

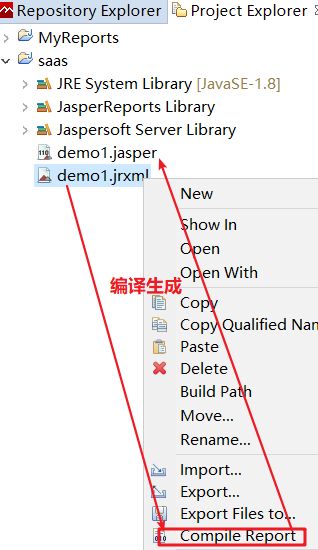
3.5 将模板转换为二进制文件
将 .jrxml 文件转换成 .jasper文件
3.6 通过java代码,填充数据,生成pdf
在ExportController添加导出方法
(value = "/exportPdf1", name = "测试")
public void exportPdf1(String id) throws JRException, IOException {
//1. 获取模板
String realPath = session.getServletContext().getRealPath("/jasper/demo1.jasper");
//2 向模板填充数据
HashMap map = new HashMap<>();
JRDataSource dataSource = new JREmptyDataSource();
JasperPrint jasperPrint = JasperFillManager.fillReport(realPath, map, dataSource);
//3.输出到浏览器
JasperExportManager.exportReportToPdfStream(jasperPrint, response.getOutputStream());
}
4. 中文处理
4.1 修改模板中的文字,为中文楷体
注意: 修改完毕之后要重新编译文件, 然后复制替换java工程中的模板

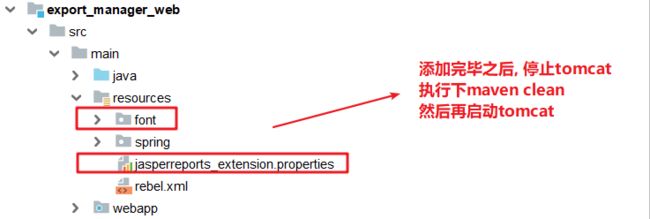
4.2 在工程中添加中文楷体的库和配置
注意: 修改完之后,重启tomcat
第九章 模板数据填充(对着视频做)
1. Map集合数据填充
1.1 需求说明
要完成如下效果, 注意: 页面上的数据要通过后台动态传递

1.2 制作模板

1.3 填充数据
(value = "/exportPdf2", name = "测试")
public void exportPdf2(String id) throws JRException, IOException {
//1. 获取模板
String realPath = session.getServletContext().getRealPath("/jasper/demo2.jasper");
//2 向模板填充数据
HashMap map = new HashMap<>();
map.put("username", "安妮");
map.put("age", "18");
map.put("address", "家里蹲");
map.put("company", "腾讯");
JRDataSource dataSource = new JREmptyDataSource();
JasperPrint jasperPrint = JasperFillManager.fillReport(realPath, map, dataSource);
//3.输出到浏览器
JasperExportManager.exportReportToPdfStream(jasperPrint, response.getOutputStream());
}
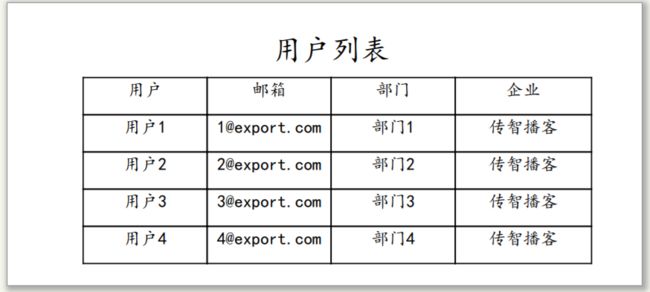
2. List集合数据填充
2.1 需求说明
要完成如下效果, 注意: 页面上的数据要通过后台动态传递
2.2 制作模板

2.3 填充数据
(value = "/exportPdf3", name = "测试")
public void exportPdf3(String id) throws JRException, IOException {
//1. 获取模板
String realPath = session.getServletContext().getRealPath("/jasper/demo3.jasper");
//2 向模板填充数据
List> list = new ArrayList<>();
for (int i = 0; i < 5; i++) {
Map map = new HashMap<>();
map.put("userName", "安妮" + i);
map.put("email", "18" + i);
map.put("deptName", "家里蹲" + i);
map.put("companyName", "腾讯" + i);
list.add(map);
}
JRDataSource dataSource = new JRBeanCollectionDataSource(list);
JasperPrint jasperPrint = JasperFillManager.fillReport(realPath, new HashMap<>(), dataSource);
//3.输出到浏览器
JasperExportManager.exportReportToPdfStream(jasperPrint, response.getOutputStream());
}
第十章 报运单详情PDF生成
1. 思路分析

2. 导入模板(已提供)

3. 数据填充
(value = "/exportPdf", name = "报运单下载")
public void exportPdf(String id) throws JRException, IOException {
//0. 获取模板
String realPath = session.getServletContext().getRealPath("/jasper/export.jasper");
//1. 获取数据 条件 报运单id 结果 报运单信息和报运单下货物信息
//1-1) 报运单信息
Export export = exportService.findById(id);
Map map = BeanUtil.beanToMap(export);
//1-2) 货物信息
List list = exportProductService.findByExportId(id);
JRDataSource dataSource = new JRBeanCollectionDataSource(list);
//2 向模板填充数据
JasperPrint jasperPrint = JasperFillManager.fillReport(realPath, map, dataSource);
//3.输出到浏览器
JasperExportManager.exportReportToPdfStream(jasperPrint, response.getOutputStream());
}
4. pdf下载
(value = "/exportPdf", name = "报运单下载")
public void exportPdf(String id) throws JRException, IOException {
//0. 获取模板
String realPath = session.getServletContext().getRealPath("/jasper/export.jasper");
//1. 获取数据 条件 报运单id 结果 报运单信息和报运单下货物信息
//1-1) 报运单信息
Export export = exportService.findById(id);
Map map = BeanUtil.beanToMap(export);
//1-2) 货物信息
List list = exportProductService.findByExportId(id);
JRDataSource dataSource = new JRBeanCollectionDataSource(list);
//2 向模板填充数据
JasperPrint jasperPrint = JasperFillManager.fillReport(realPath, map, dataSource);
//3.输出到浏览器
//JasperExportManager.exportReportToPdfStream(jasperPrint, response.getOutputStream());
//3. 文件下载
ByteArrayOutputStream byteArrayOutputStream = new ByteArrayOutputStream();
JasperExportManager.exportReportToPdfStream(jasperPrint, byteArrayOutputStream);
DownloadUtil.download(byteArrayOutputStream,response,"报运单.pdf");
}