VUE3-Cesium(entity、primitive总结及材质的修改)
目录
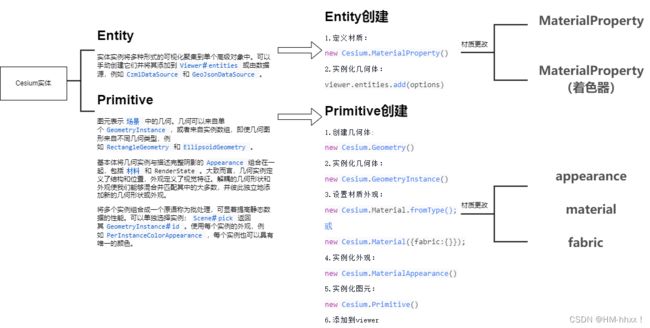
0. Entity和Primitive概述
1. entity材质修改
1.1 MaterialProperty方式修改材质
1.1.1 MaterialProperty方式设置材质
1.1.2 示例1-设置矩形材质:
1.1.3 示例2-设置折线材质:
1.2 通过自定义materialProperty更改材质(自定义着色器)
2.primitive材质修改
2.1 appearance修改材质
2.1.1 appearance详解
2.1.2 MaterialAppearance详解
2.1.3 EllipsoidSurfaceAppearance详解
2.1.4 PerInstanceColorAppearance详解
2.1.5 fragmentShaderSource片段着色器实现材质更改
2.2 Material修改材质
2.2.1 Material详解
2.2.2 示例
2.3 fabric修改材质
2.3.1 fabric详解
2.3.2 fabric示例
0. Entity和Primitive概述
CesiumJS 拥有丰富的空间数据 API,可以分为两类: Primitive API 面向图形开发人员的低级 API,以及 Entity API 面向数据驱动可视化的高级 API。
低级 Primitive API 公开了执行手头任务所需的最少量抽象。它的结构是为图形开发人员提供灵活的实现,而不是为了 API 的一致性。加载模型与创建广告牌不同,两者都与创建多边形完全不同。每种类型的可视化都有其独特的特征。此外,每个都有不同的性能特征,需要不同的最佳实践。虽然这种方法功能强大且灵活,但大多数应用程序都可以更好地使用更高级别的抽象。
Entity API 公开了一组一致设计的高级对象,这些对象将相关的可视化和信息聚合到一个统一的数据结构中,我们称之为 Entity. 它让我们专注于数据的呈现,而不是担心可视化的底层机制。它还提供了用于轻松构建复杂的、时间动态的可视化的结构,这种可视化方式与静态数据自然相适应。虽然 Entity API 实际上在底层使用 Primitive API,但这是我们(几乎)不必关心的实现细节。通过对我们提供的数据应用各种启发式方法,Entity API 能够提供灵活、高性能的可视化,同时提供一致、易于学习和易于使用的界面。
1. entity材质修改
1.1 MaterialProperty方式修改材质
1.1.1 MaterialProperty方式设置材质
abstract new Cesium.MaterialProperty()
所有表示 Material 的 Property 对象的接口>制服。此类型定义一个接口,不能直接实例化。
See:
- ColorMaterialProperty
- CompositeMaterialProperty
- GridMaterialProperty
- ImageMaterialProperty
- PolylineGlowMaterialProperty
- PolylineOutlineMaterialProperty
- StripeMaterialProperty
提供如下属性(对应上方):
颜色材质属性、复合材质属性、网格材质属性、图像材质属性、发光多边形材质属性、多边形外边材质属性、条纹材质属性。
1.1.2 示例1-设置矩形材质:
使用entity创建矩形:
 // 使用entity创建矩形
  var rectangle = viewer.entities.add({
    id: "entityRect",
    rectangle: {
      coordinates: Cesium.Rectangle.fromDegrees(
        // 西边的经度
        90,
        // 南边维度
        20,
        // 东边经度
        110,
        // 北边维度
        30
      ),
      // 设置entity材质,MaterialProperty
      // material: Cesium.Color.RED.withAlpha(0.5),
      material: material,//获取自定义的材质meterial
    },
  });
  console.log(rectangle);
设置材质:
1).普通颜色:
let material = new Cesium.ColorMaterialProperty(
    new Cesium.Color(1.0, 1.0, 1.0, 1.0)
  );
实现效果:

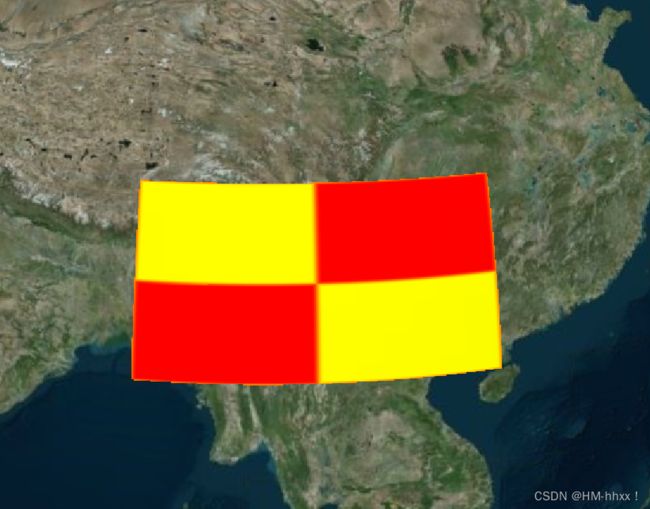
2).棋盘纹理
// 棋盘纹理
  let material = new Cesium.CheckerboardMaterialProperty({
    evenColor: Cesium.Color.RED,
    oddColor: Cesium.Color.YELLOW,
    repeat: new Cesium.Cartesian2(2, 2),
  });
实现效果:
3). 条纹纹理
 // 条纹纹理
  let material = new Cesium.StripeMaterialProperty({
    evenColor: Cesium.Color.WHITE,
    oddColor: Cesium.Color.BLACK,
    repeat: 8,
  });
实现效果:

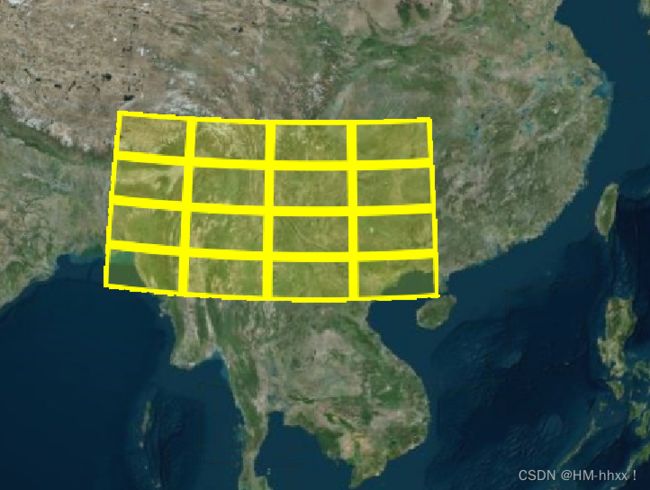
4). 网格纹理
  // 网格纹理
  let material = new Cesium.GridMaterialProperty({
    color: Cesium.Color.YELLOW,
    cellAlpha: 0.2,
    lineCount: new Cesium.Cartesian2(4, 4),
    lineThickness: new Cesium.Cartesian2(4.0, 4.0),
  });
实现效果:
1.1.3 示例2-设置折线材质:
使用entity创建折线:
// 使用entity创建折线
const polyLine = viewer.entities.add({
    polyline: {
      positions: Cesium.Cartesian3.fromDegreesArray([-75, 35, -125, 35]),
      width: 20,
      material: material,
    },
  });
1)设置虚线材质
  // 设置虚线材质
  let material = new Cesium.PolylineDashMaterialProperty({
    dashLength: 30,
    color: Cesium.Color.RED,
  });
实现效果:

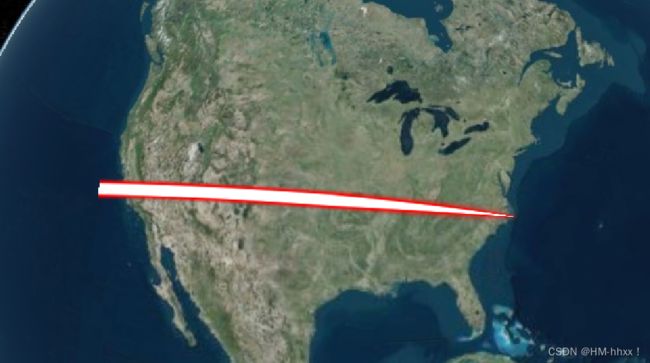
2) 设置箭头材质:
// 设置箭头材质
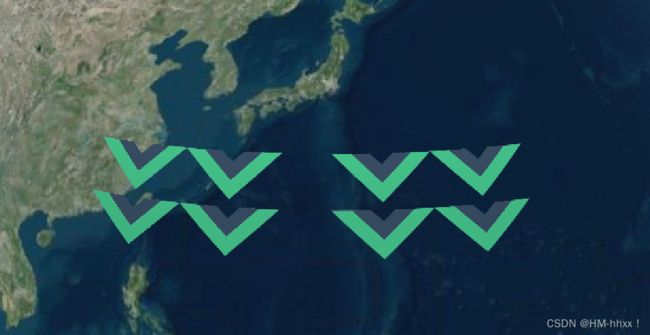
let material = new Cesium.PolylineArrowMaterialProperty(Cesium.Color.RED);实现效果:

3) 设置发光飞线效果:
// 设置发光飞线效果
  let material = new Cesium.PolylineGlowMaterialProperty({
    // 设置发光程度
    glowPower: 0.8,
    // 尾椎缩小程度
    taperPower: 0.7,
    color: Cesium.Color.RED,
  });
实现效果:
1.2 通过自定义materialProperty更改材质(自定义着色器)
1)自定义materialProperty
//自定义materialproperty
  class CustomMaterialPropery {
    constructor() {
      this.definitionChanged = new Cesium.Event();
      Cesium.Material._materialCache.addMaterial("CustomMaterial", {
        fabric: {
          type: "CustomMaterial",
          uniforms: {
            uTime: 0,
          },
          source: `
          czm_material czm_getMaterial(czm_materialInput materialInput)
          {
            // 生成默认的基础材质
            czm_material material = czm_getDefaultMaterial(materialInput);
            material.diffuse = vec3(materialInput.st, uTime);
            return material;
          }

          `,
        },
      });

      this.params = {
        uTime: 0,
      };
      gsap.to(this.params, {
        uTime: 1,
        duration: 5,
        repeat: -1,
        yoyo: true,
      });
    }
    getType() {
      // 返回材质类型
      return "CustomMaterial";
    }
    getValue(time, result) {
      // // console.log(result, time);
      // let t = performance.now() / 1000;
      // t = t % 1;
      // console.log(t);
      // result.uTime = t;
      result.uTime = this.params.uTime;
      // 返回材质值
      return result;
    }
  }
2)实例化材质
let material = new CustomMaterialPropery();3) 实例化几何体
  var rectangle = viewer.entities.add({
    id: "entityRect",
    rectangle: {
      coordinates: Cesium.Rectangle.fromDegrees(
        // 西边的经度
        90,
        // 南边维度
        20,
        // 东边经度
        110,
        // 北边维度
        30
      ),
      // 设置entity材质,MaterialProperty
      // material: Cesium.Color.RED.withAlpha(0.5),
      material: material,
    },
  });
  console.log(rectangle);
4)实现效果:
2.primitive材质修改
2.1 appearance修改材质
2.1.1 appearance详解
外观定义了完整的GLSL顶点和片段着色器,以及用于绘制 Primitive 的呈现状态。所有外观工具基本的 Appearance 接口。
| Name | Type | Description | ||||||||||||||||||||||||||||
|---|---|---|---|---|---|---|---|---|---|---|---|---|---|---|---|---|---|---|---|---|---|---|---|---|---|---|---|---|---|---|
options |
Object | optionalObject with the following properties:
|
Demo:
- Geometry and Appearances Demo
See:
- MaterialAppearance
- EllipsoidSurfaceAppearance
- PerInstanceColorAppearance
- DebugAppearance
- PolylineColorAppearance
- PolylineMaterialAppearance
提供以下选项(对应上方):
材质外观、椭球体表面外观、每个实例颜色外观、调试外观、折线颜色外观、多边形几何图形材质外观
2.1.2 MaterialAppearance详解
new Cesium.MaterialAppearance ( options )
任意几何的外观(例如,与 EllipsoidSurfaceAppearance 相对)支持材质着色。
| Name | Type | Description | ||||||||||||||||||||||||||||||||||||||
|---|---|---|---|---|---|---|---|---|---|---|---|---|---|---|---|---|---|---|---|---|---|---|---|---|---|---|---|---|---|---|---|---|---|---|---|---|---|---|---|---|
options |
Object | 可选具有以下属性的对象:
|
示例:
1)创建几何体
// 01-创建几何体
//几何体1-实例1
  let rectGeometry = new Cesium.RectangleGeometry({
    rectangle: Cesium.Rectangle.fromDegrees(
      // 西边的经度
      115,
      // 南边维度
      20,
      // 东边经度
      135,
      // 北边维度
      30
    ),
    // 距离表面高度
    height: 0,
    vertexFormat: Cesium.PerInstanceColorAppearance.VERTEX_FORMAT,
  });
//几何体2-实例2
let rectGeometry1 = new Cesium.RectangleGeometry({
    rectangle: Cesium.Rectangle.fromDegrees(
      // 西边的经度
      140,
      // 南边维度
      20,
      // 东边经度
      160,
      // 北边维度
      30
    ),
    // 距离表面高度
    height: 0,
    vertexFormat: Cesium.PerInstanceColorAppearance.VERTEX_FORMAT,
  });
2)创建几何实例
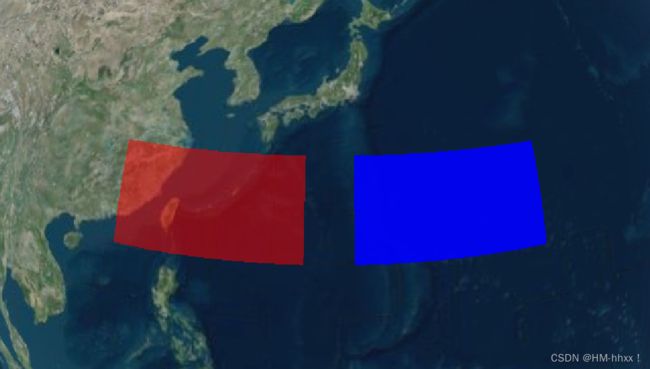
实例1为红色,实例2为蓝色:
  // 02-创建几何体实例
//实例1
  let instance = new Cesium.GeometryInstance({
    id: "redRect",
    geometry: rectGeometry,
    attributes: {
      color: Cesium.ColorGeometryInstanceAttribute.fromColor(
        Cesium.Color.RED.withAlpha(0.5)
      ),
    },
  });


//实例2
  let instance2 = new Cesium.GeometryInstance({
    id: "blueRect",
    geometry: rectGeometry1,
    attributes: {
      color: Cesium.ColorGeometryInstanceAttribute.fromColor(
        Cesium.Color.BLUE.withAlpha(0.9)
      ),
    },
    vertexFormat: Cesium.EllipsoidSurfaceAppearance.VERTEX_FORMAT,
  });
3)设置外观
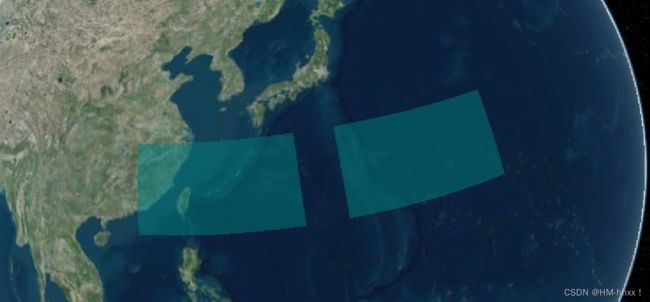
//使用MaterialAppearance材质外观方式修改primitive材质
 let material1 = new Cesium.Material.fromType("Color", {
    color: Cesium.Color.AQUA.withAlpha(0.5),
  });
let appearance = new Cesium.MaterialAppearance({
    material: material1,
  });
4)图元实例化
let primitive = new Cesium.Primitive({
    geometryInstances: [instance, instance2],
    appearance: appearance,
  });
5)添加到viewer
// 05-添加到viewer
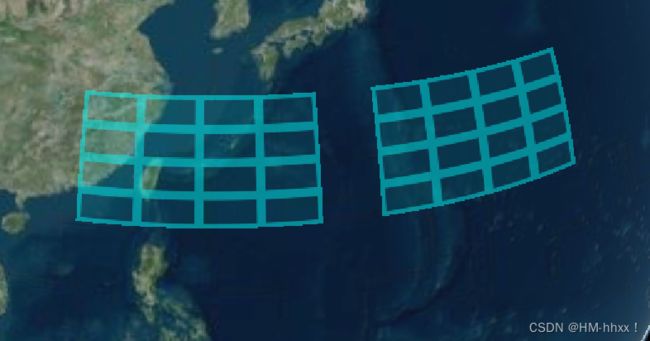
viewer.scene.primitives.add(primitive);6)实现效果:
2.1.3 EllipsoidSurfaceAppearance详解
new Cesium.EllipsoidSurfaceAppearance(options)
椭球表面上的几何外观,例如 PolygonGeometry 和 RectangleGeometry ,它支持所有材料,例如 MaterialAppearance 与 MaterialAppearance.MaterialSupport.ALL 一起使用。但是,这种外观要求更少的顶点属性,因为片段着色器可以按程序计算 normal , tangent 和 bitangent 。
NameTypeDescriptionoptionsObjectoptionalObject with the following properties:
| Name | Type | Default | Description |
|---|---|---|---|
flat |
Boolean | false |
optional) When 当 |
faceForward |
Boolean | options.aboveGround |
optional) When 如果为 |
translucent |
Boolean | true |
optional) When 如果 |
aboveGround |
Boolean | false |
optional) When true, the geometry is expected to be on the ellipsoid's surface - not at a constant height above it - so EllipsoidSurfaceAppearance#renderState has backface culling enabled.如果为 true ,则该几何体应位于椭圆体的表面上-不在其上方的恒定高度-因此 EllipsoidSurfaceAppearance#renderState 启用了背面剔除。 |
material |
Material | Material.ColorType |
optional) The material used to determine the fragment color. 用于确定片段颜色的材料。 |
vertexShaderSource |
String | optional) Optional GLSL vertex shader source to override the default vertex shader. 可选的GLSL顶点着色器源,用于覆盖默认的顶点着色器。 |
|
fragmentShaderSource |
String | optional) Optional GLSL fragment shader source to override the default fragment shader. 可选的GLSL片段着色器源,用于覆盖默认的片段着色器。 |
|
renderState |
Object | optional) Optional render state to override the default render state. 可选的渲染状态将覆盖默认的渲染状态。 |
示例:
1)创建几何体
// 01-创建几何体
//几何体1-实例1
  let rectGeometry = new Cesium.RectangleGeometry({
    rectangle: Cesium.Rectangle.fromDegrees(
      // 西边的经度
      115,
      // 南边维度
      20,
      // 东边经度
      135,
      // 北边维度
      30
    ),
    // 距离表面高度
    height: 0,
    vertexFormat: Cesium.PerInstanceColorAppearance.VERTEX_FORMAT,
  });
//几何体2-实例2
let rectGeometry1 = new Cesium.RectangleGeometry({
    rectangle: Cesium.Rectangle.fromDegrees(
      // 西边的经度
      140,
      // 南边维度
      20,
      // 东边经度
      160,
      // 北边维度
      30
    ),
    // 距离表面高度
    height: 0,
    vertexFormat: Cesium.PerInstanceColorAppearance.VERTEX_FORMAT,
  });
2)创建几何实例
实例1为红色,实例2为蓝色:
  // 02-创建几何体实例
//实例1
  let instance = new Cesium.GeometryInstance({
    id: "redRect",
    geometry: rectGeometry,
    attributes: {
      color: Cesium.ColorGeometryInstanceAttribute.fromColor(
        Cesium.Color.RED.withAlpha(0.5)
      ),
    },
  });


//实例2
  let instance2 = new Cesium.GeometryInstance({
    id: "blueRect",
    geometry: rectGeometry1,
    attributes: {
      color: Cesium.ColorGeometryInstanceAttribute.fromColor(
        Cesium.Color.BLUE.withAlpha(0.9)
      ),
    },
    vertexFormat: Cesium.EllipsoidSurfaceAppearance.VERTEX_FORMAT,
  });
3)设置外观
// type color
  let material1 = new Cesium.Material.fromType("Color", {
    color: Cesium.Color.ORANGE.withAlpha(0.5),
  });

  // 设定几何体都是与地球的椭球体平行
  // 假定几何体与地球椭球体平行,就可以在计算大量顶点属性的时候节省内存
  let appearance = new Cesium.EllipsoidSurfaceAppearance({
    material: material1,
    aboveGround: true,
  });
4)图元实例化
let primitive = new Cesium.Primitive({
    geometryInstances: [instance, instance2],
    appearance: appearance,
  });
5)添加到viewer
// 05-添加到viewer
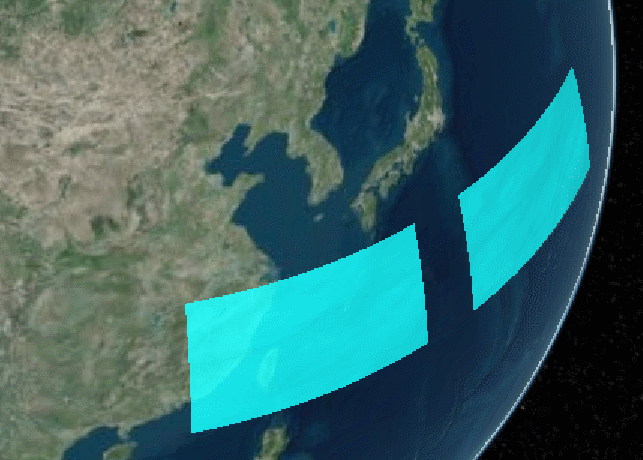
viewer.scene.primitives.add(primitive);6)实现效果:

2.1.4 PerInstanceColorAppearance详解
具有颜色属性的 GeometryInstance 实例的外观。这允许几个几何实例,每个都有不同的颜色使用相同的 Primitive 进行绘制,如下面的第示例所示。
new Cesium.PerInstanceColorAppearance(options)
options具有以下属性的对象:
| 名称 | 类型 | 默认 | 说明 |
|---|---|---|---|
flat |
布尔值Boolean | 错误 |
可选 )当 true 时,片段着色器中将使用平面阴影,这意味着不考虑照明。 |
faceForward |
布尔值Boolean | !options.closed | 可选) 如果为 true ,则片段着色器会根据需要翻转表面法线,以确保法线面对观察者以避免黑斑。当几何图形的两侧都应像 WallGeometry 一样着色时,这很有用。 |
translucent半透明 |
布尔值Boolean | 真 |
可选) 如果 true 为true,则几何图形应显示为半透明,因此 PerInstanceColorAppearance#renderState 启用了alpha混合。 |
closed |
布尔值Boolean | 错误 |
可选) 如果 true 为true,则预计几何将关闭,因此 PerInstanceColorAppearance#renderState 启用了背面剔除。 |
vertexShaderSource |
字符串String | 可选 ) 可选的GLSL顶点着色器源,用于覆盖默认的顶点着色器。 | |
fragmentShaderSource |
字符串String | 可选 ) 可选的GLSL片段着色器源,用于覆盖默认的片段着色器。 | |
renderState |
对象Object | 可选) 可选的渲染状态将覆盖默认的渲染状态。 |
示例:
1)创建几何体
// 01-创建几何体
//几何体1-实例1
  let rectGeometry = new Cesium.RectangleGeometry({
    rectangle: Cesium.Rectangle.fromDegrees(
      // 西边的经度
      115,
      // 南边维度
      20,
      // 东边经度
      135,
      // 北边维度
      30
    ),
    // 距离表面高度
    height: 0,
    vertexFormat: Cesium.PerInstanceColorAppearance.VERTEX_FORMAT,
  });
//几何体2-实例2
let rectGeometry1 = new Cesium.RectangleGeometry({
    rectangle: Cesium.Rectangle.fromDegrees(
      // 西边的经度
      140,
      // 南边维度
      20,
      // 东边经度
      160,
      // 北边维度
      30
    ),
    // 距离表面高度
    height: 0,
    vertexFormat: Cesium.PerInstanceColorAppearance.VERTEX_FORMAT,
  });
2)创建几何实例
实例1为红色,实例2为蓝色:
  // 02-创建几何体实例
//实例1
  let instance = new Cesium.GeometryInstance({
    id: "redRect",
    geometry: rectGeometry,
    attributes: {
      color: Cesium.ColorGeometryInstanceAttribute.fromColor(
        Cesium.Color.RED.withAlpha(0.5)
      ),
    },
  });


//实例2
  let instance2 = new Cesium.GeometryInstance({
    id: "blueRect",
    geometry: rectGeometry1,
    attributes: {
      color: Cesium.ColorGeometryInstanceAttribute.fromColor(
        Cesium.Color.BLUE.withAlpha(0.9)
      ),
    },
    vertexFormat: Cesium.EllipsoidSurfaceAppearance.VERTEX_FORMAT,
  });
3)设置外观
//使用每个instance的颜色去着色
  let appearance = new Cesium.PerInstanceColorAppearance({
    flat: true,
  });
4)图元实例化
let primitive = new Cesium.Primitive({
    geometryInstances: [instance, instance2],
    appearance: appearance,
  });
5)添加到viewer
// 05-添加到viewer
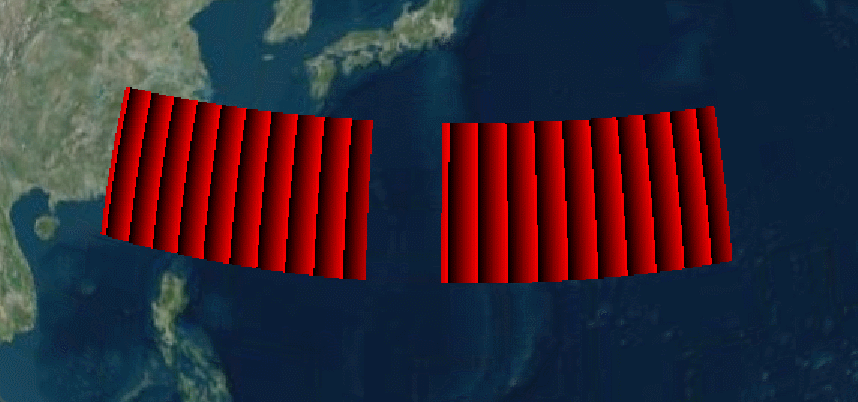
viewer.scene.primitives.add(primitive);6)实现效果:
2.1.5 fragmentShaderSource片段着色器实现材质更改
1)创建几何体:
// primivite创建矩形
  // 01-创建几何体
  //几何体1
  let rectGeometry = new Cesium.RectangleGeometry({
    rectangle: Cesium.Rectangle.fromDegrees(
      // 西边的经度
      115,
      // 南边维度
      20,
      // 东边经度
      135,
      // 北边维度
      30
    ),
    // 距离表面高度
    height: 0,
    vertexFormat: Cesium.EllipsoidSurfaceAppearance.VERTEX_FORMAT,
  });
  //几何体2
  let rectGeometry1 = new Cesium.RectangleGeometry({
    rectangle: Cesium.Rectangle.fromDegrees(
      // 西边的经度
      140,
      // 南边维度
      20,
      // 东边经度
      160,
      // 北边维度
      30
    ),
    // 距离表面高度
    height: 1000,
  });
2)创建几何体实例
// 02-创建几何体实例
  let instance = new Cesium.GeometryInstance({
    id: "redRect",
    geometry: rectGeometry,
    attributes: {
      color: Cesium.ColorGeometryInstanceAttribute.fromColor(
        Cesium.Color.RED.withAlpha(0.5)
      ),
    },
  });

  let instance2 = new Cesium.GeometryInstance({
    id: "blueRect",
    geometry: rectGeometry1,
    attributes: {
      color: Cesium.ColorGeometryInstanceAttribute.fromColor(
        Cesium.Color.BLUE.withAlpha(0.5)
      ),
    },
    vertexFormat: Cesium.EllipsoidSurfaceAppearance.VERTEX_FORMAT,
  });
3) 设置几何体外观(使用片段着色器,使用gasp实现补间动画)
 //03-设置几何体外观
  // 设定几何体都是与地球的椭球体平行
  //假定几何体与地球椭球体平行,就可以在计算大量顶点属性的时候节省内存
  let appearance = new Cesium.EllipsoidSurfaceAppearance({
    fragmentShaderSource: `
    varying vec3 v_positionMC;
    varying vec3 v_positionEC;
    varying vec2 v_st;
    uniform float uTime;

    void main()
    {
        czm_materialInput materialInput;

        gl_FragColor = vec4(v_st,uTime, 1.0);
    }
    `,
  });
  appearance.uniforms = {
    uTime: 0,
  };

  gsap.to(appearance.uniforms, {
    uTime: 1,
    duration: 2,
    repeat: -1,
    yoyo: true,
    ease: "linear",
  });
4) 图元(primitive)实例化
// 04-图元
  let primitive = new Cesium.Primitive({
    geometryInstances: [instance, instance2],
    appearance: appearance,
    show: true,
  });

  console.log(primitive);
5)将图元添加至viewer
// 05-添加到viewer
  viewer.scene.primitives.add(primitive);
6)实现效果:
2.2 Material修改材质
2.2.1 Material详解
new Cesium.Material(options)
材料通过漫反射、镜面反射、法线、发射和阿尔法组件的组合来定义表面外观。这些值是通过一个叫做Fabric的JSON模式指定的,该模式会被解析并组装成幕后的glsl着色器代码。请查看维基页面,了解关于Fabric的更多细节。
基本材料类型和它们的统一:
- Color(颜色)
color: rgba color object.
- Image(图像)
image: path to image.repeat: Object with x and y values specifying the number of times to repeat the image.
- DiffuseMap(漫反射贴图)
image: path to image.channels: Three character string containing any combination of r, g, b, and a for selecting the desired image channels.repeat: Object with x and y values specifying the number of times to repeat the image.
- AlphaMap(透明贴图{)
image: path to image.channel: One character string containing r, g, b, or a for selecting the desired image channel.repeat: Object with x and y values specifying the number of times to repeat the image.
- SpecularMap(高光反射贴图)
image: path to image.channel: One character string containing r, g, b, or a for selecting the desired image channel.repeat: Object with x and y values specifying the number of times to repeat the image.
- EmissionMap(放射图/自发光贴图)
image: path to image.channels: Three character string containing any combination of r, g, b, and a for selecting the desired image channels.repeat: Object with x and y values specifying the number of times to repeat the image.
- BumpMap(凹凸贴图)
image: path to image.channel: One character string containing r, g, b, or a for selecting the desired image channel.repeat: Object with x and y values specifying the number of times to repeat the image.strength: Bump strength value between 0.0 and 1.0 where 0.0 is small bumps and 1.0 is large bumps.
- NormalMap((普通)法向贴图)
image: path to image.channels: Three character string containing any combination of r, g, b, and a for selecting the desired image channels.repeat: Object with x and y values specifying the number of times to repeat the image.strength: Bump strength value between 0.0 and 1.0 where 0.0 is small bumps and 1.0 is large bumps.
- Grid(网格)
color: rgba color object for the whole material.cellAlpha: Alpha value for the cells between grid lines. This will be combined with color.alpha.lineCount: Object with x and y values specifying the number of columns and rows respectively.lineThickness: Object with x and y values specifying the thickness of grid lines (in pixels where available).lineOffset: Object with x and y values specifying the offset of grid lines (range is 0 to 1).
- Stripe(条纹)
horizontal: Boolean that determines if the stripes are horizontal or vertical.evenColor: rgba color object for the stripe's first color.oddColor: rgba color object for the stripe's second color.offset: Number that controls at which point into the pattern to begin drawing; with 0.0 being the beginning of the even color, 1.0 the beginning of the odd color, 2.0 being the even color again, and any multiple or fractional values being in between.repeat: Number that controls the total number of stripes, half light and half dark.
- Checkerboard(棋盘图)
lightColor: rgba color object for the checkerboard's light alternating color.darkColor: rgba color object for the checkerboard's dark alternating color.repeat: Object with x and y values specifying the number of columns and rows respectively.
- Dot(斑点图)
lightColor: rgba color object for the dot color.darkColor: rgba color object for the background color.repeat: Object with x and y values specifying the number of columns and rows of dots respectively.
- Water(水面)
baseWaterColor: rgba color object base color of the water.blendColor: rgba color object used when blending from water to non-water areas.specularMap: Single channel texture used to indicate areas of water.normalMap: Normal map for water normal perturbation.frequency: Number that controls the number of waves.animationSpeed: Number that controls the animations speed of the water.amplitude: Number that controls the amplitude of water waves.specularIntensity: Number that controls the intensity of specular reflections.
- RimLighting(边缘高亮/外轮廓高亮)
color: diffuse color and alpha.rimColor: diffuse color and alpha of the rim.width: Number that determines the rim's width.
- Fade(褪色)
fadeInColor: diffuse color and alpha attimefadeOutColor: diffuse color and alpha atmaximumDistancefromtimemaximumDistance: Number between 0.0 and 1.0 where thefadeInColorbecomes thefadeOutColor. A value of 0.0 gives the entire material a color offadeOutColorand a value of 1.0 gives the the entire material a color offadeInColorrepeat: true if the fade should wrap around the texture coodinates.fadeDirection: Object with x and y values specifying if the fade should be in the x and y directions.time: Object with x and y values between 0.0 and 1.0 of thefadeInColorposition
- PolylineArrow(箭头折线)
color: diffuse color and alpha.
- PolylineDash(间隔折线)
color: color for the line.gapColor: color for the gaps in the line.dashLength: Dash length in pixels.dashPattern: The 16 bit stipple pattern for the line..
- PolylineGlow(发光/泛光折线)
color: color and maximum alpha for the glow on the line.glowPower: strength of the glow, as a percentage of the total line width (less than 1.0).taperPower: strength of the tapering effect, as a percentage of the total line length. If 1.0 or higher, no taper effect is used.
- PolylineOutline(带边界折线)
color: diffuse color and alpha for the interior of the line.outlineColor: diffuse color and alpha for the outline.outlineWidth: width of the outline in pixels.
- ElevationContour(高程轮廓线)
color: color and alpha for the contour line.spacing: spacing for contour lines in meters.width: Number specifying the width of the grid lines in pixels.
- ElevationRamp(高程坡道)
image: color ramp image to use for coloring the terrain.minimumHeight: minimum height for the ramp.maximumHeight: maximum height for the ramp.
- SlopeRamp(坡度坡道)
image: color ramp image to use for coloring the terrain by slope.
- AspectRamp(坡向坡道)
image: color ramp image to use for color the terrain by aspect.
- ElevationBand(高程带)
heights: image of heights sorted from lowest to highest.colors: image of colors at the corresponding heights.
material提供以下方法:
Example:
// Create a color material with fromType:
polygon.material = Cesium.Material.fromType('Color');
polygon.material.uniforms.color = new Cesium.Color(1.0, 1.0, 0.0, 1.0);

// Create the default material:
polygon.material = new Cesium.Material();

// Create a color material with full Fabric notation:
polygon.material = new Cesium.Material({
    fabric : {
        type : 'Color',
        uniforms : {
            color : new Cesium.Color(1.0, 1.0, 0.0, 1.0)
        }
    }
});
2.2.2 示例
1)创建几何体
let rectGeometry = new Cesium.RectangleGeometry({
    rectangle: Cesium.Rectangle.fromDegrees(
      // 西边的经度
      115,
      // 南边维度
      20,
      // 东边经度
      135,
      // 北边维度
      30
    ),
    // 距离表面高度
    height: 0,
    vertexFormat: Cesium.EllipsoidSurfaceAppearance.VERTEX_FORMAT,
  });
let rectGeometry1 = new Cesium.RectangleGeometry({
    rectangle: Cesium.Rectangle.fromDegrees(
      // 西边的经度
      140,
      // 南边维度
      20,
      // 东边经度
      160,
      // 北边维度
      30
    ),
    // 距离表面高度
    height: 1000,
  });
2)创建几何体实例
// 02-创建几何体实例
  let instance = new Cesium.GeometryInstance({
    id: "redRect",
    geometry: rectGeometry,
    attributes: {
      color: Cesium.ColorGeometryInstanceAttribute.fromColor(
        Cesium.Color.RED.withAlpha(0.5)
      ),
    },
  });

  let instance2 = new Cesium.GeometryInstance({
    id: "blueRect",
    geometry: rectGeometry1,
    attributes: {
      color: Cesium.ColorGeometryInstanceAttribute.fromColor(
        Cesium.Color.BLUE.withAlpha(0.5)
      ),
    },
    vertexFormat: Cesium.EllipsoidSurfaceAppearance.VERTEX_FORMAT,
  });
3)设置外观
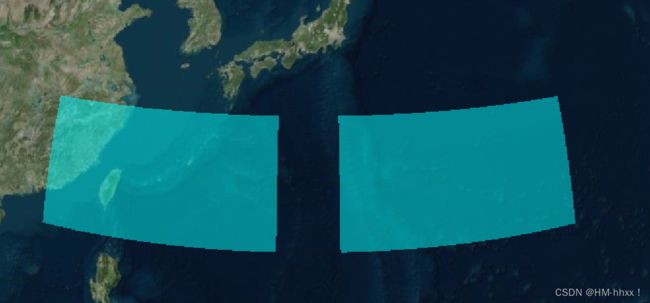
a.color类型
  // type color
  let material1 = new Cesium.Material.fromType("Color", {
    color: Cesium.Color.AQUA.withAlpha(0.5),
  });
实现效果:
b. image类型
  // type image
  let material1 = new Cesium.Material.fromType("Image", {
    image: "./texture/logo.png",
    repeat: new Cesium.Cartesian2(2.0, 2.0),
  });
实现效果:
c. disffuseMap漫反射贴图类型
// type disffuseMap
  let material1 = new Cesium.Material.fromType("DiffuseMap", {
    image: "./texture/logo.png",
  });
实现效果:

d. grid 网格类型
 // type grid
  let material1 = new Cesium.Material.fromType("Grid", {
    color: Cesium.Color.AQUA.withAlpha(0.5),
    cellAlpha: 0.2,
    lineCount: new Cesium.Cartesian2(4, 4),
    lineThickness: new Cesium.Cartesian2(4.0, 4.0),
  });
实现效果:
e. water 水波纹类型
// type water
  let material1 = new Cesium.Material.fromType("Water", {
    baseWaterColor: Cesium.Color.AQUA.withAlpha(0.8),
    distortion: 0.25,
    normalMap: "./Assets/Textures/waterNormals.jpg",
  });
实现效果:
4)实例化材质
  // 设定几何体都是与地球的椭球体平行
  //假定几何体与地球椭球体平行,就可以在计算大量顶点属性的时候节省内存
  let appearance = new Cesium.EllipsoidSurfaceAppearance({
    material: material1,
    aboveGround: false,
    translucent: true,
  });
5)实例化图元
// 04-图元
  let primitive = new Cesium.Primitive({
    geometryInstances: [instance, instance2],
    appearance: appearance,
    show: true,
  });
6)添加到viewer
// 05-添加到viewer
  viewer.scene.primitives.add(primitive);
2.3 fabric修改材质
2.3.1 fabric详解
详见Fabric · CesiumGS/cesium Wiki · GitHub https://github.com/CesiumGS/cesium/wiki/Fabric
Fabric 是Cesium中基于JSON格式来描述materials的机制。材质描述多边形、折线、椭球等对象的外观特征。
材质可以简单的是覆盖一张图片,或者是条纹或者棋盘图案。使用Fabric 和GLSL,可以从零开始写脚本新建材质,也可以从现有的材质中派生。比如潮湿碎裂的砖块可以使用程序生成的纹理、凹凸贴图和反射贴图来组合。使用 Fabric 和 GLSL,能够彻底自定义材质。
经过几何对象的 material 属性能够建立材质,这个属性是 Cesium.Material 对象。
polygon.material = Material.fromType('Color'); 这就建立了一个只有颜色的材质,包括透明度的颜色。Cesium.Material.fromType() 方法是一个简写,完整的写法是:
polygon.material = new Cesium.Material({
  fabric : {
    type : 'Color'
  }
});
每个 Material 均可以有 0 ~ N 个 uniform,这个参数在建立时指定,也能够在渲染后修改。例如,color 类型的 Material 就有格式为 rgba 的颜色 uniform:url
polygon.material = new Cesium.Material({
  fabric : {
    type : 'Color',
    uniforms : {
      color : new Cesium.Color(1.0, 0.0, 0.0, 0.5)
    }
  }
});

// Change from translucent red to opaque white
polygon.material.uniforms.color = Cesium.Color.WHITE;
2.3.2 fabric示例
1)primitive创建几何体
// 01-创建几何体
  //几何体1
  let rectGeometry = new Cesium.RectangleGeometry({
    rectangle: Cesium.Rectangle.fromDegrees(
      // 西边的经度
      115,
      // 南边维度
      20,
      // 东边经度
      135,
      // 北边维度
      30
    ),
    // 距离表面高度
    height: 0,
    vertexFormat: Cesium.EllipsoidSurfaceAppearance.VERTEX_FORMAT,
  });
  //几何体2
  let rectGeometry1 = new Cesium.RectangleGeometry({
    rectangle: Cesium.Rectangle.fromDegrees(
      // 西边的经度
      140,
      // 南边维度
      20,
      // 东边经度
      160,
      // 北边维度
      30
    ),
    // 距离表面高度
    height: 1000,
  });
2)创建几何体实例
 // 02-创建几何体实例
  //实例1
  let instance = new Cesium.GeometryInstance({
    id: "redRect",
    geometry: rectGeometry,
    attributes: {
      color: Cesium.ColorGeometryInstanceAttribute.fromColor(
        Cesium.Color.RED.withAlpha(0.5)
      ),
    },
  });
  //实例2
  let instance2 = new Cesium.GeometryInstance({
    id: "blueRect",
    geometry: rectGeometry1,
    attributes: {
      color: Cesium.ColorGeometryInstanceAttribute.fromColor(
        Cesium.Color.BLUE.withAlpha(0.5)
      ),
    },
    vertexFormat: Cesium.EllipsoidSurfaceAppearance.VERTEX_FORMAT,
  });
3)设置外观
a.使用fabric设置颜色材质:
let material1 = new Cesium.Material({
    fabric: {
      type: "Color",
      uniforms: {
        color: new Cesium.Color(1.0, 0.0, 0.0, 0.5),
      },
    },
  });
实现效果:

b.使用fabric设置图片贴图材质:
let material1 = new Cesium.Material({
    fabric: {
      type: "Image",
      uniforms: {
        image: "texture/logo.png",
      },
    },
  });
实现效果:

c.使用fabric着色器修改材质:
  let material1 = new Cesium.Material({
    fabric: {
      uniforms: {
        uTime: 0,
      },
      source: `
        czm_material czm_getMaterial(czm_materialInput materialInput)
        {
          // 生成默认的基础材质
          czm_material material = czm_getDefaultMaterial(materialInput);
          // material.diffuse = vec3(materialInput.st+uTime, 0.0);
          float strength = mod((materialInput.s-uTime) * 10.0, 1.0);
          material.diffuse = vec3(strength, 0.0, 0.0);
          return material;
        }
      `,
    },
  });
//使用gasp实现补间动画,完成动画效果
  gsap.to(material1.uniforms, {
    uTime: 1,
    duration: 2,
    repeat: -1,
    ease: "linear",
  });
实现效果:
4)实例化材质:
// 设定几何体都是与地球的椭球体平行
  //假定几何体与地球椭球体平行,就可以在计算大量顶点属性的时候节省内存
  let appearance = new Cesium.EllipsoidSurfaceAppearance({
    material: material1,
    aboveGround: false,
    translucent: true,
  });

  console.log(appearance.vertexShaderSource);
  console.log(appearance.fragmentShaderSource);
5)实例化图元
// 04-图元
  let primitive = new Cesium.Primitive({
    geometryInstances: [instance, instance2],
    appearance: appearance,
    show: true,
  });
6)添加图元至viewer
// 05-添加到viewer
  viewer.scene.primitives.add(primitive);